Before we start: Before fixing Kingston SSD not detected on your computer, you can use data recovery program - such as Donemax Data Recovery to recover all inaccessible/lost data from the SSD. Then you can fix any issue on the Kingston SSD or reformat it for your Windows/macOS computer.
PAGE CONTENT:
- Why Is My Kingston SSD Not Detected?
- Recover Data Before Fixing Kingston Not Detected Issue
- Fix Kingston SSD Not Detected on Windows
- Fix Kingston SSD Not Detected on macOS
- More Fixes for Kingston SSD Not Detected (Advanced Troubleshooting)
- Fix Kingston SSD Not Detected After Cloning or OS Install
- Fix Kingston SSD Is Detected but Not Booting
- Conclusion
Kingston is one of the most trusted brands in the solid-state drive (SSD) market, offering reliable storage solutions for both consumer and enterprise applications. However, like all hardware, a Kingston SSD may occasionally not be recognized by your system - whether you're installing a new drive, upgrading from an old one, or troubleshooting an existing device that has suddenly vanished from view.
This guide provides a comprehensive step-by-step approach to diagnosing and resolving the issue of a Kingston SSD not being detected, covering Windows, macOS, BIOS/UEFI settings, and advanced fixes.

Why Is My Kingston SSD Not Detected?
The issue can stem from a variety of causes:
- Loose or faulty cables
- Incompatible BIOS/UEFI settings
- Outdated drivers or firmware
- File system corruption
- Faulty drive or hardware failure
Before jumping to conclusions, it's important to walk through a systematic troubleshooting process.
Preliminary Checks
1. Check Physical Connections
Ensure that your SSD is physically connected properly.
- For SATA SSDs: Recheck the SATA and power cables. Try a different SATA port or use another cable.
- For M.2 or NVMe SSDs: Make sure the SSD is fully seated in the M.2 slot and secured with the screw.
- External SSDs: Try using a different USB port or USB cable, especially if the drive uses an enclosure.
💡 Tip: Try the SSD on another computer to confirm if the issue is system-specific or hardware-related.
2. Check BIOS/UEFI Detection
Enter the BIOS/UEFI settings after restarting your computer (typically by hitting Del, F2, or Esc during boot).
- Look under the Boot, Storage, or NVMe Configuration sections to see if your SSD is listed.
- Enable AHCI Mode if it's not already selected. IDE or RAID mode can sometimes prevent detection.
💡 Note: On newer systems, you may also need to disable Secure Boot or enable CSM (Compatibility Support Module) for legacy drives.
Recover Data Before Fixing Kingston Not Detected Issue
Before fixing errors or reformatting your Kingston SSD, you can use data recovery program - such as Donemax Data Recovery to recover deleted/formatted or inaccessible data from the SSD and save the data to another drive.
Step 1. Download and install Donemax Data Recovery on your computer.
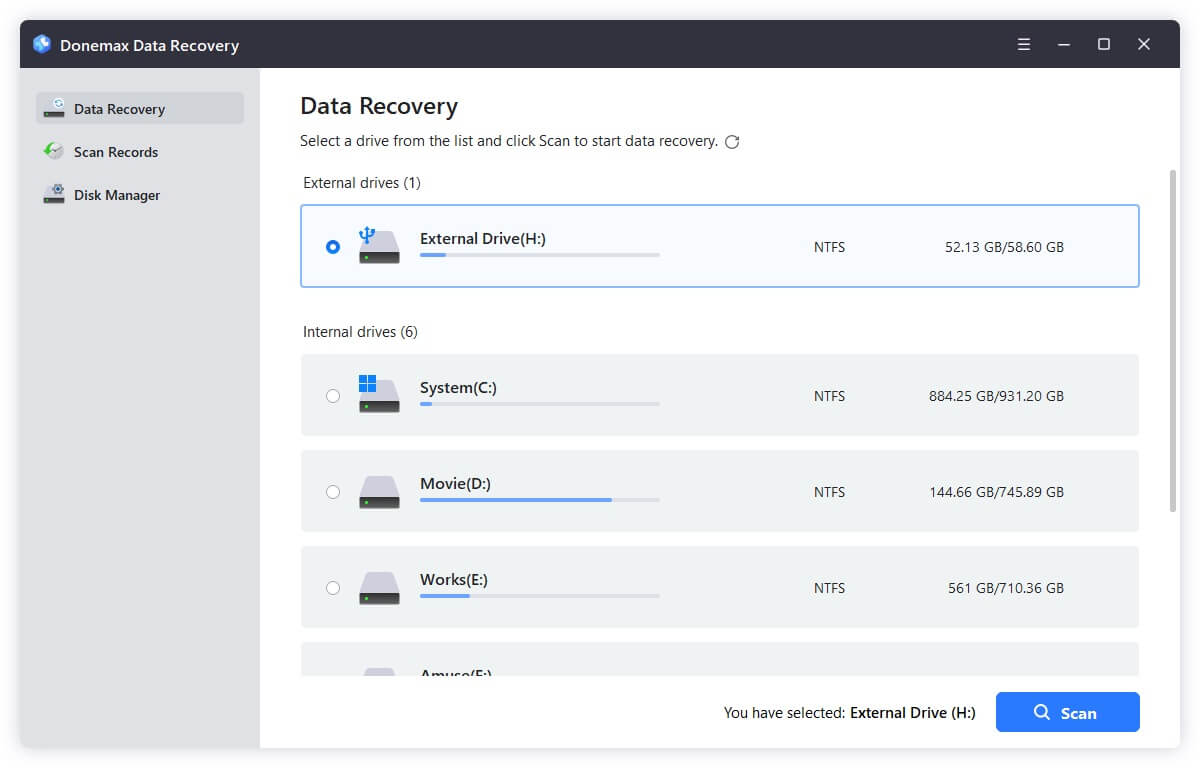
Step 2. Open Donemax Data Recovery, then select the Kingston SSD to start data recovery.

Step 3. Click on Scan button to deeply scan the Kingston SSD and find all deleted/formatted or inaccessible files.

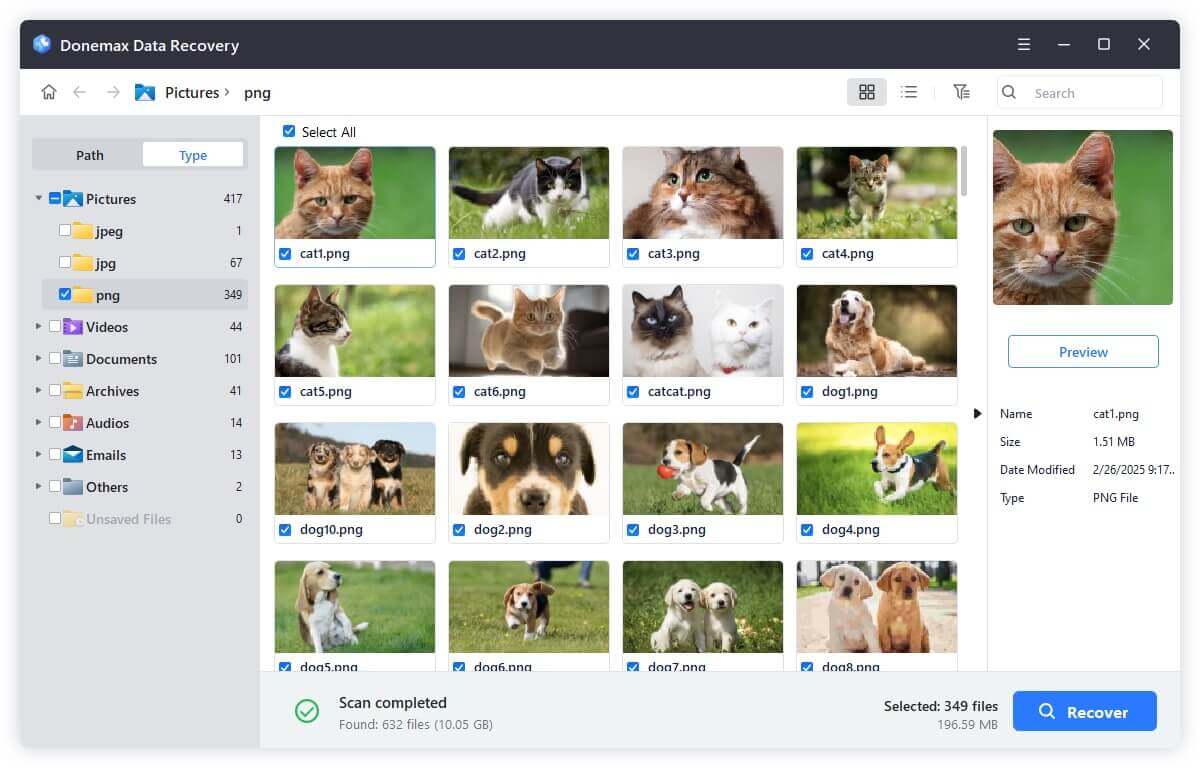
Step 4. Once the scan is completed, you can select the wanted files, click on Recover button to save the files to another drive.

Fix Kingston SSD Not Detected on Windows
If the drive is visible in BIOS but not in Windows, follow these methods:
1. Use Disk Management
Choose Disk Management by pressing Win + X. Find the SSD:
- Right-click and select Initialize Disk if it says Unallocated.
![Kingston SSD not being detected]()
- Right-click and choose Online if it's offline.
![Kingston SSD not being detected]()
- Right-click > Change Drive Letter and Paths > Add if there isn't a drive letter.
![Kingston SSD not being detected]()
- For new drives, format the SSD using NTFS or exFAT file system.
⚠️ Warning: Formatting will erase all data. Do not format if you're trying to recover files.
2. Update or Reinstall Storage Drivers
Outdated or corrupted drivers can prevent Windows from detecting your SSD.
- To expand IDE ATA/ATAPI Controllers and Storage Controllers, use Win + X > Device Manager.
- Right-click each controller > Update driver > Search automatically for drivers.
![Kingston SSD not being detected]()
- Also, update Disk Drives > locate your SSD > right-click > Update driver.
![Kingston SSD not being detected]()
For more robust support:
- Visit the motherboard manufacturer's website to download the latest chipset and SATA/NVMe drivers.
- For Kingston SSDs, check their official support page.
3. Use Device Manager to Refresh Hardware
Sometimes, the SSD might not be recognized properly by Windows due to system-level errors.
- Click Action > Scan for hardware changes after opening Device Manager.
![Kingston SSD not being detected]()
- If the SSD is listed with a yellow triangle or as "Unknown Device," uninstall it and reboot your PC.
4. Run Hardware and Devices Troubleshooter
Though deprecated in newer versions of Windows, you can still run this tool manually:
- Type msdt.exe -id DeviceDiagnostic by pressing Win + R.
![Kingston SSD not being detected]()
- Press Enter and follow the on-screen instructions.
![Kingston SSD not being detected]()
Fix Kingston SSD Not Detected on macOS
1. Use Disk Utility
- Go to Disk Utility from Utilities via Applications
- If the SSD appears but is unmounted:
- Select the SSD and click Mount.
![Kingston SSD not being detected]()
- If it’s listed as "unformatted" or "not initialized," click Erase and choose APFS or Mac OS Extended (Journaled).
![Kingston SSD not being detected]()
- Select the SSD and click Mount.
⚠️ Caution: Erasing will wipe the entire drive.
2. Check System Information
- Select System Report under the Apple menu in About This Mac.
![Kingston SSD not being detected]()
- Under SATA or NVMe Express, see if your Kingston SSD appears.
![Kingston SSD not being detected]()
- If it shows up here but not in Finder or Disk Utility, it likely has partition table issues.
More Fixes for Kingston SSD Not Detected (Advanced Troubleshooting)
If basic methods don't work, deeper fixes may be needed.
1. Update BIOS/UEFI Firmware
Many users overlook the BIOS/UEFI firmware as a potential cause of detection issues. An outdated BIOS may lack support for newer SSD models, particularly NVMe drives.
Why BIOS/UEFI Updates Matter:
- They include bug fixes, hardware compatibility improvements, and performance enhancements.
- They can resolve issues like the SSD not appearing during POST (Power-On Self-Test).
- They often add support for new storage protocols like NVMe 1.3+.
How to Update BIOS/UEFI:
- Identify your motherboard model: You can find this in the BIOS, on the motherboard itself, or by using software like CPU-Z.
- Go to the manufacturer’s support page: Look for your model and find the "BIOS" or "Firmware" section.
- Download the latest update and follow instructions carefully - usually involves:
- o Copying the BIOS file to a USB stick (FAT32 format).
- o Entering BIOS and using the EZ Flash (ASUS), M-Flash (MSI), or similar tool to update.
⚠️ Warning: Interrupting the BIOS update process can brick your system. Ensure your PC is plugged into a reliable power source.
2. Update Kingston SSD Firmware
Like BIOS updates, firmware upgrades directly improve SSD performance and fix bugs such as power-state issues, drive not initializing, or unexpected dropouts.
Steps to Update:
- Download Kingston SSD Manager: https://www.kingston.com/ssdmanager
- Install and open the software.
- o It should detect your Kingston SSD if it's partially visible to the system.
- o If detected, it will show details like model number, firmware version, and health status.
- Check for firmware updates:
- o The tool will automatically notify you if an update is available.
- o Click "Update" and follow prompts.
⚠️ Caution: Firmware updates may temporarily disconnect the SSD during the process. It's highly recommended to back up your data beforehand.
3. Use Kingston SSD Manager Diagnostic Tools
The Kingston SSD Manager is more than just a firmware updater - it includes several powerful diagnostic features that can help you assess the state of your SSD.
Key Features:
- SMART Monitoring: See real-time health metrics such as wear level, temperature, and total bytes written.
- Drive Identification: Confirms that the system recognizes the drive's controller and capacity.
- Secure Erase: Allows safe data wiping and resets the SSD to factory condition, useful for drives stuck in a corrupted state.
- Over-Provisioning Control: Optimizes performance and lifespan by allocating spare blocks.
When to Use:
- If your SSD is detected by Kingston SSD Manager but not the OS, use the "Secure Erase" function (after data backup) to reset the drive.
- If health metrics show 0% remaining life or high reallocated sectors, the SSD may be failing and require replacement.
4. Enable NVMe Support in BIOS (For M.2 SSDs)
Some motherboards require manual enabling of NVMe support or boot protocol settings for NVMe drives.
BIOS Tips:
- Look for settings like "NVMe Configuration", "M.2/PCIe Storage Mode", or "CSM".
- For booting:
- Enable UEFI Boot Mode (especially for GPT-partitioned SSDs).
- Disable Legacy Boot/CSM if the drive was formatted using GPT and UEFI OS installation is expected.
5. Try Disk Repair Tools
If the SSD is detected inconsistently or shows errors during reads/writes:
Use Tools Like:
- CHKDSK:
chkdsk X: /f /r
![Kingston SSD not being detected]()
Replace X with your SSD drive letter.
- Third-party utilities:
- CrystalDiskInfo: SMART health check.
- Donemax Data Recovery: Repair partition table, check file system errors.
These tools can detect and repair issues like bad sectors, file system corruption, and broken boot records.
Fix Kingston SSD Not Detected After Cloning or OS Install
If the SSD was cloned or used to install a new OS, detection problems may arise from:
1. Improper Partitioning
- The cloned disk may lack a proper EFI System Partition (ESP) or bootloader.
- Use tools like MiniTool Partition Wizard or GParted to verify partition structure.
2. MBR vs. GPT Conflicts
- Windows may fail to boot or detect if your system uses UEFI (GPT) but the SSD is formatted in MBR.
- Convert using Disk Management (data loss) or tools like AOMEI Partition Assistant (without data loss).
3. Repair Boot Configuration
Use Windows installation media:
- Start from the DVD or USB.
- Select Command Prompt under Repair your computer > Troubleshoot.
- Run these commands:
bootrec /fixmbr
bootrec /fixboot
bootrec /scanos
bootrec /rebuildbcd
Fix Kingston SSD Is Detected but Not Booting
If your Kingston SSD is visible in BIOS and OS, but doesn't boot:
1. Check Boot Order
Enter BIOS and ensure your SSD is the first boot device.
2. Reinstall the Bootloader
Use tools like EasyBCD or Windows Recovery to repair the boot sector.
3. Clean Install Windows/macOS
If all else fails, perform a fresh install of the OS after backing up data.
When to Consider Hardware Failure?
If none of the steps work, and the SSD:
- Doesn't appear in BIOS
- Isn't detected on multiple systems
- Shows no activity (no LED, no spin or heat)
Then, it’s likely a case of drive failure.
1. Check Warranty
Kingston SSDs typically come with 3 to 5 years of warranty coverage. You can:
- Check warranty status: https://www.kingston.com/support/warranty
- Initiate RMA if eligible.
2. Data Recovery Options
If your SSD has important data:
- Use professional data recovery services.
- For drives with intermittent detection, try tools like Donemax Data Recovery before total failure.
Conclusion
A Kingston SSD not being detected can be a frustrating issue, but in most cases, it's solvable through methodical troubleshooting. Start with simple physical and BIOS checks, then move on to operating system-level fixes and driver updates. Tools like Disk Management, Device Manager, and Kingston SSD Manager are your allies in diagnosing the problem.
If the SSD still isn't showing up after trying all these solutions, it may be time to consider a firmware update - or in worst-case scenarios, an RMA or replacement. Remember to keep your firmware and drivers up to date, and always maintain backups of important data to avoid data loss in the event of SSD failure.


Donemax Data Recovery
One of the best data recovery programs to recover deleted, formatted or lost data from PC, Mac, HDD, SSD, USB drive, SD card, camera, RAID, Sever or other storage devices.
Related Articles
- May 18, 2024Mac Keeps Booting Into macOS Recovery Mode, Fix It Now
- Dec 28, 2024(Solved) Delete Many Files on Mac, But Can't Free Up Disk Space
- Feb 17, 2025Fix SanDisk Device Won't Format Error on Windows 11/10/8
- Oct 25, 2024(Solved) Command + R Not Working When Entering into macOS Recovery Mode
- May 13, 20257 Solutions to Fix Flash Drive Not Showing Up on Mac Without Losing Data
- Dec 09, 2025How to Fix AMD_AGS_X64.DLL Missing Error?

Christina
Christina is the senior editor of Donemax software who has worked in the company for 4+ years. She mainly writes the guides and solutions about data erasure, data transferring, data recovery and disk cloning to help users get the most out of their Windows and Mac. She likes to travel, enjoy country music and play games in her spare time.

Gerhard Chou
In order to effectively solve the problems for our customers, every article and troubleshooting solution published on our website has been strictly tested and practiced. Our editors love researching and using computers and testing software, and are willing to help computer users with their problems
Hot Donemax Products

Clone hard drive with advanced clone technology or create bootable clone for Windows/Mac OS.

Completely and easily recover deleted, formatted, hidden or lost files from hard drive and external storage device.

Certified data erasure software - permanently erase data before selling or donating your disk or any digital device.


