
Written byStevenUpdated on Oct 11, 2025
External Hard Drive Not Recognized on macOS Tahoe, How to Fix It?
Approved byGerhard Chou
Before we start: If an external hard drive is not recognized on macOS Tahoe, there might be issues with the system settings or the drive is damaged. If the drive is corrupted and there are important files, you can first use Donemax Data Recovery for Mac to get back the files before further fixes.
PAGE CONTENT:
Upgrading to a new macOS version can sometimes cause unexpected issues, especially when it comes to external storage devices. Many Mac users have reported problems external hard drive not recognized on macOS Tahoe or fails to appear in Finder. This issue can be frustrating because it prevents access to important data such as work files, media libraries, or backups.
Fortunately, in most cases, the problem isn't permanent and can be resolved through proper troubleshooting. Whether the cause is a simple connection issue, disk corruption, or an incompatibility with macOS Tahoe, there are several effective ways to restore access to your external drive. This guide will walk you through all possible causes and provide detailed step-by-step solutions.
Why External Hard Drives Are Not Recognized on macOS Tahoe
Before diving into the solutions, it's important to understand why macOS might fail to recognize your external hard drive. Some of the most common causes include:
- File System Incompatibility – If the drive is formatted in NTFS (commonly used in Windows), macOS Tahoe may detect it but won't allow write access unless third-party drivers are installed.
- Disk Corruption – A corrupted file system or partition table can prevent macOS from mounting the drive.
- USB Port or Cable Issues – Faulty or loose connections often cause recognition errors.
- macOS Bugs or Compatibility Issues – Major updates like Tahoe can introduce temporary glitches affecting external storage.
- Power Supply Limitations – Some external hard drives require more power than a single USB port can provide.
- Drive Hardware Failure – A physically damaged drive may not show up at all, requiring professional recovery.
Identifying the cause helps you choose the right fix, so let's go through the troubleshooting process step by step.
Preliminary Checks Before Troubleshooting
Sometimes, the solution is simpler than expected. Perform these quick checks before moving to advanced fixes:
- Ensure the drive has power: For larger external drives that use external power adapters, confirm the power source is connected.
- Check cables and ports: Try a different USB cable or plug the drive into another USB/Thunderbolt port.
- Test on another computer: Connect the drive to a different Mac or even a Windows PC to rule out drive failure.
- Check Finder preferences: Go to Finder > Settings > General and ensure external disks are set to appear on the desktop and sidebar.
If none of these checks solve the issue, proceed with deeper troubleshooting.
6 Fixes for External Hard Drive Not Recognized on macOS Tahoe
Fix 1. Check Disk Utility
Disk Utility is the first place to check when your external hard drive is not visible in Finder.
- Open Disk Utility from Utilities via Applications.
- Look in the left sidebar for your external drive.
- If it appears but is grayed out, select it and click Mount.
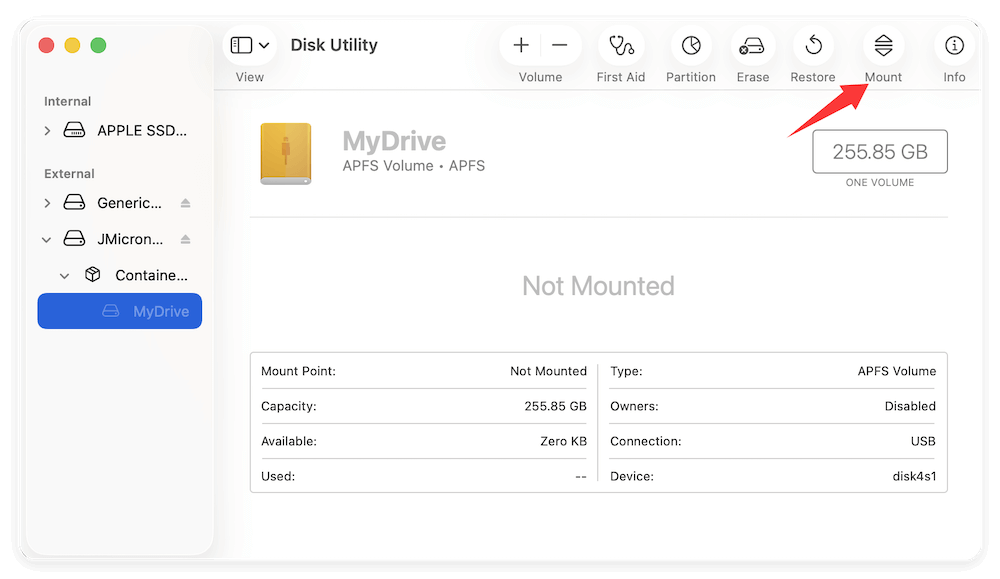
If the drive mounts successfully, it should now appear in Finder. If not, move on to the next step.
Fix 2. Run First Aid in Disk Utility
The First Aid feature scans and repairs file system issues.:
- Open Disk Utility and select your external drive.
- Click First Aid at the top.
- Confirm and let the process complete.
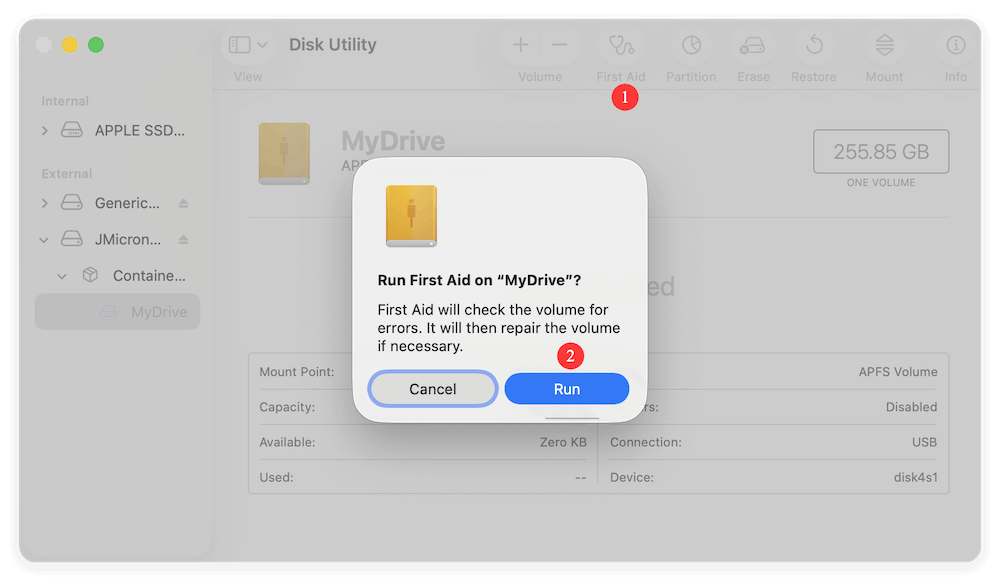
If errors are found and repaired, your drive should be accessible again. If Disk Utility cannot repair it, the file system may be severely corrupted.
Fix 3. Update macOS Tahoe and Drivers
Sometimes, the issue is due to software bugs introduced in early macOS Tahoe releases.
- Go to Apple Menu > System Settings > General > Software Update.
- Install any pending macOS updates.
- If you use third-party drivers (like NTFS driver for Mac), make sure they are updated as well.
Keeping your system current often resolves compatibility issues.
Fix 4. Reset NVRAM/PRAM and SMC
Mac hardware settings stored in NVRAM/PRAM and the System Management Controller (SMC) can sometimes cause external device issues. Resetting them may help.
Reset NVRAM/PRAM:
- Turn Off your Mac.
- Turn it on and immediately press Option + Command + P + R.
- Hold for about 20 seconds, then release.
Reset SMC (for Intel-based Macs):
- Turn Off your Mac.
- Hold Shift + Control + Option + Power for 10 seconds.
- Release all keys and restart.
For Apple Silicon Macs, just restart to reset these settings automatically.
Fix 5. Reformat the External Drive (If Necessary)
Reformatting is often the last resort when all other methods fail to make macOS Tahoe recognize your external hard drive. This process essentially wipes the drive clean, erases any corruption in the file system, and replaces it with a fresh format that macOS can read and write. While this is an effective solution, it comes with a big caution: reformatting deletes all existing data on the drive. If your data is important, consider recovering files with data recovery software before proceeding.
When Should You Reformat?
- If your drive appears in Disk Utility but won't mount.
- If First Aid reports errors that cannot be repaired.
- If the drive shows up as "uninitialized" or "RAW" in Disk Utility.
- If the file system is unsupported by macOS Tahoe (e.g., NTFS).
Choosing the Right File System Format
When reformatting in macOS Tahoe, you'll need to choose a file system. The best choice depends on how you plan to use the drive:
- APFS (Apple File System) – Best for SSDs and external drives used exclusively on modern Macs. Faster performance, space sharing, and native to macOS Tahoe.
- Mac OS Extended (HFS+ Journaled) – Compatible with older Macs running pre-macOS High Sierra. A good choice if you plan to use the drive with older systems.
- exFAT – Best for cross-platform compatibility (works with both Mac and Windows). Ideal for large file transfers, such as 4K videos.
- MS-DOS (FAT32) – Works across most platforms but has a 4GB file size limit. Suitable only for smaller drives or USB flash drives.
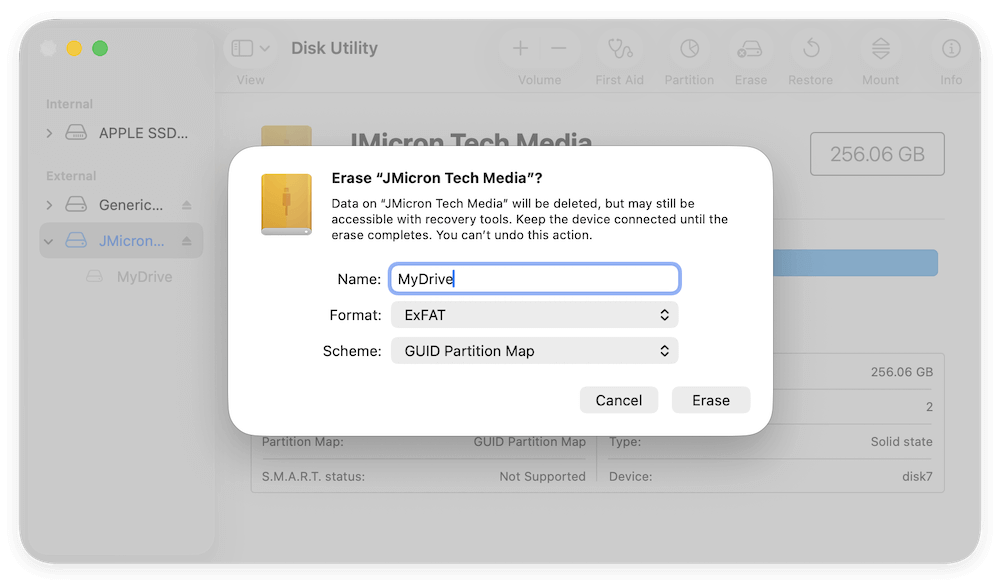
Steps to Reformat in Disk Utility
- Connect your external hard drive to your Mac.
- Open Disk Utility from Utilities via Applications.
- Select the external hard drive from the left sidebar. Be sure to choose the entire drive, not just a partition.
- Click the Erase button at the top toolbar.
- In the dialog box: Enter a new name for your drive. Select a file system format (APFS, HFS+, exFAT, or FAT32). Choose "GUID Partition Map" for the scheme (this ensures compatibility).
- Click Erase and wait for the process to complete.
- Once done, your drive should appear in Finder and be fully usable.
Important Notes
- If the erase process fails, try selecting the parent drive instead of the partition and repeat the steps.
- Always back up important data before formatting—once erased, recovery becomes more difficult.
- If macOS Tahoe still refuses to reformat the drive, it may indicate hardware failure. At that point, professional recovery is the best option.
Example Scenario
Imagine you bought a new external drive formatted in NTFS for Windows. When you plug it into macOS Tahoe, the drive may appear in Disk Utility but won't allow you to copy files. Reformatting it to exFAT makes it instantly usable across both Mac and Windows without restrictions.
Fix 6. Use Terminal Commands
For advanced users, Terminal offers additional ways to troubleshoot.
- Open Terminal from Utilities via Applications.
- Type diskutil list to display all connected drives. If your external drive appears in the list, note its identifier (e.g., disk2).
- Try manually mounting it:
diskutil mountDisk /dev/disk2
- If that fails, run the following command: (replace disk2 with your actual identifier).
sudo fsck_hfs -fy /dev/disk2
This can sometimes repair corrupted drives that Disk Utility cannot fix.
Data Recovery Options if the Drive Still Isn't Recognized
If none of the above methods work, your drive may be corrupted or damaged. Data recovery becomes the next priority.
Option 1. Use Data Recovery Software
Several third-party tools can scan and recover data from unrecognized drives, such as: Donemax Data Recovery for Mac. The software is effective to recover lost data in different data loss scenarios.
The tool can often recover files even when macOS Tahoe fails to mount the drive. Here you can follow the steps to recover the data with the software:
Step 1. Connect the external drive to Mac and run Donemax Data Recovery for Mac. Choose the external drive from the drive list in the software.

Step 2. Start scanning the external hard drive to search for the lost files. Wait patiently until the scan process is completed.

Step 3. Check and located the wanted files. Preview the files to confirm if they are recoverable. At last, select the files and recover to another drive.

Option 2. Professional Data Recovery Services
If your drive makes unusual noises (clicking, grinding) or is physically damaged, software won't help. In such cases, professional recovery labs are the safest option. While costly, they offer the highest chance of retrieving critical files.
Preventive Measures for the Future External Drive Issues
Once you've resolved the issue, it's wise to take preventive steps to avoid future problems:
- Always eject drives safely: Use Finder or right-click > Eject before disconnecting.
- Keep macOS updated: Regular updates fix bugs and improve compatibility.
- Use compatible file systems: For drives used across Mac and Windows, exFAT is ideal.
- Backup regularly: Use Time Machine or a cloud service to protect against sudden drive failures.
- Check drive health periodically: Monitor SMART status with tools like DriveDx.
Conclusion
When an external hard drive is not recognized on macOS Tahoe, it doesn't always mean the drive is permanently damaged. The issue could stem from something as simple as a faulty cable or a Finder setting, or it could involve deeper problems like disk corruption or incompatibility.
Start with basic checks, then move to Disk Utility, First Aid, macOS updates, and hardware resets. If those don't work, formatting or using Terminal may resolve the issue. And if the drive remains inaccessible, consider data recovery software or professional services.
Most importantly, remember that prevention is key—regular backups, safe ejection, and updated software can save you from future headaches. By following these steps, you can restore access to your external hard drive and keep your data secure while using macOS Tahoe.
Donemax Data Recovery for Mac
Donemax Data Recovery for Mac is one of the best Mac data recovery software. It is easy-to-use and can help in recovering deleted, formatted, inaccessible or lost data from Mac HDD/SSD, external disk, USB drive, SD card, camera or other storage devices.
Related Articles
- Mar 13, 2025How to Format Seagate Ultra Touch External Hard Drive?
- Jun 08, 20269 Ways to Fix a Slow Seagate or WD External Hard Drive
- May 26, 2026PS4 External Hard Drive Not Recognized/Detected/Working
- Dec 16, 2024My Brand New External Hard Drive is Read-Only on Mac, How to Fix This Issue?
- Dec 05, 2024How to Use Samsung Portable SSD T5 EVO on Mac
- Nov 18, 2024External Hard Drive Not Working on M4 Mac, Fix It Now

Contributing Writer
Steven
Steven has been a senior writer & editor of Donemax software since 2020. He's a super nerd and can't imagine the life without a computer. Over 6 years of experience of writing technical solutions and software tesing, he is passionate about providing solutions and tips for Windows and Mac users.

Editor in chief
Gerhard Chou
In order to effectively solve the problems for our customers, every article and troubleshooting solution published on our website has been strictly tested and practiced. Our editors love researching and using computers and testing software, and are willing to help computer users with their problems