
Written byMariaUpdated on Apr 25, 2025
Fix ADATA External Hard Drive Not Working (such as not mounting, not detected, being read-only) on Mac
Approved byGerhard Chou
Tip: If the ADATA external hard drive is an NTFS drive, you can install an NTFS driver on your Mac. It can help you mount NTFS ADATA external hard drive on Mac, repair damaged ADATA external hard drive on Mac, enable writable for NTFS ADATA external hard drive on Mac, etc.
PAGE CONTENT:
ADATA is a well-known brand in the data storage industry, offering high-performance external hard drives that cater to both casual users and professionals. However, even reliable devices like ADATA's can sometimes run into compatibility or recognition issues - especially on macOS. If your ADATA external hard drive isn't working on your Mac, you're not alone. Many users face this frustrating problem, but the good news is that there are multiple solutions available.
In this article, we'll walk you through all the possible reasons why your ADATA external hard drive might not be working on your Mac and provide a series of step-by-step troubleshooting methods to fix it without risking data loss. Whether you're dealing with a file system incompatibility or a hardware issue, this guide will help you get back on track.
Understand the Problem: ADATA Drive Not Working on Mac
Symptoms of an Unrecognized ADATA External Drive
Before diving into the fixes, it's important to identify the symptoms that indicate your ADATA drive isn't functioning properly on macOS:
- The drive doesn't appear on the desktop or in Finder.
- It shows up in Disk Utility but is not mounted.
- Your Mac displays an error when attempting to access the drive.
- The drive's LED indicator lights up, but nothing happens on the screen.
- The drive works on a Windows PC but not on your Mac.
Common Causes Behind Why ADATA Drive Not Working on Mac
Several reasons could be preventing your ADATA external hard drive from being recognized by your Mac:
- Incompatible file system (e.g., NTFS not natively supported for write access on macOS).
- Damaged or faulty USB cable/port.
- macOS not detecting the drive due to driver issues.
- Logical errors or disk corruption.
- Power delivery problems.
- Physical damage to the drive.
Recover Inaccessible or Lost Data from ADATA External Hard Drive on Mac
Before performing drastic actions like reformatting, it's wise to try data recovery -especially if the drive was previously accessible and contained important files. Donemax Data Recovery for Mac is one of the best Mac data recovery software. If you want to recover inaccessible or lost files from the ADATA external hard drive before fixing it, you can use this Mac data recovery software to completely recover/export files from the ADATA external hard drive to your Mac or another drive.
Step 1. Download and install Donemax Data Recovery for Mac and run it from Launchpad.
Step 2. Connect the ADATA external hard drive to the Mac. After opening Donemax Data Recovery for Mac, select the ADATA external hard drive to start data recovery.

Step 3. Click on Scan button to deeply scan the ADATA external hard drive and find all recoverable files including existing files, inaccessible files, deleted/formatted/lost files, etc.

Step 4. Once the scan gets finished, you can preview all recoverable files. Then select the wanted files, click on Recover button to save them.

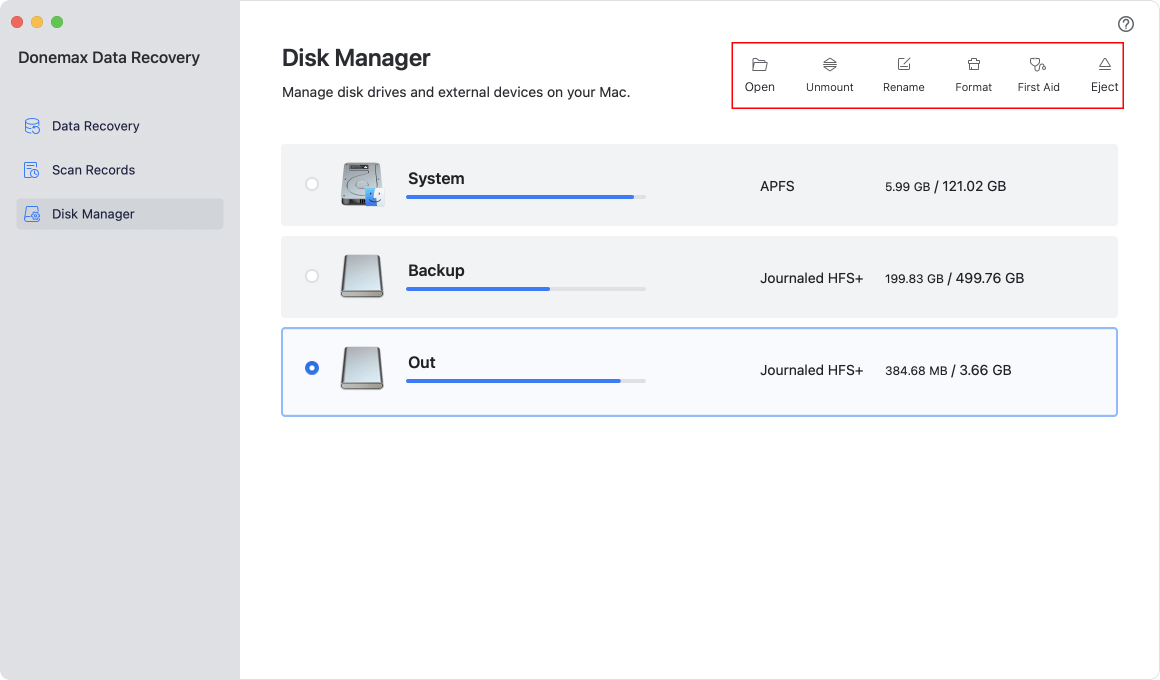
Donemax Data Recovery for Mac also can help you mount ADATA external hard drive, repair corrupted ADATA external hard drive, reformat ADATA external hard drive on Mac, etc.
How to Fix ADATA External Hard Drive Not Working on Mac?
Fix 1. Check the Physical Connection
Start with the basics. A faulty USB cable or port can often be the root cause:
- Use a different USB port on your Mac.
- Try a different USB-C or USB-A cable.
- Avoid using USB hubs or extension adapters.
- Connect the drive to another Mac or even a Windows PC to see if it's detected.
Fix 2. Restart Your Mac
A simple restart can refresh system processes and sometimes fix unrecognized external drives including unrecognized ADATA external hard drive.
Fix 3. Check Finder Settings
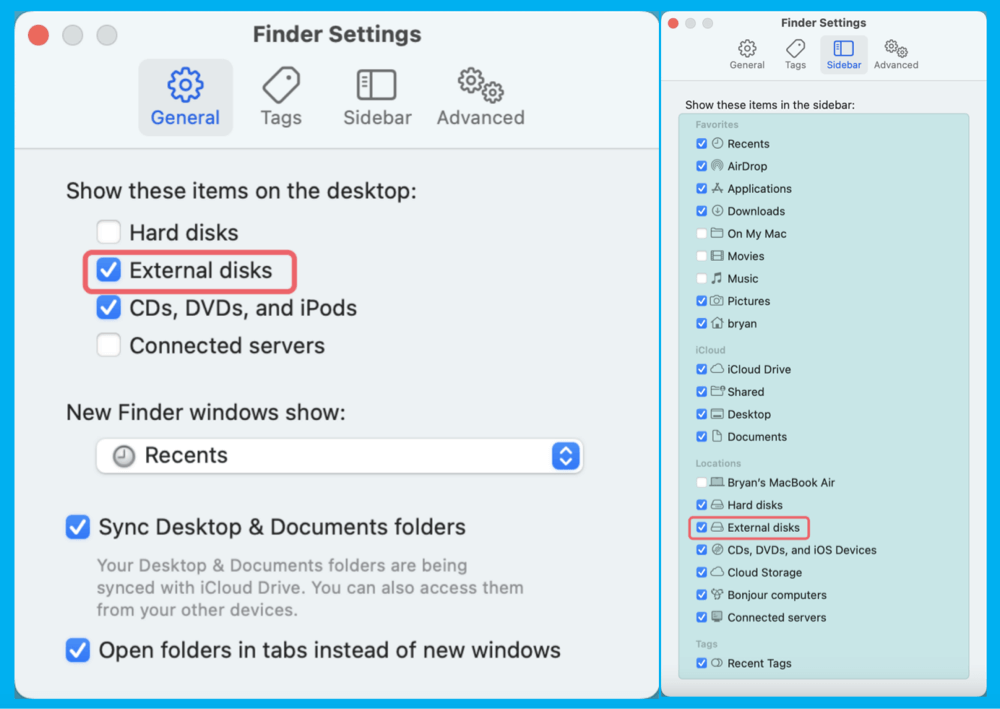
Your Mac might be hiding the external drive by default:
- Open Finder.
- Click on Finder > Settings (or Preferences).
- Under the General tab, ensure "External disks" is checked.
- Under the Sidebar tab, also check "External disks."
![ADATA external hard drive isn't working on your Mac]()
Fix 4. Use Disk Utility to Diagnose and Repair the ADATA Drive
Disk Utility is macOS's built-in tool for managing and troubleshooting drives.
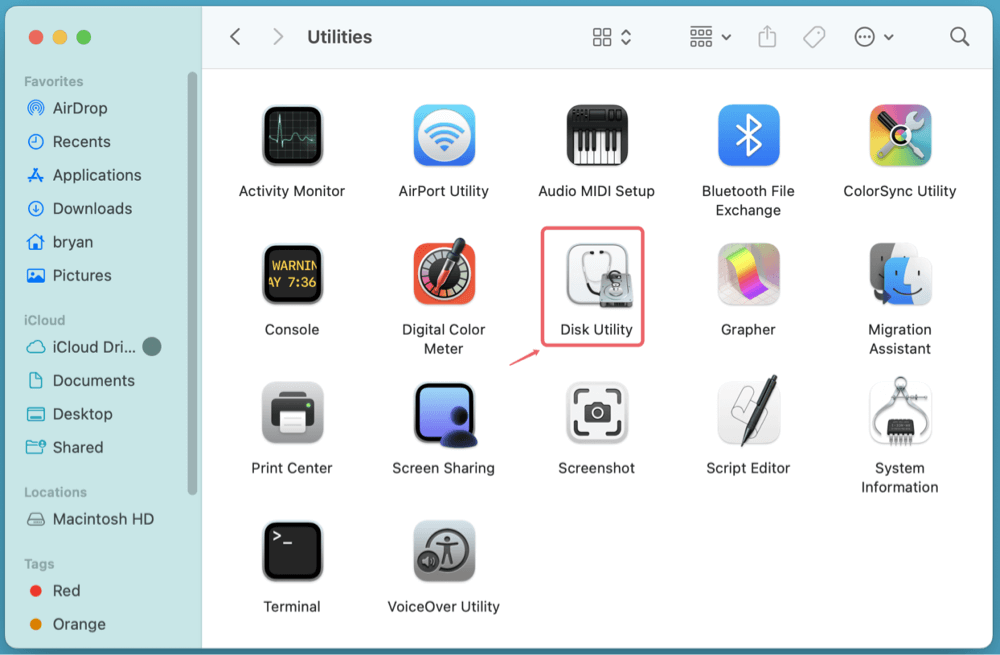
1. Open Disk Utility
Navigate to Applications > Utilities > Disk Utility, or use Spotlight (Command + Spacebar) and type "Disk Utility."
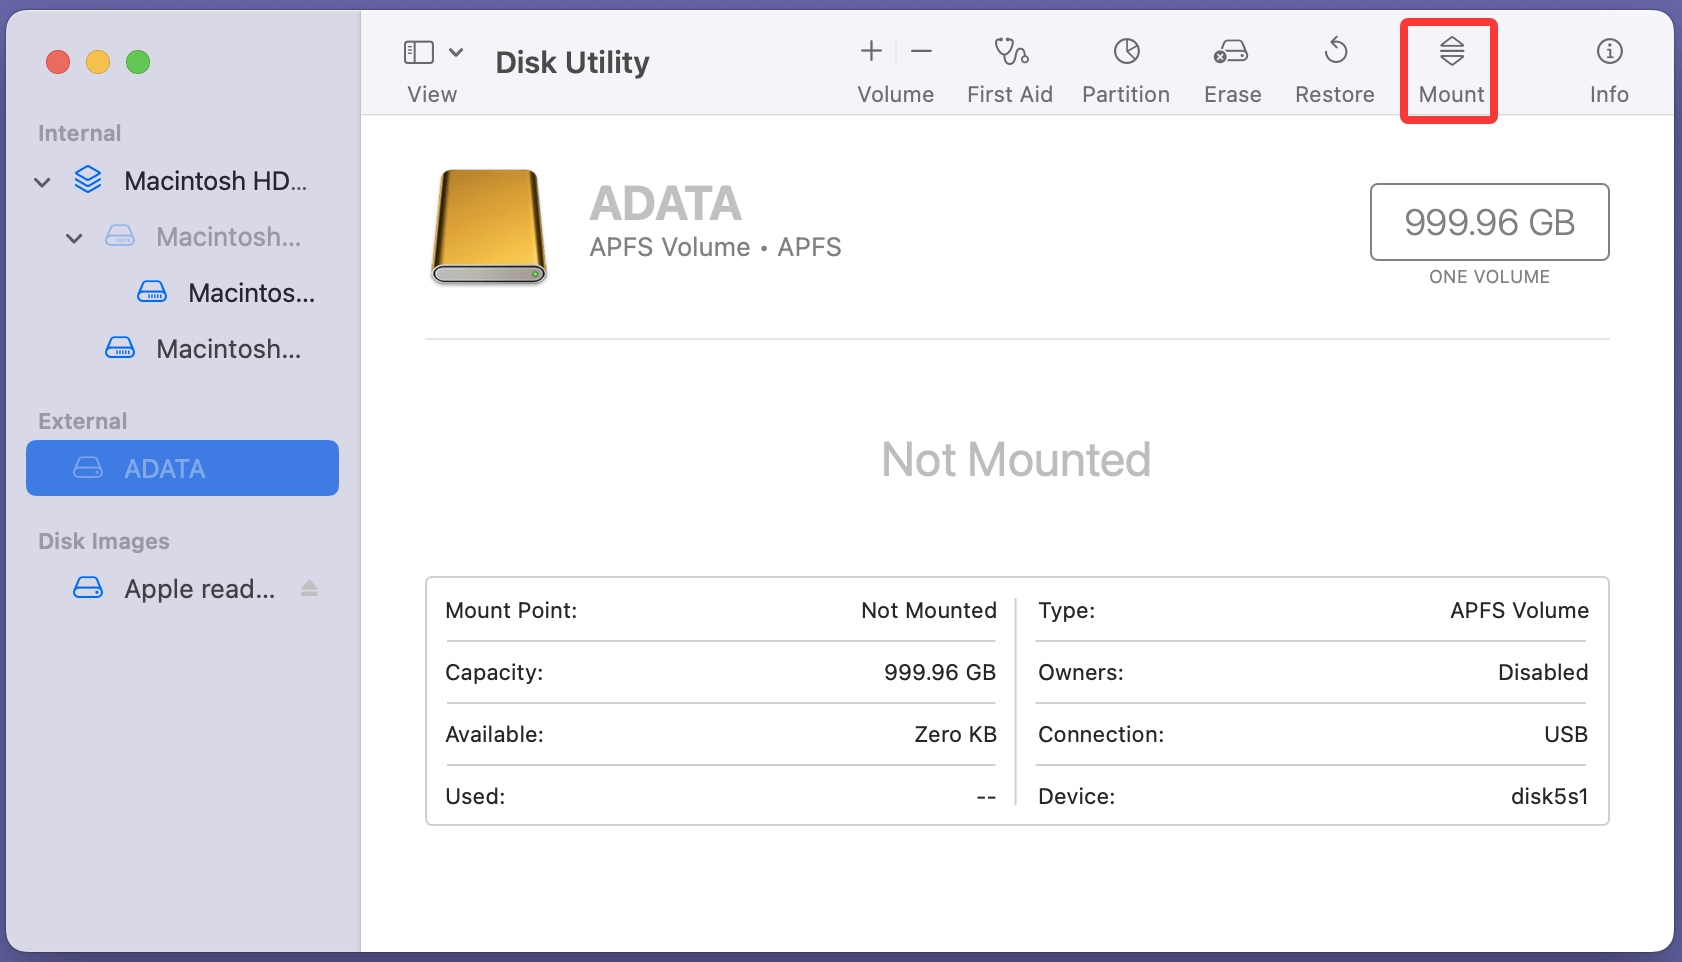
2. Try Mounting the Drive
If the ADATA drive appears in the left pane but is grayed out:
- Select the drive and click Mount.
![ADATA external hard drive isn't working on your Mac]()
- If it doesn't mount, take note of any error messages.
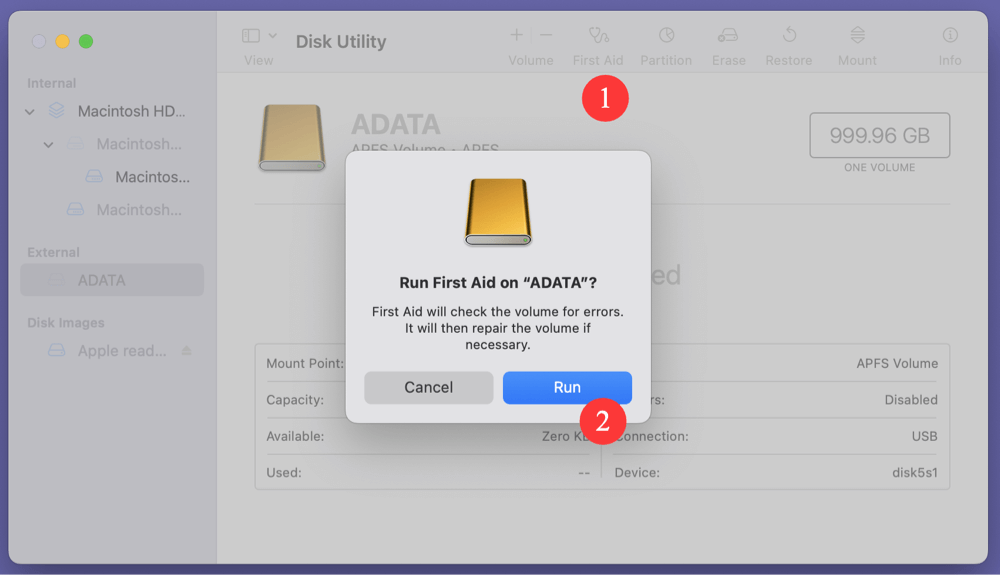
3. Run First Aid
First Aid checks the drive for errors and attempts repairs:
- Select the ADATA drive in Disk Utility.
- Click First Aid in the toolbar.
![ADATA external hard drive isn't working on your Mac]()
- Wait for the process to complete and review the summary.
If First Aid fails, proceed to advanced options or data recovery steps.
Fix 5. Resolve ADATA Drive's File System Compatibility Issues
macOS can read NTFS drives but cannot write to them by default, which can cause issues with drive detection or access.
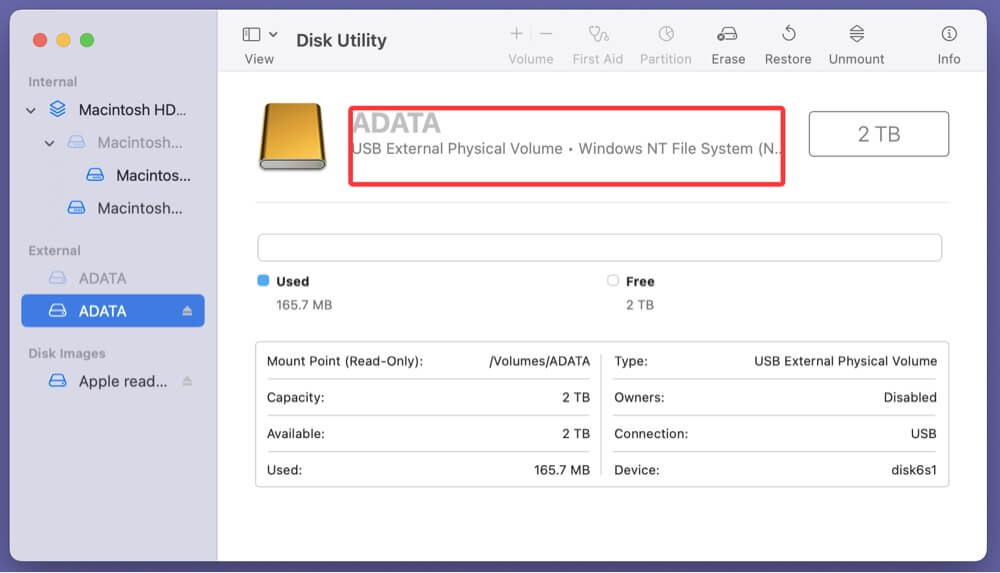
Check the File System Format
- Open Disk Utility.
- Select the ADATA drive and check the Format under the drive name.
![ADATA external hard drive isn't working on your Mac]()
Supported Formats on Mac:
- Read/Write: APFS, Mac OS Extended (HFS+), exFAT, FAT32
- Read-Only (by default): NTFS
Reformat the Drive (Caution: Data Will Be Erased)
If the drive is NTFS and you don't need to preserve its data:
- Back up the data using a Windows PC or recovery software.
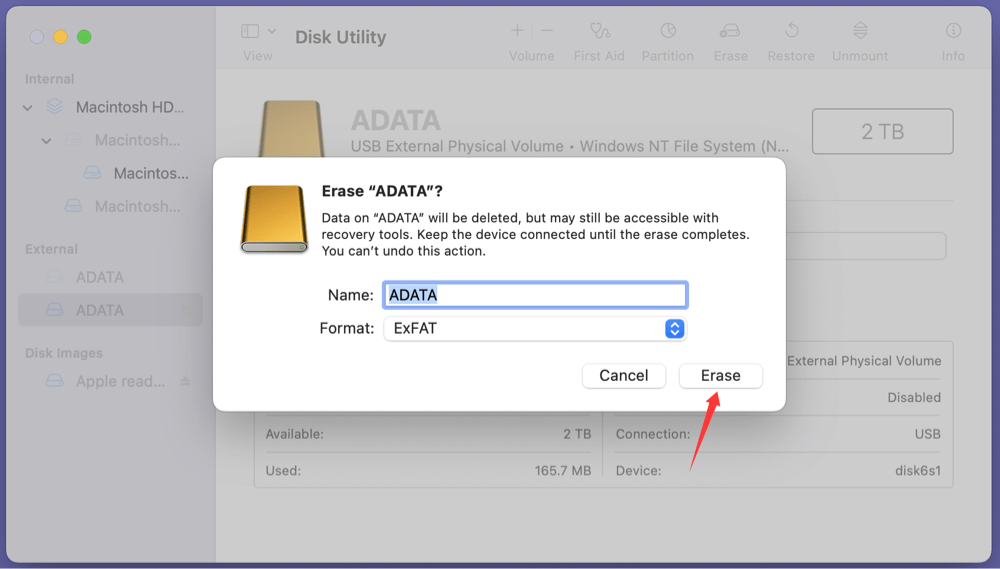
- Open Disk Utility.
- Select the drive and click Erase.
![ADATA external hard drive isn't working on your Mac]()
- Choose exFAT (compatible with both macOS and Windows) or Mac OS Extended (Journaled) for Mac-only use.
![ADATA external hard drive isn't working on your Mac]()
- Click Erase to format the drive.

Fix 6. Use Terminal for Manual Mounting the ADATA Drive
If the drive isn't mounting through Disk Utility, Terminal provides more control.
List All Drives
Open Terminal (Applications > Utilities > Terminal) and enter:
diskutil list
Find your ADATA drive in the list (e.g., /dev/disk2).
Mount the Drive Manually
If the disk appears but is unmounted:
diskutil mountDisk /dev/disk4
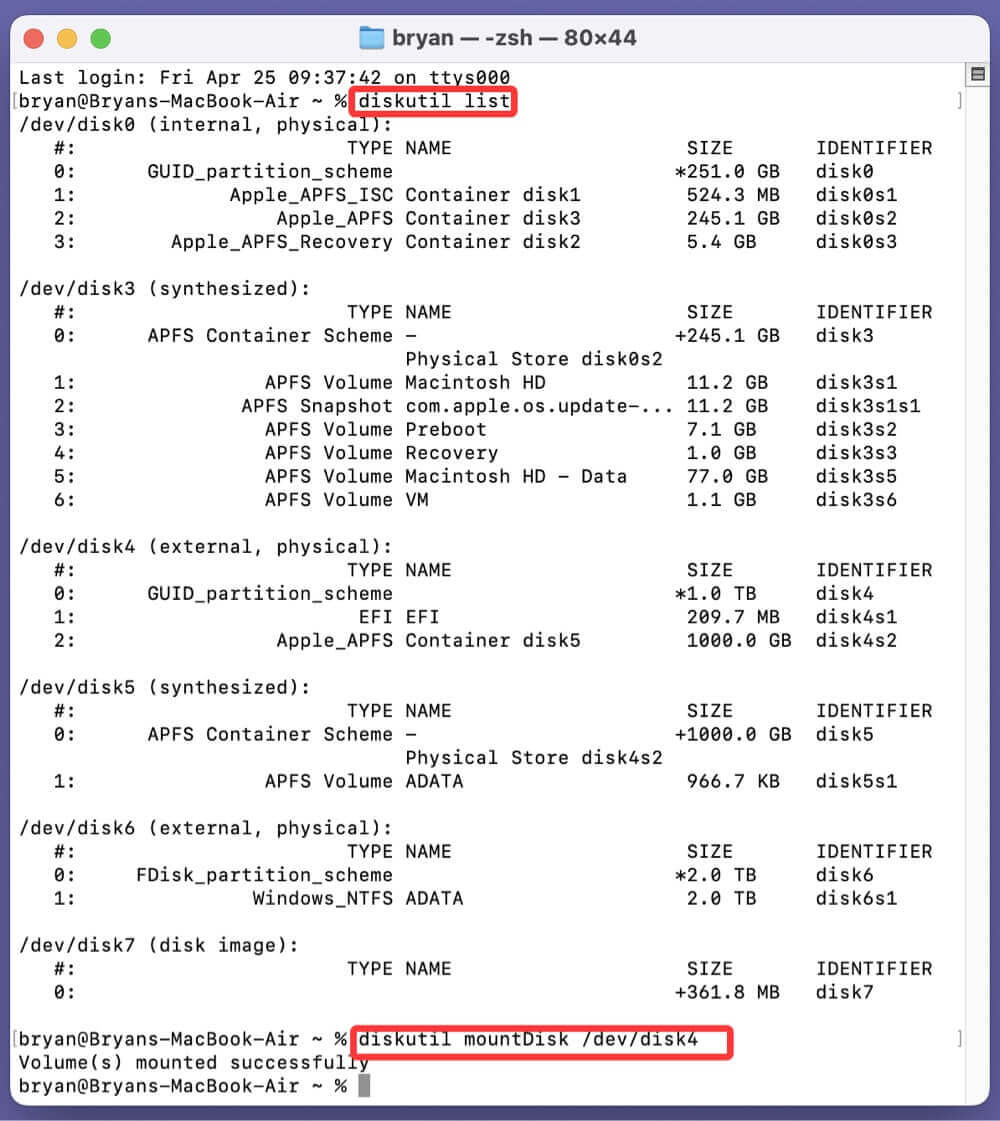
Replace /dev/disk4 with the actual identifier for your drive.
Erase or Repair via Terminal
As a last resort, you can erase or repair the drive:
diskutil eraseDisk ExFAT ADATA /dev/disk4
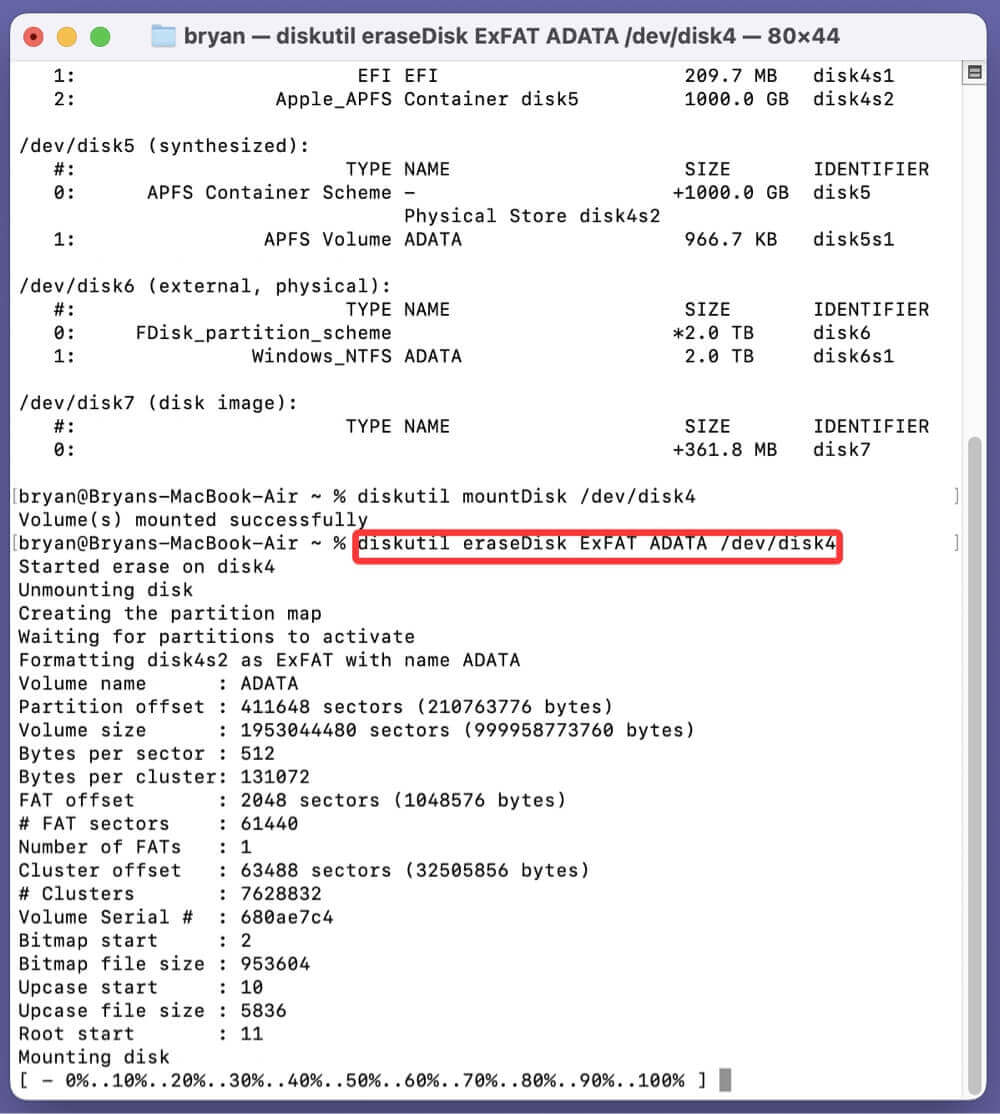
⚠️ Warning: This will delete all data on the drive.
Fix 7. Use NTFS for Mac Tool to Mount the NTFS ADATA Drive
If Disk Utility and Terminal don't resolve the issue, and your ADATA external hard drive is still not accessible on Mac, it's time to bring in third-party software solutions.
If your ADATA drive is formatted in NTFS (common for Windows users), macOS can only read from it - not write to it - without third-party drivers. This can result in the drive appearing unresponsive or "read-only."
Donemax NTFS for Mac is one of the best NTFS for Mac tools. It can quickly mount NTFS ADATA external hard drive on Mac and allow your Mac to write data to it without any limitation.
Step 1. Download and install Donemax NTFS for Mac on your Mac.
Step 2. Open Donemax NTFS for Mac, select the NTFS ADATA external hard drive, click on Mount button.
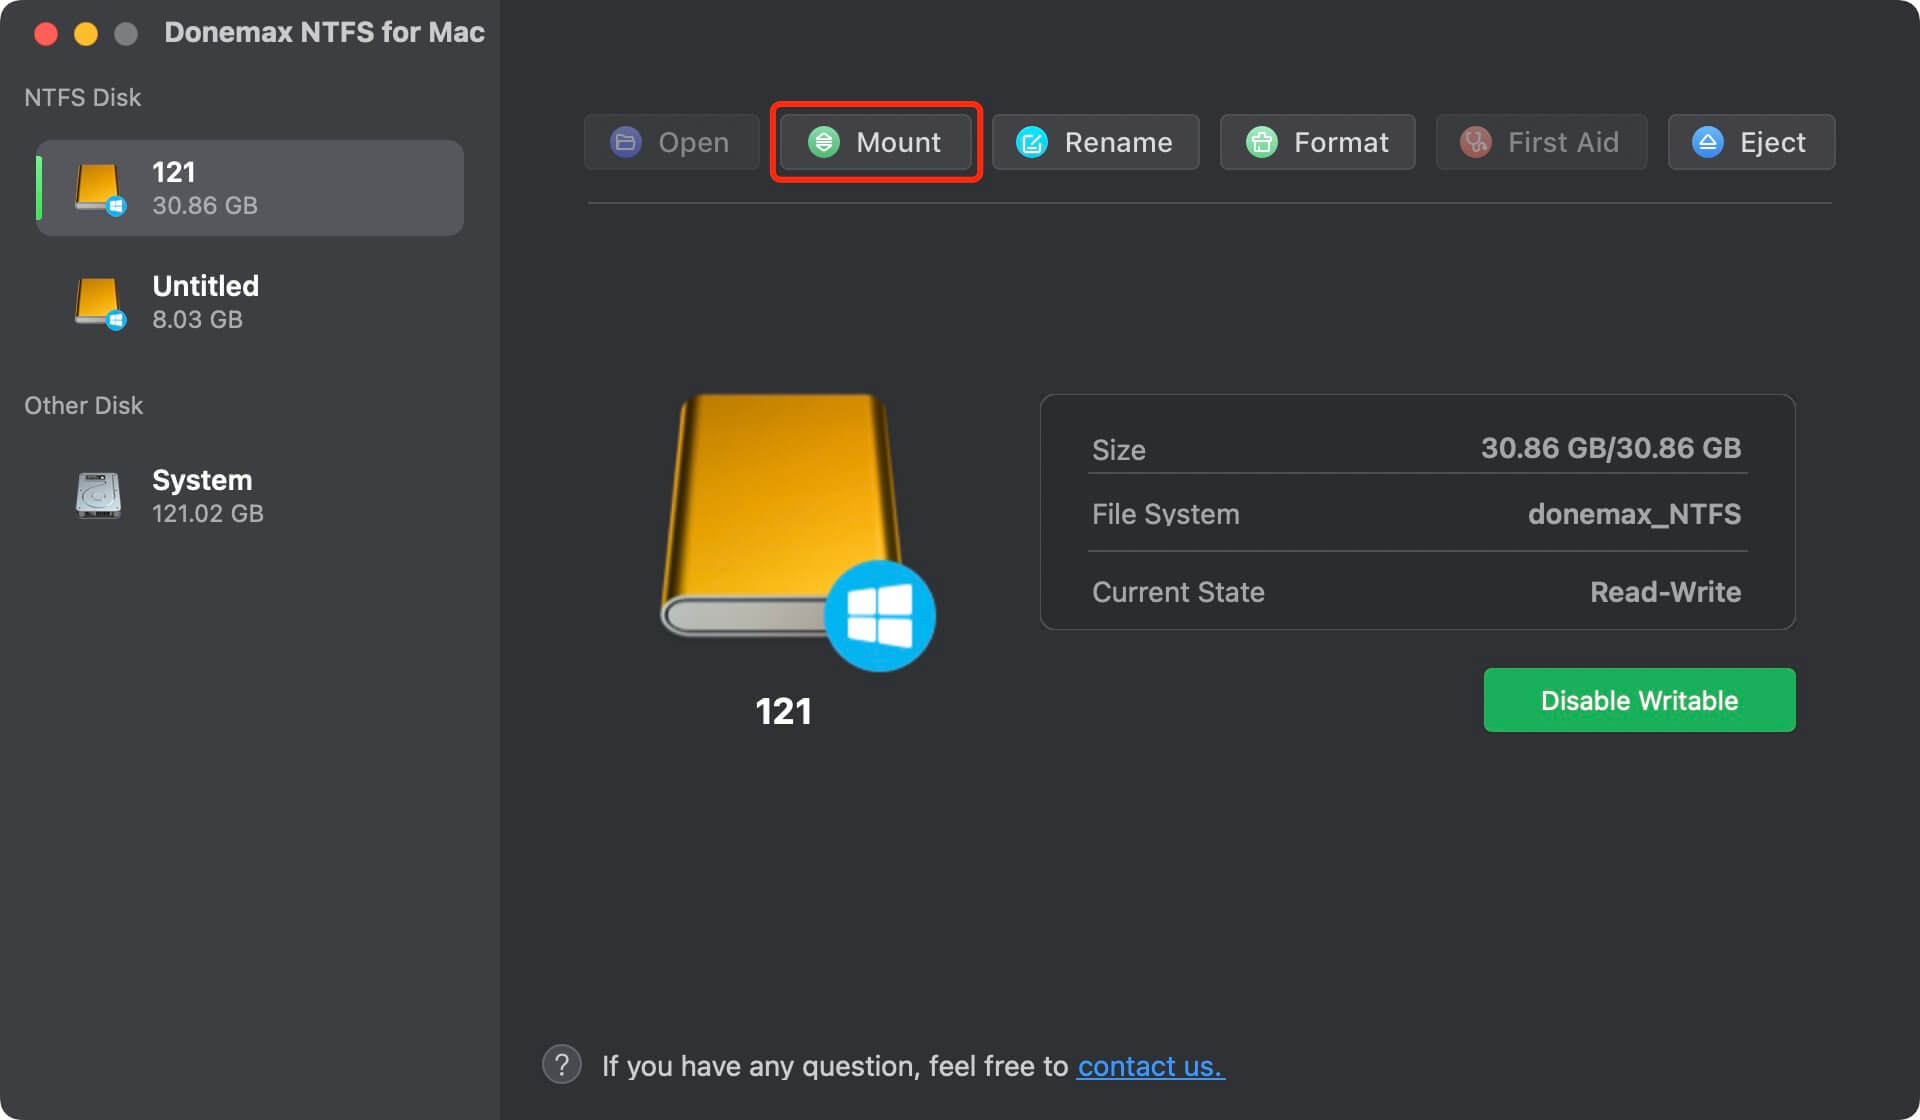
Step 3. Then click on Enable Writable button so that you can write data to NTFS drives.

By using third-party recovery tools and NTFS drivers, you can avoid permanent data loss and make your ADATA drive fully functional on macOS - even if it was originally formatted for Windows. These solutions are especially valuable when macOS's built-in utilities fall short or when you're working across platforms.
Fix 8. Fix ADATA Drive Hardware Issues
Detect Signs of Physical Damage
If none of the above solutions work, the problem might be hardware-related:
- Drive makes unusual clicking or beeping noises.
- Drive is not detected by multiple devices.
- LED doesn't light up.
Contact ADATA Support
ADATA provides warranty services for most of their products. Visit their official support page to:
- Check warranty status.
- Submit an RMA (Return Merchandise Authorization) request.
- Seek product-specific troubleshooting help.
Seek Professional Data Recovery Services
If your data is critical and the drive is physically damaged:
- Contact a certified data recovery company (like DriveSavers, Ontrack).
- Avoid DIY disassembly - this could void your warranty or damage the drive further.
Tips to Prevent Future ADATA Drive Issues on Mac
Prevention is better than cure. Follow these best practices to ensure your ADATA external drive remains healthy:
- Always eject your drive properly: Right-click the drive icon and select "Eject."
- Avoid unplugging the drive during transfers: This can cause data corruption.
- Use surge protection: Power fluctuations can damage external drives.
- Regularly back up your data: Use Time Machine or cloud storage as a secondary backup.
- Update macOS and drivers regularly for improved compatibility.
- Avoid using cheap USB hubs or cables that may underpower your drive.
Conclusion
ADATA external hard drives are generally reliable, but they can occasionally run into problems on macOS due to file system differences, hardware issues, or corrupted data. The good news is, in most cases, the issue is fixable with a bit of troubleshooting.
Start with the basics: check the physical connection and Finder settings. If that doesn't work, use Disk Utility and Terminal to mount or repair the drive. For NTFS drives, consider using a compatible driver or reformatting the drive after backing up your data. If all else fails, professional data recovery services and ADATA support are your last resort.
By following the solutions in this guide, you should be able to restore access to your ADATA external hard drive on Mac and safeguard your files moving forward.
Donemax NTFS for Mac
An easy-to-use NTFS for Mac tool to help you enable writable for NTFS drives on Mac so that you can read-write NTFS drives on Mac without any limitation. It also can help you mount, format, repair, rename, open drive on your Mac.
Related Articles
- Jun 25, 2024Fix LaCie Hard Drive Not Mounting on Mac
- May 23, 2025Step-by-step Guide: Fix a Corrupted USB Flash Drive Using CMD
- May 26, 2026PS4 External Hard Drive Not Recognized/Detected/Working
- Jul 27, 20256 Methods to Fix External Hard Drive Not Mounting on macOS Tahoe 26
- Feb 05, 2025Fix/Repair Unallocated External Hard Drive without Losing Data
- Jan 02, 2025Convert APFS to HFS/HFS+ (Mac OS Extended) Without Losing Data?

Contributing Writer
Maria
Maria is one of the senior writers & editors of Donemax who lives and works in Sydney, Australia. She loves PC, Mac and Internet Technology. She has 6 years of writing articles about data recovery on PC/Mac, disk cloning solution, data eraser and computer OS optimization, etc. She is also interested in testing various software and digital products.

Editor in chief
Gerhard Chou
In order to effectively solve the problems for our customers, every article and troubleshooting solution published on our website has been strictly tested and practiced. Our editors love researching and using computers and testing software, and are willing to help computer users with their problems