
Written byMariaUpdated on May 18, 2026
Can't Eject an External Hard Drive on Windows? Fix It!
Approved byGerhard Chou
PAGE CONTENT:
- Why Does Windows Say Your Drive is "In Use"?
- Quick First Steps for External Drive Not Ejecting
- Advanced Methods to Fix External Drive That Won't Eject
- When All Else Fails: The Ultimate Safe Workaround
- Pro-Tips: How to Avoid Drive Ejection Problems in the Future
- FAQs about External Hard Drive Not Ejecting
- Conclusion:
We've all been there: you've finished backing up your photos, moving your work files, or transferring a movie to your external drive. You go to click that little USB icon in your system tray, click eject, and boom—Windows shoots back an error message saying the device is currently in use.
When your external hard drive not ejecting issues pop up, it's tempting to just yank the USB cable out. But doing that can corrupt your files, mess up your file system, or even damage your drive's hardware.
If you can't eject external hard drive on Windows 11 or Windows 10, don't panic. This friendly, step-by-step guide will walk you through exactly why this happens and how to safely free your drive without losing a single byte of your data.
Why Does Windows Say Your Drive is "In Use"?
Before we dive into the fixes, let's look at why Windows locks your drive in the first place. Understanding the culprit helps you pick the right tool for the job.
- Active Background Processes: An app or system tool is actively reading or writing to the drive. This could be a Windows Update, an antivirus scan, or a cloud backup syncing in the background.
- Open Files: You might have left a Word document, a photo, or a video open that is stored on the external drive.
- Windows Explorer Glitches: Sometimes Windows Explorer simply fails to release its handle on the drive after you close a folder.
- File System Errors: If the drive's internal indexing or partition structure has a minor error, Windows might keep it locked trying to resolve it.
Quick First Steps for External Drive Not Ejecting
Before diving into advanced settings, let's rule out the most obvious roadblocks:
- Close All Open Applications: Check your taskbar. Do you have any open folders showing the drive's contents? Is there a media player, text editor, or game running that lives on that drive? Close them completely.
- Give It a Minute: If you just finished moving a massive 20GB folder, Windows might still be clearing its write cache. Wait 60 seconds and try to eject it again.
- Check the System Tray: Don't just rely on the main taskbar. Click the little up-arrow near your clock, click the Safely Remove Hardware and Eject Media icon, and select your drive from there.
Advanced Methods to Fix External Drive That Won't Eject
If the quick fixes didn't work, it means a hidden process or system setting is keeping a tight grip on your storage device. Work your way down these proven solutions.
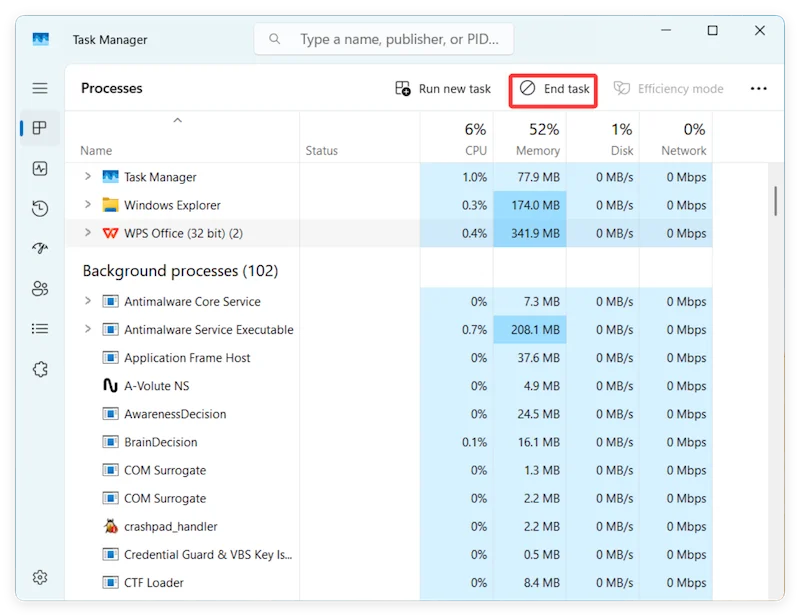
Method 1: Use Task Manager to Terminate Hidden Apps
Sometimes an app is running invisibly in the background, keeping your drive hostage.
- Press Ctrl + Shift + Esc simultaneously to open the Task Manager.
- If you see the simple view, click More details at the bottom.
- Under the Processes tab, look for any app that might be accessing your drive (like a video editing app, a torrent client, or a file transfer tool).
- Click the problematic program and select End task.
- Try to eject your drive again.
Method 2: Restart Windows Explorer
Windows Explorer is the system process that manages your desktop, taskbar, and file folders. If it glitches out, it won't let your external drive go. Restarting it resets the connection without messing up your open work.
- Open Task Manager (Ctrl + Shift + Esc).
- Scroll down the Processes tab until you find Windows Explorer.
- Right-click on Windows Explorer and click Restart.

Your desktop screen might flicker or disappear for a second—this is completely normal. Once it reappears, try ejecting your drive.
Method 3: Use Disk Management to Offline the Drive
If Windows refuses to tell you what's using the drive, you can force the operating system to take the drive "Offline." This safely severs all active software links to the drive so you can pull the cable out.
- Right-click the Start Menu button and select Disk Management.
- Locate your external hard drive in the bottom list (e.g., Disk 1 or Disk 2).
- Right-click the gray box on the left side that says Disk [Number] / Basic / Online. Select Offline.
- Unplug your external hard drive safely.
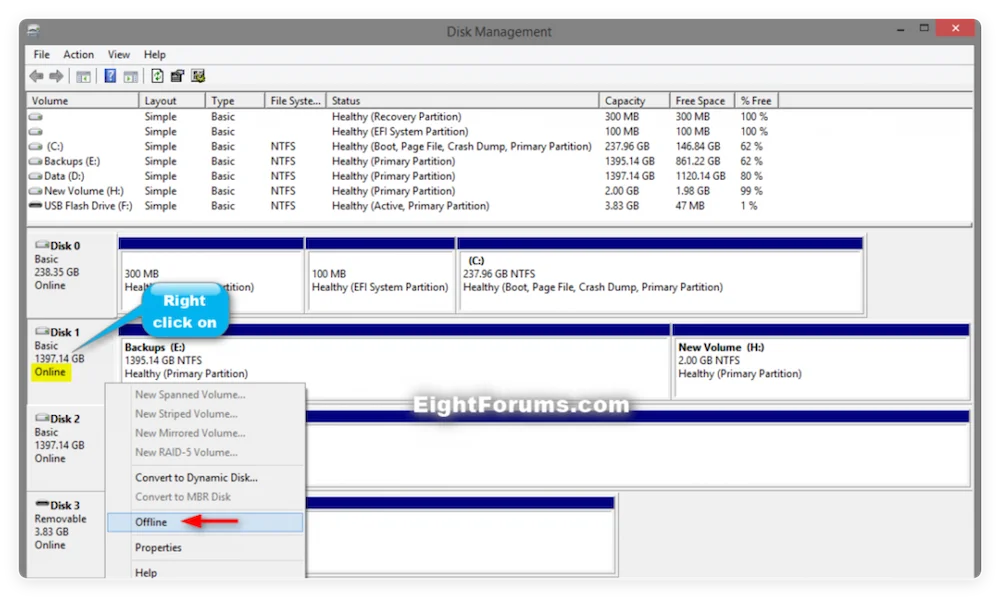
📌 Crucial Step: The next time you plug this drive into your computer, come back here, right-click it, and select Online so Windows can read it again!
Method 4: Switch to the "Quick Removal" Policy
Windows allows you to change how it interacts with external drives. By default, it might be optimized for "Better performance," which uses a cache that requires you to manually eject the drive every time. Switching it to "Quick Removal" disables this cache, allowing you to disconnect the drive safely whenever data isn't actively transferring.
- Right-click the Start Menu and choose Device Manager.
- Expand the Disk drives category.
- Right-click your external hard drive and select Properties.
- Go to the Policies tab.
- Select Quick removal (default) and click OK.
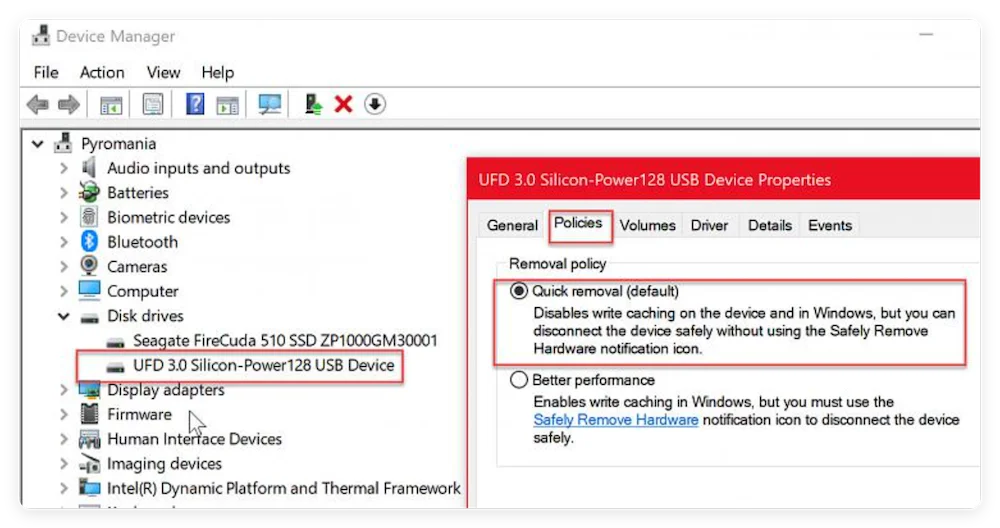
📌 Note: While this helps prevent future ejection hang-ups, it's still best practice to check the drive's activity light before unplugging it.
Method 5: Run CHKDSK to Fix File System Errors
If a drive has hidden corruption, Windows might lock it out of caution. Running a quick scan can fix these underlying volume errors.
- Press the Windows Key, type cmd, right-click Command Prompt, and select Run as administrator.
- Type the following command (replace X with your external drive's actual drive letter) and press Enter:
chkdsk X: /f
- Let Windows scan and repair any errors. Once complete, try the standard eject procedure.

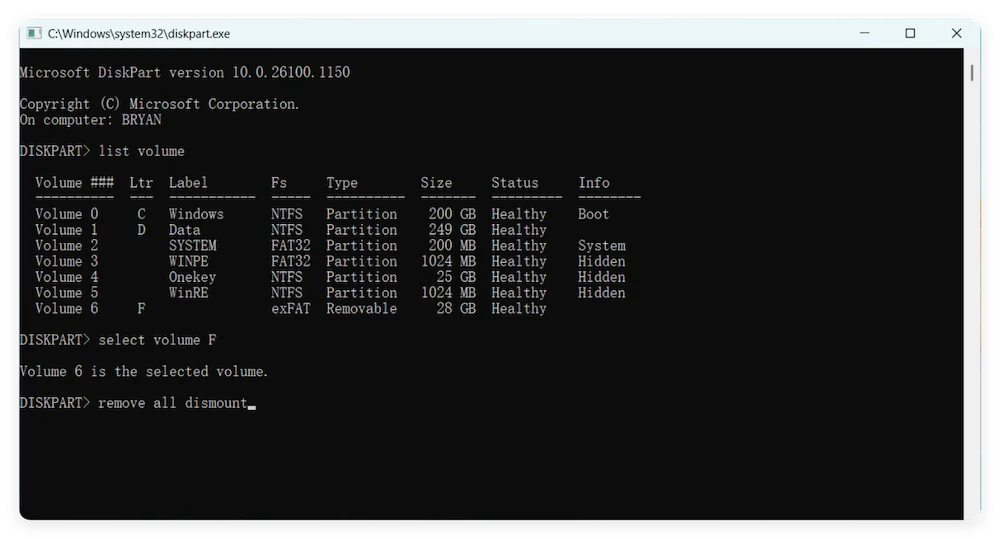
Method 6: Use Diskpart to Dismount via Command Line
For advanced users, you can use Windows' command-line disk partitioning utility to force a dismount.
- Open Command Prompt as an administrator.
- Type diskpart and press Enter.
- Type list volume and press Enter. Identify your external drive's volume number.
- Type select volume X (replace X with your drive's volume number) and hit Enter.
- Type remove all dismount and press Enter. This completely detaches the drive from system access.
When All Else Fails: The Ultimate Safe Workaround
If you've tried every step and Windows still says you can't eject external hard drive, don't just pull the plug while the PC is fully active. There is one 100% foolproof way to prevent data corruption:
- Click the Start menu and select Shut down or Restart.
- Wait for your computer to completely turn off (the power lights on your PC tower or laptop should be completely dark).
- Unplug the external hard drive's USB cable.
When the operating system shuts down, it automatically closes all file structures, dumps its cache, and safely powers down the USB ports, ensuring your data remains completely pristine.
Pro-Tips: How to Avoid Drive Ejection Problems in the Future
- Keep Your Antivirus in Check: Some antivirus suites are overaggressive and scan your external drive continuously. Configure your software to exclude background scans on temporary external storage devices if appropriate.
- Avoid Running Apps Directly From the Drive: Whenever possible, copy files (like portable apps or large video assets) to your internal SSD before running or editing them.
- Keep Windows Updated: Micro-glitches between Windows Explorer and USB hubs are frequently patched in monthly Windows quality updates.
FAQs about External Hard Drive Not Ejecting
A: If no data is actively being written, you might get lucky and nothing happens. However, if Windows or a background app is mid-write, you risk corrupting the file system, turning your files into unreadable "RAW" data, or losing the files entirely.
A: Windows has several background services, such as Distributed Link Tracking, Windows Search Indexing, or third-party cloud apps (like OneDrive or Dropbox), that might be scanning the drive for changes without showing an active window on your desktop.
A: Yes! Free utilities like Sysinternals Process Explorer or LockHunter allow you to right-click a drive or file to see exactly which background program has an open handle on it, allowing you to close it instantly.
🇶 4: I accidentally unplugged my drive and now it says "Format Disk before using." What should I do?
A: This means the file partition table was corrupted during the unsafe removal. Do not format the drive, as this will overwrite your files. Instead, use a reliable recovery tool like Donemax Data Recovery to scan the drive. It can bypass the corruption, locate your lost, inaccessible, or deleted files, and restore them safely to your computer's main storage.
Conclusion:
The inability to eject an external hard drive safely on Windows is a common issue, but it is usually solvable through the steps outlined above. By closing unnecessary applications, scanning for errors, and using the right tools, you can quickly address this problem and prevent future occurrences. Remember to always safely eject your devices and maintain your system to ensure smooth operation.
By following these troubleshooting tips and preventive steps, you can safeguard your data and extend the life of your external hard drive. If you have lost data due to fixing can't eject external hard drive, you can use data recovery program - such as Donemax Data Recovery to scan the external hard drive, then find and recover the lost data.
Donemax Data Recovery
Donemax Data Recovery is one of the best data recovery software. It is easy-to-use and can help in recovering deleted, formatted, inaccessible or lost data from HDD/SSD, external disk, USB drive, SD card, camera or other storage devices.
Related Articles
- Feb 27, 2024Can't Erase A Drive to APFS On Mac? Fix It Now
- Dec 23, 20245 Effective Methods to Fix SD Card Read-only on Mac
- Feb 06, 2024Lexar Portable SSD Is Not Showing Up on Windows PC, Fix It Now
- Feb 05, 2025Fix GoPro SD Card Error: A Complete Troubleshooting Guide
- May 14, 2025Dell Computer Won't Turn On, Fix It Now
- Feb 12, 2025Fix The Semaphore Timeout Period Has Expired Error Without Losing Data

Contributing Writer
Maria
Maria is one of the senior writers & editors of Donemax who lives and works in Sydney, Australia. She loves PC, Mac and Internet Technology. She has 6 years of writing articles about data recovery on PC/Mac, disk cloning solution, data eraser and computer OS optimization, etc. She is also interested in testing various software and digital products.

Editor in chief
Gerhard Chou
In order to effectively solve the problems for our customers, every article and troubleshooting solution published on our website has been strictly tested and practiced. Our editors love researching and using computers and testing software, and are willing to help computer users with their problems
Hot Donemax Products

Clone hard drive with advanced clone technology or create bootable clone for Windows/Mac OS.

Completely and easily recover deleted, formatted, hidden or lost files from hard drive and external storage device.

Certified data erasure software - permanently erase data before selling or donating your disk or any digital device.