
Written byStevenUpdated on Jan 22, 2024
New SSD Not Recognized By Disk Utility on Mac, Fix It Now
Approved byGerhard Chou
PAGE CONTENT:
Getting a new solid-state drive (SSD) for your Mac is exciting. It will give you faster speeds, better performance, and a smoother working experience. What started as excitement can quickly turn into anger when your Mac won't recognize your new SSD. Fear not; we will investigate how to fix this problem and determine why Disk Utility is hiding your new storage friend.
You can think of this article as your reliable guide. It will help you find the best way to connect your SSD to your Mac, ensure it works with other devices, and show off your tech skills. So, prepare for an easy-to-understand journey into the world of problem-solving, where we'll reveal why your SSD won't show up in Disk Utility. Let us turn your SSD problem into a win!
Possible SSD Not Recognized Causes:
Physical Connection Issues: Verify the connection between the Mac and the SSD. Ensure there is no damage or loose connection on the wires and connectors. If the SSD is connected via an external Thunderbolt or USB port, you can test the port's functionality by connecting it to another device.
Faulty Cable or Adapter: The problem can lie with the connection cord or adapter if the SSD is an external device. If the problem still exists after attempting a different cable or adapter, give that a try.
Compatibility Issues: Check the Mac's compatibility with the SSD. It is possible that firmware updates are necessary or that certain older Mac models do not support SSDs from more recent generations.
Driver Issues: Usually, macOS doesn't need any extra drivers for SSDs, but sometimes, drivers that are too old or incompatible can cause recognition problems. If there are any available driver updates, you can find them on the manufacturer's website.
Power Supply Issues: Verify that the SSD is getting power if it needs an external power source. Without enough juice, some solid-state drives won't work.
Steps to Fix SSD Not Recognized in Disk Utility:
Restart Your Mac:
To fix short-lived problems and restore system connections, restart your Mac. In most cases, this takes care of small problems that might stop your SSD from being detected.
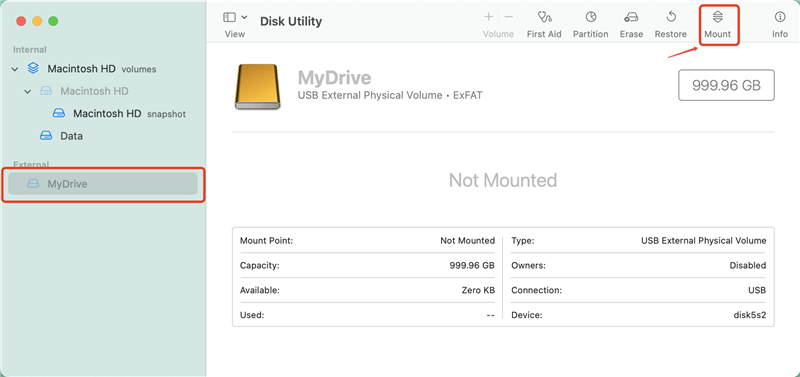
Check Disk Utility:
Go to the Applications > Utilities folder and open Disk Utility. Go to the left-hand column and find your SSD. If you locate it, you might have to mount it, and it seems grayed out. To begin mounting the SSD, choose it and then click the "Mount" button.
Verify Physical Connections:
Check the SSD's physical connections. Plug the solid-state drive (SSD) into your Mac and make sure the connections are snugly in place. If you're using an external solid-state drive (SSD), you can rule out the port by trying it with another USB or Thunderbolt port.
Test Power Supply:
Connecting an external power source is necessary for certain solid-state drives (SSDs), particularly those that are external. Remember to turn on and attach your solid-state drive (SSD) to a power outlet. If the SSD has any indication lights, you can use them to check if it is getting power.
Reset NVRAM and SMC:
Some hardware-related problems may be fixable after resetting the System Management Controller and non-volatile random-access memory (NVRAM). For further instructions on resetting your Mac, check out Apple's official guidelines for your particular model.
Test on Another Mac or PC:
To check if the problem with recognition is computer-specific, try connecting the SSD to a different Mac or even a Windows PC. Doing so aids in problem isolation and determines whether the SSD is operational.
Check for Disk Utility Updates:
Always use the most recent version of Disk Utility. Locate any available updates for Disk Utility by opening the App Store and navigating to the "Updates" page. If you're experiencing problems with recognition, installing the most recent update may fix the problem and provide other changes.
Contact Manufacturer Support:
Contact the SSD manufacturer's customer service department if everything else fails. Give them specifics about the problem you're having and the model of your SSD. To fix the ongoing recognition issue, they may provide detailed instructions, troubleshooting procedures, or further measures to take.
FAQs About Fixing SSD Not Recognized in Disk Utility on Mac
During fixing the unrecognized SSD, you may lose your data due to erasing the SSD using Disk Utility. Don’t panic, the lost data in the SSD is not lost forever and can be recovered by data recovery software. Here are the steps to recover lost data from the SSD:
- Download and install a data recovery application - such as Donemax Data Recovery for Mac. Then open it from Launchpad.
- Connect the SSD to your Mac, then select it to start data recovery.
- Click on Scan button.
- Once the scan is completed, you can preview all recoverable files. Then select the wanted files and save them.
![How to recover lost data from a SSD]()

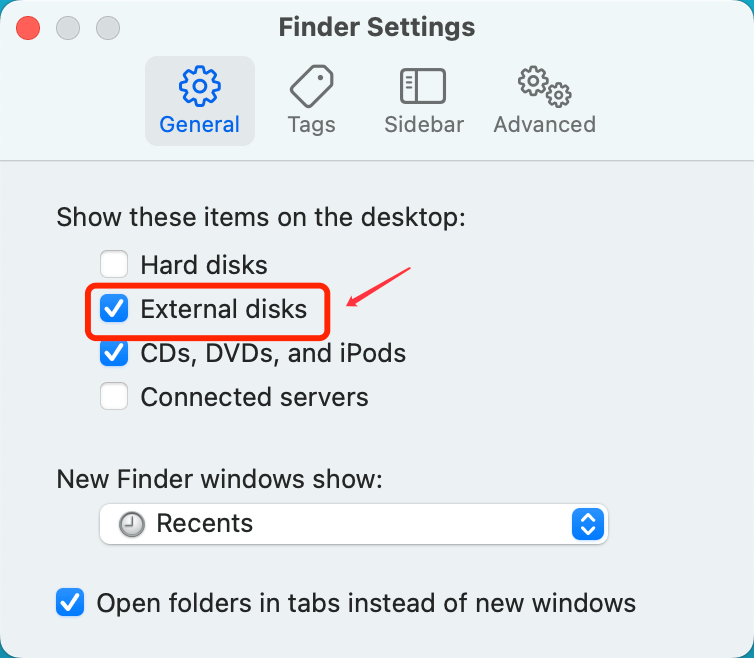
- Open a Finder, then click Finder on Apple menu and choose Settings.
- Open Finder Settings.
- Select External disks under General and Sidebar.
![How to fix SSD not showing up on Mac]()
Then check if the SSD is recognized by your Mac. If you still can not find the SSD, just open Disk Utility, click on First Aid to repair the damaged SSD.
- Connect the SSD to your Mac.
- Go to Launchpad > Other > Disk Utility, open this app.
- Select the SSD and click on Mount button.
You can download and install a third-party NTFS for Mac tool on your Mac, then run it to enable writable for the NTFS drive.
- Download and install Donemax NTFS for Mac.
- Open Donemax NTFS for Mac, select the SSD.
- Click Enable Writable button.
![SSD not recognized by SSD]()

There are lots of disk utilities can help you repair damaged or unrecognized SSD on Mac, here are top 5 ones:
- Disk Utility
- Donemax NTFS for Mac
- Donemax Data Eraser for Mac
- DMmenu for Mac
- AweEraser for Mac
Conclusion:
If Disk Utility isn't noticing your new SSD on your Mac, you may need to look at the hardware and software to determine what's wrong. Users can find and fix the problem's root cause by following the steps in this guide. It will let them fully utilize their SSD's features. Remember to be careful when you do any troubleshooting steps, and if you're not sure what to do, contact the SSD maker or Apple support. Users can fix problems with SSD detection and enjoy the benefits of their fast SSD on their Macs if they keep at it and take the right steps.
Related Articles
- Jan 15, 2025USB Drive Requires to Be Formatted: How to Fix It
- Feb 11, 2025Mac Can't Recognize the Connected SD Card? Fix It Now
- May 20, 2024Seagate Backup Plus External Hard Drive Not Showing Up on Mac, Fix It
- Dec 23, 20247 Solutions to Fix 'Cannot Reinstall macOS' – Troubleshooting and Solutions
- Apr 15, 20258 Solutions to Fix com.apple.DiskManagement.disenter error -119930868 on a Mac
- Feb 20, 2024How to Fix External SSD Not Mounting on Mac?

Contributing Writer
Steven
Steven has been a senior writer & editor of Donemax software since 2020. He's a super nerd and can't imagine the life without a computer. Over 6 years of experience of writing technical solutions and software tesing, he is passionate about providing solutions and tips for Windows and Mac users.

Editor in chief
Gerhard Chou
In order to effectively solve the problems for our customers, every article and troubleshooting solution published on our website has been strictly tested and practiced. Our editors love researching and using computers and testing software, and are willing to help computer users with their problems
Hot Donemax Products

Clone hard drive with advanced clone technology or create bootable clone for Windows/Mac OS.

Completely and easily recover deleted, formatted, hidden or lost files from hard drive and external storage device.

Certified data erasure software - permanently erase data before selling or donating your disk or any digital device.