
Written byMariaUpdated on Apr 25, 2025
How to Clear a Pen Drive: A Complete Guide (Windows & macOS)
Approved byGerhard Chou
Before we start: Donemax Data Eraser is a powerful disk wipe tool. It can help in securely clearing a pen drive on Windows or macOS. It can permanently erase all existing data, deleted/formatted/lost data from the pen drive, making data recovery be impossible.
PAGE CONTENT:
A pen drive - also known as a USB flash drive - is a compact, portable storage device used to transfer and store data. Whether you're cleaning up space, removing unwanted files, or securely wiping data before disposal or resale, knowing how to clear a pen drive safely and effectively is essential.
In this guide, we'll cover various methods to clear a pen drive using Windows, macOS, and third-party tools, as well as advanced fixes for stubborn drives. Let's dive in.
Why You Might Want to Clear a Pen Drive?
There are several scenarios where you might need to wipe a pen drive:
- Freeing up space: Old files and folders can take up valuable storage.
- Removing viruses or malware: Pen drives often spread infections between systems.
- Reusing or reselling the drive: Ensuring your data is gone for good.
- Fixing corrupted file systems: A clean format often resolves issues.
⭐ Important: Clearing a pen drive permanently removes data. Backup any essential files before proceeding.
4 Methods to Securely Clear a Pen Drive on Windows or macOS
Before clear a pen drive, back up your important files.
Method 1: Clear a Pen Drive Using File Explorer (Windows)
This is the most straightforward method and ideal for beginners. File Explorer is the default file navigation tool in Windows, and it includes a simple formatting option that works well for most use cases.
Step-by-Step Guide
Step 1: Insert the Pen Drive
Plug your USB flash drive into an available USB port on your Windows PC. Wait a few seconds for Windows to recognize it. If the pen drive is functional, a notification will appear and you'll see the drive listed in File Explorer, usually labeled something like "USB Drive (E:)" or "Removable Disk".
Step 2: Open File Explorer
You can access File Explorer in several ways:
- Press Windows + E
- Click the folder icon on your taskbar
- Open Start > File Explorer
Step 3: Locate the Pen Drive
On the left-hand sidebar of File Explorer, look under "This PC" to find your pen drive. Confirm it by checking the storage size or name of the device.
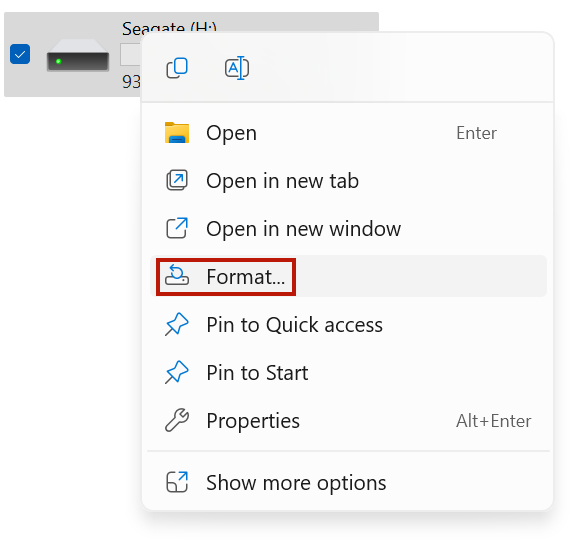
Step 4: Right-Click and Choose Format
Choose Format from the context menu that appears when you right-click the drive. This will open the Format dialog box where you can choose various options for the formatting process.
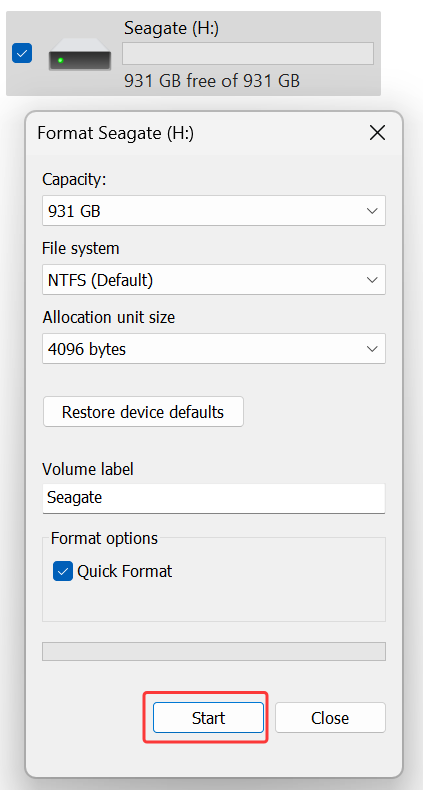
Step 5: Choose Format Settings
In the Format window, you'll see the following fields:
- Capacity: Displays the total available size. No need to change this.
- File System:
- FAT32 – Best for compatibility (e.g., smart TVs, car stereos), but limited to 4GB maximum file size.
- exFAT – Supports larger files, good for modern systems.
- NTFS – Windows-only; allows encryption and permissions.
- Allocation Unit Size: Leave this at Default unless you have a specific reason to change it.
- Volume Label: Give your drive a custom name or leave it blank.
- Format Options:
- Quick Format (checked by default) – This only removes the file directory but not the data itself.
- Uncheck Quick Format for a full format, which scans for bad sectors and securely wipes all data.
💡 Tip: If you're selling or giving away the drive, uncheck Quick Format to make data recovery harder.
Step 6: Start the Formatting Process
Click Start and confirm when prompted with the warning: "Formatting will erase all data on this disk."
The process may take anywhere from a few seconds to a few minutes, depending on the size of the drive and whether you're doing a quick or full format.
Step 7: Format Complete
Once formatting is finished, a pop-up will confirm that the drive has been formatted. Your pen drive is now clean and ready for use.
Visual Reference
If you're a visual learner, here's a quick breakdown of what you'll typically see:
- Drive Letter: E.g., "USB Drive (E:)"
- Format Window:
- Drop-down for File System
- Checkbox for Quick Format
- "Start" and "Cancel" buttons
When to Use This Method
This method is best when:
- The pen drive is working fine (i.e., no corruption).
- You want to quickly delete all files.
- You need to switch to another file system for compatibility.
- You don't need military-grade data deletion.
Limitations
While this method is convenient, it does have some limitations:
- A Quick Format doesn't completely erase the data - it just removes the file references, making recovery possible with tools.
- Doesn't fix deep file system corruption or boot sector issues.
- If the USB is write-protected, you’ll get an error: "Windows was unable to complete the format."
Error Handling
If you encounter formatting errors:
- Try running as administrator
- Use Command Prompt with DiskPart (see Method 2)
- Check for write protection (physical or software-based)
- Make sure no programs or files are using the pen drive
Method 2: Clear a Pen Drive Using Command Prompt (Windows)
If your pen drive is behaving oddly - won't format, shows incorrect space, or is infected - DiskPart via Command Prompt is a powerful alternative.
Step-by-Step Guide
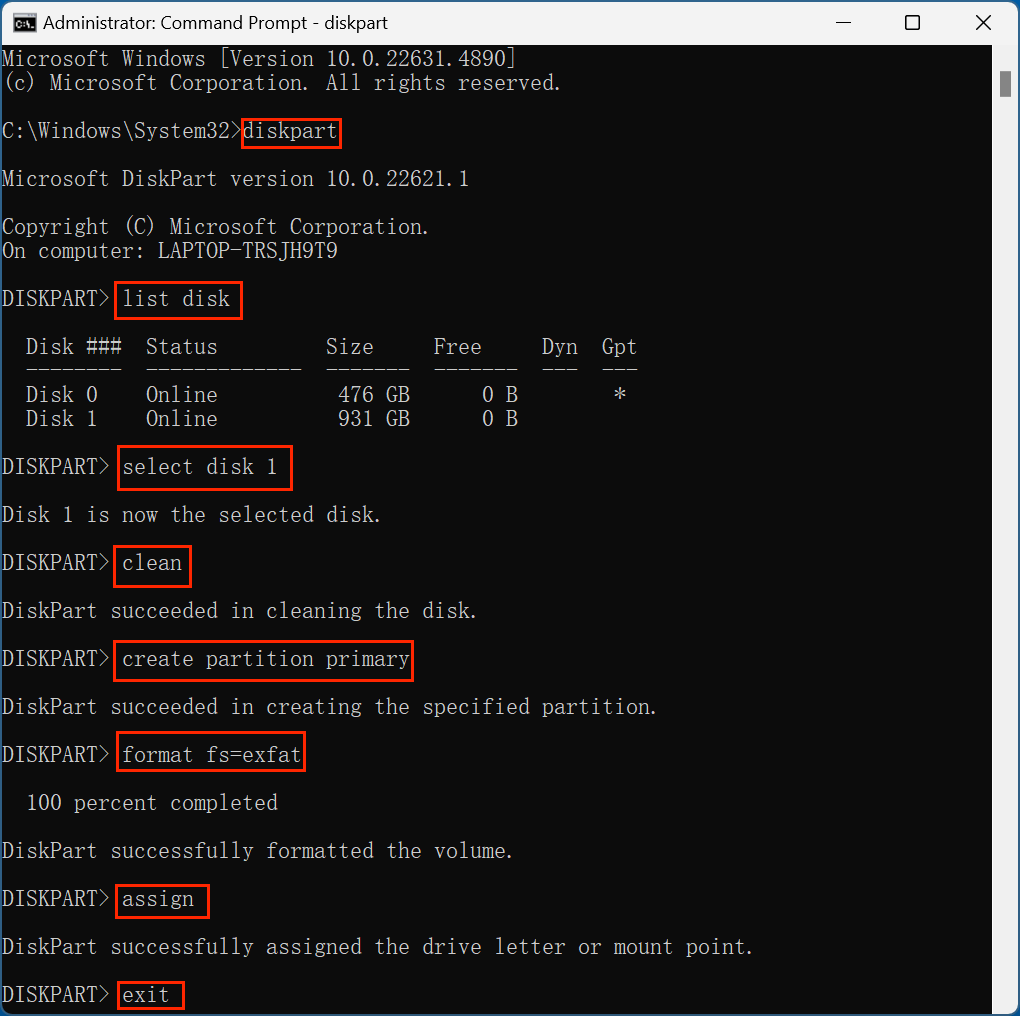
- Press Windows + S, type cmd, and run as administrator.
- In Command Prompt, type:
diskpart
- Enter the following commands:
list disk
This shows all connected drives. Identify your pen drive by its size.
select disk X
Replace X with your pen drive’s number.
clean
create partition primary
format fs=exfat quick (or format fs=exfat for full format)
assign
Exit
💡 Important Tips
- Double-check disk numbers to avoid wiping your internal hard drive.
- For a full format (non-quick), remove quick from the format command.
Method 3: Clear a Pen Drive on macOS
Clearing a USB drive on macOS can be done via Disk Utility or Terminal.
Using Disk Utility (Graphical Method)
- Plug in your pen drive.
- Open Disk Utility from Utilities via Applications.
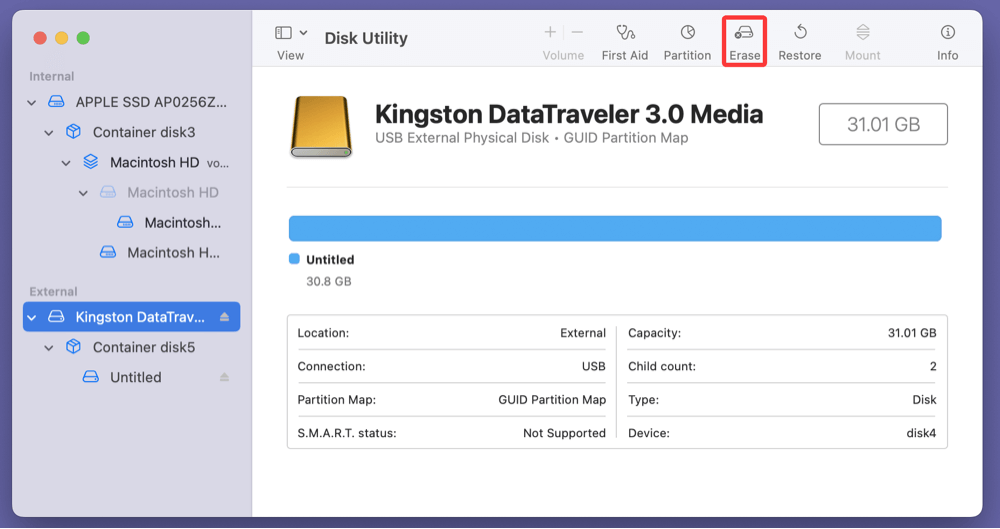
- Choose the Pen drive from the left panel.
- Click Erase at the top.
![clear a pen drive]()
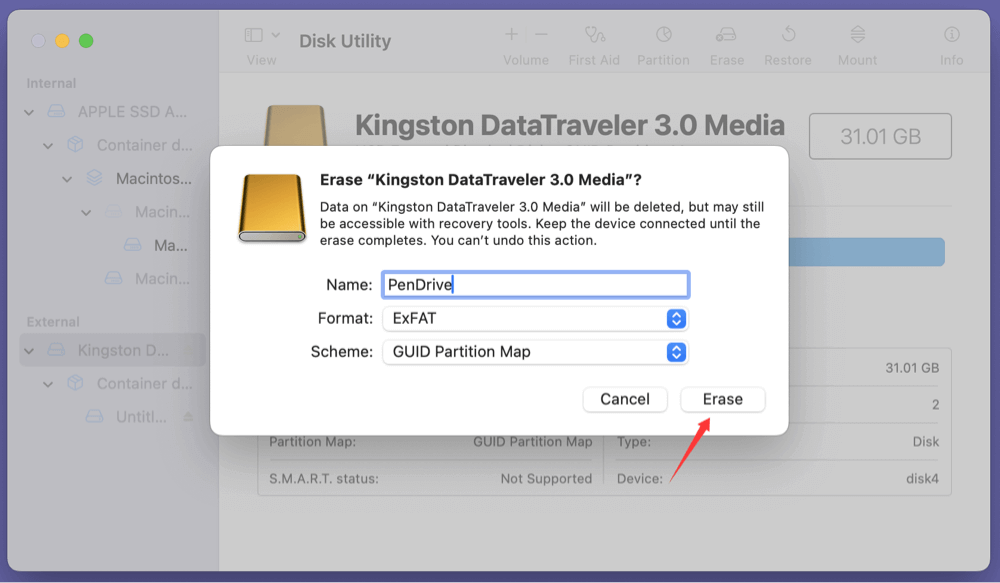
- Choose:
- Name: (Optional)
- Format: Choose ExFAT (for compatibility) or Mac OS Extended (if only using with Macs).
- Scheme: GUID Partition Map
- Click Erase to start.
![clear a pen drive]()
Using Terminal (Advanced Users)
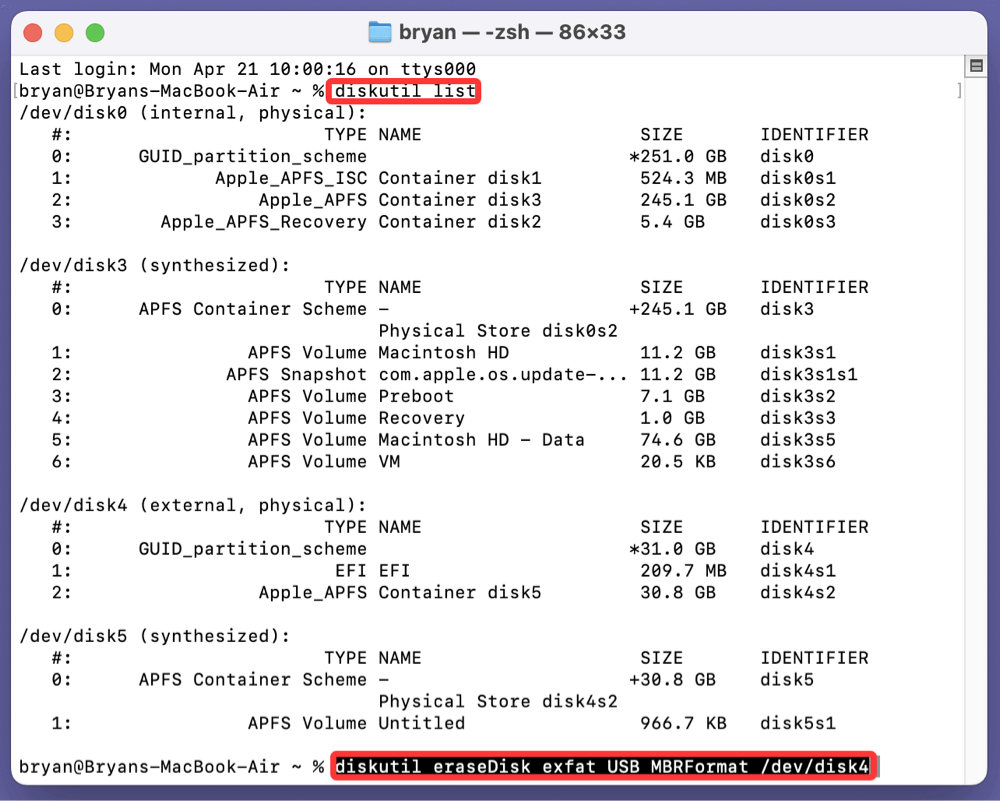
- Open Terminal.
- Type:
diskutil list
Identify your pen drive (e.g., disk4).
- Run:
diskutil eraseDisk exfat USB MBRFormat /dev/disk4
![clear a pen drive]()
Method 4: Use Third-Party Software (Windows & macOS)
When built-in methods fail or you need more options, consider third-party software.
Popular Tools
- SD Card Formatter (by SD Association)
- Ideal for SD cards and USB drives
- Deep formatting support
- Windows/macOS
- Donemax Data Recovery
- Format, repair pen drives.
- Recover lost data from formatted pen drives.
- DMcleaner for Mac
- Reformat pen drives on Mac.
- Shred files from pen drives on Mac.
When to Use Third-Party Tools
- If standard formatting fails.
- To securely erase data (for resale).
- For managing hidden partitions or complex file systems.
💡 Note: Always download third-party tools from official websites to avoid malware.
Troubleshooting: When You Can't Clear the Pen Drive
Sometimes, a USB drive refuses to be formatted. Common issues include write protection, corruption, or malware. Here's how to deal with them.
Remove Write Protection
1. Check for a Physical Switch
Some drives have a tiny write-protect switch. Slide it to the unlocked position.
2. Change Registry Settings (Windows)
Use caution: Editing the registry incorrectly can cause issues.
- Press Windows + R, type regedit, and hit Enter.
- Navigate to:
Computer\HKEY_LOCAL_MACHINE\SYSTEM\CurrentControlSet\Control\StorageDevicePolicies
If WriteProtect is set to 1, double-click and set it to 0.
- Restart your computer.
Scan for Malware
A virus can lock your USB drive or hide files.
- Use Windows Defender or a trusted antivirus.
- Run a full scan on the USB drive.
- Delete/quarantine any detected threats.
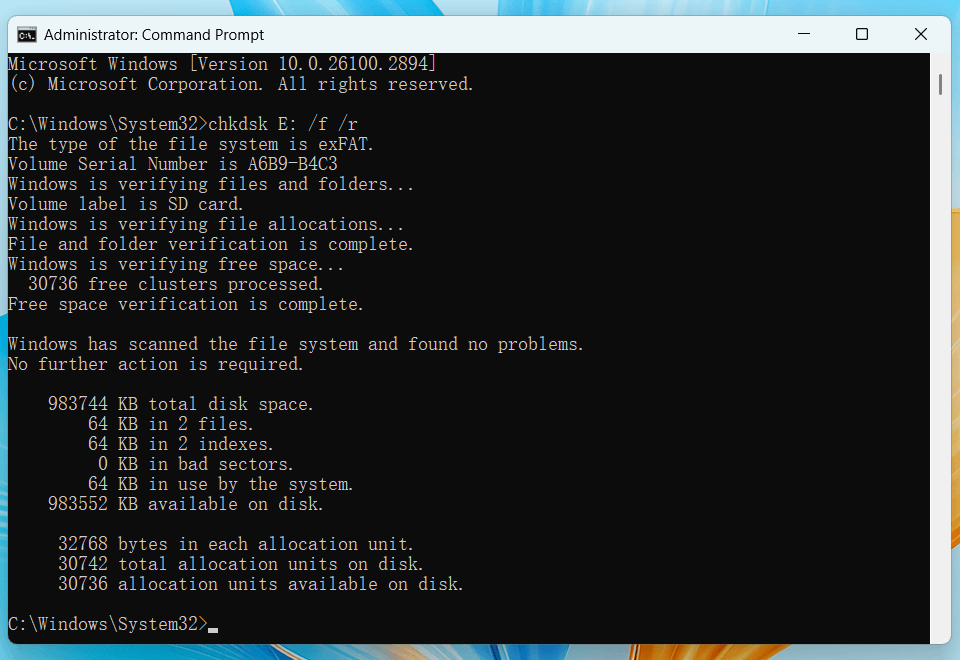
Use CHKDSK to Fix File System Errors (Windows)
- Open Command Prompt as admin.
- Type:
chkdsk X: /f /r
![clear a pen drive]()
Replace X with your USB drive's letter.
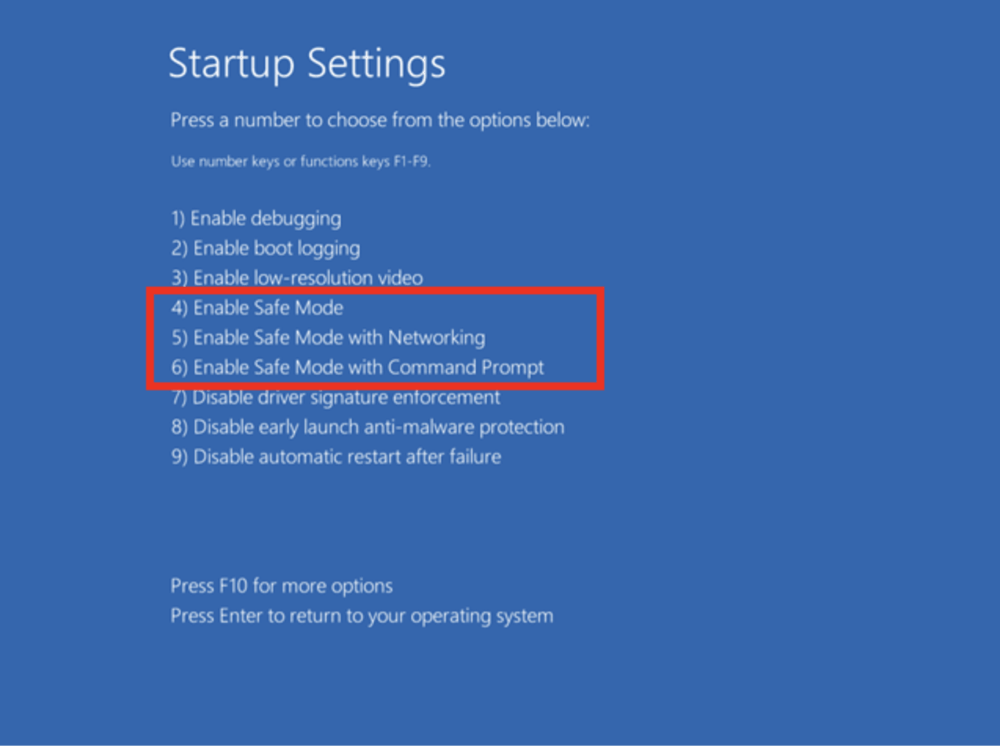
Use Safe Mode
If antivirus or tools can't access the pen drive, try Safe Mode.
- Restart your PC while holding Shift.
- Select Advanced options > Startup Settings > Restart > Safe Mode.
![clear a pen drive]()
- Try formatting the pen drive again.
Tips to Maintain a Healthy Pen Drive
To avoid the need for frequent formatting, follow these USB care tips:
- Eject safely: Always use the "Safely Remove Hardware" option to avoid data corruption.
- Avoid virus-prone PCs: Don't use public or unprotected computers.
- Keep some space free: Full USB drives slow down and can corrupt easily.
- Use antivirus software: Scan regularly for hidden threats.
- Avoid frequent writes: Flash memory wears down over time.
Bonus: Securely Erasing Data (Data Recovery Prevention)
If you're giving away your pen drive, regular formatting might not be enough. Data can still be recovered using special tools.
Donemax Data Eraser is a powerful disk wipe software. It can securely wipe a pen drive and permanently erase all data from it.
Step 1. Download and install Donemax Data Eraser, then connect the pen drive to your computer.
Step 2. Open Donemax Data Eraser, choose Erase Hard Drive mode. Then select the pen drive, click on Erase Now button. It will securely and permanently erase all data from the pen drive.

Choose higher wipe passes for increased security (e.g., government standards use 3-7 passes). Be aware that excessive overwriting can shorten the life of a USB flash drive.
Conclusion
Clearing a pen drive can be as simple as a right-click in Windows or as advanced as wiping sectors with command-line tools. Your method depends on:
- Your operating system
- Whether the pen drive is working or corrupted
- Your privacy/security needs
Recommended Approach:
- For everyday cleanup: Use File Explorer (Windows) or Disk Utility (macOS).
- For stubborn or corrupted drives: Use DiskPart or Terminal.
- For full secure wipe: Use third-party tools or command-line methods.
By following the right method and precautions, you'll ensure your pen drive is clean, functional, and safe from lingering data traces.
Donemax Data Eraser
One of the best data erasure programs for permanently erase data from PC, Mac, HDD, SSD, USB drive, digital camera and other devices. Once the data is erased, it is lost for good, cannot be recovered by any method.
Related Articles
- May 09, 2025System Restore on Windows: A Detailed Guide
- Feb 13, 2025[10 Solutions] Fix USB Flash Drive Not Working on Windows 11/10/8/7
- Apr 01, 2026What is Desktop.ini? Safe to Delete or Virus? (2026 Windows Guide)
- Feb 07, 2025How to Fix Crucial SSD Not Detected/Not Showing Up?
- Mar 13, 2025[5 Fixes] Fix Seagate One Touch SSD Not Showing Up on My Computer
- Oct 27, 2024How to Wipe Recycle Bin on Windows: A Complete Guide

Contributing Writer
Maria
Maria is one of the senior writers & editors of Donemax who lives and works in Sydney, Australia. She loves PC, Mac and Internet Technology. She has 6 years of writing articles about data recovery on PC/Mac, disk cloning solution, data eraser and computer OS optimization, etc. She is also interested in testing various software and digital products.

Editor in chief
Gerhard Chou
In order to effectively solve the problems for our customers, every article and troubleshooting solution published on our website has been strictly tested and practiced. Our editors love researching and using computers and testing software, and are willing to help computer users with their problems