Before we start: Before repairing hard drive partition on Windows 11, it's essential to recover the important data first. You can use Donemax Data Recovery to deeply scan and recover the files before further repairing operations.
PAGE CONTENT:
Have you ever turned on your computer and seen an error message like "Drive Not Accessible" or noticed that some of your files seem missing? These can be signs of a corrupted hard drive partition. Not to worry! Partition issues may sound scary, but they can often be fixed with a few easy steps.
Let's discuss what a partition is, what causes it to become corrupted, and how to repair hard drive partition on Windows 11. There are system built-in and third-party tools introduced in this page.
What is a Hard Drive Partition?
A partition is like a separate storage container within your physical hard drive that acts as its drive. So your whole hard drive may have a total capacity of 500GB, but this might be split up into a 300GB partition for storing documents and photos (usually the C: drive), and a 200GB partition just for games.
🪧 Good to know: Most PCs come from the manufacturer with a single C: drive partition taking up the whole hard drive. Creating additional partitions is optional.
Partitions show up with their drive letters (like C: and D:) in File Explorer. Behind the scenes, partitions have their separate file systems. The main file system used by Windows is NTFS. It organizes and gives structure to how data is saved to your hard drive partition.
Common Partition Corruption Issues
There are a few warning signs that indicate your drive partitions have become corrupted:
- "Drive Not Accessible" or similar errors when trying to open a drive
- Your files or folders going missing
- A partition shows the wrong size in Disk Management
- Constant computer crashes, especially during start up
- Very slow hard drive performance
Corrupted partitions can even stop your PC from booting entirely!
What Causes Partition Corruption?
There are several common causes of partition issues:
- Improperly shutting down your computer: Pulling the power plug or forced restarts can interrupt file operations and leave the file system in an unstable state.
- Power outages: Sudden loss of power has the same effect as an improper shutdown.
- Virus or malware infections: Malicious programs can sometimes directly damage or overwrite partition data.
- Faulty hardware: Issues with cables, connections, the drive itself, or RAM can lead to data errors.
- Bad sectors: Drives can develop damaged sectors that cause corruption.
- File system errors: The NTFS or FAT32 structures may become damaged, resulting in data loss or strange behavior.
4 Methods to Repair Hard Drive Partition on Windows 11
Precautions to Take Before Repairing Your Drive
Before you attempt any repairs, taking some simple precautions can save you headaches down the road:
- Back up important data: Copy important files to external drives, cloud backup services, DVDs, or USB flash drives in case anything goes wrong during the repair process.
- Verify drive letter assignments: Use the Disk Management utility (access it by right-clicking the Start menu and selecting "Disk Management") to check which letters are assigned to each drive and partition. Making a note now will avoid confusion later if the letters change.
- Check drive cable connections: If you have an external hard drive or SSD, ensure all cables are securely plugged into the appropriate ports before starting. Loose connections can cause errors.
Method 1: Using CHKDSK to Detect and Fix File System Errors
One of the easiest ways to fix partition issues is by using the built-in Windows CHKDSK utility. Short for "Check Disk", CHKDSK scans your entire drive to identify and repair logical file system errors, bad sectors, and file corruption.
Here is how to use the CHKDSK command line tool to scan and repair drive errors:
- Press the Win + S to open the search bar. Type "Command Prompt", then right-click on the result and select "Run as administrator".
- In the Command Prompt window, type the following command, replacing "X" with the letter of the drive you want to repair:
chkdsk X: /f /r /x
Here's what each switch does:
- /f - Fixes any errors found
- /r - Locates any bad sectors so they won't be used
- /x - Forces the drive to dismount before scanning
- Press Enter to run the scan. CHKDSK will take some time to complete depending on drive size and errors found. Don't interrupt it!
- If the drive is in use by the operating system, CHKDSK may recommend scheduling the scan for your next reboot. Type "Y" to confirm.
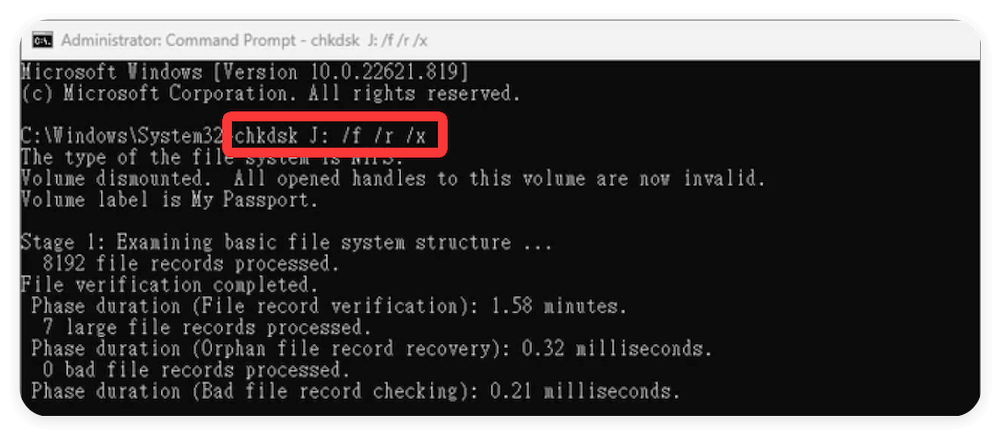
Once finished, CHKDSK will repair any file system errors or bad sectors it can. This should resolve many corruption issues!
🪧 Pro Tip: You can also access CHKDSK via the drive's Properties window. Right click its icon in File Explorer > Properties > Tools tab > Click "Check" button.
Method 2: Using Windows Disk Management Utility
The Windows Disk Management utility features graphical tools to fix partition and file system problems. Access it the same way you would CHKDSK - right-click the Start menu and selecting "Disk Management".
Once open, look around for warning signs like partitions showing as "RAW File System" or "Unallocated space" rather than listing their file system type. These indicate corruption.
You can use Disk Management's tools to resolve many issues:
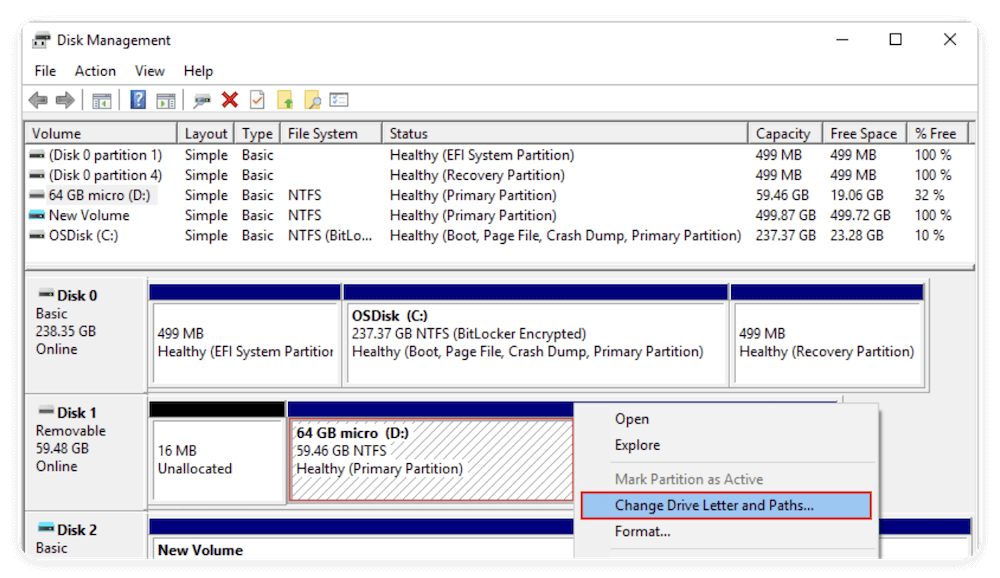
- Change Drive Letter: If a drive isn't showing its usual letter for some reason, you can manually reassign it. Right-click the affected partition > Change Drive Letter and Paths.
![repair hard drive partition on Windows 11]()
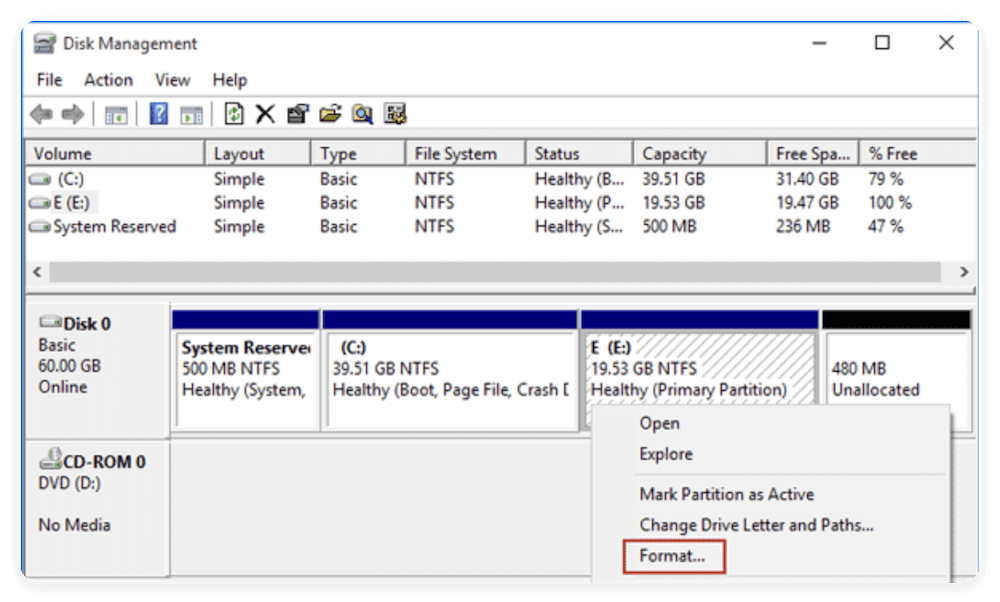
- Format Partition: For badly corrupted partitions, you may need to wipe and reformat the partition (data will be lost!). Right-click it > Format. Before formatting the drive, ensure to recover the important files first.
![repair hard drive partition on Windows 11]()
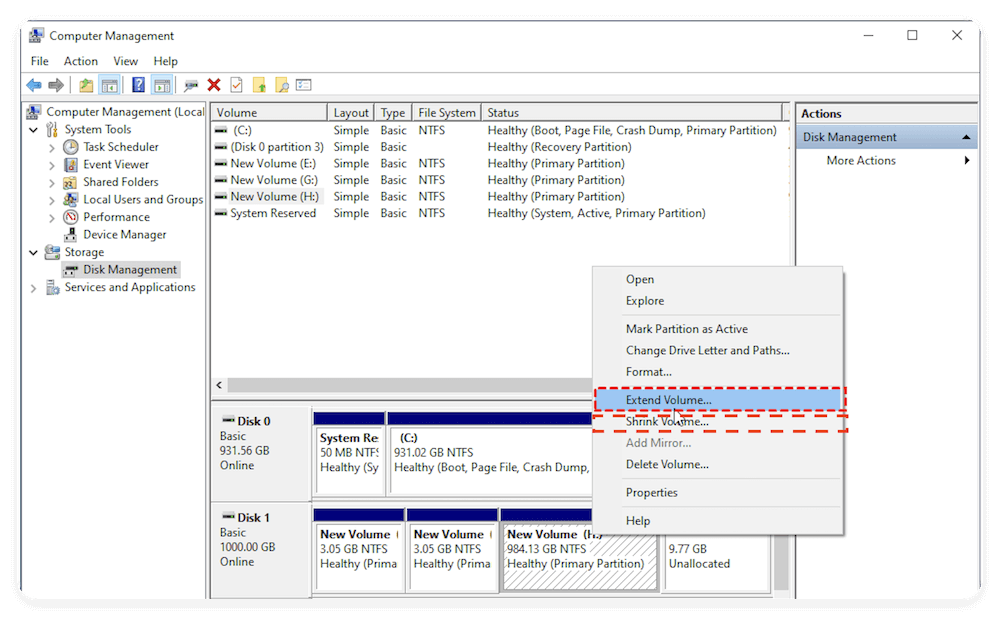
- Extend/Shrink Volume: If you get mismatch errors between partition sizes, use these options to correct it.
![repair hard drive partition on Windows 11]()
Formatting should resolve most significant file system problems that prevent a partition from working properly.
Method 3: Repair using PowerShell Commands
For more advanced users comfortable with some basic command line work, Windows PowerShell provides additional drive repairing tools.
PowerShell requires Administrator access just like Command Prompt. Right-click the Start menu again, but this time open "Windows Terminal (Admin)".
First, run a scan to detect issues:
Repair-Volume -DriveLetter X -Scan
Then instruct PowerShell to fix any problems found:
Repair-Volume -DriveLetter X -OfflineScanAndFix
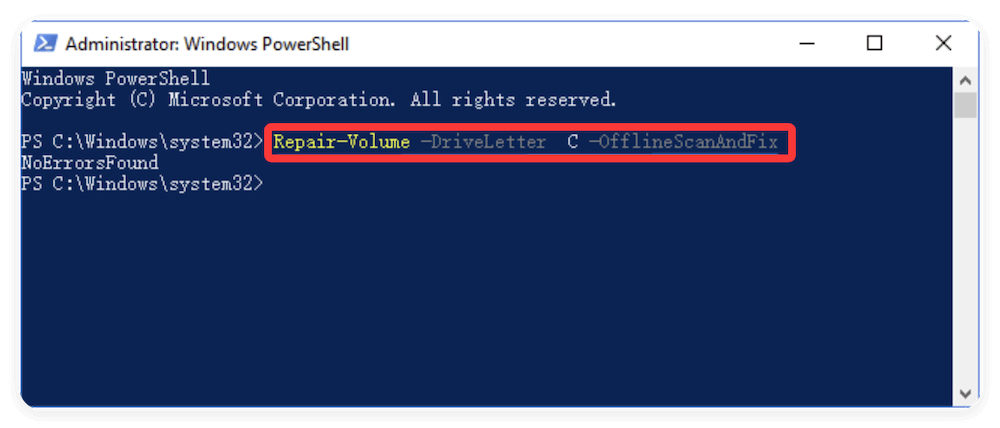
This performs an offline scan before running repairs, which is more comprehensive than the basic CHKDSK scan.
Method 4: Using Third-Party Data Recovery Software
In situations where built-in Windows tools fail to repair partitions, the next step is to try third-party software options specifically designed to recover lost data. Such as the software Donemax Data Recovery.
Donemax Data Recovery
- Most reliable and effective data recovery software.
- Recover data from corrupted or lost hard drive partition.
- 100% safe and easy to recover deleted or lost files.
The best way to recover deleted or lost partitions is using advanced third party data recovery software tools. Here are the general steps:
🪧 Tips: Immediately stop adding any new data to the affected drive to avoid overwriting the lost partition's sectors.
Step 1. Download an advanced partition recovery tool Donemax Data Recovery. Connect the problem hard drive to the computer. Run the software and select the right hard drive from the list.
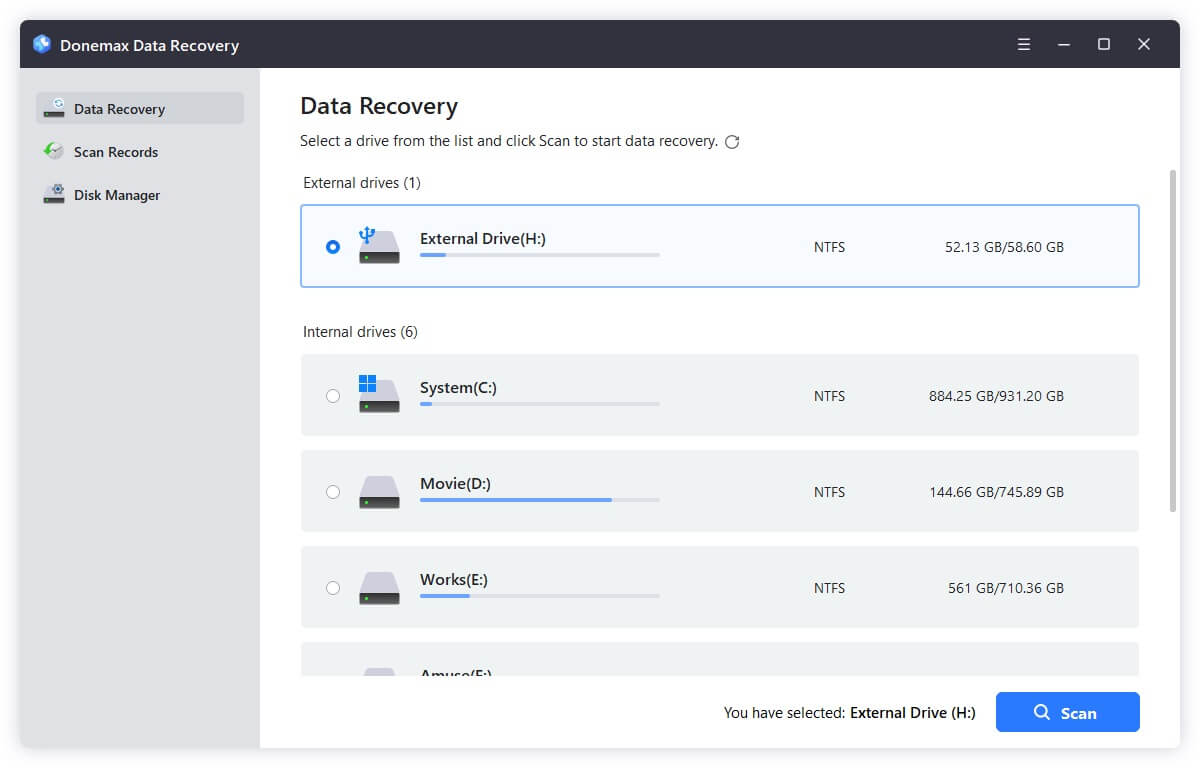
Step 2. Click the Scan button to start scanning. The software will deeply scan the hard drive and analyze the file system to find any possible missing files from the hard drive.

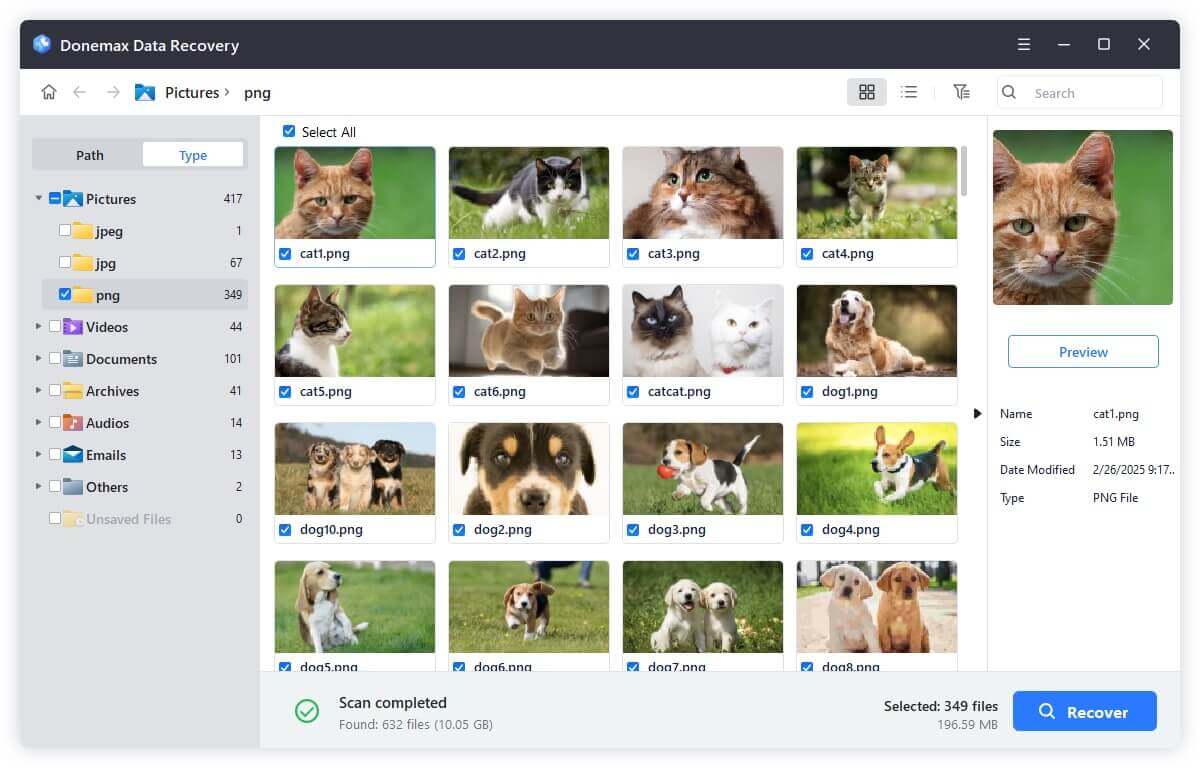
Step 3. After the scanning process is done, check and locate the wanted files. You can preview the files first and then choose the files you want to recover. Click Recover button to save the files to another health drive or partition.
Post-Repair Maintenance Tips
Once you've managed to repair your corrupted partition, here are some maintenance steps to improve long-term health and stability and prevent future data disasters:
- Run SFC and DISM: Use these built-in utilities to scan Windows system files for corruption and restore any missing ones. Helps avoid issues caused by OS file problems.
- Monitor drive health: Download a SMART monitoring tool like CrystalDiskInfo to keep an eye on hardware metrics like reallocated sectors, longevity, and read/write errors. Replace aging drives before failure occurs.
- Defragment HDDs regularly: Use the Optimize Drives utility to defragment hard disk drives, leaving files neatly organized rather than scattered in pieces across the partitions. Not needed for SSDs.
- Install a UPS: Use an uninterruptible power supply (battery backup) to protect your computer from sudden power loss events than can damage partitions.
- Practice safe computing habits: Don't pirate games or software, avoid suspicious websites, don't open strange emailed attachments, and keep Windows and security software updated to minimize malware risk. Safety first!
Quick Partition Corruption Troubleshooting Checklist
If you suddenly experience partition issues, run through this checklist before jumping to conclusions about the cause and extent of the problem:
- Rule out hardware problems - check cables and connections, try a different SATA port
- Scan all partitions with CHKDSK before determining any are corrupted
- Review event viewer system logs for disk errors pointing to a potential source
- Ensure no new programs, updates, or system changes preceded issues
- Backup data and try rebooting then scanning partitions again
- Research error codes / messages to narrow down culprit
Sometimes the problem turns out to be something simple, like a loose cable! But if scans continue revealing file system or partition errors, then it's time to break out the recovery tools covered in this guide.
Let's Recap!
From understanding partition basics to leveraging powerful data recovery software, you now have all the knowledge needed to troubleshoot and repair even seriously corrupted hard drive partitions in Windows 11.
Here are the key takeaways:
- Drive partitioning organizes data into logical sections with separate file systems
- Signs of corruption include inaccessible drives, missing files, and system crashes
- Improper shut downs and faulty hardware often to blame
- Try Windows tools CHKDSK, Disk Management before third party apps
- Use Donemax Data Recovery to recover files from the damaged hard drive partition
- Follow best practices post-repair to maximize drive health


Donemax Data Recovery
Powerful, safe & easy-to-use data recovery software. Easily and completely recover deleted, formatted, or other lost data. The tool supports PC, Mac, HDD, SSD, USB drive, camera, SD card, RAID and other storage devices.
Related Articles
- Nov 18, 2025Format a USB Flash Drive with CMD (Command Prompt)
- Jun 28, 2025Windows Storage Sense: The Ultimate Guide to Automated Disk Cleanup
- May 13, 2025Active Partition Not Found in Windows: Fixing the Issue
- Oct 23, 2024How to Format a Drive to FAT32?
- Feb 21, 2025Can't Format My Memory Card on Windows11/10/8/7? How to Fix It
- Jan 17, 2025Fix Corrupted File System – A Comprehensive Guide

Christina
Christina is the senior editor of Donemax software who has worked in the company for 4+ years. She mainly writes the guides and solutions about data erasure, data transferring, data recovery and disk cloning to help users get the most out of their Windows and Mac. She likes to travel, enjoy country music and play games in her spare time.

Gerhard Chou
In order to effectively solve the problems for our customers, every article and troubleshooting solution published on our website has been strictly tested and practiced. Our editors love researching and using computers and testing software, and are willing to help computer users with their problems
