
Written byStevenUpdated on Jun 03, 2025
Fix Crucial P3 SSD Not Showing Up
Approved byGerhard Chou
PAGE CONTENT:
Crucial P3 SSDs are known for delivering fast speeds and excellent reliability at a competitive price point. Designed using NVMe technology and PCIe Gen3 interfaces, these SSDs are often chosen by gamers, content creators, and everyday users looking to upgrade their systems. However, like any storage device, Crucial P3 SSDs may occasionally fail to show up in your system, either in File Explorer, Disk Management, or BIOS. This issue can be frustrating—especially if you're setting up a new PC or migrating from an older drive.
In this article, we will explore the common causes of the "Crucial P3 SSD not showing up" issue and walk you through step-by-step solutions to fix it, ensuring your drive is properly recognized and fully functional.
Understand the "Crucial P3 SSD not showing up" Issue
Before diving into troubleshooting, it's important to identify how and where the SSD is not showing up. Here are some common scenarios:
✦ SSD not visible in File Explorer but detected in Disk Management: This typically means the drive is uninitialized, unallocated, or doesn't have a drive letter assigned.
✦ SSD not detected in Disk Management: This may be due to driver issues, hardware conflict, or the SSD not being recognized at a hardware level.
✦ SSD not showing in BIOS/UEFI: This usually indicates a hardware connection issue, BIOS settings misconfiguration, or a faulty drive.
Understanding your situation helps narrow down the root cause and select the correct solution.
Causes of Crucial P3 SSD Not Showing Up
Here are the most frequent causes behind this problem:
- Improper installation (loose connection or not fully seated in the M.2 slot).
- Drive not initialized or formatted.
- Outdated or missing NVMe or chipset drivers.
- Motherboard incompatibility or disabled M.2 slot in BIOS.
- Drive failure (although rare for new SSDs).
- Software or OS-related issues.
9 Solutions to Fix Crucial P3 SSD Not Showing Up Issue
Now, let's go through each solution step-by-step.
Solutions 1. Perform Basic Hardware Checks
Before assuming a software issue, start by physically checking your Crucial P3 SSD:
- Turn off the PC and disconnect the power source.
- Open the case and locate the M.2 slot where the SSD is installed.
- Ensure the SSD is firmly inserted into the M.2 socket and secured with a screw.
- If available, try a different M.2 slot or install it in another compatible system to confirm it's not a port issue.
If your Crucial P3 SSD is installed correctly but still not detected, move on to BIOS settings.
Solutions 2. Check BIOS/UEFI Settings
Sometimes the M.2/NVMe interface is disabled in the BIOS, or the system needs a firmware update to support the drive.
- Reboot your computer and press the appropriate key to enter BIOS (usually Del, F2, or Esc).
- Navigate to the Storage Configuration or NVMe Configuration section.
- Look for entries like:
- "M.2 Mode" – ensure it's set to Auto or Enabled.
- "SATA Mode" – set it to AHCI (instead of RAID or IDE).
- If the SSD is not listed, try updating the BIOS to the most recent version found on the website of the motherboard's manufacturer.
If the Crucial P3 SSD is now visible in BIOS but not in Windows, proceed to Disk Management.
Solutions 3. Initialize the Crucial P3 SSD
If your Crucial P3 SSD is physically connected but not appearing in File Explorer, it's likely because the drive hasn't been initialized or formatted. New SSDs often ship in an unallocated state, which means they must be set up with a partition structure before your operating system can use them. Fortunately, initializing an SSD is straightforward using Windows' built-in Disk Management tool.
What Does Initialization Do?
Initialization prepares the SSD for use by writing a partition table to it. You'll be prompted to choose between two partition styles:
- MBR (Master Boot Record): Best for older systems or when using legacy BIOS. Supports drives up to 2 TB.
- GPT (GUID Partition Table): Recommended for modern systems with UEFI. Supports larger drives and is more robust.
Step-by-Step Guide to Initialize Your Crucial P3 SSD:
Step 1: Open Disk Management. Press Windows + X on your keyboard.Select "Disk Management" from the menu. Wait for the utility to load—it might take a few seconds as it scans all connected storage devices.
Step 2: Look for the Crucial P3 SSD. The Crucial SSD should appear in the lower half of the window. It may be labeled as "Disk 1," "Disk 2," etc., and marked as "Unknown" or "Not Initialized." It will also show the space as "Unallocated," indicating that no partition exists yet.
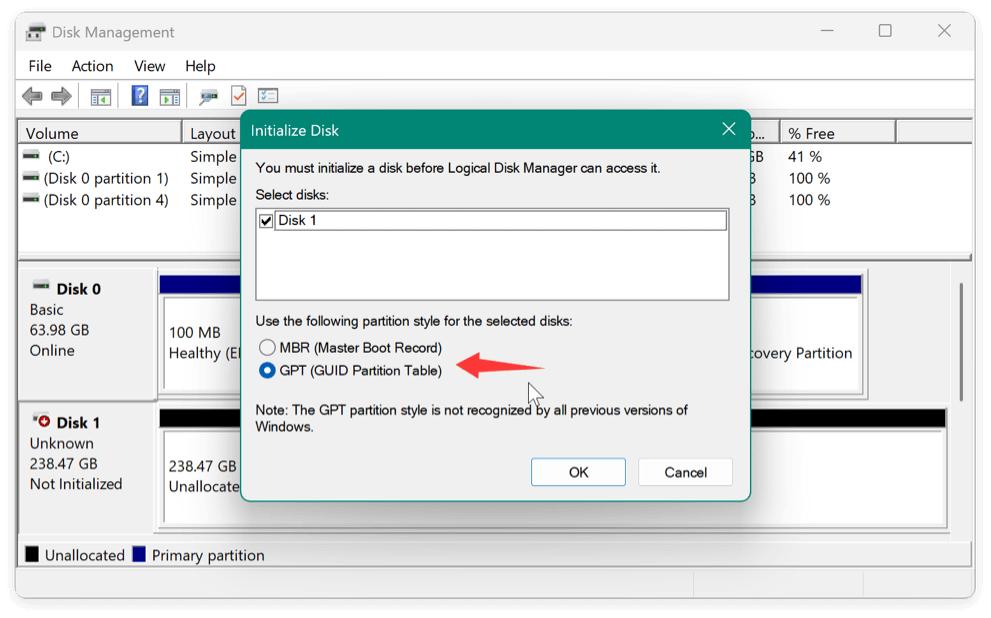
Step 3: Initialize the Disk:
- By clicking right on the "Unknown" disk and select Initialize Disk.
- A pop-up window will ask you to select a partition style: MBR or GPT. Choose GPT if you're using a modern UEFI-based system (most PCs from the last 8–10 years). Otherwise, use MBR for older systems or compatibility. Click OK to proceed.
![Crucial P3 SSD not showing up]()
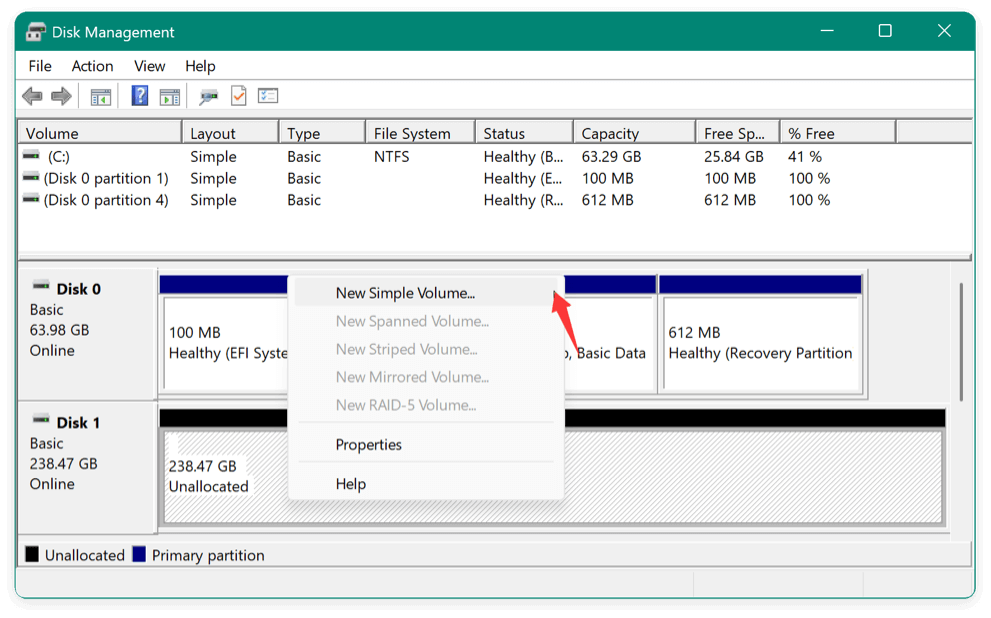
Step 4: Create a New Volume
- After initialization, you'll see the disk as "Online" and "Unallocated." For the New Simple Volume option, right-click the unallocated space.
![Crucial P3 SSD not showing up]()
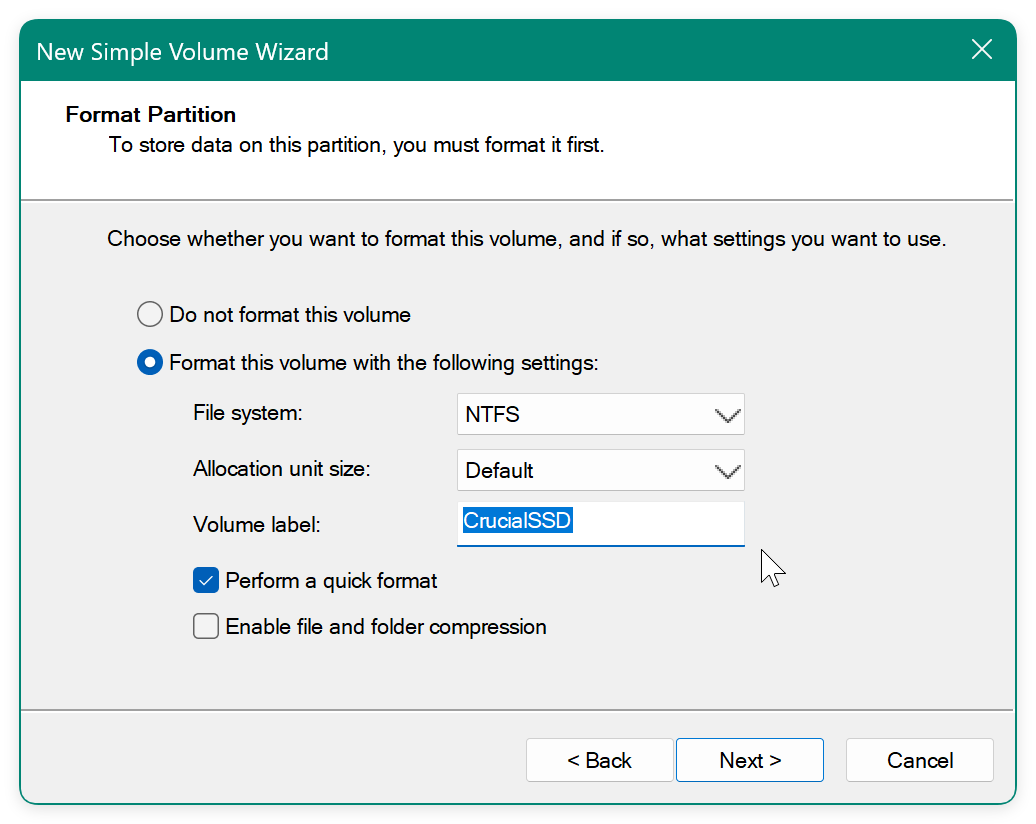
- Follow the New Simple Volume Wizard:
- Choose the size (use full size if you want a single partition).
- Assign a drive letter (like D:, E:, etc.).
- Format the volume (NTFS is the default; you can also use exFAT or FAT32 if needed).
- Give it a name (e.g., "CrucialSSD").
![Crucial P3 SSD not showing up]()
- Click Finish and wait a few seconds. The drive will now appear in File Explorer with the assigned drive letter and name.
Common Errors and Fixes
- Disk not showing in Disk Management: Check BIOS settings or use Device Manager to see if the drive is detected at a hardware level.
- "Access Denied" or "Virtual Disk Manager" errors: Run Disk Management with administrative privileges (right-click on Start > Disk Management > Run as administrator).
- Can't create volume or format: Use the diskpart tool in Command Prompt to clean the disk and retry (detailed in Section 6).
Why Initialization is Safe (But Still Requires Caution)
Initializing a new SSD is safe and does not affect any other drives. However, if the SSD has previously been used and contains data, initializing it will erase all existing partitions and make the data unrecoverable without specialized tools.
In that case, skip initialization and first attempt data recovery using tools like Donemax Data Recovery (see Section 8).
Solutions 4. Update or Reinstall Storage Drivers
Outdated or missing NVMe, chipset, or storage controller drivers can prevent the SSD from being recognized.
Steps to update drivers:
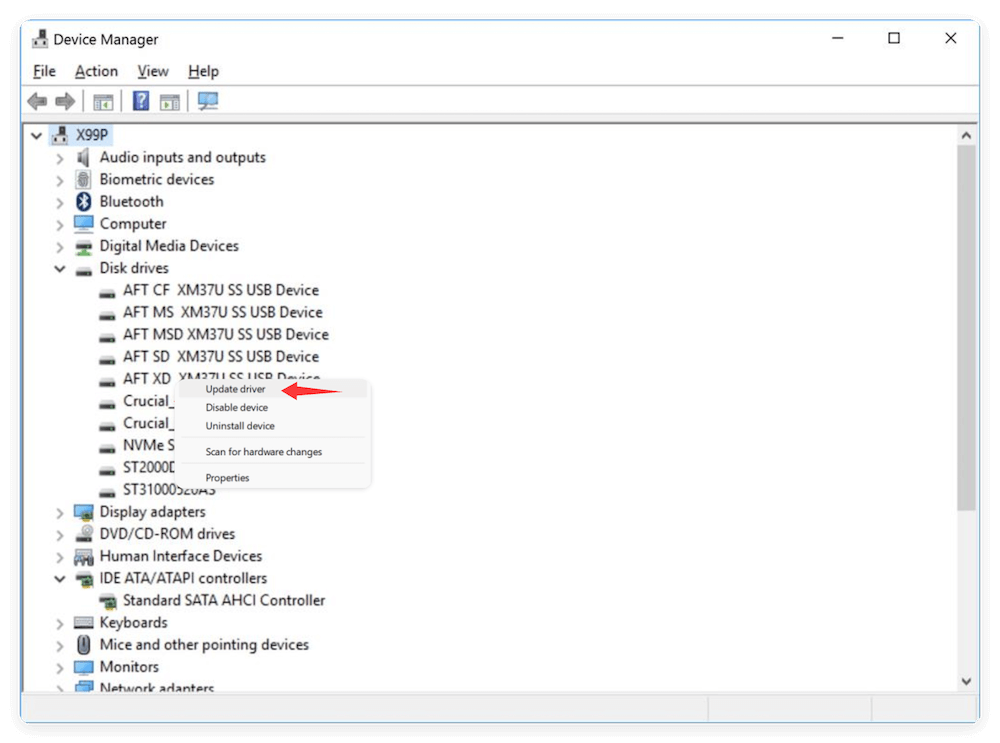
- Using Windows + X, select Device Manager. Expand the Disk Drives sections.
- If your Crucial SSD is listed with a yellow warning symbol:
- Right-click and select Update driver.
![Crucial P3 SSD not showing up]()
- Choose "Search automatically for updated driver software."
- Right-click and select Update driver.
- If no SSD is listed:
- Expand IDE ATA/ATAPI controllers or Storage Controllers.
- Right-click and update the Intel RST or similar storage controller.
- You can also visit your motherboard manufacturer's website to download the latest chipset and NVMe drivers.
After driver updates, restart your PC and check if the SSD appears.
Solutions 5. Use Crucial Storage Executive Software
Crucial offers a tool called "Storage Executive" that can help you detect and manage their SSDs.
Features:
- Detect SSD health status.
- Update firmware.
- Secure erase the drive (if needed).
- View diagnostic information.
Steps:
- Download Crucial Storage Executive from the official website.
- Install and run the tool as an administrator.
- See if the Crucial P3 SSD appears in the interface.
- If available, check for firmware updates and apply them.
![Crucial P3 SSD not showing up]()
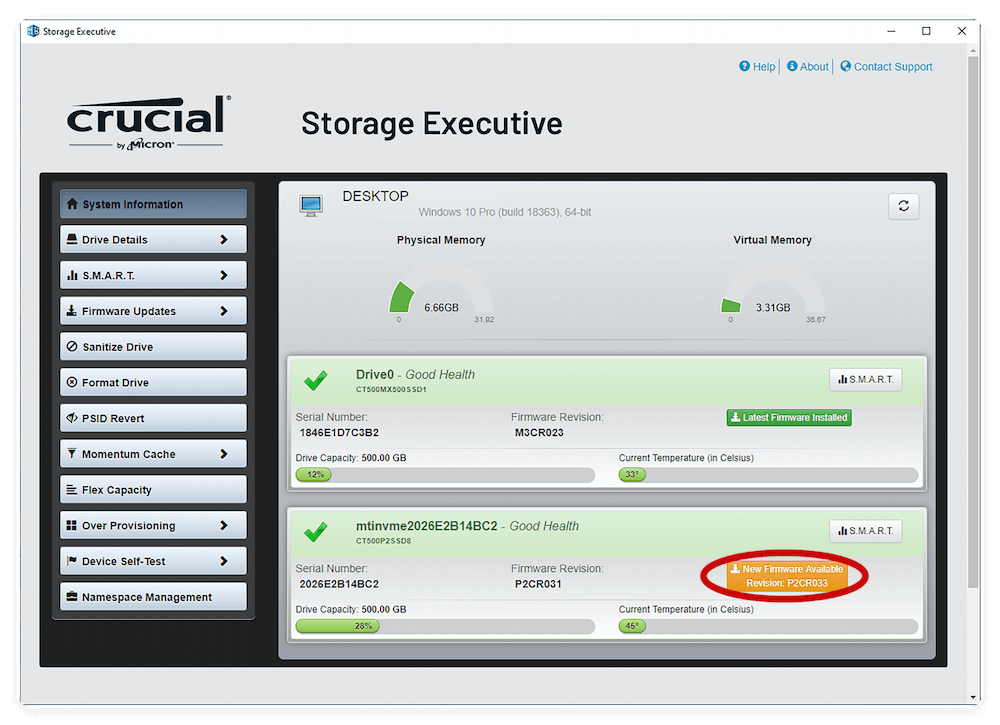
This software can also detect SSDs that Windows does not natively recognize due to driver issues.
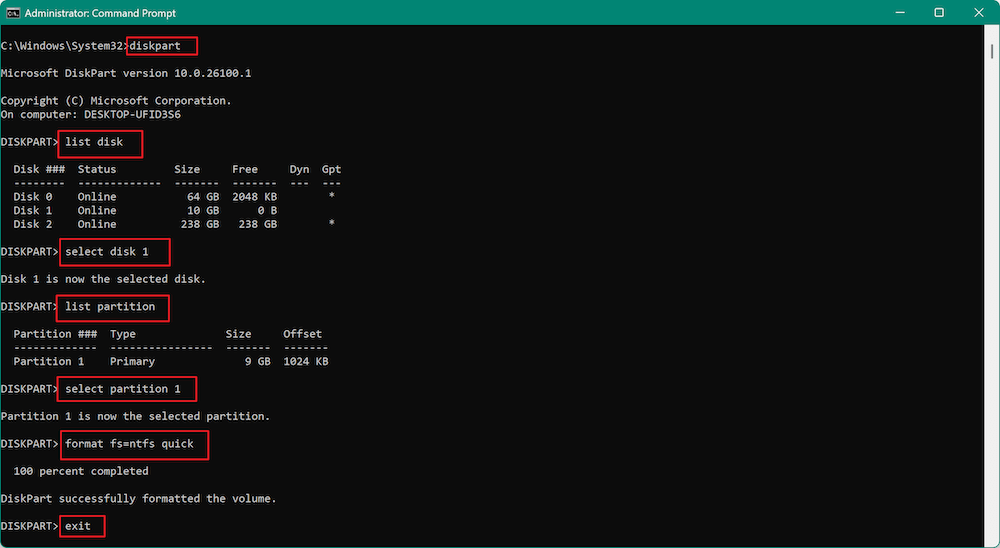
Solutions 6. Use DiskPart to Format and Assign Letter
If Disk Management doesn't help, use DiskPart, a command-line utility for disk management.
Warning: This will erase all data on the drive.
- Press Windows + R, type cmd, and run as administrator.
- Type the below commands:
diskpart
list disk
select disk X (replace X with your Crucial SSD number)
list partition
select partition 1
format fs=ntfs quick
exit![Crucial P3 SSD not showing up]()
- Check File Explorer – your SSD should now be accessible.
Solutions 7. Try on a Different PC or Use Linux
Sometimes the issue might be system-specific. Try inserting the SSD into another PC to check if it's detected.
Alternatively, use a Linux Live USB (like Ubuntu):
- Boot from the Linux USB drive.
- Use the Disks tool or lsblk in Terminal to check SSD detection.
- If Linux detects the drive, the problem is likely Windows-specific.
You can also format the SSD in Linux and then return to your Windows system.
Solutions 8. Recover Data from Crucial P3 SSD (If Applicable)
If your Crucial SSD was previously in use and contained important files, and is now not showing up, consider using data recovery software before formatting or initializing.
To recover data from the Crucial P3 SSD that is not showing up, you can use the recommended tool: Donemax Data Recovery.
Donemax Data Recovery
- Trusted data recovery software for Windows and macOS.
- Support data recovery for memory card, USB drive, HDD/SSD, etc.
- 100% safe and easy-to-use data recovery application.
The software is professional at data recovery in different data loss scenarios. No matter the file system is damaged, partition is lost/formatted, or the files were deleted/missing, there software can easily recover the lost data.
Steps to recover data from Crucial P3 SSD with Donemax Data Recovery:
- Install the recovery software on a different drive. Run the software and select the Crucial P3 SSD from the drive list.
![recover data from Crucial P3 SSD]()
- Let the software scan the SSD for lost files. It may take some time and just wait patiently.
![recover data from Crucial P3 SSD]()
- Preview and recover your data before performing any write operation like formatting.
![recover data from Crucial P3 SSD]()


Solutions 9. Contact Crucial Support or Replace SSD
If none of the solutions work, your Crucial P3 SSD may be defective. Although rare, manufacturing defects can occur.
- Visit Crucial's Support Page.
- Check warranty status by entering your serial number.
- Request RMA (Return Merchandise Authorization) if the drive is under warranty.
Most Crucial SSDs come with a 5-year limited warranty, and customer support is generally responsive.
Conclusion
The Crucial P3 SSD is a powerful and efficient storage solution, but issues like it not showing up can halt productivity and cause concern. Fortunately, in most cases, the problem can be traced to minor issues like improper installation, missing drivers, or a need for initialization.
Recap of Fixes:
- Ensure correct hardware installation.
- Verify BIOS settings and compatibility.
- Initialize the SSD in Disk Management.
- Update NVMe and chipset drivers.
- Use Crucial Storage Executive for diagnostics.
- Try DiskPart or a different OS for testing.
- Recover important data before reformatting.
- Contact Crucial support if hardware failure is suspected.
With these detailed steps, you should be able to get your Crucial P3 SSD up and running quickly. Always remember to back up your data regularly and keep your system drivers up to date to avoid future issues.
Donemax Data Recovery
Powerful, safe & easy-to-use data recovery software to easily and completely recover deleted, formatted, inaccessible and lost data from PC, Mac, HDD, SSD, USB drive, camera, SD card, RAID and other storage devices.
Related Articles
- May 13, 2026Troubleshooting Guide: How to Fix ExFAT Drive Issues on Mac
- Mar 19, 2025Fix Seagate External Hard Drive Format Error: A Complete Guide
- Apr 10, 2025Fix com.apple.DiskManagement.disenter error 0 on Mac
- Feb 12, 2025[6 Solutions] Fix There's a Problem with This Drive Error Without Losing Data
- Feb 18, 2025Fix You Must Initialize a Disk Before Logical Disk Manager Can Access It [5 Solutions]
- Jul 19, 2025Fix SD Card Is Blank or Has Unsupported File System - 7 Proven Solutions

Contributing Writer
Steven
Steven has been a senior writer & editor of Donemax software since 2020. He's a super nerd and can't imagine the life without a computer. Over 6 years of experience of writing technical solutions and software tesing, he is passionate about providing solutions and tips for Windows and Mac users.

Editor in chief
Gerhard Chou
In order to effectively solve the problems for our customers, every article and troubleshooting solution published on our website has been strictly tested and practiced. Our editors love researching and using computers and testing software, and are willing to help computer users with their problems
Hot Donemax Products

Clone hard drive with advanced clone technology or create bootable clone for Windows/Mac OS.

Completely and easily recover deleted, formatted, hidden or lost files from hard drive and external storage device.

Certified data erasure software - permanently erase data before selling or donating your disk or any digital device.