
Written byStevenUpdated on Jul 27, 2025
7 Methods to Fix External Hard Drive Not Showing Up on macOS Tahoe 26
Approved byGerhard Chou
Before we start: Donemax NTFS for Mac is a powerful NTFS for Mac tool. It is fully compatible with macOS Tahoe 26. With this tool, you can quickly mount any NTFS drive on macOS Tahoe 26, allow your Mac write data to any NTFS drive and repair damaged drives. This tool may help fix external hard drive not showing up on macOS Tahoe 26.
PAGE CONTENT:
macOS Tahoe 26 is Apple's latest iteration of the Mac operating system, promising improved performance, enhanced privacy, and seamless integration with Apple hardware. However, despite the upgrades, some users encounter compatibility hiccups - particularly with external storage devices. One of the most frustrating issues is when an external hard drive doesn't show up after connecting it to the Mac.
This article provides a detailed, step-by-step guide to help you fix the issue of an external hard drive (including HDD, SSD, USB drive, SD card) not appearing on macOS Tahoe 26. Whether your drive is not showing up in Finder, Disk Utility, or anywhere at all, the following troubleshooting methods will help you identify and resolve the problem.
Preliminary Checks If the External Hard Drive Not Appearing on macOS Tahoe
1. Inspect USB or Thunderbolt Connection
The most common reason your drive isn't showing up is a faulty cable or port. Before diving into macOS settings, make sure to:
- Try another USB/Thunderbolt port on your Mac.
- Use a different USB-C or USB-A cable if available.
- Confirm that the external drive powers on (check for LED indicators or vibration).
If the drive doesn't respond, try it on a different Mac or even a Windows PC to rule out physical failure.
2. Verify Drive Compatibility
macOS supports file systems such as APFS, HFS+, exFAT, and FAT32. Drives formatted in NTFS, however, will be read-only or may not be recognized at all, especially if the NTFS file system is damaged.
To check:
- Plug the drive into a Windows PC. If it works there, macOS may have trouble reading it.
- Consider using NTFS support software like Donemax NTFS for Mac.
3. Test the Drive on Another Computer
If the drive doesn't mount on other systems, it might be physically damaged or corrupted. Use another device to verify whether it's a macOS issue or a hardware fault.
Fix External Hard Drive Not Showing Up on macOS Tahoe [7 Fixes]
Fix 1. Check Disk Utility
macOS may recognize the drive but fail to mount it automatically.
1. Open Disk Utility
- Go to Disk Utility from Utilities via Applications.
![Fix External Hard Drive Not Showing Up on macOS Tahoe 26]()
- Look in the sidebar for your external drive.
- If it's grayed out, it's recognized but not mounted.
- If it's not listed at all, move to Fix 5 (Terminal Fixes).

2. Manually Mount the Drive
- Select the external drive in Disk Utility.
- Click the Mount button at the top.
![Fix External Hard Drive Not Showing Up on macOS Tahoe 26]()
- If it mounts successfully, it will appear on your desktop or Finder sidebar.

Fix 2. Show External Drives in Finder/Desktop
macOS may recognize the drive but not display it due to hidden Finder preferences.
1. Show in Finder
- Open Finder.
![Fix External Hard Drive Not Showing Up on macOS Tahoe 26]()
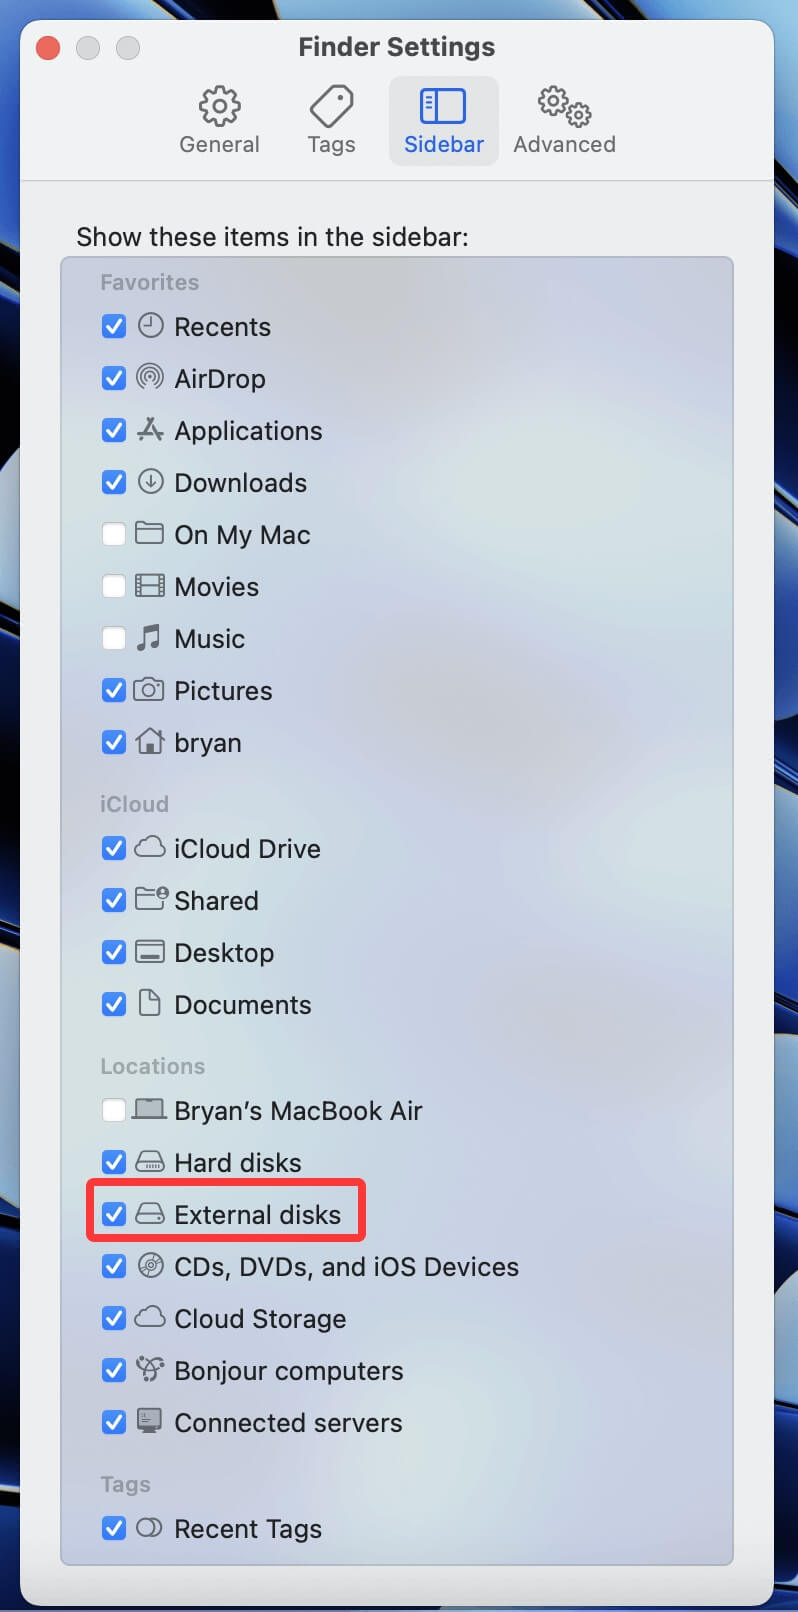
- Go to Finder > Settings > Sidebar.
- Check the box next to External disks.
![Fix External Hard Drive Not Showing Up on macOS Tahoe 26]()

2. Show on Desktop
- Go to Finder > Settings > General.
- Enable the checkbox next to External disks under "Show these items on the desktop."
![Fix External Hard Drive Not Showing Up on macOS Tahoe 26]()

After these changes, your drive should appear if it's mounted.
Fix 3. Repair Drive Using Disk Utility First Aid
If the disk appears in Disk Utility but can't be mounted, it may be corrupted.
1. Run First Aid
- In Disk Utility, select the external drive.
- Click First Aid > Run.
![Fix External Hard Drive Not Showing Up on macOS Tahoe 26]()
- macOS will check for and attempt to repair disk errors.

2. If First Aid Fails
- Note the error message.
- Consider using recovery software or reformatting (see Fix 7).
Fix 4. Reset macOS System Settings
Resetting PRAM/NVRAM or SMC can resolve hardware detection issues, especially on Intel-based Macs.
1. Reset NVRAM/PRAM
- Turn Off your Mac.
- Holding Option + Command + P + R, turn it back on.
- Hold for roughly 20 seconds, or until the logo or system chimes show up.
2. Reset SMC (Only for Intel Macs)
- Turn Off the Mac.
- For ten seconds, hold down Shift + Control + Option + Power.
- Turn on and release as usual.
For Apple Silicon (M-chip) Macs, these resets are not necessary - just restart the Mac.
Fix 5. Terminal Fixes for Advanced Users
For users who are comfortable using Terminal, the command-line interface offers powerful tools to check the status of drives, force-mount them, and gather detailed diagnostics that Disk Utility might not expose. This section walks through advanced steps to detect, mount, and troubleshoot external drives using Terminal in macOS Tahoe 26.
1. Use diskutil list
The diskutil command provides detailed information about all storage devices connected to your Mac.
- Open Terminal from Utilities via Applications.
![Fix External Hard Drive Not Showing Up on macOS Tahoe 26]()
- Type:
diskutil list
![Fix External Hard Drive Not Showing Up on macOS Tahoe 26]()
- Look for your external drive in the list (e.g., /dev/disk5).

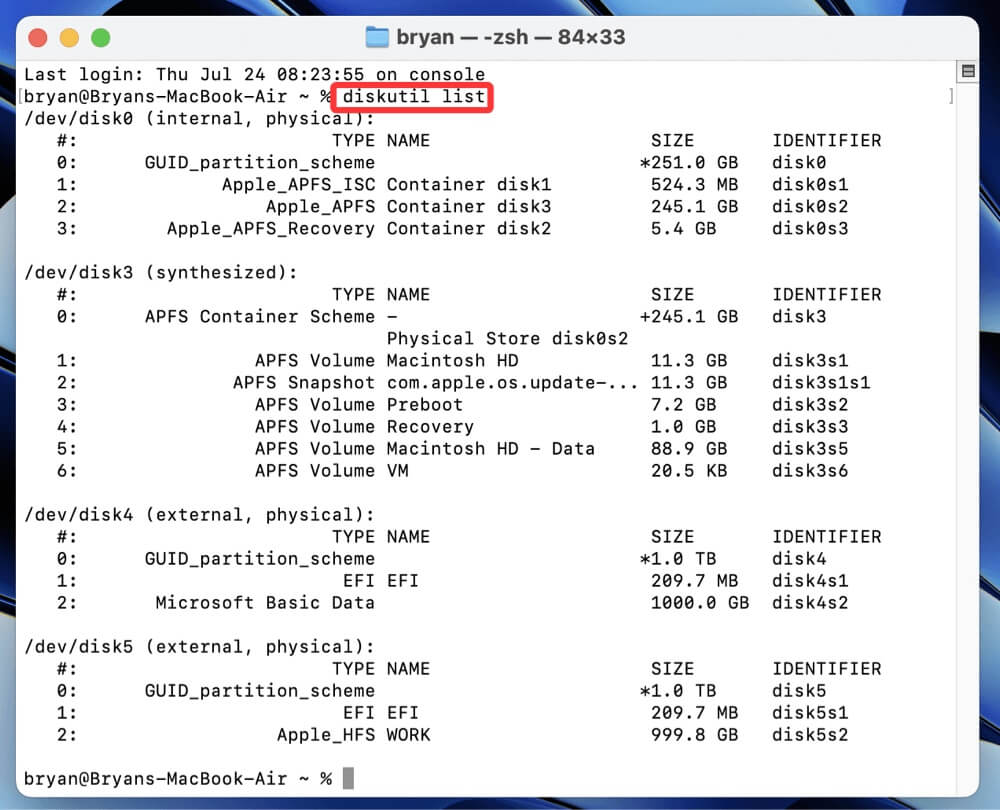
What You'll See:
A list of all drives and their partitions will appear, with identifiers like /dev/disk1.../dev/disk5, etc. Look for your external drive based on:
- Size of the disk
- Partition type (e.g., Microsoft Basic Data, EFI, Apple_APFS, etc.)
- Volume names you recognize
If the disk appears here but not in Finder or Disk Utility, it confirms macOS detects the hardware but hasn't mounted it.
2. Mount the Drive Manually
If your drive is listed but isn't mounted, you can manually attempt to mount it.
Steps:
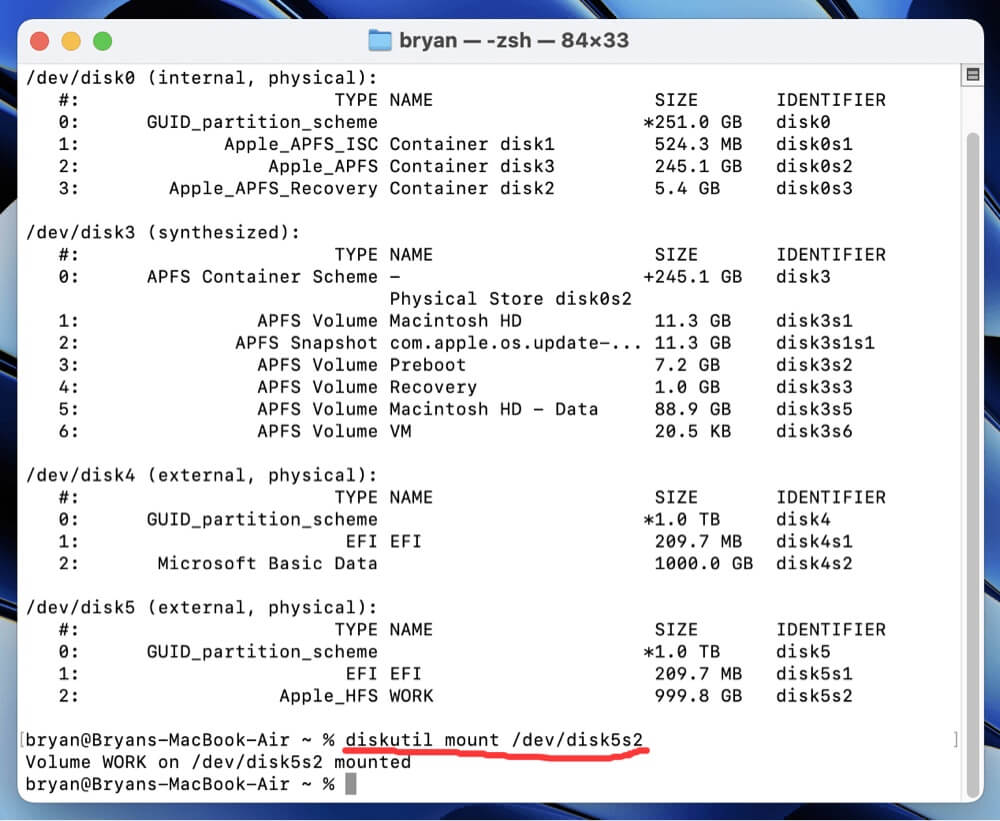
- First, locate the identifier of your disk from the output in the previous step, such as /dev/disk5s2.
- Use this command to mount the specific volume:
diskutil mount /dev/disk5s2
![Fix External Hard Drive Not Showing Up on macOS Tahoe 26]()
Replace disk5s2 with your actual identifier.
- If successful, you’ll get a message like:
Volume XYZ on disk2s1 mounted
- You should now see the drive in Finder or on the Desktop (if Settings allow).
What If It Fails?
You might see an error such as:
- "Volume on disk2s1 failed to mount"
- "No mountable file systems"
This could indicate:
- File system corruption
- Unsupported or damaged partition format
- A need to use fsck or consider formatting
3. Use diskutil info for Detailed Drive Information
This command gives you a full breakdown of a disk's properties.
diskutil info /dev/disk5

Pay attention to:
- File System (e.g., APFS, ExFAT, NTFS)
- Mounted: Yes or No
- Read-Only: Yes or No
- SMART Status (for internal or supported external drives)
This helps confirm whether the drive is mountable, readable, or experiencing hardware failure.
4. Check Disk for Errors with fsck
You can run a file system consistency check to attempt to repair issues preventing mounting. Use this only if the disk is unmounted, or you risk damaging mounted volumes.
Steps:
- First, unmount the disk if it isn't already:
diskutil unmountDisk /dev/disk5
- Run fsck (File System Consistency Check):
sudo fsck_exfat -y /dev/disk5s2
or, for HFS+/APFS:
sudo fsck_hfs -fy /dev/disk5s2
- Let the check complete. If fsck reports "File system was modified," rerun the command until it reports "The volume appears to be OK."
💡 Note:
- Use fsck_exfat for exFAT drives
- Use fsck_hfs for HFS+ formatted drives
- There's no native fsck tool for APFS (Apple File System); repairs for APFS must be done through Disk Utility or Third-party tools
Fix 6. Inspect System Information
System Information can help determine whether the Mac is detecting the hardware connection.
1. Check USB/Thunderbolt Bus
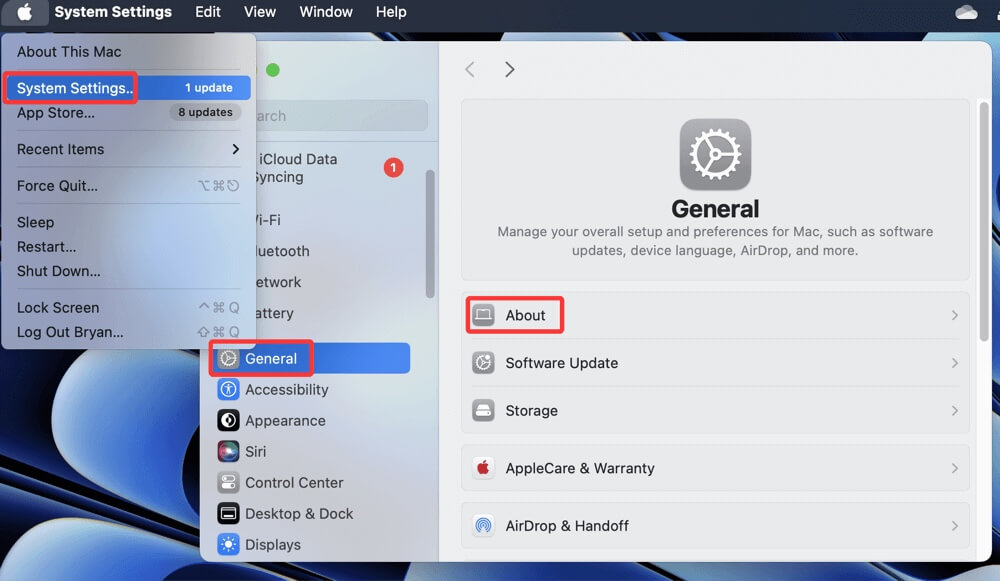
- Go to Apple Menu > System Settings > General > About.
![Fix External Hard Drive Not Showing Up on macOS Tahoe 26]()
- Scroll down and click System Report.
![Fix External Hard Drive Not Showing Up on macOS Tahoe 26]()
- Select USB or Thunderbolt in the sidebar.
![Fix External Hard Drive Not Showing Up on macOS Tahoe 26]()
- Look for the external drive in the list.


If it's listed here but not elsewhere, the issue is likely with the filesystem or driver, not the connection.
Fix 7. Format the Drive (If Data Is Not Important)
If the drive is visible but inaccessible and you don't need the data, reformatting may solve the problem.
1. Back Up First
If the drive contains important data, attempt recovery first (see Fix 8).
2. Format Using Disk Utility
- Open Disk Utility.
- Select your external drive.
- Click Erase.
![Fix External Hard Drive Not Showing Up on macOS Tahoe 26]()
- Choose:
- Name: Choose any
- Format: APFS (for Macs only) or exFAT (cross-platform)
- Scheme: GUID Partition Map

Click Erase, and the drive will be reformatted.

Recover Data Before or After Formatting (Optional Step)
If your data is important and you can't access the drive, use a data recovery tool.
Donemax Data Recovery for Mac is a powerful data recovery application. It can securely and completely recover lost data from an unmounted external hard drive or reformatted external hard drive on Mac.
Step 1. Download and install Donemax Data Recovery for Mac, ensure the external hard drive is connected to the same Mac.
Step 2. Open Donemax Data Recovery for Mac, choose the external hard drive to start data recovery.

Step 3. Click on Scan button to deeply scan the formatted or unmounted external hard drive.

Step 4. After scanning, you can preview all recoverable files. Then select the wanted files, click on Recover button to save them.

Fix 8. Use NTFS for Mac Tool
If the external hard drive has been pre-formatted to NTFS file system, it may not appear on macOS Tahoe. Third-party NTFS for Mac tool can quickly solve this problem and allow your Mac to write data to any NTFS drive without any limitation.
Step 1. Download and install Donemax NTFS for Mac.
Step 2. Open Donemax NTFS for Mac, then select the NTFS disk, click on Mount button.
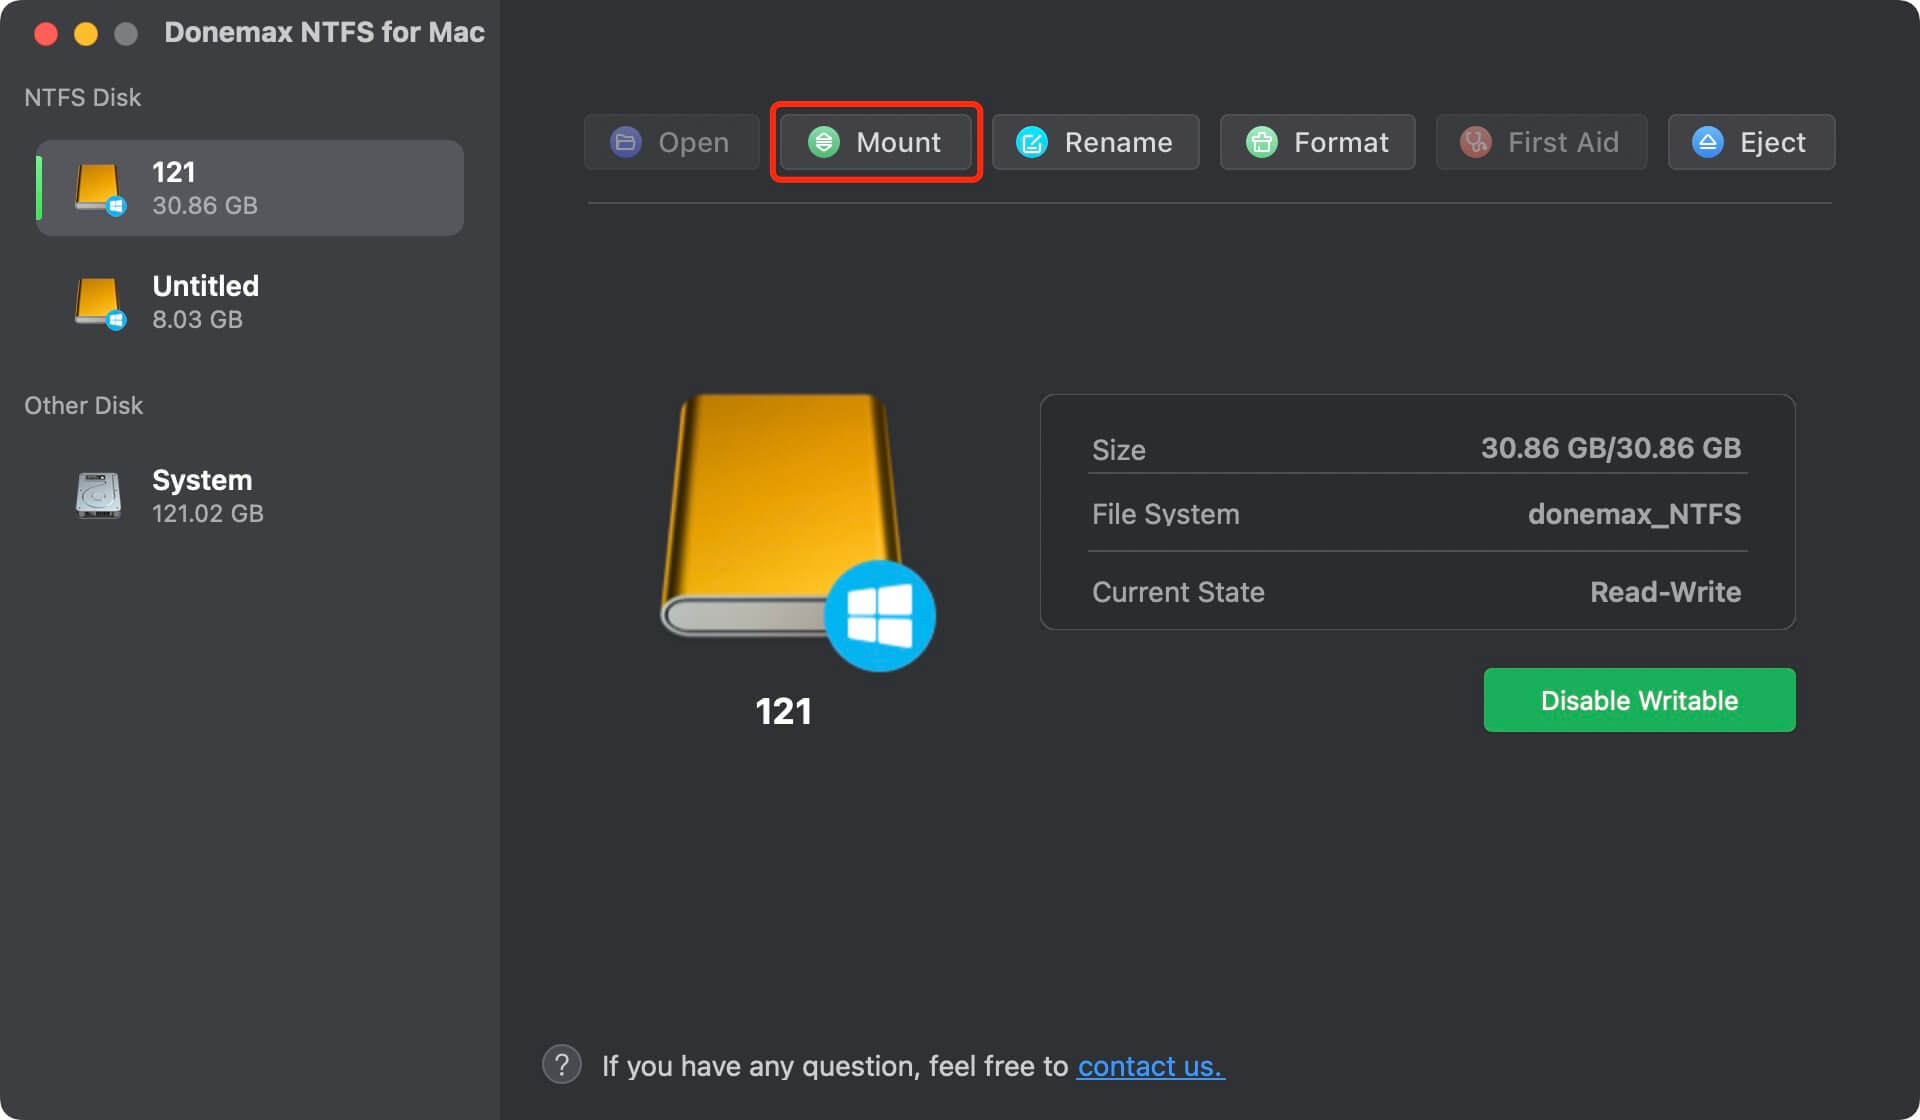
Step 3. Click on Enable Writable button to add NTFS read-write support to macOS Tahoe.

Keep External Drives Working Properly on macOS Tahoe 26
Once your issue is resolved, use the following practices to avoid recurrence:
1. Always Eject Safely
- Right-click the drive and choose Eject.
- Prevents filesystem corruption.
2. Avoid Sleep Mode While Writing
- Don't let your Mac sleep while large file transfers are happening.
3. Keep Software Updated
- macOS updates often fix hardware and filesystem bugs.
- Check for updates via System Settings > General > Software Update.
4. Use Compatible File Systems
- Use APFS or HFS+ for macOS-only use.
- Use ExFAT for cross-platform compatibility (Windows and macOS).
Conclusion
If your external hard drive isn't showing up on macOS Tahoe 26, don't panic - there are multiple reasons for this, and most of them are fixable without needing professional help. Start with basic physical checks, confirm compatibility, then move to software-level diagnostics through Disk Utility and Terminal.
If the disk appears in Disk Utility, try mounting it manually or using First Aid. If it's completely undetected, inspect System Report and reset your Mac's PRAM/SMC. As a last resort, you can reformat the disk or recover your data using third-party software.
By following these structured steps, you'll have the best chance at fixing the issue and restoring full access to your external drive on macOS Tahoe 26.
Related Articles
- Feb 19, 2025Fix The Parameter is Incorrect Without Losing Data
- Mar 12, 2024External Hard Drive Not Mounting on Mac mini, What to Do?
- Jan 16, 20262026 Top 5 Methods to Format USB Flash Drive
- Jun 30, 2025How to Delete Backup Disk in Time Machine?
- Jan 08, 2024How to Format or Unformat Crucial X10 Pro Portable SSD on Windows/macOS?
- Nov 25, 2024External Hard Drive Not Working on macOS Sonoma: Causes and Fixes

Contributing Writer
Steven
Steven has been a senior writer & editor of Donemax software since 2020. He's a super nerd and can't imagine the life without a computer. Over 6 years of experience of writing technical solutions and software tesing, he is passionate about providing solutions and tips for Windows and Mac users.

Editor in chief
Gerhard Chou
In order to effectively solve the problems for our customers, every article and troubleshooting solution published on our website has been strictly tested and practiced. Our editors love researching and using computers and testing software, and are willing to help computer users with their problems