Written byCharlesUpdated on Jul 27, 2025
6 Methods to Fix External Hard Drive Not Mounting on macOS Tahoe 26
Approved byGerhard Chou
Before we start: Your external hard drive not mounting on new macOS Tahoe 26? Don't worry, just mount it via Disk Utility or Terminal. If the external hard drive is an NTFS drive, just install an NTFS driver - such as Donemax NTFS for Mac on your Mac. It can quickly mount the NTFS external hard drive on macOS Tahoe and allow you write data to the drive without any limitation.
PAGE CONTENT:
- Why External Drives Fail to Mount on macOS Tahoe 26?
- Recover Files from Unmounted External Hard Drive on macOS Tahoe 26
- 6 Methods to Fix External Hard Drive Not Mounting on macOS Tahoe 26
- Prevent Mounting Issues in the Future on macOS Tahoe
- Conclusion
- FAQs About Repairing and Mounting External Hard Drive on macOS Tahoe 26
An external hard drive that won't mount on macOS Tahoe 26 can instantly disrupt your workflow - especially if it contains important files, backups, or creative work. While macOS is known for its robust disk management, mounting issues can arise due to hardware malfunctions, software incompatibilities, or file system corruption.
In this guide, we'll walk you through a comprehensive series of steps - from basic checks to advanced recovery tools - to help you diagnose the problem and get your external drive working again on macOS Tahoe 26.
Why External Drives Fail to Mount on macOS Tahoe 26?
macOS "mounts" external storage when it recognizes and assigns it a location in Finder, enabling you to interact with it. If your external hard drive doesn't mount, you may be facing one of the following:
- Faulty USB cables or ports
- Power issues with the drive
- File system errors or corruption
- Format incompatibility (e.g., NTFS on macOS)
- Software bugs or permission changes in macOS Tahoe 26
Basic Checks Before Diving Deep
Before you go into disk repair or Terminal commands, it's best to rule out common physical issues:
1. Try Different USB Ports and Cables
- Connect the drive to another USB port.
- Swap the cable with a known working one.
- If using a USB-C hub or adapter, try a direct port or different hub.
2. Test the Drive on Another Computer
- Plug the drive into a different Mac or even a Windows PC.
- If it shows up elsewhere, the issue may be macOS-specific.
3. Check Drive Power Supply
- Some 3.5-inch drives require an external power source. Ensure the adapter is connected and functional.
Recover Files from Unmounted External Hard Drive on macOS Tahoe 26
It is highly recommended to back up or recover files before fixing external hard drive not mounting on macOS Tahoe 26. If you can't manually copy files from the external hard drive to another drive, you can use Mac data recovery software - such as Donemax Data Recovery for Mac to recover the files.
Step 1. Download and install Donemax Data Recovery for Mac and connect the external hard drive to the same Mac.
Step 2. Open Donemax Data Recovery for Mac, then select the external hard drive to start data recovery.

Step 3. Click on Scan button to deeply scan the external hard drive and find all recoverable files including existing files, inaccessible files, deleted files, formatted/lost files, etc.

Step 4. After scanning, you can preview all recoverable files. Then select the wanted files, click on Recover button. Choose a safe location to save the recovered files.

Donemax Data Recovery for Mac also can help:
- Recover permanently deleted files from the external hard drive.
- Recover lost files from an formatted external hard drive.
- Repair corrupted external hard drive on Mac.
6 Methods to Fix External Hard Drive Not Mounting on macOS Tahoe 26
Fix 1. Check Disk Utility for Drive Visibility
Disk Utility is your first stop in macOS to inspect connected disks:
Steps to Access Disk Utility:
- Go to Finder > Applications > Utilities > Disk Utility.
![mount NTFS drive on macOS Tahoe 26]()
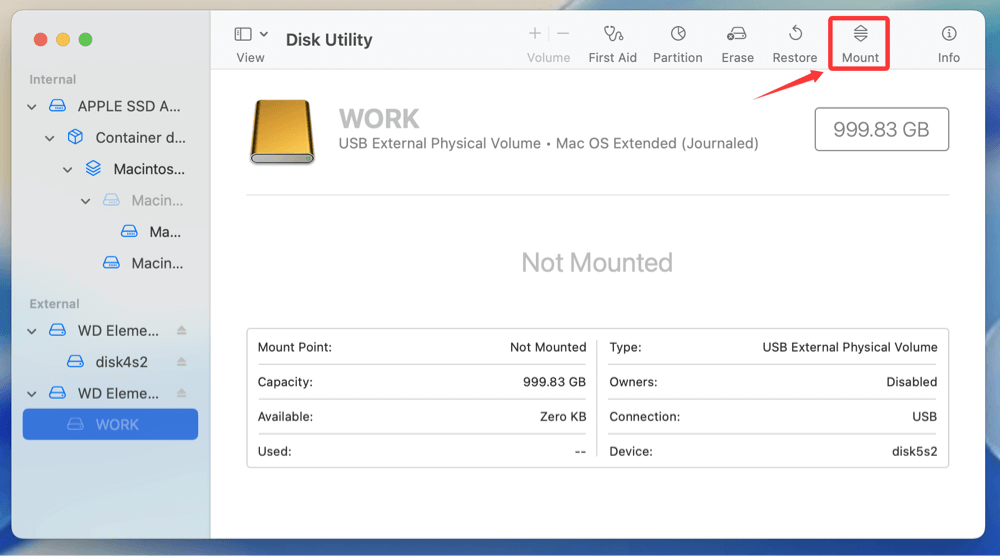
- Check the sidebar for your external drive.

Scenarios:
- Drive shows but is grayed out: It's detected but unmounted - try selecting it and clicking "Mount".
![mount NTFS drive on macOS Tahoe 26]()
- Drive doesn't appear: Proceed to Terminal or hardware diagnostics.
Fix 2. Run First Aid in Disk Utility
Disk Utility includes a First Aid tool to check and repair file system issues.
Steps:
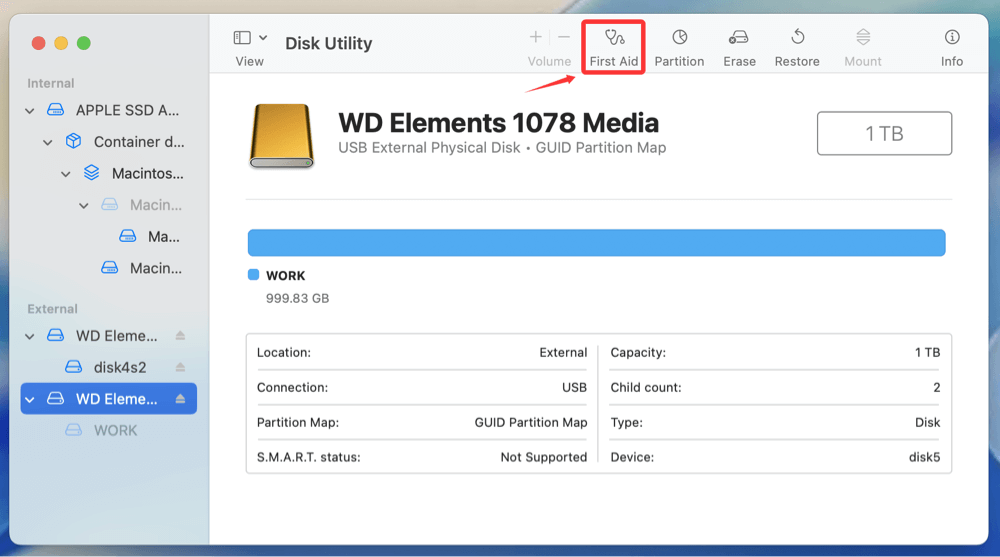
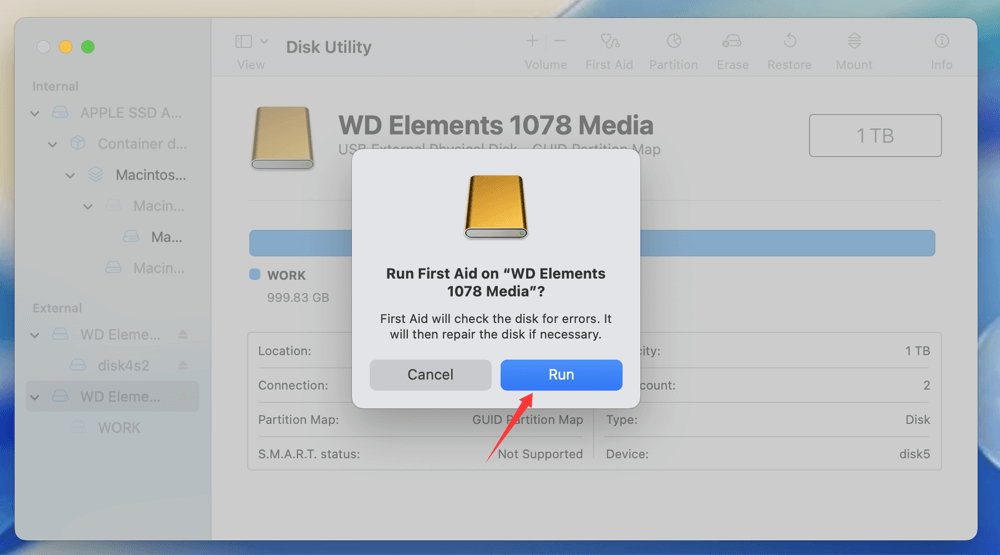
- Open Disk Utility and select the external drive.
- Click First Aid and confirm.
![mount NTFS drive on macOS Tahoe 26]()
- Wait for the check to complete.
![mount NTFS drive on macOS Tahoe 26]()
Interpretation:
- "The volume appears to be OK" → likely a mount permission issue.
- "Errors found and repaired" → retry mounting.
- "Cannot repair the disk" → may require data recovery or reformat.
Fix 3. Use Terminal to Manually Mount the Drive
While Disk Utility offers a graphical interface for managing drives, it may not always detect or mount problematic volumes - especially if the drive has file system inconsistencies or macOS doesn't assign it a mount point automatically. In such cases, macOS Terminal becomes an essential tool for advanced troubleshooting.
Here's how to use Terminal to manually inspect and attempt to mount an external hard drive on macOS Tahoe 26.
1. View Disk List
Open Terminal and type:
diskutil list
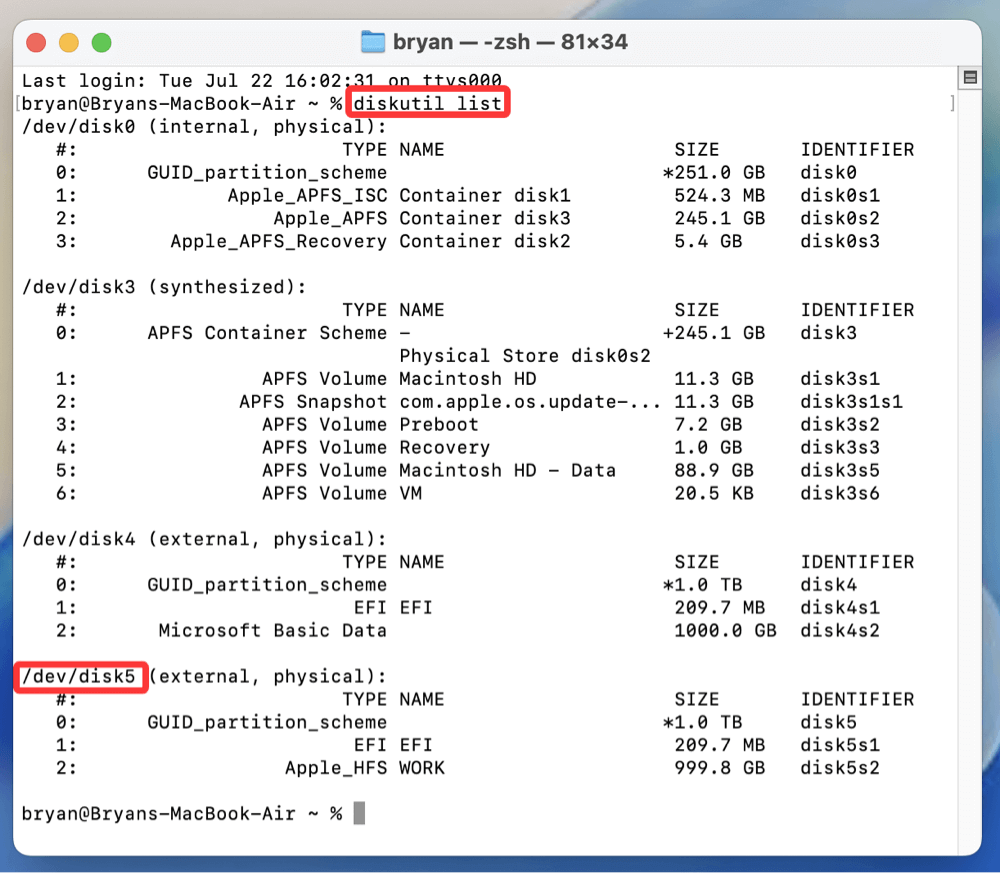
Identify your external drive by size or label (e.g., /dev/disk5).
2. Mount the Drive Manually
diskutil mount /dev/diskX

(Replace diskX with your drive's actual identifier)
If it mounts successfully, it should appear in Finder.
3. Repair via Terminal
You can also attempt a repair:
diskutil repairVolume /dev/diskX

4. Try Forcing the Mount Process (Advanced)
If mounting with diskutil doesn't work, you can try mounting manually by creating a mount point:
- Create a mount directory:
sudo mkdir /Volumes/MyExternalDrive
- Mount the drive manually (assuming it's formatted as HFS+):
sudo mount -t hfs /dev/disk2s1 /Volumes/MyExternalDrive
💡 Note: Replace hfs with the appropriate file system type:
- apfs for APFS-formatted drives
- msdos for FAT32
- exfat for exFAT
- ntfs (requires additional drivers for write support)
If successful, the disk will be accessible via the specified folder.
5. Unmount and Remount the Drive
Sometimes unmounting and remounting helps resolve stuck volumes:
sudo diskutil unmountDisk /dev/disk5
sudo diskutil mountDisk /dev/disk5
- unmountDisk detaches all volumes on the physical disk
- mountDisk attempts to reinitialize and mount all available partitions
This is especially useful when macOS has inconsistently mounted partitions.
6. View System Log for Mounting Errors
To troubleshoot further, you can check macOS logs for mounting errors:
log show --predicate 'eventMessage contains "disk"' --info --last 1h
Look for messages such as:
- "Disk arbitration failed"
- "Could not mount disk because…"
These can point you toward file system corruption, driver conflicts, or kernel permission issues.
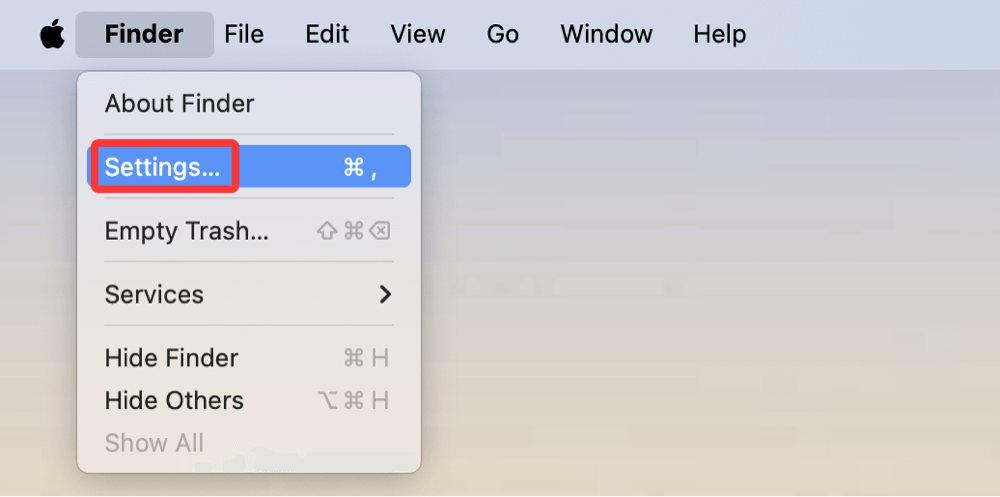
Fix 4. Check Finder Settings
Your drive might be mounted but not visible in Finder due to settings.
Steps:
- Open Finder > Settings (Preferences).
![mount NTFS drive on macOS Tahoe 26]()
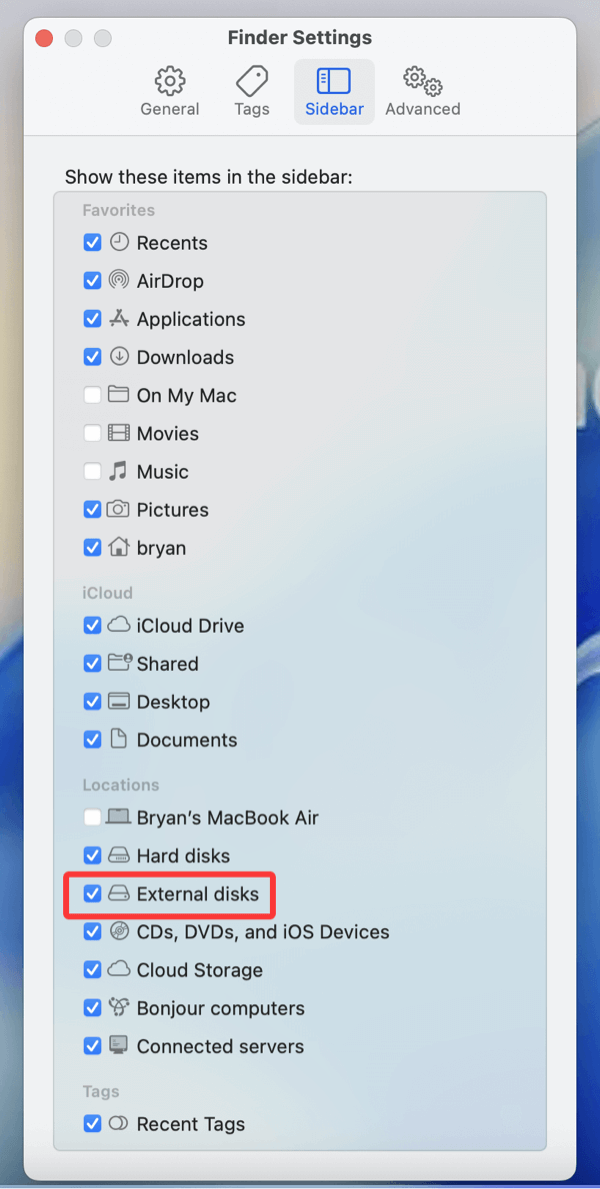
- Go to the Sidebar tab and ensure External Disks is checked.
![mount NTFS drive on macOS Tahoe 26]()
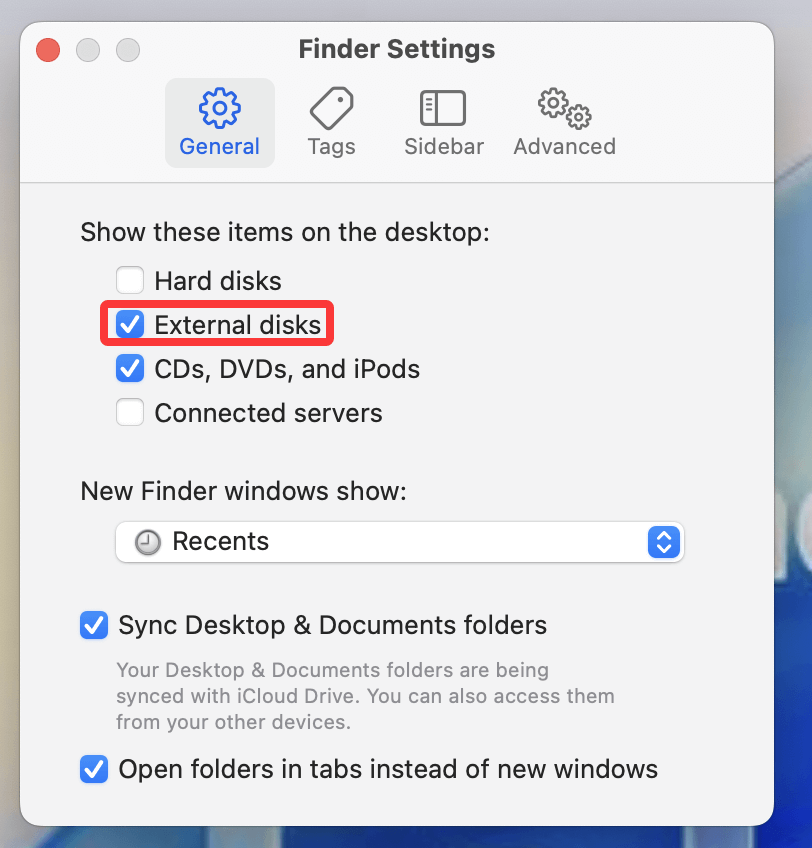
- Also check "External disks" under the General tab to make it show on the desktop.
![mount NTFS drive on macOS Tahoe 26]()
Fix 5. Address Known Issues in macOS Tahoe 26
macOS Tahoe 26 has introduced several new privacy and USB device handling updates that could interfere with drive mounting.
1. Update macOS
Go to System Settings > General > Software Update
Install any pending updates or security patches.
2. Reset SMC and NVRAM
Sometimes, resetting system memory helps resolve I/O and USB issues.
To reset NVRAM:
- Turn off your Mac.
- Turn it on and immediately press and hold: Option + Command + P + R
- Hold for ~20 seconds, then release.
To reset SMC (for Intel Macs):
- Shut down > Hold Shift + Control + Option + Power for 10 seconds > Release and power on.
💡 Note: Apple Silicon Macs reset SMC automatically on reboot.
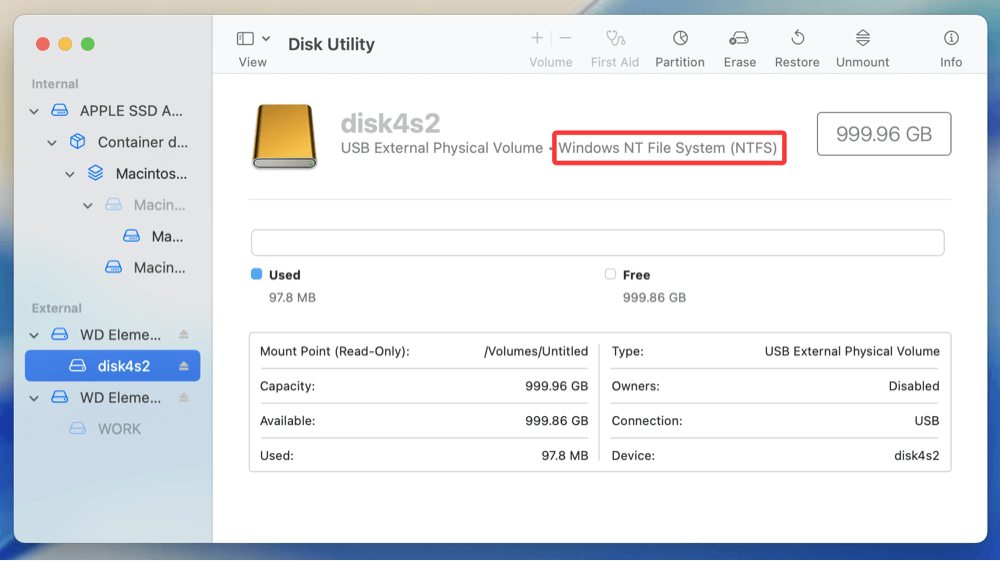
Fix 6. Check and Change Drive Format
If your drive is using NTFS, macOS can read but not write or mount it in some cases.
How to Check Format:
- Open Disk Utility.
- Click on the external drive and look the file system (e.g., NTFS, exFAT, HFS+).
![mount NTFS drive on macOS Tahoe 26]()
Solutions:
Solution 1. Use NTFS drivers for Mac (e.g., Donemax NTFS for Mac)
Step 1. Download and install Donemax NTFS for Mac.
Step 2. Open Donemax NTFS for Mac, select the NTFS external hard drive, click on Mount button.
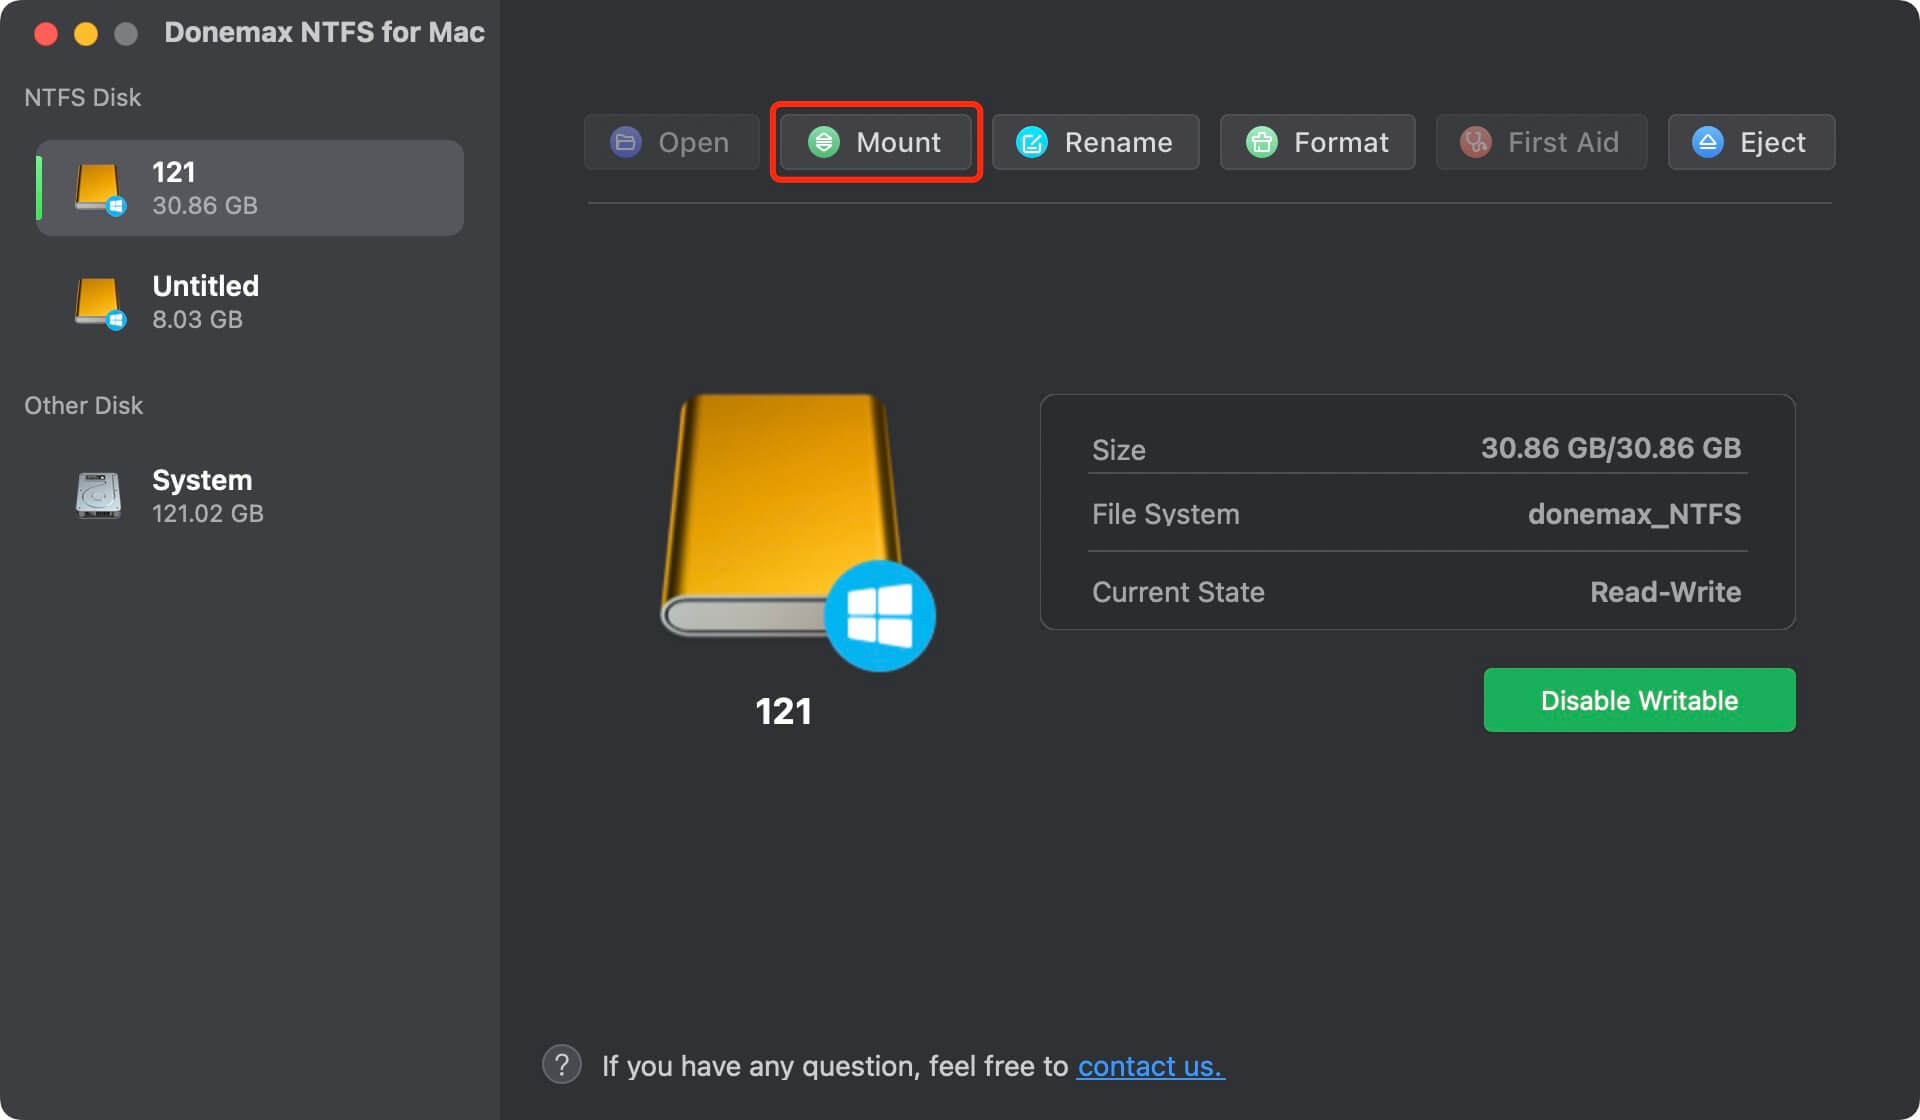
Step 3. Click on Enable Writable button so that you can write data to any NTFS drive on macOS Tahoe 26.

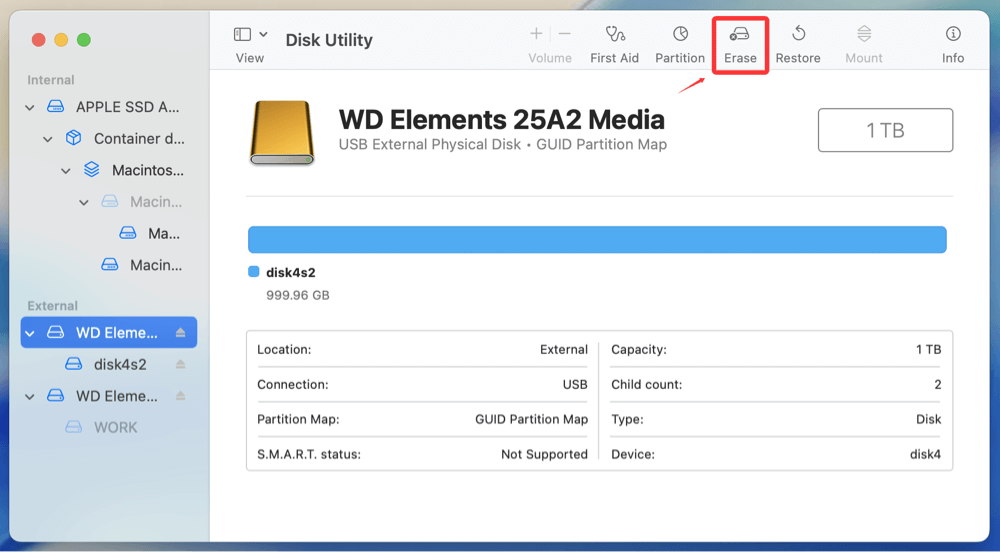
Solution 2. Reformat the drive to a macOS-compatible format (APFS, ExFAT, or Mac OS Extended)
⚠️ Warning: Reformatting erases all data!
Steps to Reformat:
- Select the drive in Disk Utility.
- Click Erase.
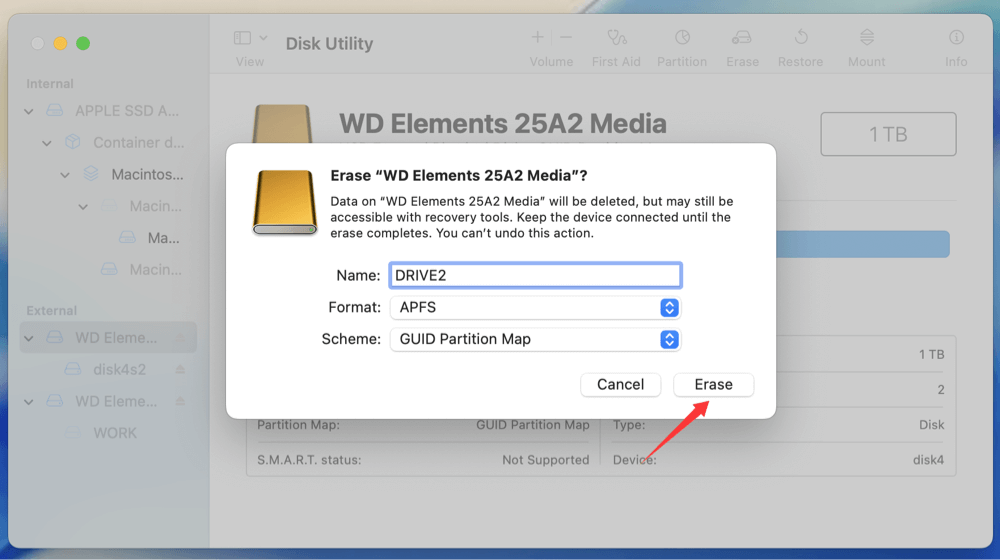
![mount NTFS drive on macOS Tahoe 26]()
- Choose format (ExFAT for cross-platform, APFS for macOS only).
![mount NTFS drive on macOS Tahoe 26]()
- Confirm.
When to Contact a Data Recovery Professional
If the drive doesn't appear at all in Disk Utility or Terminal, and you hear clicking, grinding, or if the drive overheats:
Signs of Physical Failure:
- No LED or power indication
- Repetitive clicking sounds (head crash)
- Smell of burning or overheating
Next Steps:
- Avoid DIY recovery to prevent further damage.
- Contact professional services like:
- DriveSavers
- Ontrack
- Gillware
They can often retrieve data from dead drives using cleanroom technology.
Prevent Mounting Issues in the Future on macOS Tahoe
Now that your external drive is accessible again - or replaced - it's wise to follow best practices to avoid mounting issues in the future.
Tips:
- Eject safely using Finder or right-click
- Use macOS-compatible formats (APFS, exFAT)
- Avoid using the drive across multiple OSes without proper format support
- Back up regularly using Time Machine or cloud services
- Keep macOS updated for driver and security patches
Conclusion
When an external hard drive won't mount on macOS Tahoe 26, the problem can range from minor software bugs to serious file system corruption or hardware failure. By following this structured guide - from checking hardware to using Disk Utility, Terminal, or third-party recovery tools - you can resolve most mounting problems without losing data.
If all else fails, professional recovery remains a viable last resort. Always back up important files, and ensure your drives are ejected and formatted correctly to maintain their health and longevity on macOS.
FAQs About Repairing and Mounting External Hard Drive on macOS Tahoe 26
1. How to mount an external hard drive on macOS Tahoe 26?
Follow the steps below to mount an external hard drive on macOS Tahoe 26:
- Open Disk Utility, select the drive that is unmounted.
- Click on Mount button.
- If the Mount button is grayed out, click on First Aid button to repair the drive.
2. How to use third-Party tools for macOS Tahoe 26 drive mounting issues?
If the native tools don't help, these utilities may offer advanced mounting or repair options:
🔹 Donemax NTFS for Mac
100% safe, powerful and easy-to-use tool to help mount any drive including NTFS drive on macOS Tahoe 26 and can repair corrupted drive, reformat RAW drive, etc.
🔹 FUSE for macOS
An open-source utility to support different file systems. Requires technical setup but supports NTFS and EXT drives.
🔹 DiskWarrior
Repairs corrupted directories that prevent mounting.
🔹 Paragon or Tuxera NTFS
Best for users needing NTFS write and mount support on Mac.
🔹 Mounty for NTFS
Free, lightweight tool that mounts NTFS volumes with write access.
3. How to recover data from unmounted drives on macOS Tahoe 26?
If the drive is visible but refuses to mount or has corrupted file systems, consider data recovery before formatting.
Top Recovery Tools:
Donemax Data Recovery for Mac
- Detects unmounted or RAW drives
- Supports NTFS, HFS, APFS, FAT32, exFAT
- Can preview files before recovery
EaseUS Data Recovery Wizard
- Easy interface
- Deep and quick scan options
- Ideal for drives that are detected but won’t open
Stellar Data Recovery
- Supports various file systems and file types
- Offers a disk image creation feature
Steps:
- Install your chosen tool.
- Select the unmounted drive.
- Run the scan and preview files.
- Recover and save to a different destination.
4. Can I use NTFS drive on macOS Tahoe 26 without formatting?
Yes, third-party NTFS driver - such as Donemax NTFS for Mac is fully compatible with macOS Tahoe 26. It can quickly mount NTFS drive on macOS Tahoe 26 and add NTFS read-write support to the Mac.
Related Articles
- Jul 01, 2026Safely Remove & Change Time Machine Backup Drives on Mac
- Aug 21, 2023How to Convert RAW to NTFS Without Losing Data?
- Mar 12, 2024External Hard Drive Not Mounting on Mac mini, What to Do?
- Oct 09, 2024How to Format and Unformat an ExFAT Drive on Mac?
- Sep 15, 2023How to Wipe An NTFS Hard Drive on Windows or Mac?
- Dec 05, 2024How to Add an APFS Volume on Mac: A Comprehensive Guide

Contributing Writer
Charles
Charles, who lives in Sydney, Australia, is an editor & writer of Donemax Team. He is good at writing articles related with Apple Mac computers, Windows operating systems, data recovery, data erasure, disk clone and data backup, etc. He loves reading and playing tennis in his spare time and is interested in testing new digital devices such as mobile phones, Macs, HDDs, SSDs, digital cameras, etc.

Editor in chief
Gerhard Chou
In order to effectively solve the problems for our customers, every article and troubleshooting solution published on our website has been strictly tested and practiced. Our editors love researching and using computers and testing software, and are willing to help computer users with their problems