
Written byCharlesUpdated on Apr 25, 2025
How to Reformat BitLocker Encrypted Hard Drive – A Comprehensive Guide
Approved byGerhard Chou
Before we start: You can quickly reformat a BitLocker encrypted hard drive without password/recovery key. If you will sell, donate or dispose of the old BitLocker encrypted hard drive, just use disk wipe software - such as Donemax Data Eraser to wipe the drive, permanently erase all data from the drive.
PAGE CONTENT:
- What is BitLocker Encryption?
- Precautions Before Reformatting Your BitLocker Drive
- How to Unlock a BitLocker Encrypted Drive?
- Reformat a BitLocker Encrypted Hard Drive With or Without Recovery Key
- How to Remove BitLocker Encryption Before Formatting (Optional)?
- Is It Possible to Recover a Formatted BitLocker Encrypted Hard Drive
- How to Wipe BitLocker Encrypted Hard Drive Without Recovery Key?
- Conclusion
- FAQs About Reformatting BitLocker Drive
BitLocker is a built-in encryption feature in Windows that secures your drive by encrypting all data on it. While this level of protection is excellent for security, it also adds complexity when you want to perform operations like formatting the drive. Whether you're repurposing an old hard drive, troubleshooting an issue, or preparing a device for resale, reformatting a BitLocker-encrypted hard drive is not as simple as a typical format.
This article will walk you through the complete process, precautions, and multiple methods to reformat a BitLocker-encrypted hard drive safely and effectively.
What is BitLocker Encryption?
Some versions of Microsoft Windows come with a full-disk encryption capability called BitLocker Drive Encryption. Its main function is data protection by offering encryption for whole volumes. BitLocker employs a 128-bit or 256-bit key and the AES encryption algorithm in XTS or cipher block chaining (CBC) mode.
BitLocker can be applied to:
- Internal hard drives (OS and data drives)
- External USB drives and SD cards
- Partitioned volumes
The encryption ensures that even if someone physically removes the drive from your computer, they won't be able to access the data without the encryption key. However, this also means you can't just plug the drive into another system and reformat it - BitLocker protection must first be addressed.
Precautions Before Reformatting Your BitLocker Drive
Before you proceed with formatting a BitLocker-encrypted drive, take these critical steps:
1. Backup Your Data
Formatting will erase all data on the drive. Ensure that you have a complete backup of any important files stored on the encrypted volume.
2. Locate Your BitLocker Recovery Key
You'll need to unlock the drive before formatting, which often requires a password or a 48-digit recovery key. You can find this key:
- In your Microsoft account (https://account.microsoft.com/devices/recoverykey)
- Saved as a printout or file
- Provided by your system administrator (if you're on a domain)
3. Check User Permissions
Ensure you're logged in as an administrator, as you'll need elevated privileges to unlock or reformat a BitLocker-protected drive.
How to Unlock a BitLocker Encrypted Drive?
Before formatting, the drive must be unlocked. Here's how:
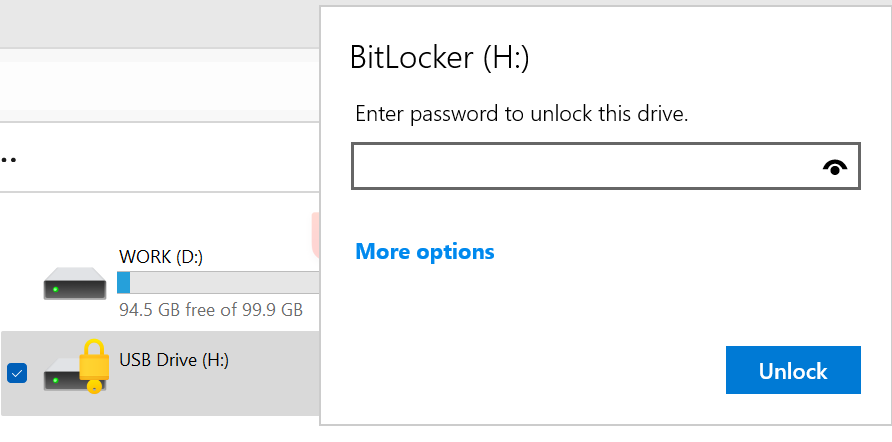
Method 1: Unlock via File Explorer
- Plug in or access the encrypted drive.
- A pop-up will appear asking for a password or recovery key.
- Enter the correct credentials and click Unlock.
![reformatting a BitLocker-encrypted hard drive]()
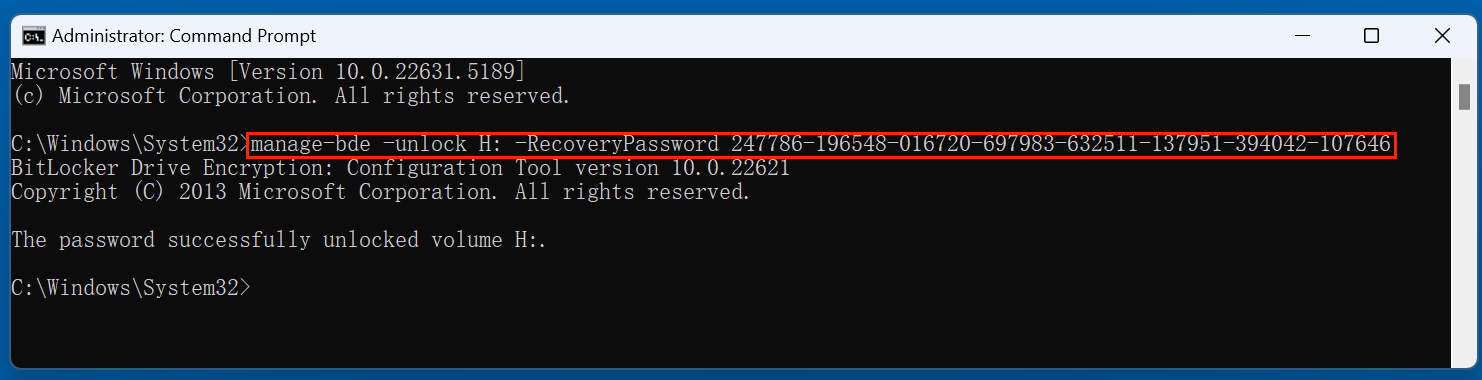
Method 2: Unlock via Command Prompt
- Launch the Command Prompt in Administrator mode.
- Enter the command:
manage-bde -unlock X: -RecoveryPassword YOUR-RECOVERY-KEY
Replace X: with your drive letter and add your actual 48-digit key. For example:
Reformat a BitLocker Encrypted Hard Drive With or Without Recovery Key
If you have backed up your important data, you can quickly reformat the BitLocker encrypted hard drive.
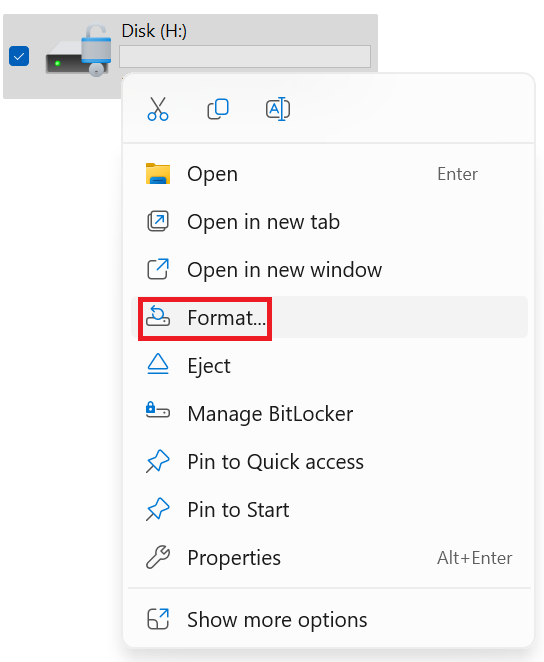
Method 1: Reformat the BitLocker Drive via File Explorer
This is the easiest method to reformat a BitLocker encrypted hard drive.
Steps:
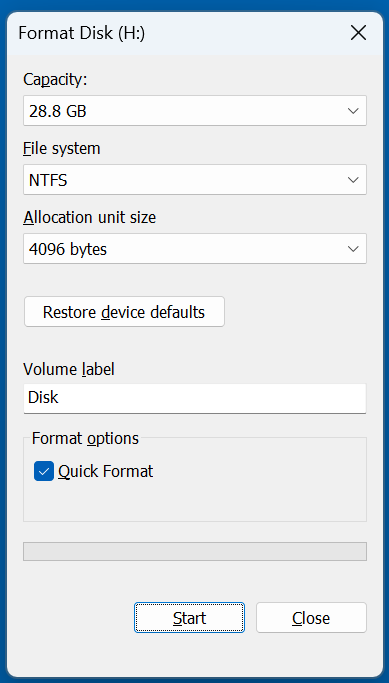
- Open File Explorer.
- Right-click the unlocked drive and select Format.
![reformatting a BitLocker-encrypted hard drive]()
- Choose the desired File System:
- NTFS – Best for Windows systems.
- exFAT – Compatible with both Windows and macOS.
- FAT32 – Legacy compatibility, limited to 4GB file size.
- Set a Volume Label (optional).
- Select Quick Format or Full Format.
- Click Start and confirm.
![reformatting a BitLocker-encrypted hard drive]()
😊 Pros:
- Simple, GUI-based
- Fast for basic formatting
☹️ Cons:
- May not work if the drive is still locked
- Limited error handling
Method 2: Reformat BitLocker Drive via Disk Management
If File Explorer doesn't work or shows errors, use Disk Management for more control.
Steps:
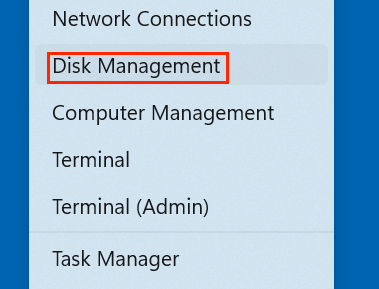
- Choose Disk Management by pressing Windows + X.
![reformatting a BitLocker-encrypted hard drive]()
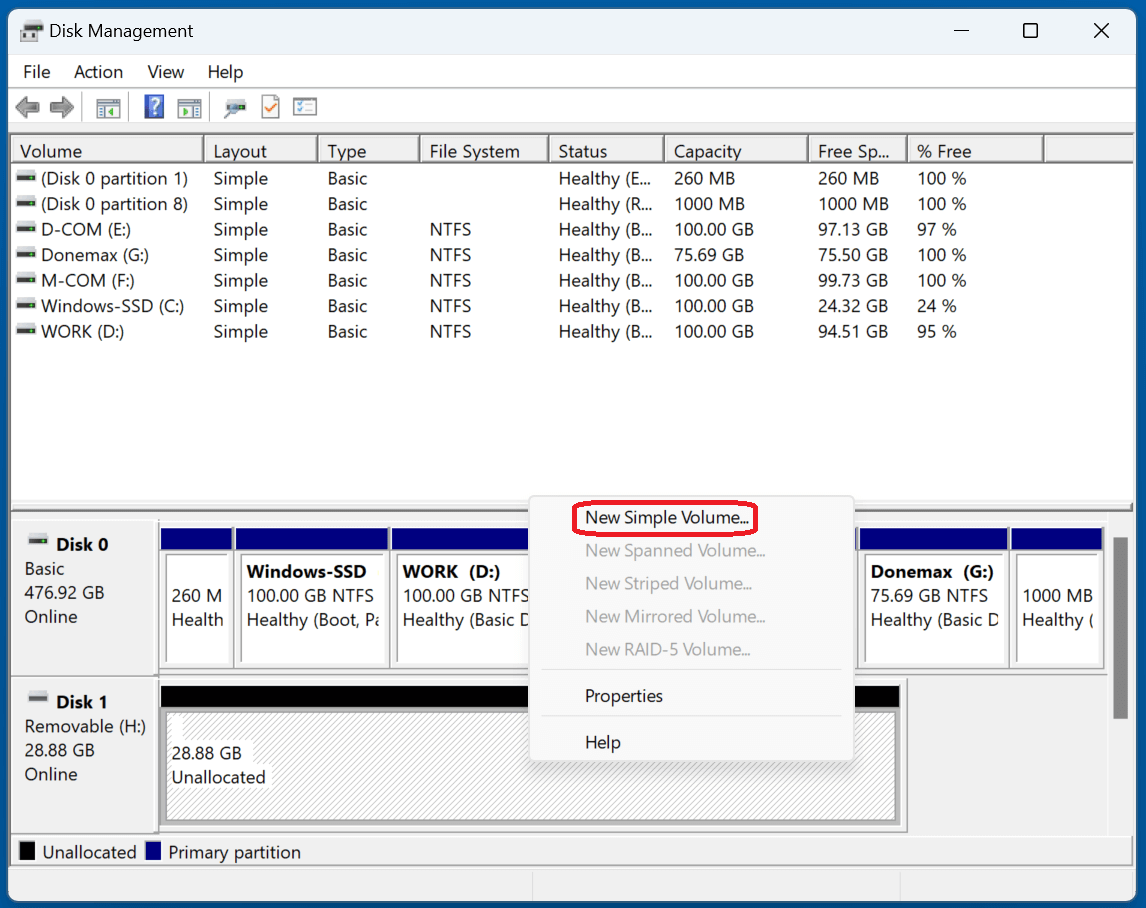
- Locate the encrypted drive in the volume list.
- Select Delete Volume with a right-click.
![reformatting a BitLocker-encrypted hard drive]()
- To select the New Simple Volume, right-click the unallocated space.
![reformatting a BitLocker-encrypted hard drive]()
- Follow the wizard to:
- Set partition size
- Assign a drive letter
- Choose a file system (NTFS/exFAT)
- Format the partition

😊 Pros:
- Better management of partitions
- Useful for drives with multiple volumes
☹️ Cons:
- Slightly more technical
- Requires admin privileges
Method 3: Reformat BitLocker Drive via Command Prompt (DiskPart)
For more advanced users, the Command Prompt using DiskPart provides deep control.
Steps:
- Open Command Prompt as Administrator.
- Launch DiskPart:
diskpart
- List all disks:
list disk
- Identify and select your disk:
select disk X
Replace X with the correct disk number.
- Wipe the drive:
clean
- Create a new partition:
create partition primary
- Format the partition:
format fs=ntfs quick
You can change ntfs to exfat or fat32 if desired.
- Assign a drive letter:
Assign
![reformatting a BitLocker-encrypted hard drive]()

😊 Pros:
- Works even if GUI tools fail
- Wipes all partitions and metadata
☹️ Cons:
- Risky if the wrong disk is selected
- No visual feedback
How to Remove BitLocker Encryption Before Formatting (Optional)?
While you can format a BitLocker-encrypted drive directly after unlocking it, some users may prefer to disable encryption before formatting. Doing so removes all encryption metadata and ensures the drive behaves like any standard unencrypted storage device. This step is especially useful if you're preparing the drive for resale, repurposing, or simply want a clean start without BitLocker.
Why Decrypt Before Formatting?
Here are a few reasons why disabling BitLocker before formatting may be the best route:
- Complete removal of encryption metadata: Formatting an encrypted drive doesn’t always remove BitLocker metadata. Decrypting first ensures a truly clean drive.
- Improved compatibility: Some older systems or non-Windows devices may have issues accessing a drive with remnants of BitLocker, even after formatting.
- Easier future use: Once decrypted, you won't need to manage encryption keys or passwords again unless you choose to re-enable BitLocker.
- Security clarity for resale: If you're giving away or selling your drive, decrypting ensures the new owner doesn't encounter locked partitions or leftover security settings.
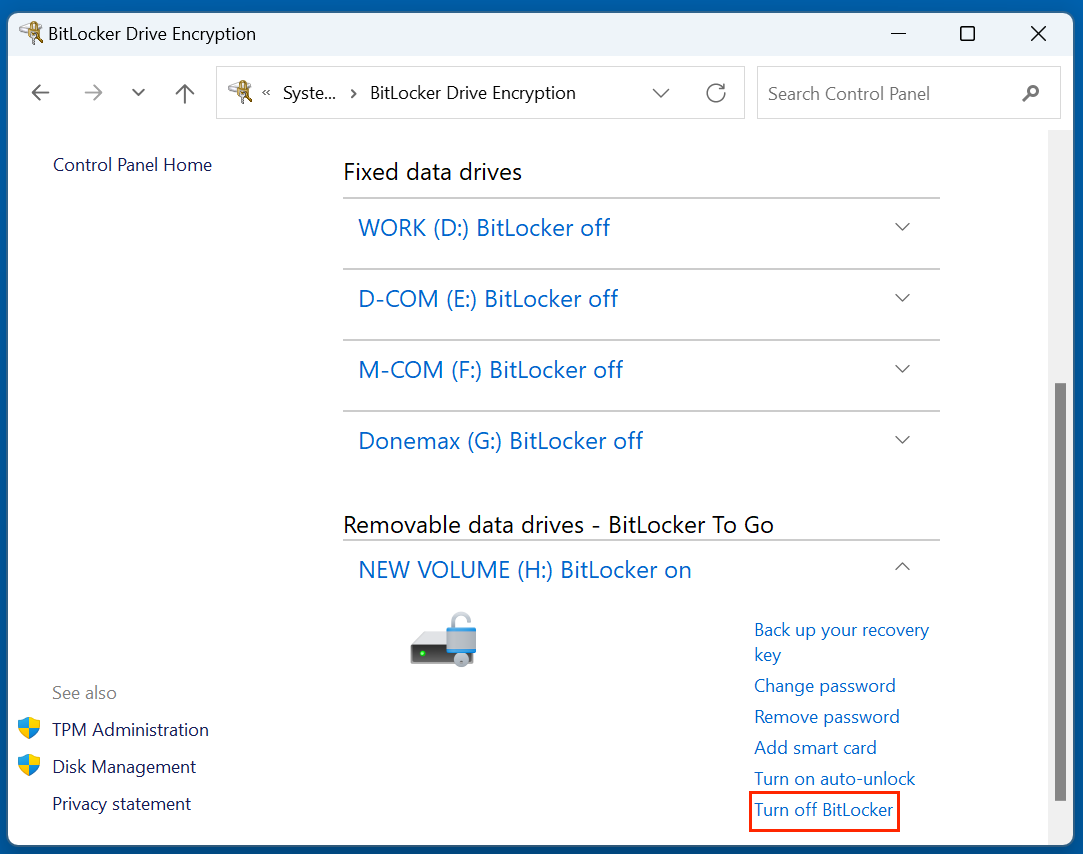
Option 1: Turn Off BitLocker Using Control Panel
This is the most user-friendly way to decrypt a drive.
Steps:
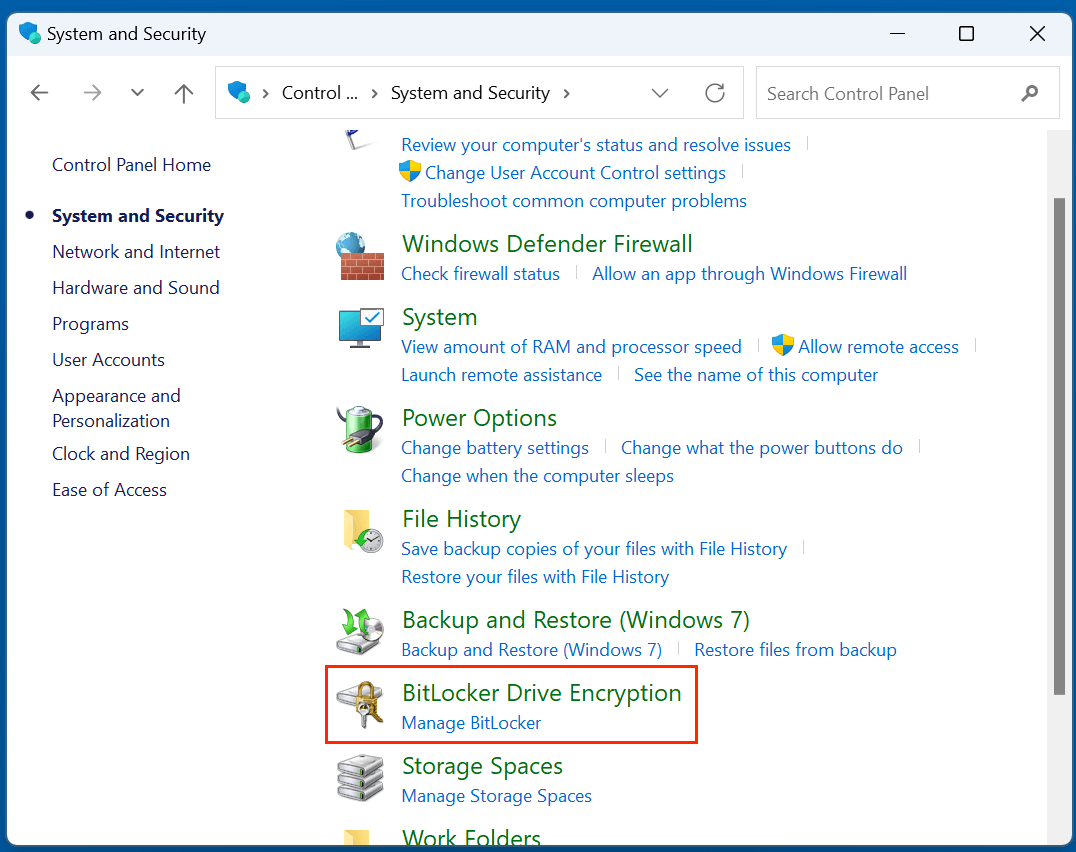
- Open the Control Panel.
- Navigate to System and Security > BitLocker Drive Encryption.
![reformatting a BitLocker-encrypted hard drive]()
- Locate the encrypted drive in the list.
- Click Turn off BitLocker next to the appropriate volume.
![reformatting a BitLocker-encrypted hard drive]()
- You'll see a prompt confirming that decryption will begin.
- Wait for the process to complete. Depending on the drive size and data volume, this could take minutes to hours.
- Once decryption is complete, the drive will be free of encryption and can be formatted like any regular volume.
💡 Notes:
- Decryption does not delete your data.
- You can continue using your PC during the decryption process.
- The status bar will show decryption progress; don't shut down your system during this phase.
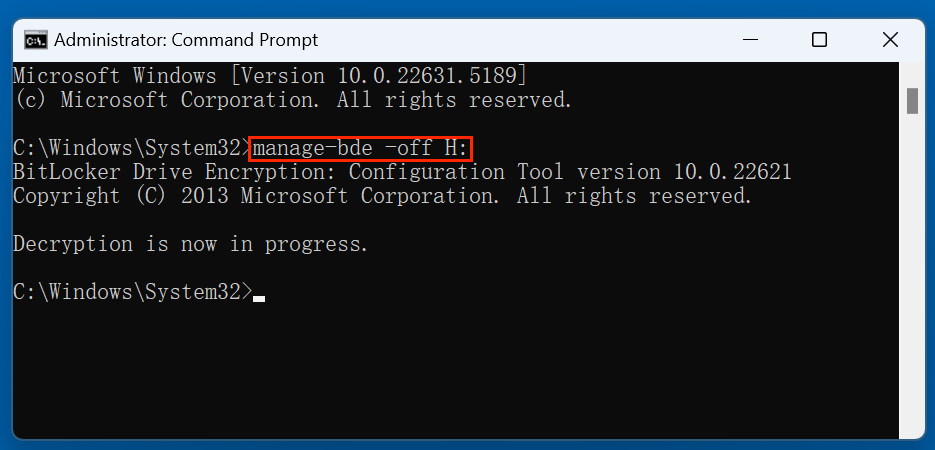
Option 2: Turn Off BitLocker via Command Prompt
For power users or when Control Panel access is restricted, the Command Prompt offers a quick alternative.
Steps:
- Choose Command Prompt (Admin) or Windows Terminal (Admin) by performing a right-click on the Start Menu.
- Enter the below command:
manage-bde -off X:
![reformatting a BitLocker-encrypted hard drive]()
Replace X: with the drive letter of the encrypted drive.
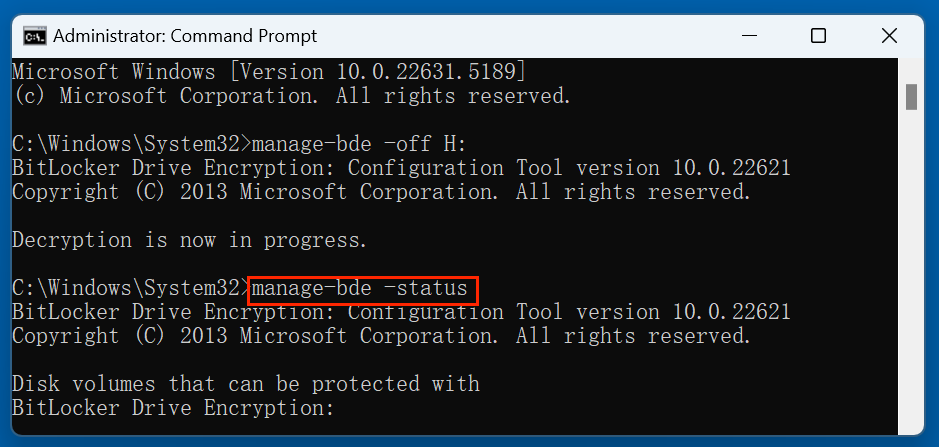
- You’ll see confirmation that decryption has started. You can check the progress with:
manage-bde -status
![reformatting a BitLocker-encrypted hard drive]()
Pros of This Method:
- Works even when GUI elements are inaccessible (e.g., in Safe Mode or with UI issues).
- Useful in scripting environments or enterprise deployments.
After Decryption: Formatting the Drive
Once the decryption process finishes, the drive is no longer protected by BitLocker and behaves like any normal drive. At this point, you can format it using any of the previously mentioned methods:
- File Explorer: Right-click → Format
- Disk Management: Delete volume → Create new volume → Format
- DiskPart (Command Prompt): Clean → Create partition → Format
You can also re-enable BitLocker afterward if desired:
- Right-click the drive.
- Select Turn on BitLocker.
- Follow the setup wizard to set a password and save the recovery key.
What If I Can't Turn Off BitLocker?
Sometimes you might run into restrictions that prevent you from disabling BitLocker:
Common Causes:
- Missing administrative rights
- Group policy restrictions on enterprise-managed systems
- Missing or incorrect recovery key/password
- Corrupt BitLocker metadata
Solutions:
- Try logging in with an administrator account.
- Use the correct BitLocker recovery key.
- If you're in a corporate environment, contact your IT department.
- If BitLocker metadata is corrupt and decryption fails, you may need to erase the drive using DiskPart or a secure erase tool, which will destroy all data.
Common Errors and Troubleshooting
Access Denied
- Ensure you're running all commands and tools as an Administrator.
- Unlock the drive before attempting to format.
Drive is Write Protected
- Run this command in Command Prompt:
attributes disk clear readonly
The disk is encrypted and cannot be formatted
- Make sure the drive is fully unlocked.
- Use Disk Management or DiskPart if File Explorer fails.
Is It Possible to Recover a Formatted BitLocker Encrypted Hard Drive
How to recover lost data from a formatted BitLocker encrypted hard drive? You can try data recovery program - such as Donemax Data Recovery. It can deeply scan the drive which is formatted by Disk Management, diskpart or other tools.
Step 1. Download and install Donemax Data Recovery on your computer.
Step 2. Open Donemax Data Recovery, then select the formatted BitLocker encrypted hard drive.

Step 3. Click on Scan button to deeply scan the formatted drive and find all recoverable files.

Step 4. Once the scan is completed, you can preview all recoverable files. Then select the wanted files, click on Recover button to save them.

How to Wipe BitLocker Encrypted Hard Drive Without Recovery Key?
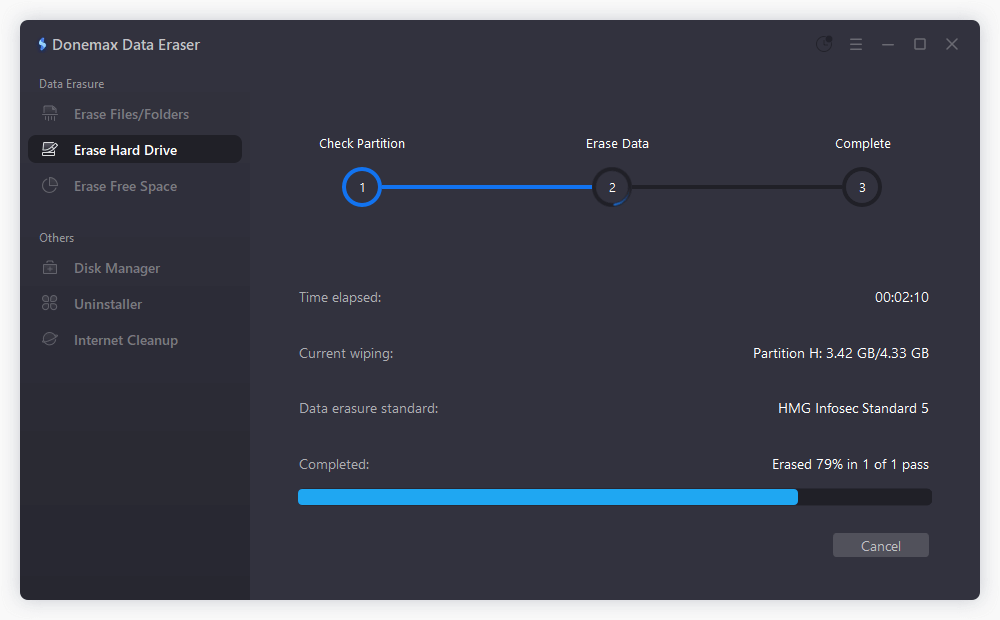
Before you sell, donate or dispose of a BitLocker encrypted hard drive, you'd better permanently erase all data from the drive. Disk wipe software - such as Donemax Data Eraser is able to securely wipe the BitLocker locked drive.
Step 1. Download and install Donemax Data Eraser on your computer.
Step 2. Open Donemax Data Eraser, then choose Erase Hard Drive mode. Select the BitLocker encrypted hard drive, click on Erase Now button.

Step 3. It will format and wipe the selected BitLocker drive and permanently erase all data (existing data, hidden data, deleted/formatted/lost data, etc) from the drive. Once the process gets finished, all data is lost for good, can't be recovered by any method.
Conclusion
Reformatting a BitLocker-encrypted hard drive is completely possible, but it requires proper preparation and the correct steps. The key is to unlock the drive first, either via the password or recovery key, and then use one of several formatting methods - File Explorer for simplicity, Disk Management for flexibility, or Command Prompt for full control.
Always remember to back up important data and verify access credentials before making changes. For those planning to repurpose or sell their drive, consider decrypting the drive before formatting to remove all encryption traces.
By following the detailed steps above, you can confidently and safely reformat any BitLocker-encrypted hard drive without running into unexpected issues.
FAQs About Reformatting BitLocker Drive
1. Can I format a locked BitLocker drive without recovery key/password?
Yes, but formatting will erase everything from the drive. If you want to back up files from the locked drive to another drive before formatting, you need to enter the recovery key to unlock the drive.
2. Will formatting remove BitLocker encryption?
Yes, formatting the drive removes all data and the encryption key, effectively disabling BitLocker on that volume.
3. Should I decrypt before formatting?
It's not required, but decrypting ensures a clean format without residual BitLocker metadata. If you plan to reuse the drive or sell it, decrypting first is a good idea.
4. Can I use the formatted drive again with BitLocker?
Yes. After formatting, you can re-enable BitLocker through the Control Panel or right-clicking the drive and choosing Turn on BitLocker.
Donemax Data Eraser
One of the best data erasure programs for permanently erase data from PC, Mac, HDD, SSD, USB drive, digital camera and other devices. Once the data is erased, it is lost for good, cannot be recovered by any method.
Related Articles
- Jul 10, 2025How to Use WD Easystore on Mac: A Complete Guide
- Dec 18, 2024How to Use SanDisk Professional G-DRIVE on Mac?
- Feb 17, 2025How to Fix Corrupted USB Flash Drive Without Formatting? [5 Methods]
- Jan 14, 2025Convert GPM (GUID Partition Map, GPT) Disk to MBR (Master Boot Record) on Mac
- Sep 21, 2023How to Partition Hard Drive on Mac?
- Nov 11, 2025How to Fix External Hard Drive Not Working on M5 Mac?

Contributing Writer
Charles
Charles, who lives in Sydney, Australia, is an editor & writer of Donemax Team. He is good at writing articles related with Apple Mac computers, Windows operating systems, data recovery, data erasure, disk clone and data backup, etc. He loves reading and playing tennis in his spare time and is interested in testing new digital devices such as mobile phones, Macs, HDDs, SSDs, digital cameras, etc.

Editor in chief
Gerhard Chou
In order to effectively solve the problems for our customers, every article and troubleshooting solution published on our website has been strictly tested and practiced. Our editors love researching and using computers and testing software, and are willing to help computer users with their problems