The best iTunes alternative - reliable and easy-to-use iOS data transfer & data management software.
AirDrop can simplify data transfer from one Apple device to another. It uses Wi-Fi and Bluetooth to create encrypted communication channels. However, AirDrop is not perfect.
If you encounter AirDrop not working on your iPhone or Mac, here are some quick tips to fix AirDrop.
- 1. Update the operating system
- 2. Reboot both devices
- 3. Turn off AirDrop restrictions
- 4. Disable Personal Hotspot on iPhone
- 5. Turn off do not disturb mode
- 6. Restart Wi-Fi and Bluetooth on both devices
- 7. Change your AirDrop visibility settings
- 8. Use AirDrop from a third Apple device
- 9. Turn off your VPN for AirDrop to work
- 10. Turn on your Mac's firewall for more connections
- 11. Log back into your Apple ID account
First, you need to check that your device is compatible with AirDrop. Sometimes Apple's requirements change, but as of this writing, you can use AirDrop with the following:
- Any iPhone, iPad, or iPod touch running iOS 7 or later.
- All Macs launched after 2011 (excluding 2012 Mac Pro) and running OS X Yosemite or later.
Apple has also allowed Mac-to-Mac AirDrop transfers between older computers in the past. If your Mac is running macOS High Sierra or earlier, you can still AirDrop with the following Macs:
- MacBook or MacBook Pro (from late 2008)
- Mac Pro or iMac (from early 2009, with AirPort Extreme)
- Mac Mini (from 2010)
- MacBook Air (from late 2010)
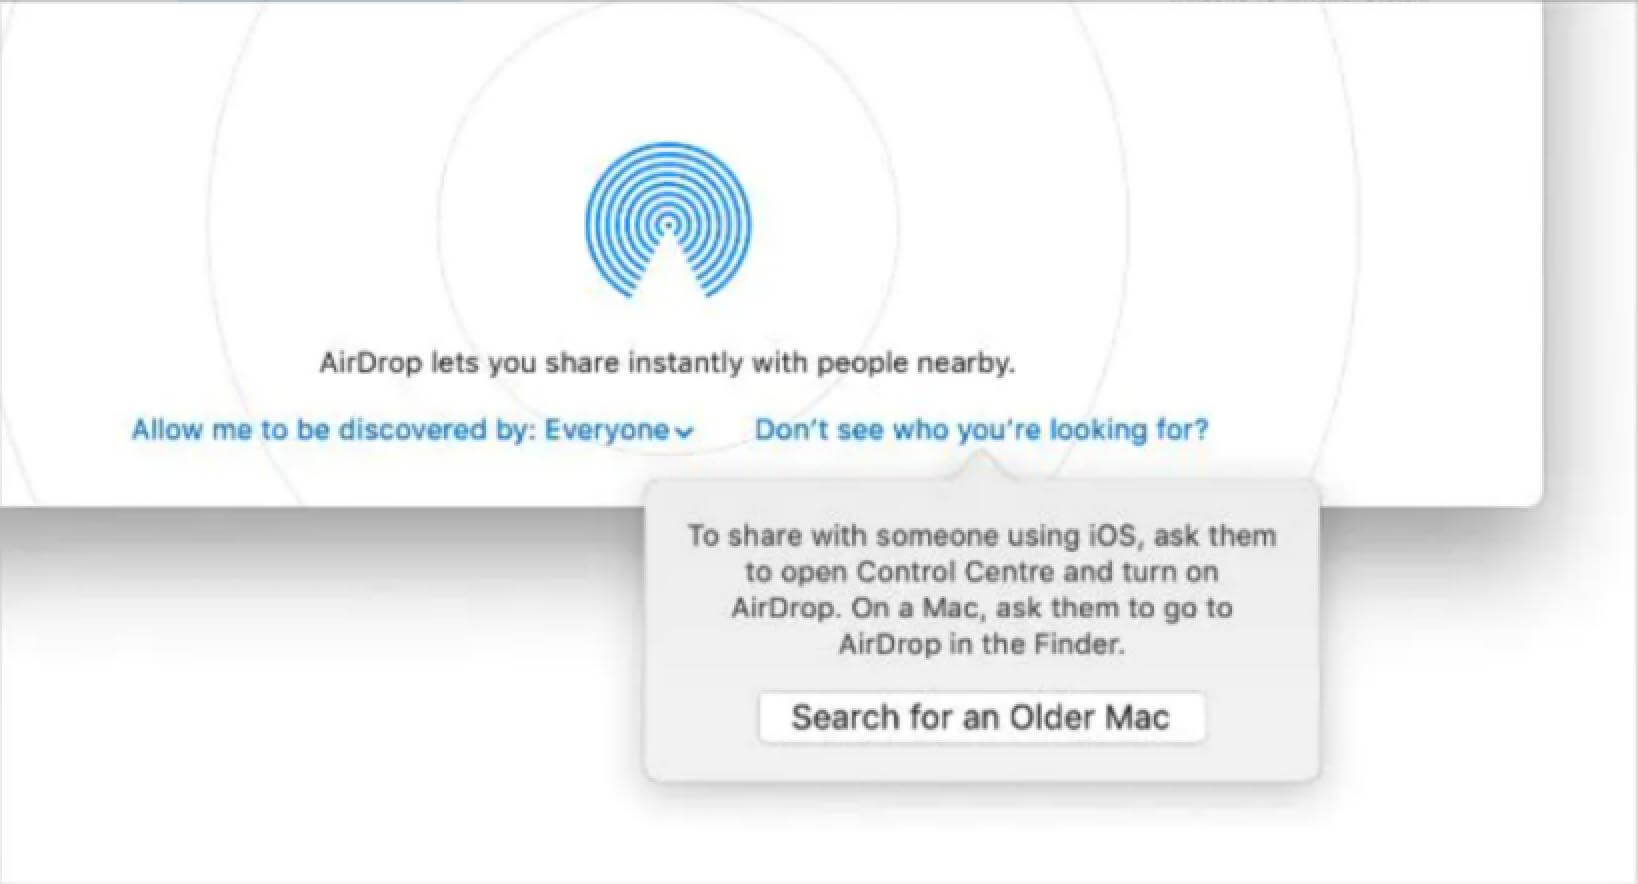
If you can't find one of these older Macs using AirDrop, click "Can't see who you're looking for?" and select Search for Older Macs. Apple removed this option in macOS Catalina.
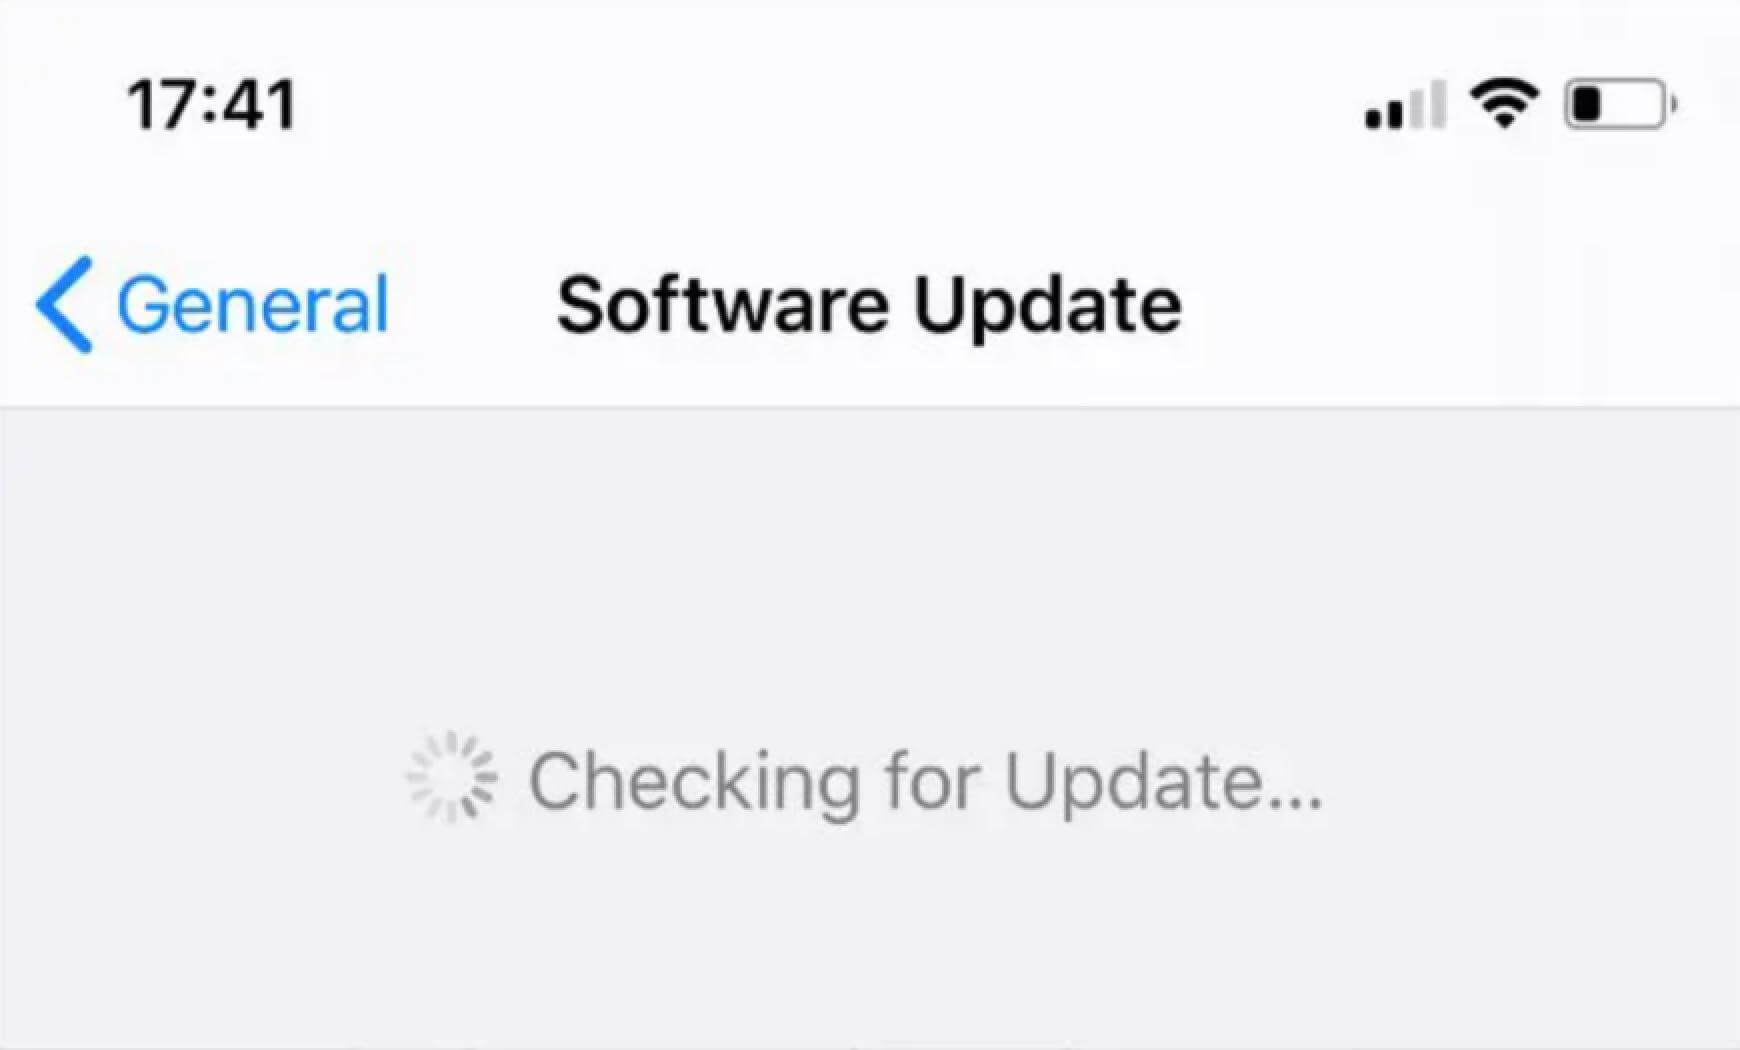
1. Update the Operating System
Apple frequently releases new updates to iOS, iPadOS, and macOS designed to fix software bugs. If AirDrop isn't working, install the latest updates for your device as they may fix it.
Go to Settings > General > Software Update on an iPhone or iPad. Open the Apple menu and go to System Preferences > Software Update on a Mac.
2. Reboot Both Devices
To reboot devices is a classic troubleshooting trick because it's so effective. Rebooting your iPhone, iPad, or Mac might be all you need to get AirDrop working again. And it only takes a little time to try.
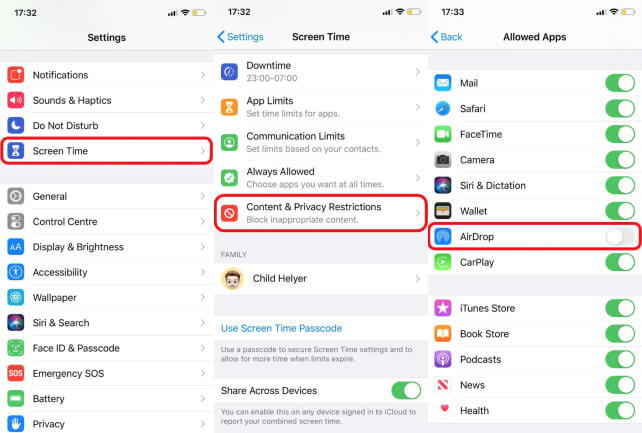
3. Turn off AirDrop Restrictions
If AirDrop isn't showing up on your iOS device at all, you may have blocked it in Content & Privacy Restrictions, which you can find under Settings > Screen Time. Check out the Allowed Apps section and make sure AirDrop is turned on.
You may need to enter your Screen Time passcode to change it.
4. Disable Personal Hotspot on iPhone
Both AirDrop and Personal Hotspot utilize your Bluetooth and Wi-Fi connections, so you can't use them simultaneously. Go to Settings > Personal Hotspot on your iOS device to turn off the feature, then try AirDrop again.
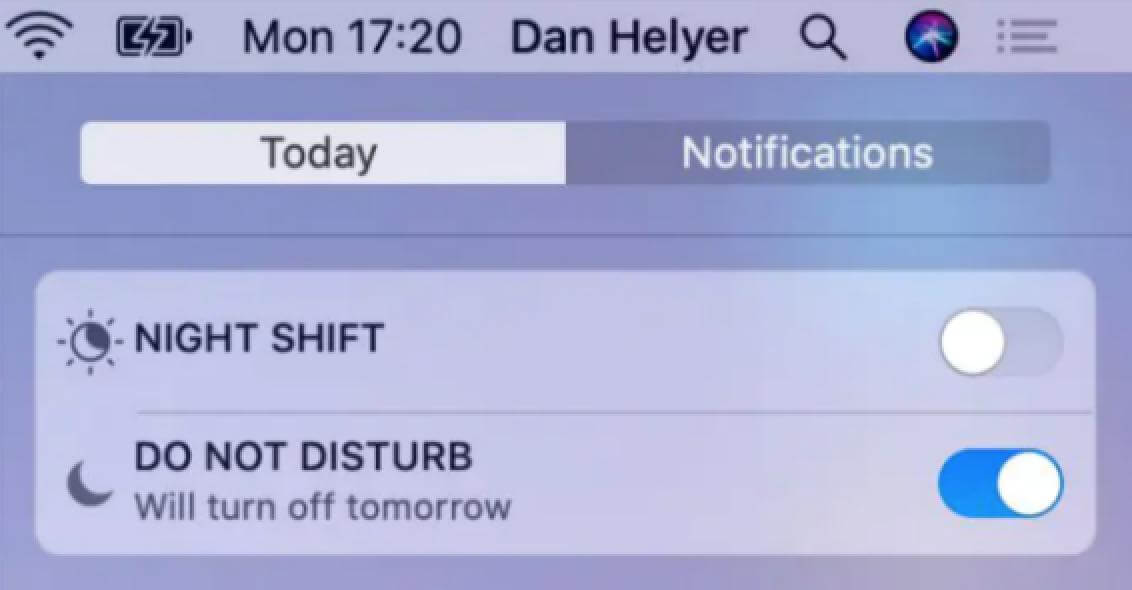
5. Turn off do not disturb mode
Your device may not be receiving the transfer request from AirDrop because you have turned on the Do Not Disturb mode.
Open Control Center and tap the moon icon to turn it off your iPhone or iPad. On a Mac, click the Notification Center icon in the upper-right corner of the menu bar, then scroll down to reveal the Do Not Disturb toggle.
6. Restart Wi-Fi and Bluetooth on Both Devices
If AirDrop isn't working, a beneficial solution is disable and re-enable Wi-Fi and Bluetooth. Using your iPhone or iPad, open Control Center again, then tap the Wi-Fi and Bluetooth icons to turn them off and on.
On a Mac, click the Wi-Fi icon in the menu bar and select "Turn Wi-Fi Off" to turn it off, then enable it again. Go to System Preferences > Bluetooth to restart Bluetooth.
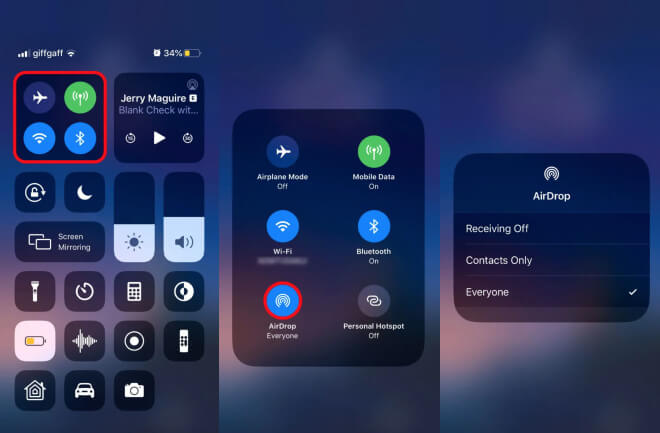
7. Change Your AirDrop Visibility Settings
AirDrop offers three visibility options: Everyone, Contacts Only, or Receiving. If your device isn't showing up in AirDrop, try switching to each option to fix it.
On a Mac, open the Finder and select AirDrop from the sidebar. Then open the drop-down menu that says Allow me to be discovered to choose other options.
On an iPhone or iPad, open Control Center, then tap and hold the upper left section to reveal the AirDrop button. Use it to select different options.
8. Use AirDrop from A Third Apple Device
It's not an option for everyone, but if you have a spare Apple device, you should try connecting via AirDrop with that device. Usually, if your iPhone or Mac appears on this new device, it will suddenly appear on the original as well.
9. Turn Off Your VPN for AirDrop to Work
Some users have found that AirDrop does not work until the VPN is turned off or on the Mac iPhone. You may need to do this in the VPN app or device settings.
On your iPhone or iPad, go to Settings > General > VPN. Go to System Preferences > Network and select VPN from the sidebar on a Mac.
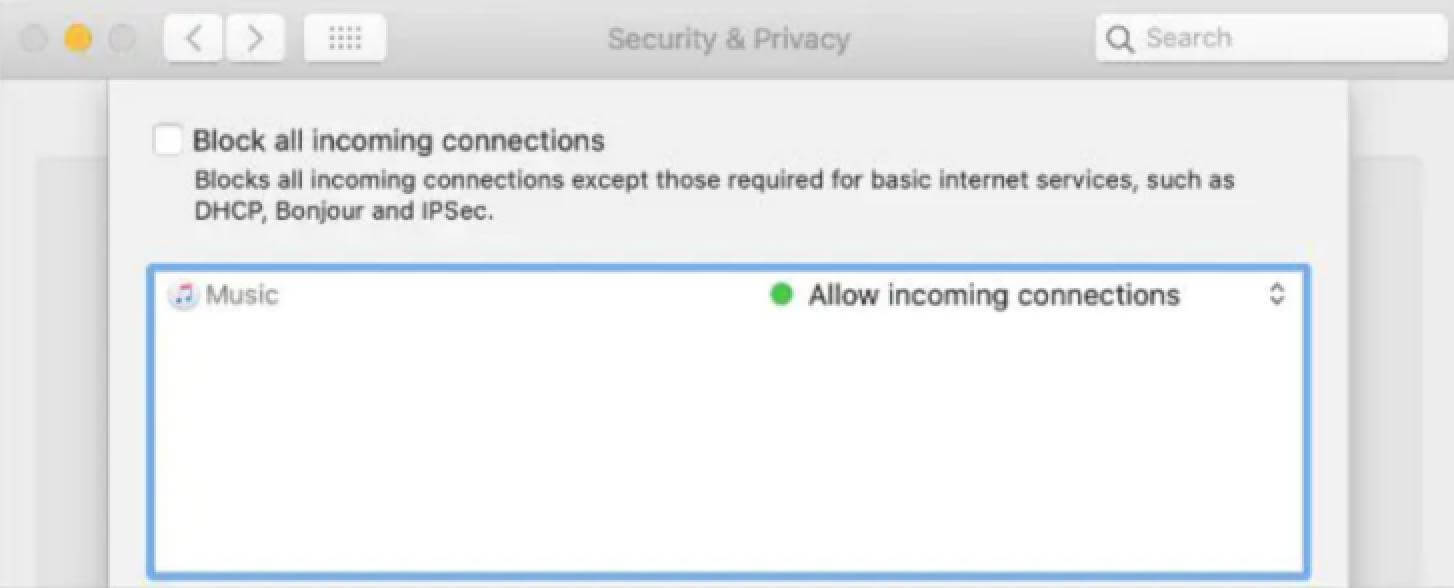
10. Turn On Your Mac's Firewall for More Connections
The firewall on your Mac may be set to block all incoming connections, which often includes new AirDrop transfers. If AirDrop still doesn't work, you'll need to relax these restrictions from System Preferences.
Go to System Preferences > Security & Privacy > Firewall. Click the padlock and enter the administrator password to unlock the changes. Then open the Firewall Options window and uncheck the Block all incoming connections option.
11. Log Back into Your Apple ID Account
On an iPhone or iPad, go to Settings > [your name] > Sign out. Select the data you want to keep on your device and confirm that you want to sign out. After logging out, go back to Settings to log in to your Apple ID again.
Go to System Preferences > Apple ID > Overview on a Mac to sign out. Select the data you want to keep on the device again and confirm that you want to sign out. After logging out, log in from the same page and try AirDrop again.
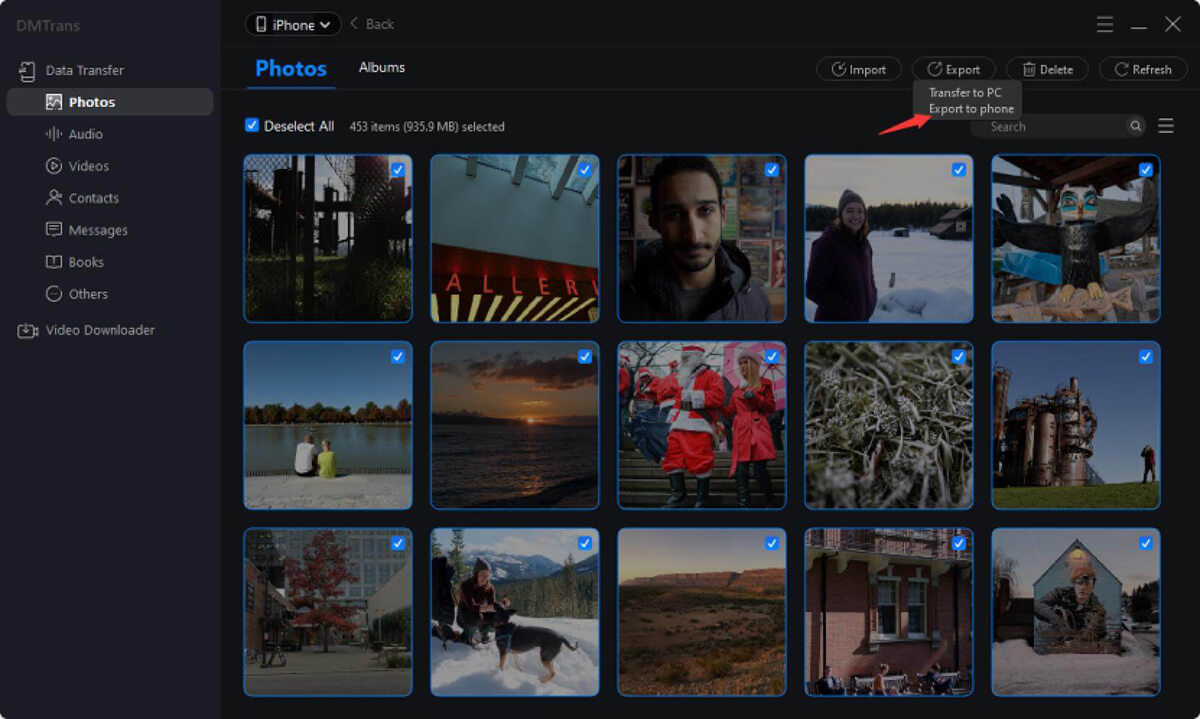
All solutions listed above are for AirDrop Not Working issues. If you still can't solve the case, try the professional iPhone data transfer software that can help you transfer files among iPhone, iPad, Mac, and Windows PC. DMtrans can help you move and migrate all essential data and files from one device to another, whether there are contacts, messages, music and video files, and photos.
Follow the steps to transfer data from the iPhone to another iPhone
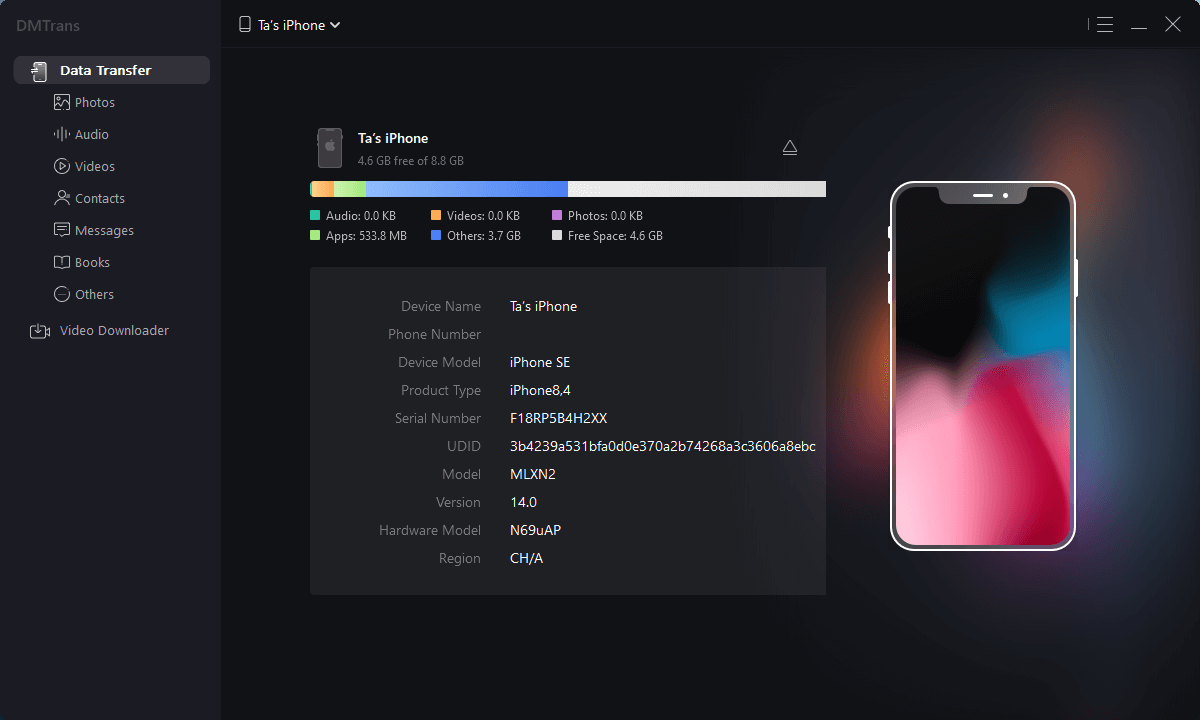
Step 1. Download and install Donemax DMtrans on your Windows or Mac computer.
Step 2. Connect your iPhones to your PC or Mac device first. Then launch the data transfer software, and it will load the data on your iPhone.
Step 3. Select the files like music, video, contacts, and voice memo that you want to transfer.
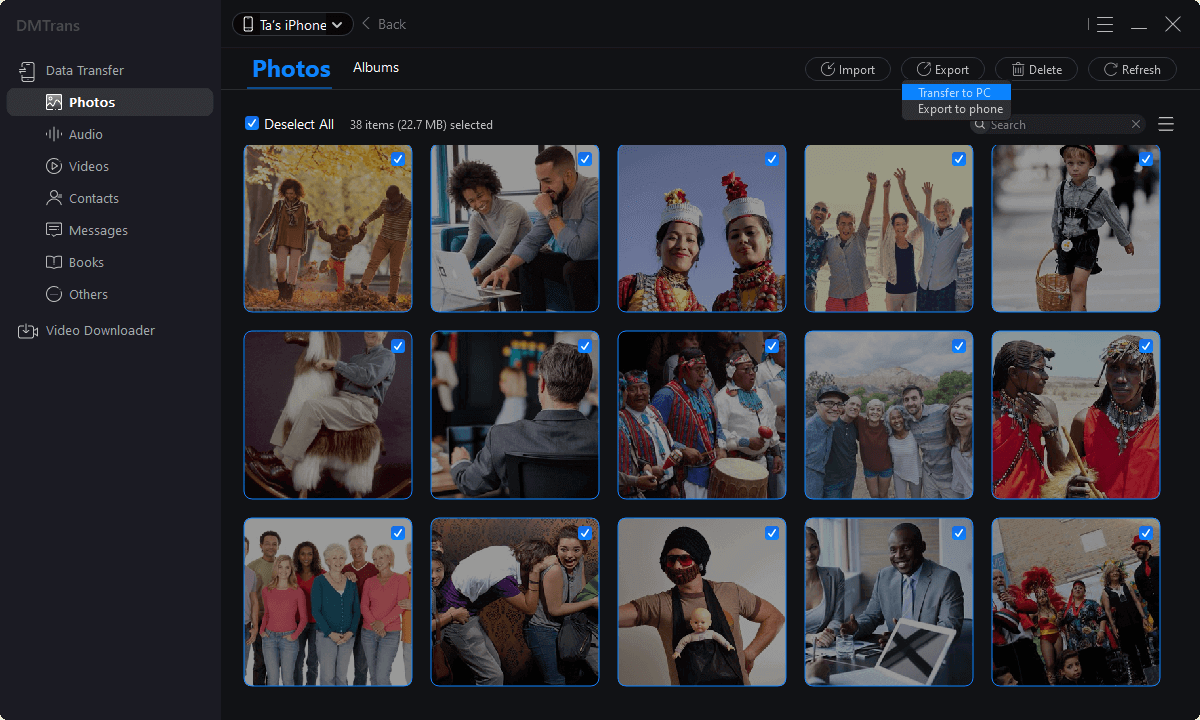
Step 4. Select 'Export to phone' and start data transfer.
After it is done, you can go to the pc to check the transfer data. Please select the other files to continue if you want to transfer more files.
The software can do more for you. It can also import data from your Windows PC to iPad. If you need to transfer data from iPad to another iPad, iPhone, or iPod touch, the software can also help you. If there are too much data and the space is limited, the iOS data manager can also help you remove some files to free space. It can drag multiple files in bulk.
If you want to transfer or manage iOS data easily and quickly on iPhone, iPad, iPod touch, you can choose Donemax DMtrans. It is professional and safe iOS data transfer software. You can download and have a try first.