
Written byCoco LinUpdated on Jun 06, 2025
How to Recover Pictures from Photo Booth on Mac?
Approved byGerhard Chou
Before we start: There are many ways to recover lost images/videos from Mac's Photo Booth. Data recovery software is a good option if the pictures are deleted permanently. Donemax Data Recovery for Mac supports to recover 2000+ file formats and it can recover lost pictures and videos on Mac. If you are going to recover missing pictures from Photo Booth on Mac, just try this data recovery software.
PAGE CONTENT:
- Where Does Photo Booth Store Pictures on Mac?
- Quick Fixes: Check Before Advanced Recovery
- Recover Photo Booth's Photos and Videos from Time Machine Backup
- Use Data Recovery Software to Recover Deleted Photo Booth Pictures
- Manually Extract Photos from a Corrupted or Damaged Photo Booth Library
- Tips to Avoid Photo Loss in Photo Booth
Photo Booth is a beloved built-in macOS app that allows Mac users to capture fun photos and videos using their Mac's built-in camera. Whether it's a quick selfie, a silly moment with friends, or a video clip, many Mac users rely on Photo Booth to create and save memories. But what happens if you accidentally delete those precious photos or videos? Or if a system glitch causes your Photo Booth library to become inaccessible?
Losing pictures from Photo Booth can be frustrating, but don't panic! This comprehensive guide will walk you through every step you need to recover your lost or deleted Photo Booth pictures on your Mac. From understanding where your photos are stored, to simple quick fixes, to advanced recovery techniques, you'll learn how to get your photos back safely and efficiently.

Where Does Photo Booth Store Pictures on Mac?
Understanding where Photo Booth stores your pictures and videos on your Mac is crucial when it comes to recovering lost files. Unlike some apps that save photos in easily accessible folders, Photo Booth uses a unique system that keeps your photos bundled in a special library file, which can be confusing if you don’t know where to look.
The Photo Booth Library Explained:
Photo Booth does not save individual pictures as separate, stand-alone files in your Pictures folder or elsewhere. Instead, it stores all photos and videos inside a single container called the Photo Booth Library. This file looks like a regular file in Finder but is actually a package or bundle - a special type of folder that macOS treats as a single entity.
This design keeps your photos organized, allows the app to manage the media efficiently, and helps keep the user interface clean. However, it can also make it tricky to manually access or recover individual files unless you know how to open the package contents.
Default Storage Location:
Your Photo Booth pictures and videos are saved inside the Photo Booth Library file located at:
/Users/[YourUsername]/Pictures/Photo Booth Library
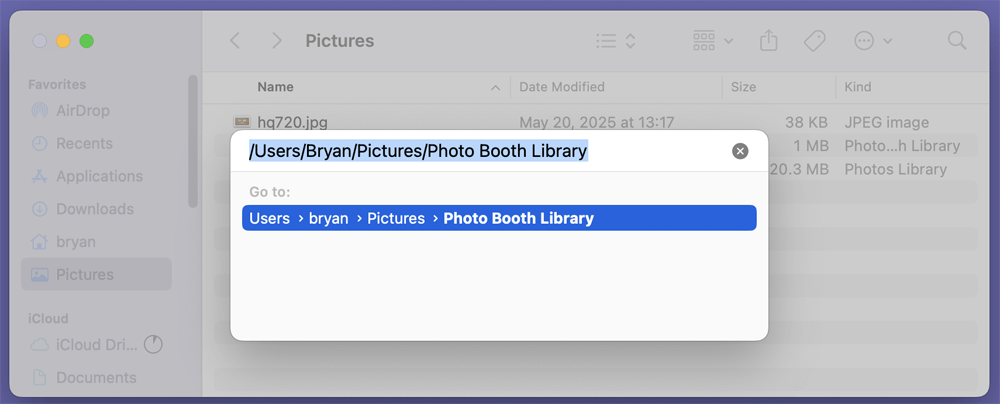
This file is not a typical folder; it's a package, which means it looks like a single file but actually contains many files and folders inside.
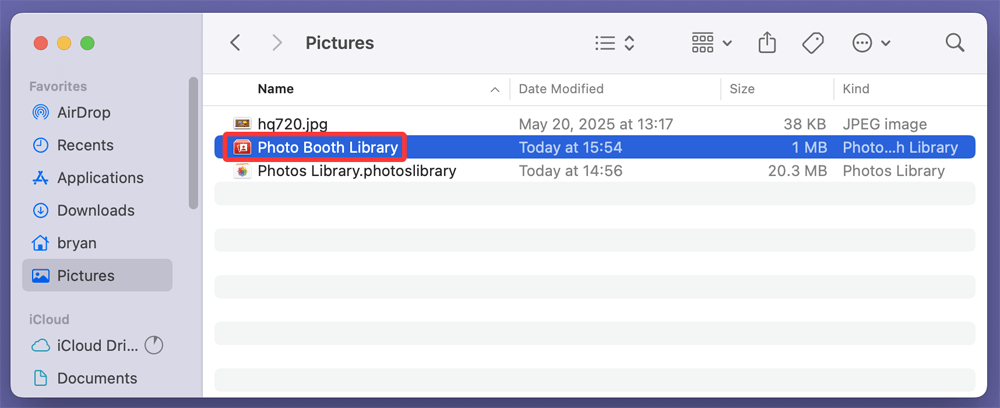
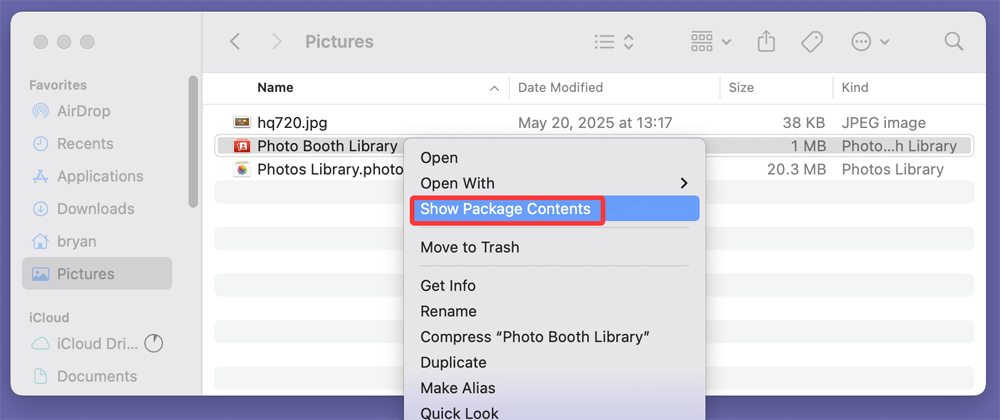
To access the actual pictures inside the Photo Booth Library:
- Open Finder.
- Navigate to the Pictures folder.
- Locate the Photo Booth Library file.
- Right-click (or Ctrl+click) on it and select Show Package Contents.
![select Show Package Contents]()
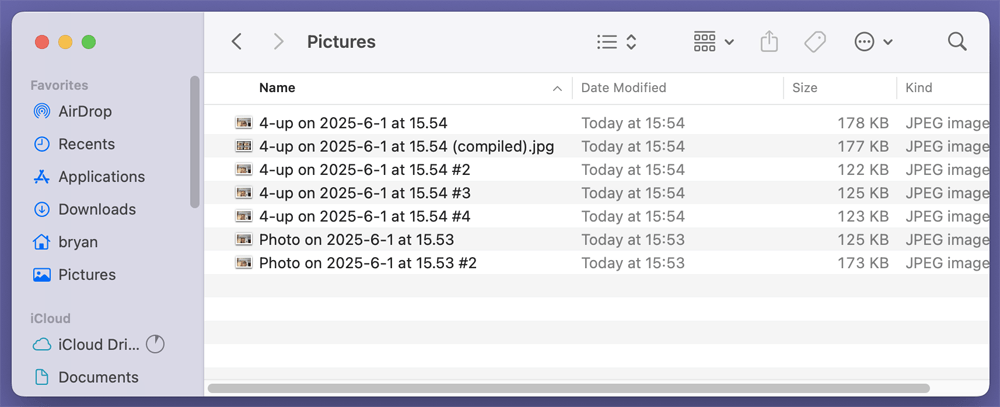
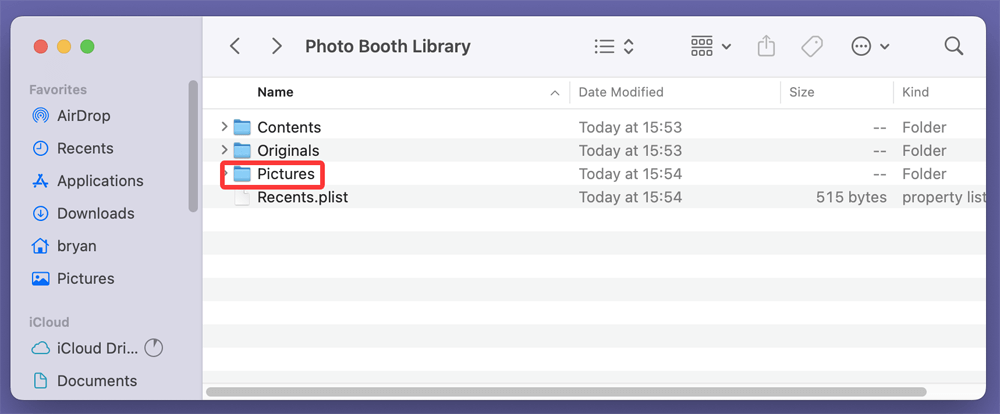
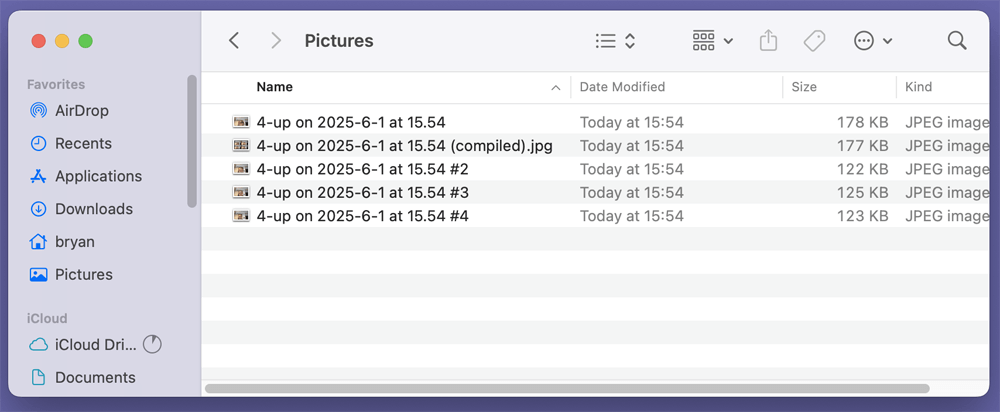
- Inside, open the Pictures folder to see your photos (typically .jpeg files).
![open the Pictures folder]()
![see your photos]()
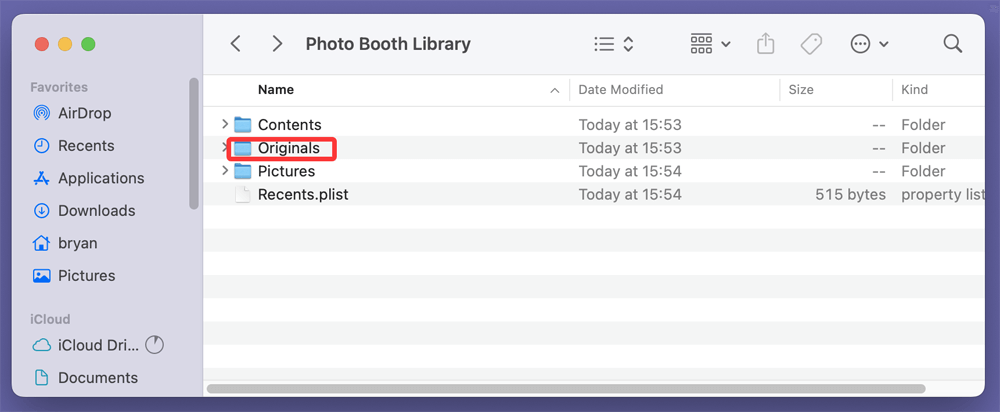
- The Originals folder contains the raw photos and videos.
![Originals folder contains the raw photos and videos]()

Why Knowing This Matters
If your Photo Booth app crashes, won't open, or the library file is corrupted, you can still access your photos directly by opening this package. This method allows you to:
- Manually copy photos to a safe location.
- Extract photos if the app refuses to launch.
- Use these files for further recovery attempts with software if they appear damaged.
Additional Notes
- Don't delete or move the Photo Booth Library unless you have backed it up. It's the central container for all your Photo Booth media.
- If you want to free up space or save photos outside Photo Booth, export or copy the images from inside the library to another folder.
- Some users mistakenly delete or replace the library file, which can result in total loss of all Photo Booth pictures. Regular backups are essential.
Quick Fixes: Check Before Advanced Recovery
Sometimes, lost photos can be recovered quickly with a few simple checks. Before jumping into complicated recovery tools, try these quick fixes:
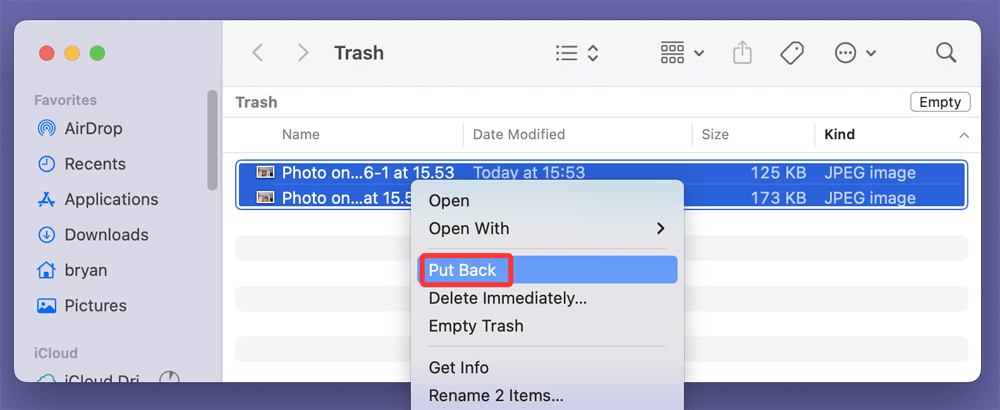
1. Check the Trash (Recycle Bin)
If you unintentionally deleted your Photo Booth pictures recently, there’s a chance they are still in the Trash.
- Open the Trash from your Dock.
- Look for your missing pictures or the Photo Booth Library.
- To return them to their original spot, right-click and choose Put Back if you locate them.
![Check the Trash]()
2. Search Using Spotlight
Your photos might still be somewhere on your Mac but misplaced or moved.
- Press Command + Space to open Spotlight search.
- Type keywords like "Photo Booth," or search for image files by typing ".jpg" ".jpeg"or ".mov".
![Search Using Spotlight]()
- Review the search results to see if your photos appear.

3. Check iCloud Photos or Time Machine Backup
If you use iCloud Photos or have Time Machine backups enabled, your photos may be backed up automatically.
- Open Photos app and check the Recently Deleted folder.
- Visit iCloud.com and check if your photos are synced.
- Connect your Time Machine drive (if you use it) to restore previous versions of the Photo Booth Library.
If none of these quick fixes work, you will need to try more advanced recovery techniques.
Recover Photo Booth's Photos and Videos from Time Machine Backup
If you've been using Time Machine, the built-in backup tool for Macs, you have a powerful method to recover lost photos from Photo Booth.
How to Restore from Time Machine:
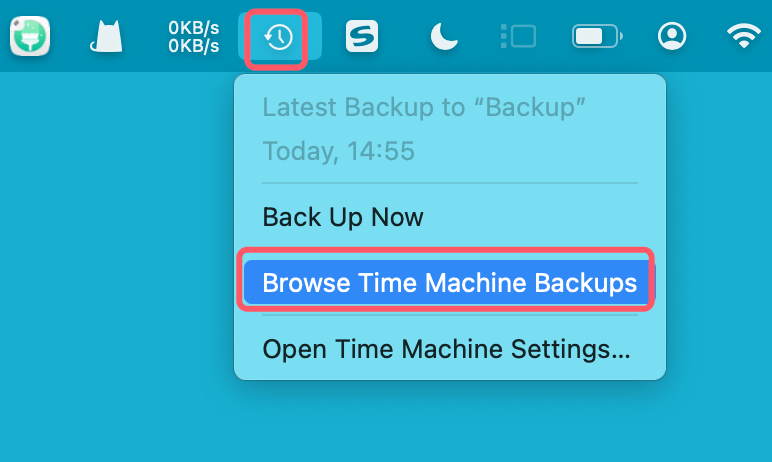
- Attach your Mac to the Time Machine backup drive.
- In Finder, open the Pictures folder.
- Choose Enter Time Machine (for older macOS Version) or Browse Time Machine Backups after clicking the Time Machine symbol in the navigation bar.
![How to Restore from Time Machine]()
- To find a date when you had the pictures, use the timeline on the right.
- Find the Photo Booth Library file or the images within it.
- Click Restore after selecting the file or images you wish to recover.
![Click Restore after selecting the file or images you wish to recover]()
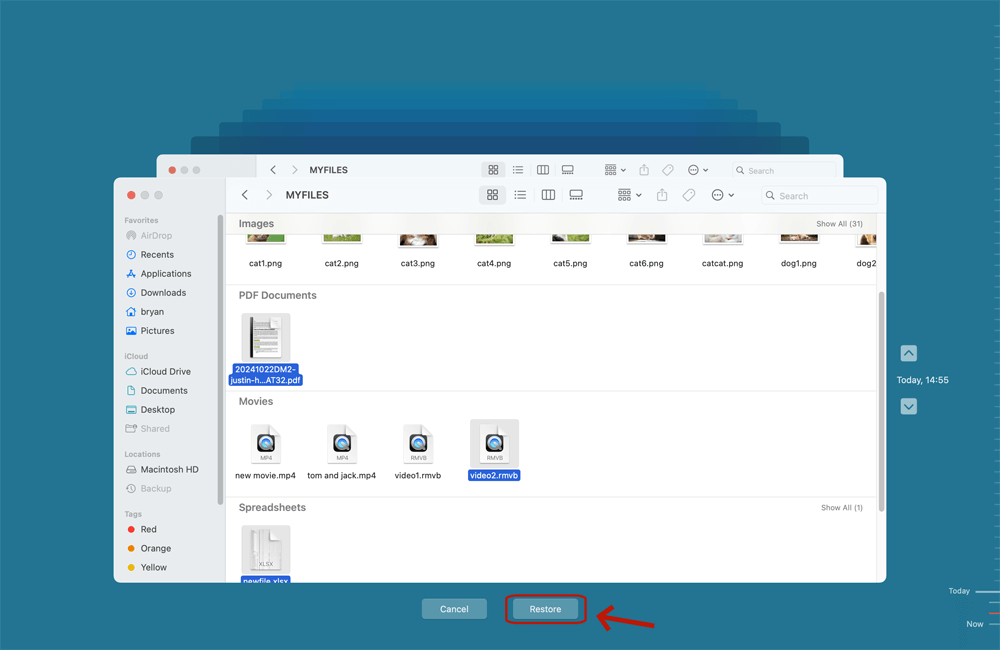
Time Machine will restore the files to their original location, effectively recovering your lost Photo Booth pictures.
What if You Don't Have Time Machine?
If Time Machine was not enabled before losing your pictures, don't worry. Consider enabling it now to prevent future data loss. Meanwhile, other recovery methods may help you retrieve your photos.
Use Data Recovery Software to Recover Deleted Photo Booth Pictures
When photos are permanently deleted from the Trash or lost due to corruption, third-party data recovery software can be very helpful.
Why Use Data Recovery Software?
- To scan your Mac's internal storage for deleted files that are not visible.
- To recover photos from a corrupted Photo Booth Library.
- To retrieve photos after a system crash or unexpected shutdown.
Recommended Mac Data Recovery Software
Here are some trusted tools that many Mac users rely on:
- Donemax Data Recovery for Mac - Known for its user-friendly interface and powerful scanning algorithms.
- Magoshare Data Recovery for Mac - Offers deep scanning and preview features.
- PhotoRec - Supports a variety of file types and recovery scenarios.
Step-by-Step Recovery Using Donemax Data Recovery for Mac
Step 1. Download and install Donemax Data Recovery for Mac. Launch the program and grant necessary permissions to access your disk.
Step 2. Select your Mac's system drive (usually named Macintosh HD).

Step 3. Click Scan to start searching for deleted files. After the scan, filter the results by file type (look for .jpg or .mov).

Step 4. Preview the photos to verify which files are recoverable. Select the photos you want to recover and click Recover.

Save the recovered photos to an external drive or different folder (never recover to the same drive to avoid overwriting).
💡Important Notes:
- Minimize using your Mac after photo loss to prevent overwriting deleted files.
- Choose reliable recovery software with good reviews to ensure safety and effectiveness.
Manually Extract Photos from a Corrupted or Damaged Photo Booth Library
If Photo Booth won't open or the library appears damaged, you can manually retrieve photos from the library's package.
How to Manually Extract Photos
- Open Finder and go to the Pictures folder.
- Right-click on Photo Booth Library and select Show Package Contents.
![select Show Package Contents]()
- Inside, navigate to the Pictures folder.
![navigate to the Pictures folder]()
- Copy the photo files (usually .jpg) to a safe location on your desktop.
![Copy the photo files to a safe location]()
- If some files don't have extensions or are corrupted, try renaming them to .jpg or open them with image viewers to test.

This method bypasses the Photo Booth app and accesses the raw photo files directly, which can save your pictures when the app or library is malfunctioning.
Tips to Avoid Photo Loss in Photo Booth
Once you have recovered your pictures, it's smart to take steps to avoid losing them again in the future:
1. Regular Backups
- Enable Time Machine backups regularly.
- Use iCloud Photos to sync your images across devices.
- Consider additional cloud backup services like Google Drive or Dropbox for extra safety.
2. Export Important Photos
- Don't keep all your important pictures only inside the Photo Booth Library.
- Export or copy them to a separate folder regularly.
3. Avoid Deleting the Photo Booth Library
- Deleting or moving the Photo Booth Library file without a backup can cause loss of all pictures.
- Always back up before making changes.
4. Keep macOS Updated
- Software updates often include fixes that improve app stability.
- Updated macOS reduces the chance of corruption.
Conclusion
Losing your precious Photo Booth pictures on Mac can be stressful, but it doesn't have to mean permanent loss. By understanding where Photo Booth stores your photos and trying simple fixes like checking the Trash or Spotlight, you can often recover your photos quickly. If those don't work, Time Machine backups and professional data recovery software provide reliable ways to restore deleted or corrupted pictures.
For cases where Photo Booth's app or library is damaged, manually extracting photos from the library package can save your images without needing to open the app itself. Finally, always remember the golden rule of digital photography: back up your photos regularly to avoid permanent loss.
With the tips and methods shared in this article, you're well-equipped to recover your Photo Booth pictures on Mac and keep your memories safe going forward.
Donemax Data Recovery for Mac
Donemax Data Recovery for Mac is one of the best Mac data recovery software. It is easy-to-use and can help in recovering deleted, formatted, inaccessible or lost data from Mac HDD/SSD, external disk, USB drive, SD card, camera or other storage devices.
Related Articles
- Nov 11, 2025SD Card Cannot Be Recognized on Mac [Fixed]
- May 13, 2025Recover Files Which Are Lost Due to Mac Shut Down
- Nov 04, 2024How to Recover Lost Data After Factory Reset a Mac?
- Jul 11, 20235 Methods to Recover Lost Data after Upgrading to macOS Sonoma
- Mar 06, 2025Three Methods to Recover Lost Data from WD My Passport on Mac
- Jun 28, 2025How to Recover Deleted .pkg Files on Mac? [4 Methods]

Contributing Writer
Coco Lin
Coco has been a writer and a chief programmer at Donemax software since 2018. Over 10 years of experience of writing troubleshooting articles in the software industry, she is passionate about programming and loves to providing solutions to Windows and Mac users. Also she enjoys music and palying tennis in her free time.

Editor in chief
Gerhard Chou
In order to effectively solve the problems for our customers, every article and troubleshooting solution published on our website has been strictly tested and practiced. Our editors love researching and using computers and testing software, and are willing to help computer users with their problems