
Written byStevenUpdated on Jul 07, 2025
How to Recover Lost Data After Upgrading to macOS Tahoe 26?
Approved byGerhard Chou
Before we start: Data loss may happen after upgrading to macOS Tahoe 26. You can first check Trash, backups, or other drives to find the missing files. Otherwise, use recovery software like Donemax Data Recovery for Mac to recover the lost data.
PAGE CONTENT:
- Why Data Loss Happens After macOS Tahoe 26 Upgrade
- First Things to Check Before Advanced Recovery
- How to Recover Lost Data Using Time Machine Backup
- Recover Lost Data with macOS Built-in Features
- Recovering Lost Data with Mac Data Recovery Software
- FAQs about Data Recovery after Upgrading to macOS Tahoe 26
Apple's latest macOS release, macOS Tahoe 26, introduces exciting new features, performance upgrades, and a refined user interface. But for some users, upgrading doesn't go as smoothly as expected. One common and frustrating issue is how to recover lost data after upgrading to macOS Tahoe 26.
Whether it's missing documents, vanished desktop files, or inaccessible external drives, losing valuable data can be alarming. Fortunately, there are several ways to recover your files, even if you didn't prepare backups beforehand.
In this comprehensive guide, we'll walk you through practical steps to recover lost data after upgrading to macOS Tahoe 26, covering both built-in solutions and third-party recovery tools.
Why Data Loss Happens After macOS Tahoe 26 Upgrade
Upgrading your Mac to a new operating system is generally safe, but unforeseen glitches can lead to data loss. Here are the most common reasons users report missing files after installing macOS Tahoe 26:
- Incomplete or Interrupted Installation: Power outages or system errors during the upgrade can corrupt files.
- Incompatibility Issues: Some older apps or file formats may not function correctly under Tahoe 26, leading to inaccessible data.
- System Glitches: Post-upgrade bugs or indexing delays can make files temporarily "disappear."
- Accidental Deletion: Files might be mistakenly deleted during the upgrade process or while reorganizing storage.
- iCloud Sync Issues: iCloud Drive syncing inconsistencies can hide files from local storage.
The good news is: In most situations, lost data can be recovered with the right tools and techniques.
First Things to Check Before Advanced Recovery
Before diving into advanced recovery methods, try these quick checks that often help recover "missing" files:
1. Check the Trash Bin
Sometimes, files accidentally get deleted during the upgrade. Open the Trash and carefully review its contents. If you spot your lost files, select the files and right-click and choose Put Back.

2. Use Spotlight Search
macOS Spotlight can help locate misplaced files. Press Command + Space, type your file name or a keyword, and check if Spotlight locates the missing document.
3. Verify iCloud Drive
If you use iCloud Drive, files might appear missing locally but still reside in your iCloud storage:
- Go to System Settings > Apple ID > iCloud > iCloud Drive and check your settings.
- Visit iCloud.com to see if your files are accessible online.
4. Look for External Backups
If you regularly back up your data to an external drive or another cloud service (Google Drive, Dropbox, etc.), check those locations for your missing files.
If these initial steps don't help, don't worry—more robust recovery options are available.
How to Recover Lost Data Using Time Machine Backup
Time Machine is macOS's built-in backup feature. If you set it up before upgrading to macOS Tahoe 26, restoring lost files is straightforward:
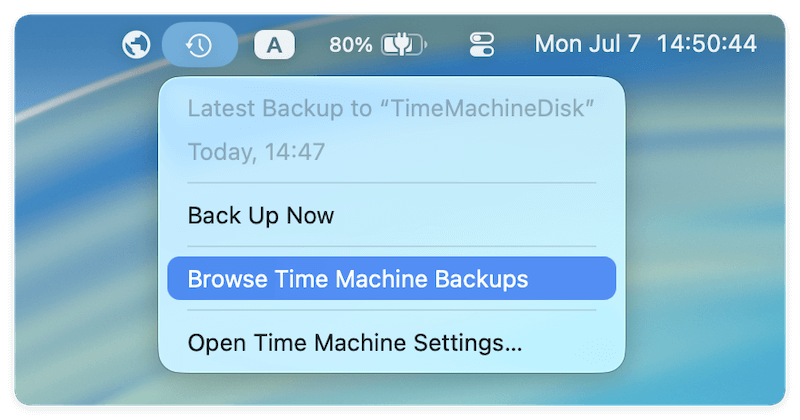
- Attach your Mac to the Time Machine backup drive.
- Go to the folder (such as Documents, Desktop) where your missing file was last found.
- Select Browse Time Machine Backups after clicking the Time Machine symbol in the navigation bar.
![recover lost data after upgrading to macOS Tahoe 26]()
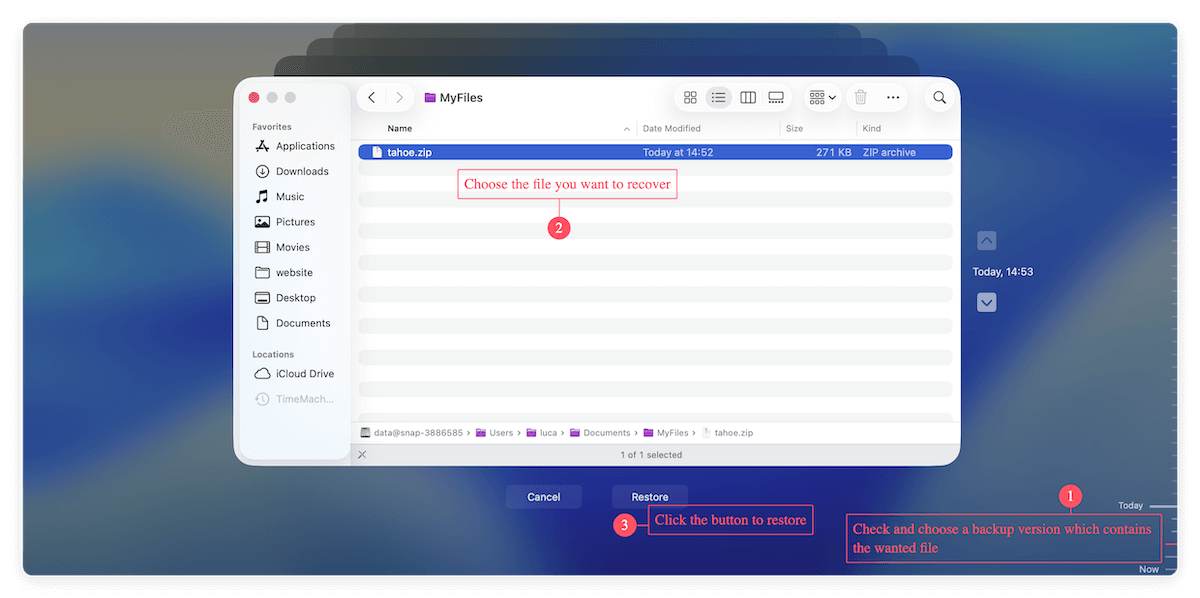
- To see a date prior to the upgrade, use the timeline on the right. Select the file or folder and click Restore.
![recover lost data after upgrading to macOS Tahoe 26]()
No Time Machine Backup? If you didn't set it up, skip to the next sections for other recovery methods.
Recover Lost Data with macOS Built-in Features
Even without Time Machine, macOS offers built-in options to help recover files:
1. Check iCloud Drive
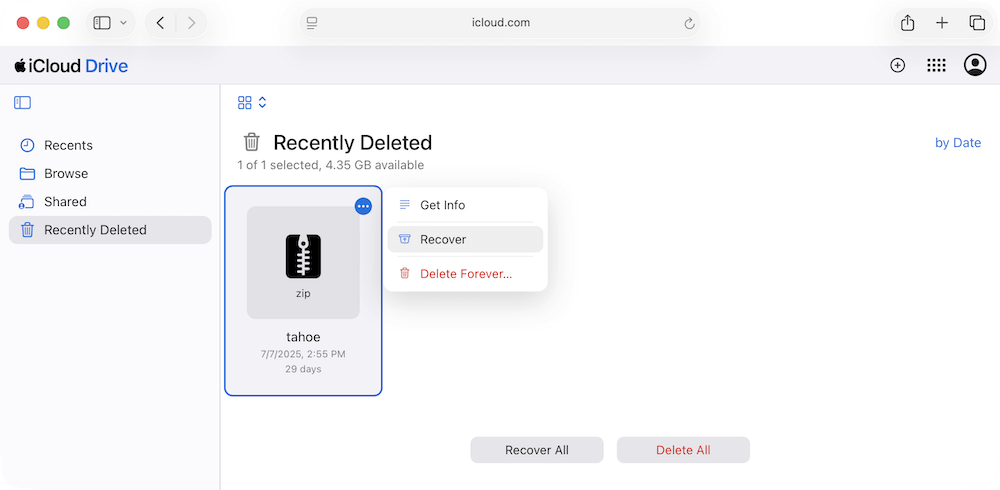
If you use iCloud Drive, files deleted or altered might still be recoverable:
- Visit iCloud.com and go to Drive > Recently Deleted.
- Restore files directly if they're present.
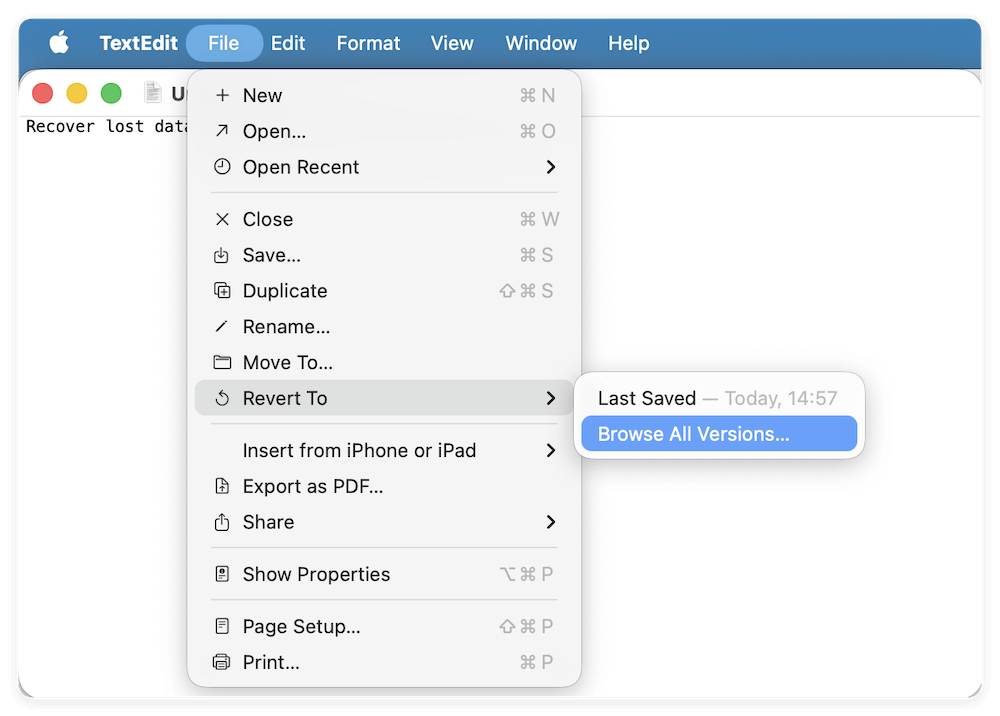
2. Use Versions to Restore Previous File States
Some apps, like Pages, Numbers, and TextEdit, support Versions:
- Open the app and the affected file.
- Go to File > Revert To > Browse All Versions to see past versions and restore lost content.
3. Migration Assistant (If Used During Upgrade)
If you used Migration Assistant to transfer files during setup:
- Re-run Migration Assistant (found in Applications > Utilities) to restore from available sources like a Time Machine backup, another Mac, or an external disk.
Recovering Lost Data with Mac Data Recovery Software
If you lack a backup and files remain missing, your best option is reliable Mac data recovery software. These tools scan your Mac's internal storage to locate recoverable data, even after system upgrades.
Here we recommend the reliable recovery tool Donemax Data Recovery for Mac. The software is comprehensive and effective. It's full of useful features to make sure data recovery successful:
- Supports recovery of documents, photos, videos, and more.
- Can restore data from APFS, HFS+, FAT32, and NTFS drives.
- User-friendly with intuitive interface.
- Can recover files from formatted, corrupted, or lost partitions.
- Powerful recovery tool for internal drives, SD cards, and external disks.
- Supports preview before recovery.
How to Recover Files Using Recovery Software
Step 1. Download and install Donemax Data Recovery on your Mac.
Step 2. Launch the software and select the disk or volume to scan.

Step 3. Run a scan to search for lost files. It will deep scan the drive to find lost data.

Step 4. Preview recoverable files and select the ones you need. Recover files to a different storage location to avoid further data loss.

🔖 Note: Stop using your Mac for new downloads or large file transfers until recovery is complete. It can minimize the risk of overwriting deleted data.
FAQs about Data Recovery after Upgrading to macOS Tahoe 26
How to Recover Data from External Drives or Encrypted Volumes after Upgrading to macOS Tahoe 26?
After upgrading to macOS Tahoe 26, some users experience issues accessing external storage devices or encrypted volumes.
Common Symptoms
- External drives not mounting
- APFS-encrypted volumes prompting for incorrect passwords
- Data inaccessible or appearing as empty
Solutions
- Check Disk Utility:
- Go to Disk Utility from Utilities via Applications.
- Select the external drive and click Mount (if available).
- Run First Aid to repair disk errors.
- Use Recovery Software:
- If the drive is recognized but inaccessible, use recovery software to scan and extract lost data.
- APFS Encrypted Drives:
- Double-check passwords or recovery keys.
- If forgotten, recovery options depend on whether a recovery key was saved during encryption setup.
What to Do If Your Mac Won't Boot After Tahoe 26 Upgrade?
If your Mac fails to boot after upgrading to macOS Tahoe 26, data recovery is still possible:
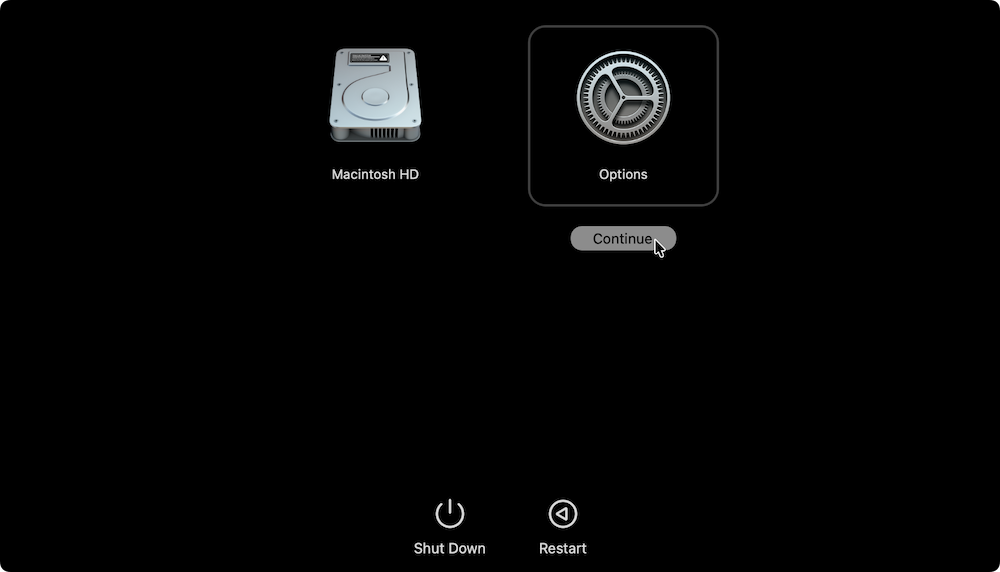
1. Boot into macOS Recovery Mode
- Power your Mac on and hold Power button until you see the startup disk list.
- Select Options and click Continue to enter Recovery Mode.
![recover lost data after upgrading to macOS Tahoe 26]()
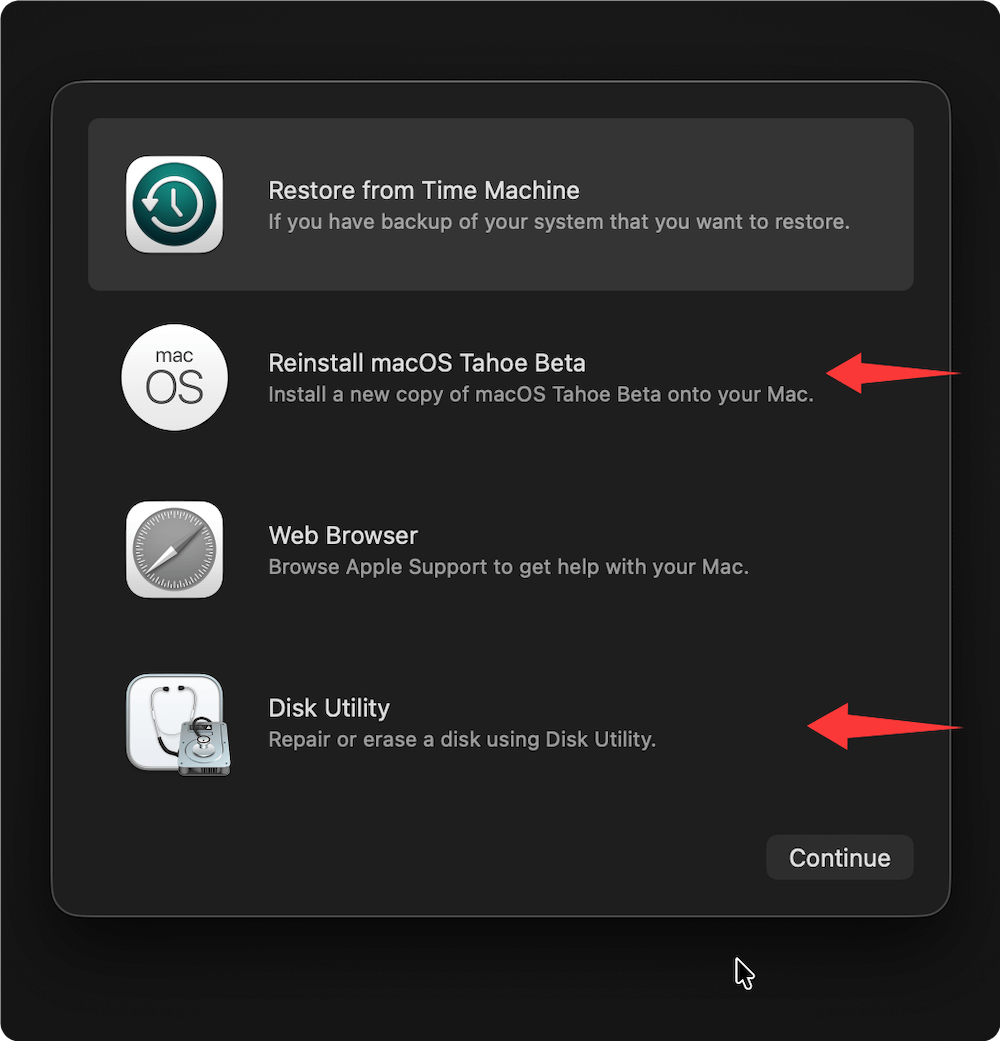
- Access Disk Utility to repair drives or reinstall macOS without erasing data.
![recover lost data after upgrading to macOS Tahoe 26]()
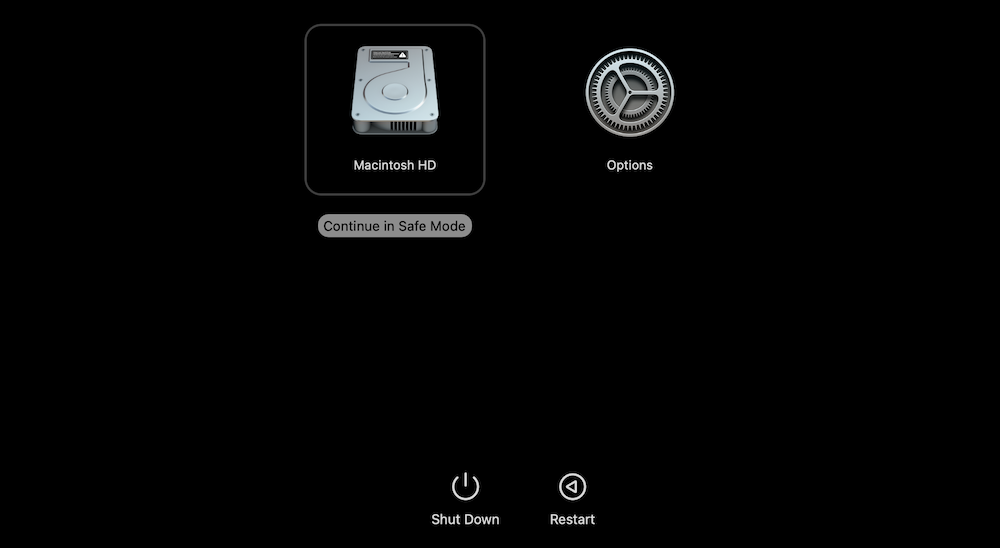
2. Use Safe Mode
- Restart your Mac and hold on Power button until you see the startup disk. Select the startup disk and hold Shift key, select Continue to Safe Mode.
![recover lost data after upgrading to macOS Tahoe 26]()
- Safe Mode can fix minor startup issues, allowing access to your files.
3. Target Disk Mode
- Connect your problematic Mac to another Mac using a Thunderbolt or USB-C cable.
- Boot into Target Disk Mode (hold T on startup).
- Your Mac's drive will appear as an external disk on the other Mac, allowing data transfer.
How to Prevent Future Data Loss During macOS Tahoe 26 Upgrades?
Data loss often occurs unexpectedly, but you can reduce the risk with proper preparation:
1. Regular Backups
- Use Time Machine for automated, incremental backups.
- Supplement with manual copies to external drives or cloud storage.
2. Verify App and Hardware Compatibility
- Before upgrading, confirm that your essential apps and devices are compatible with macOS Tahoe 26.
3. Perform a Clean Install with Caution
- Clean installs improve performance but erase data.
- Always back up files before erasing your disk.
4. Keep Recovery Tools Ready
- Install reliable recovery software in advance.
- Maintain an updated bootable installer for macOS in case recovery is needed.
Conclusion
Upgrading to macOS Tahoe 26 offers many benefits, but unexpected data loss can overshadow the excitement. Whether it's missing documents, inaccessible external drives, or a system that won't boot, your data is often recoverable with the right steps.
Future-proof your Mac experience by making regular backups and preparing for potential glitches before installing major system updates like macOS Tahoe 26.
Lost data doesn't have to be permanent—act quickly, follow the steps outlined here, and you can often restore your valuable files successfully.
Donemax Data Recovery for Mac
Donemax Data Recovery for Mac is one of the best Mac data recovery software. The tool is easy to recover deleted, formatted or lost data. The software supports Mac HDD/SSD, external disk, USB drive, SD card, camera or other storage devices.
Related Articles
- Dec 31, 2024Can't Find a File on Mac? Get It Back By Searching or Recovering
- Nov 26, 2025Load System Extension to Recover Lost Data from Apple Silicon Mac
- Apr 10, 2025How to Recover Lost Data from Unreadable Micro SD Card?
- May 29, 2025Recover Deleted or Lost iMovie Projects on Mac
- Nov 27, 2025How to Unformat USB Flash Drive on Mac?
- Jun 17, 2026AI-Based Data Recovery Solution: Smart Way to Rescue Data on MacOS 27

Contributing Writer
Steven
Steven has been a senior writer & editor of Donemax software since 2020. He's a super nerd and can't imagine the life without a computer. Over 6 years of experience of writing technical solutions and software tesing, he is passionate about providing solutions and tips for Windows and Mac users.

Editor in chief
Gerhard Chou
In order to effectively solve the problems for our customers, every article and troubleshooting solution published on our website has been strictly tested and practiced. Our editors love researching and using computers and testing software, and are willing to help computer users with their problems