
Written byCoco LinUpdated on May 13, 2026
Mac Trash Bin: Everything You Should Know
Approved byGerhard Chou
PAGE CONTENT:
If you are transitioning from Windows to macOS, or if you are simply looking to better organize your digital life, understanding the Mac Trash system is essential. Often referred to as th e recycle bin for Mac, the Trash is more than just a folder—it is a safety net for your data and a vital part of your Mac's storage management.

In this guide, we' ll explore everything from basic deletion to advanced tips on how to manage the trash bin on Mac effectiv ely, ensuring you never lose an important document accidentally while keeping your SSD clutter-free.
Where is the Trash Bin on Mac?
Unlike Windows, where the Recycle Bin often sits prominently on the desktop, the Mac Trash icon is located at the very end of the Dock (usually on the far right or bottom).
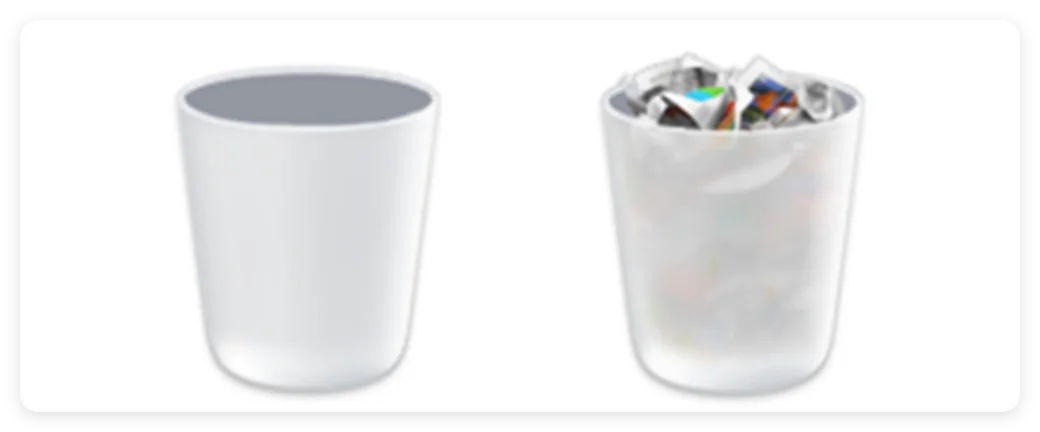
The icon itself is dynamic:
- Empty Trash: It looks like a sleek, empty wire-mesh or solid wastebasket.
- Full Trash: It appears filled with crumpled pieces of paper, signaling that there are items waiting to be either restored or permanently deleted.
How to Move Files to the Mac Trash?
There are several ways to "throw away" files on macOS. Depending on your workflow, you might prefer the mouse or keyboard shortcuts.
Option 1. The Drag-and-Drop Method
This is the most intuitive way. Simply click on a file or folder on your desktop or in a Finder window and drag it directly onto the Trash icon in the Dock.
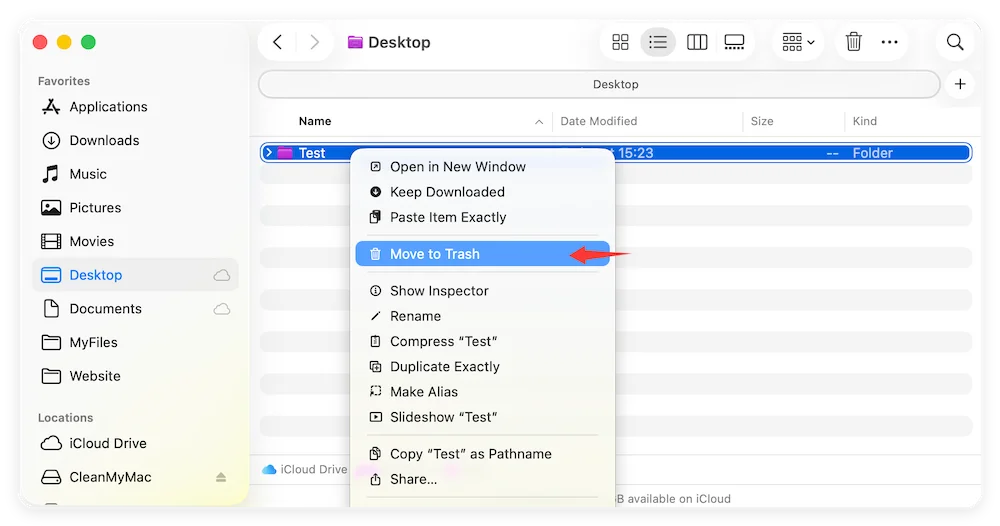
Option 2. Using the Right-Click Menu
- Select the item you want to delete.
- Right-click (or Control-click) on the file.
- Select Move to Trash from the drop- down menu.
Option 3. The Keyboard Shortcut (Fastest)
For those who like to work quickly, select your file and press Command + Delete . The file will instantly move to the trash bin on Mac .
How to Empty the Trash and Free Up Space?
Moving a file to the Trash does not actually delete it from your hard drive. It still occupies space. To reclaim that storage, you must empty the bin.
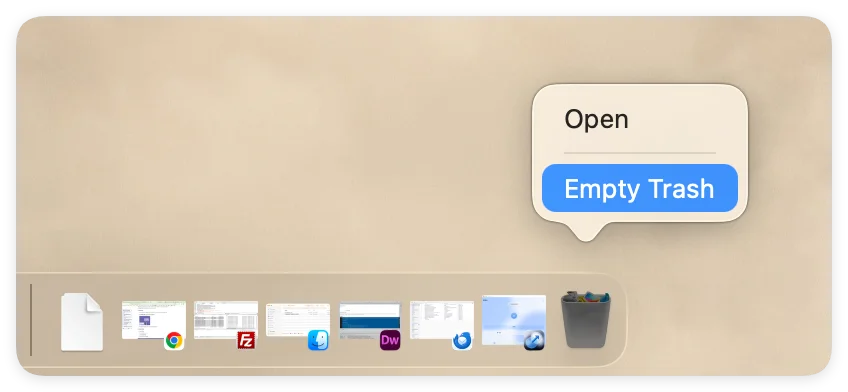
To Empty the Trash:
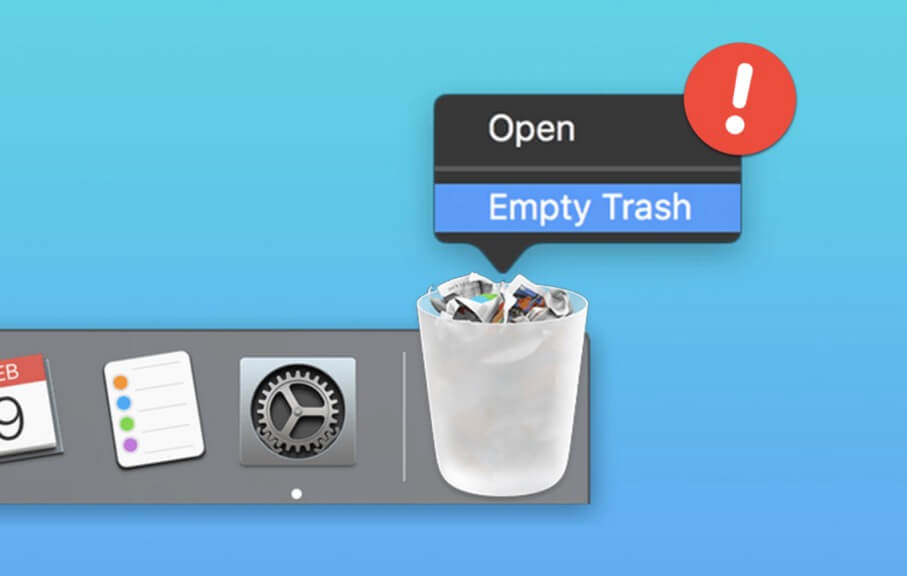
- Option A: Right-click the Trash icon in the Dock and select Empty Trash.
![empty Trash]()
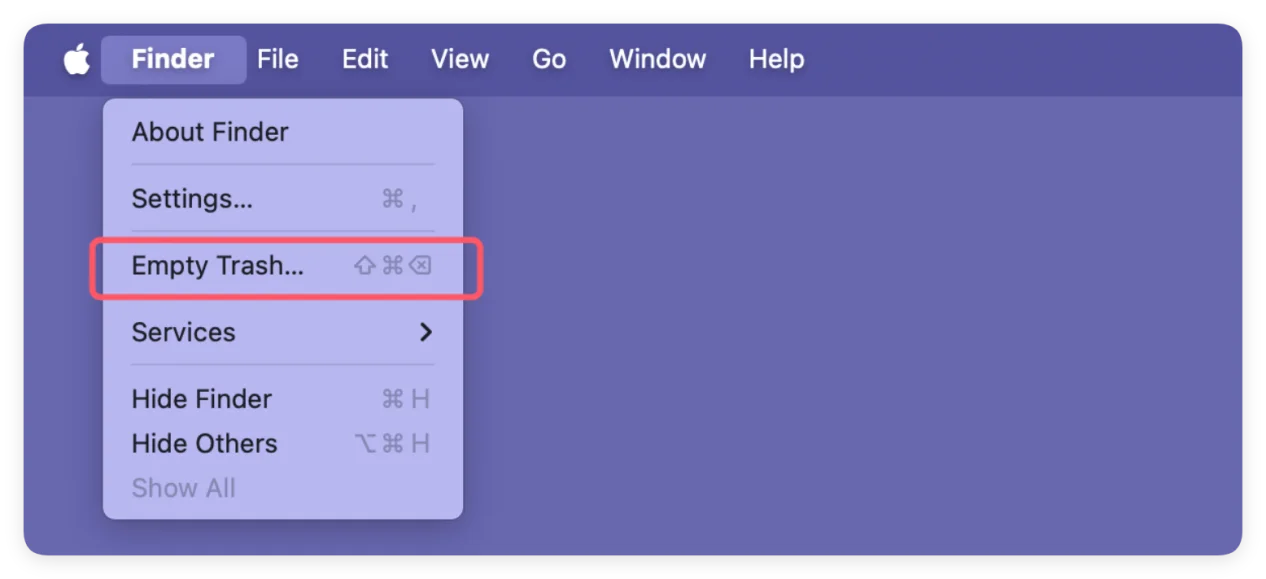
- Option B: Open the Trash folder and click the Empty button in the top right corner.
![Mac Trash]()
- Option C: Use the shortcut Command + Shift + Delete .
![Mac Trash]()
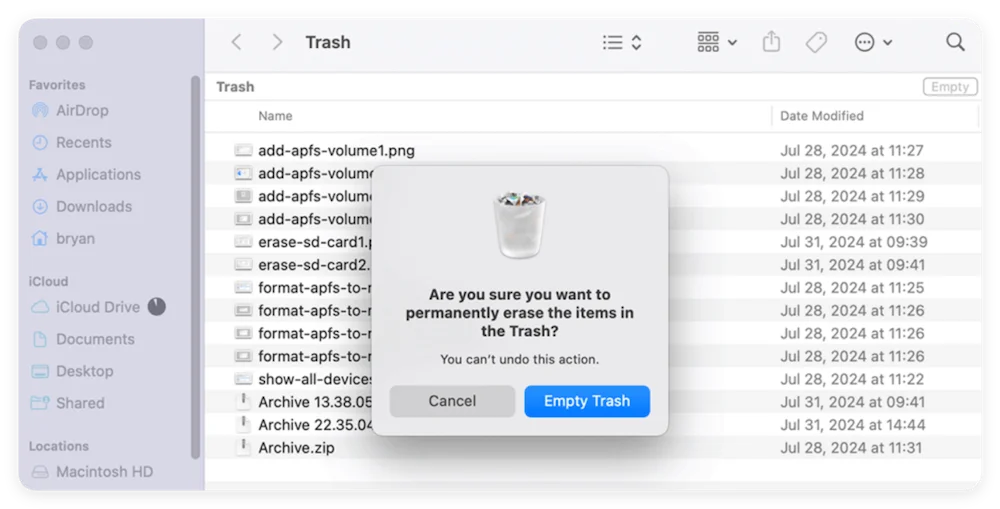
To Empty the Trash Permanently (Without Confirmation):
If you want to skip the "Are you sure?" pop-up, press Command + Shift + Option + Delete .
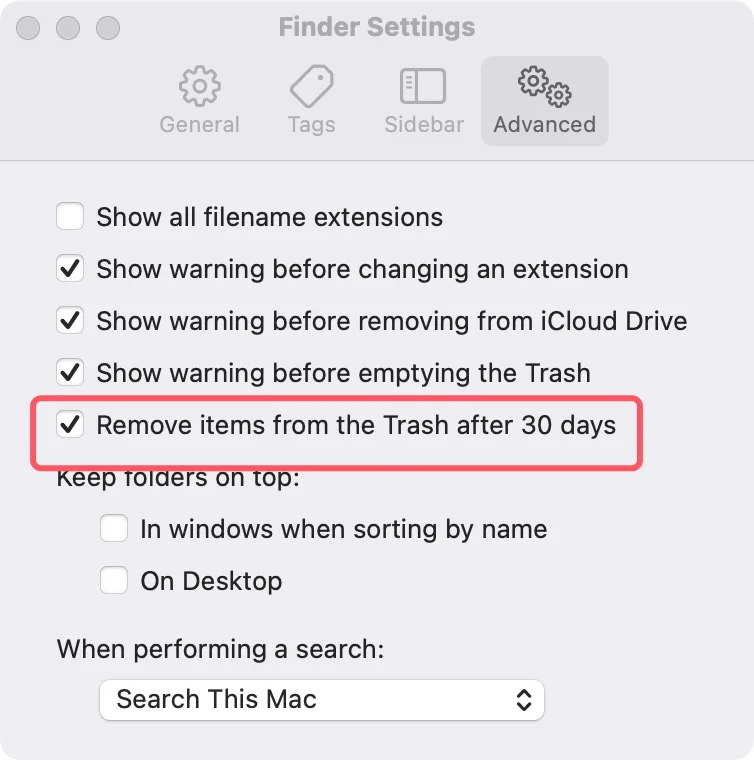
Auto-Emptying the Trash
Did you know your Mac can clean up after itself? You can set the Mac Trash to delete items automatically after they have been sitting there for 30 days.
- Open Finder.
- Go to Settings (or Preferences) > Advanced.
- Check the box: "Remove items from the Trash after 30 days."
The "Put Back" Feature: Your Digital Safety Net
One of the best features of the recycle bin for Mac is the ability to undo a mistake. If you accidentally deleted a file, don't panic!
- Open the Trash by clicking it in the Dock.
- Find the file you want to rescue.
- Right-click the file and select Put Back.
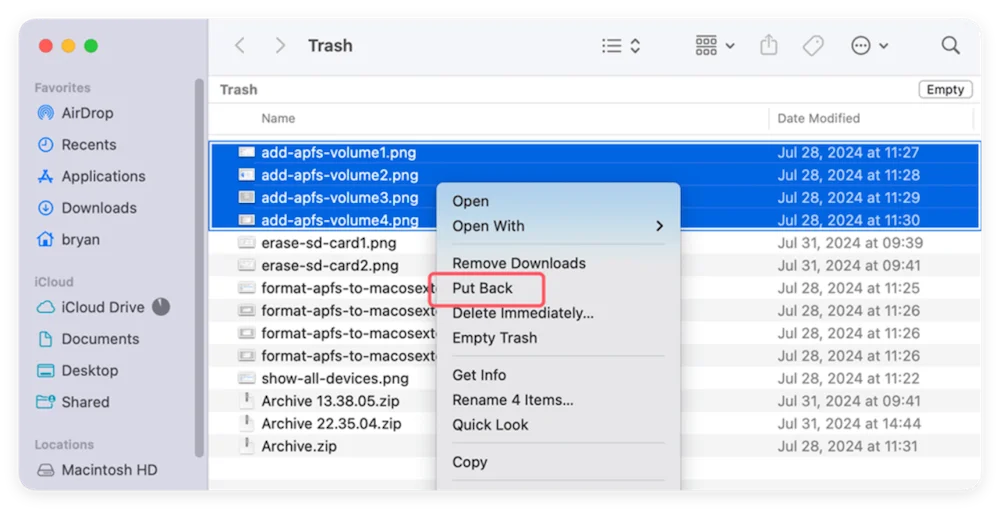
The file will automatically fly back to its original location. This is much more efficient than dragging it back manually, as macOS remembers exactly where the file lived.
If you cannot find the deleted files in Trash or the Trash has been emptied, you can use Mac data recovery app to help you get the deleted files back.
Can I recover files from emptied trash on Mac?
With the software Donemax Data Recovery, you can even recover the deleted files after emptying Trash on Mac.
Troubleshooting: When the Trash Won't Empty
Occasionally, you might encounter an error saying a file is "in use" or the "operation can' t be completed."
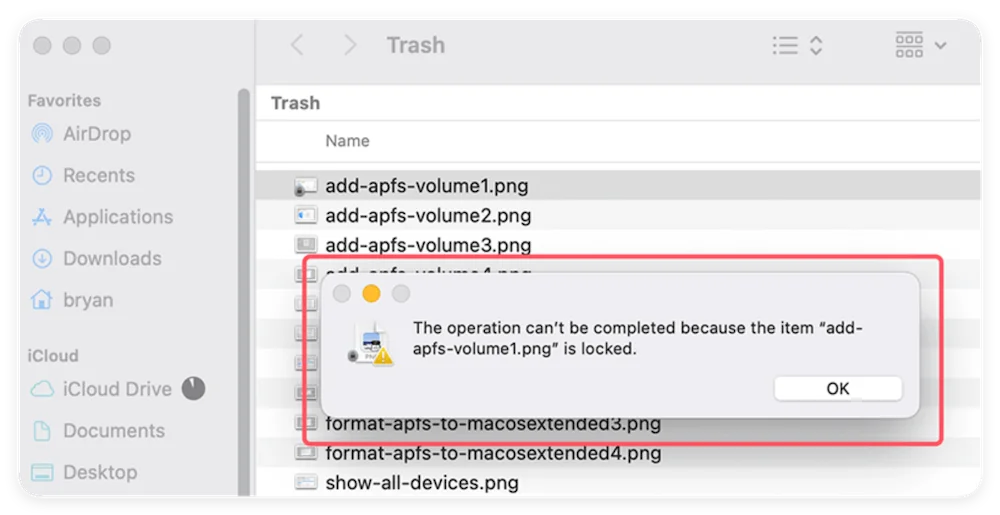
- Check for Open Apps: Ensure no programs are currently using the file you are trying to delete.
- Restart Finder: Sometimes a simple restart of the Finder (Option + Right-click Finder icon > Relaunch) clears the glitch.
- Force Delete via Terminal: For advanced users, the command sudo rm -rf ~/.Trash/* can clear the bin, but use this with extreme caution as it is irreversible.
FAQs about Mac Trash
When you empty the trash bin on Mac, the file system marks the space occupied by those files as "available." While the data isn't immediately overwritten, it becomes invisible to the OS. This is why data recovery software can often still find "deleted" files if you act quickly.
You cannot do this through standard macOS settings. However, if you have a Time Machine backup, you can restore the files from a previous snapshot. If you don't have a backup, you would need professional data recovery software.
This is usually a minor system glitch. Try moving a new file into the Trash and then emptying it again. If that fails, restarting your Mac usually refreshes the Dock icon status.
Yes and no. macOS creates a hidden .Trashes folder on every external drive you connect. When you move a file from a USB drive to the Mac Trash, it stays on that USB drive in a hidden state until you empty the Trash while the drive is still plugged in.
"Move to Trash" is a temporary state where files can be recovered. "Delete" (or emptying the trash) is a permanent action that instructs the Mac to treat that storage space as empty and ready for new data.
Final Thoughts
The Mac Trash is a simple yet powerful tool. By mastering the shortcuts and understanding how the recycle bin for Mac han dles your data, you can prevent accidental data loss and keep your system running smoothly. Remember to empty your trash regularly—or enable the 30-day auto-clean feature—to ensure you always have plenty of space for your next big project!
Donemax Data Recovery for Mac
Donemax Data Recovery for Mac is one of the best Mac data recovery software. It is easy-to-use and can help in recovering deleted, formatted, inaccessible or lost data from Mac HDD/SSD, external disk, USB drive, SD card, camera or other storage devices.
Related Articles
- Jun 25, 2025What Is Internet Recovery Mode on Mac? What Can It Do?
- Apr 30, 2025About Disk Management – How to Open and Use It on Windows 11/10?
- May 26, 2025What's EFI Partition? Is It Safe to Delete the EFI Partition on Windows?
- Jul 08, 2025RAR vs. ZIP: Which Compression Format is Better?
- Oct 11, 2024What Is Time Machine?
- Sep 12, 2025Windows Safe Mode: The Complete Troubleshooting Guide

Contributing Writer
Coco Lin
Coco has been a writer and a chief programmer at Donemax software since 2018. Over 10 years of experience of writing troubleshooting articles in the software industry, she is passionate about programming and loves to providing solutions to Windows and Mac users. Also she enjoys music and palying tennis in her free time.

Editor in chief
Gerhard Chou
In order to effectively solve the problems for our customers, every article and troubleshooting solution published on our website has been strictly tested and practiced. Our editors love researching and using computers and testing software, and are willing to help computer users with their problems
Hot Donemax Products

Clone hard drive with advanced clone technology or create bootable clone for Windows/Mac OS.

Completely and easily recover deleted, formatted, hidden or lost files from hard drive and external storage device.

Certified data erasure software - permanently erase data before selling or donating your disk or any digital device.