
Written byMariaUpdated on Sep 29, 2025
Sign Out of iCloud on Mac and Lose Files, How to Recover?
Approved byGerhard Chou
Before we start: If you failed to back up the files and there are files missing after sign out of iCloud on Mac, you can use the reliable software Donemax Data Recovery for Mac to deeply scan your Mac drive and get back the missing data effectively.
PAGE CONTENT:
iCloud is Apple's cloud-based storage and synchronization service that helps Mac users keep files, photos, notes, and app data consistent across devices. By default, macOS integrates iCloud Drive into the Finder, storing important folders such as Desktop and Documents. While this setup ensures your files are always backed up in the cloud, it can cause confusion when signing out of iCloud on a Mac.
Many users report that after signing out, their Desktop and Documents appear empty, photos vanish, and even notes or calendar entries disappear. This can be alarming—especially if you didn't realize that iCloud was acting as the main storage location for those files.
The good news is that in most cases, these files are not permanently gone. Instead, they are either still stored in iCloud, in backups, or recoverable through data recovery tools. This article will guide you through step-by-step solutions to recover files lost after signing out of iCloud on your Mac
Why Files Disappear After Signing Out of iCloud on Mac
To understand recovery, it's important to know why files vanish when signing out of iCloud:
- iCloud Drive Synchronization
- When you enable iCloud Drive, macOS may move your Desktop and Documents folders into iCloud.
- Files saved there no longer have a permanent local copy on your Mac unless you've disabled "Optimize Mac Storage."
- Optimize Mac Storage Feature
- With this setting enabled, macOS keeps only lightweight file versions locally while full versions are stored in iCloud.
- Once you sign out, those cloud-only files vanish from Finder.
- Photos, Notes, and Other Apps
- Photos stored in iCloud Photos disappear from the Photos app when you sign out.
- Notes synced with iCloud vanish from the Notes app until you sign back in.
In short, signing out doesn't delete your files but rather disconnects your Mac from their cloud copies.
Steps to Recover Files Lost after Signing Out of iCloud on Mac
Step 1: Check If Files Are Still Available in iCloud
The first recovery step is to see whether your data is still in iCloud.
Access iCloud.com
- Open iCloud.com in a browser.
- Log in with your Apple ID.
- Browse the following areas:
- iCloud Drive: Look for Desktop, Documents, or manually uploaded files.
- Photos: Browse albums or check "Recently Deleted."
- Notes, Reminders, Contacts, Calendars: Verify if synced content is still there.

Restore Deleted Items from iCloud.com
Apple provides a built-in recovery option:
- Log in to iCloud.com.
- Go to Account Settings.
- Scroll down and select Data Recovery.
- Choose to restore files, contacts, or calendars from recent deletions.
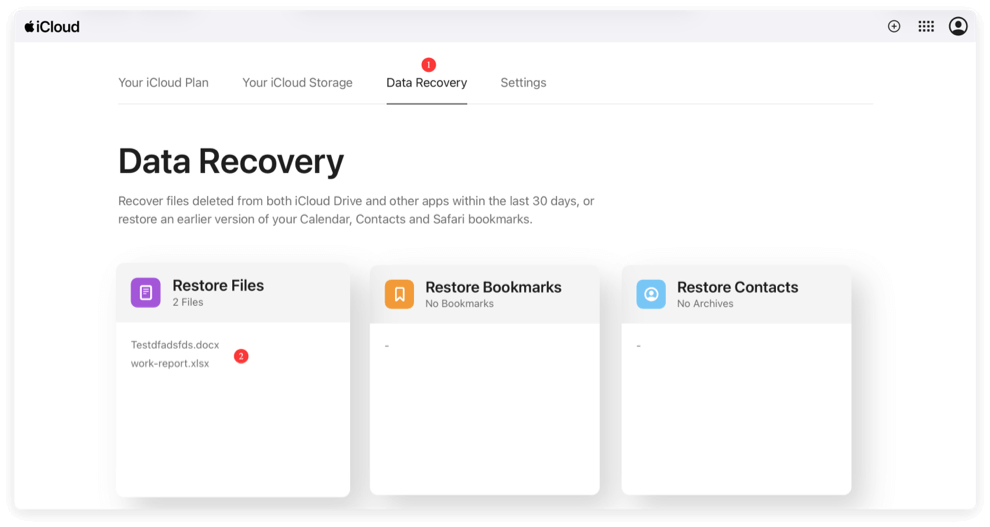
Files remain in iCloud's "Recently Deleted" for 30 days before permanent removal. If you signed out recently, there's a good chance you can restore them here.
Step 2: Re-Sign Into iCloud on Your Mac
If you don't see your files on iCloud.com, it's worth signing back into iCloud on the same Mac.
Steps to Sign In Again
- Go to Apple menu > System Settings (or Preferences).
- Select Apple ID.
- Sign in with the same Apple ID you used previously.
- Re-enable iCloud Drive and choose Desktop & Documents syncing.
This should resync your missing files, especially if you had Optimize Storage enabled. Be patient—syncing may take time, depending on file size and internet speed.
Limitation: If files were permanently deleted from iCloud before signing out, they may not reappear. In that case, proceed to backup recovery.
Step 3: Check the "Recently Deleted" Folders
Different iCloud apps include their own Recently Deleted folder, acting like a safety net.
- Photos app: Open Photos > Recently Deleted (items remain for 30 days).
- Notes app: Check Notes > Recently Deleted.
- iCloud Drive: Log in to iCloud.com and check Recently Deleted.
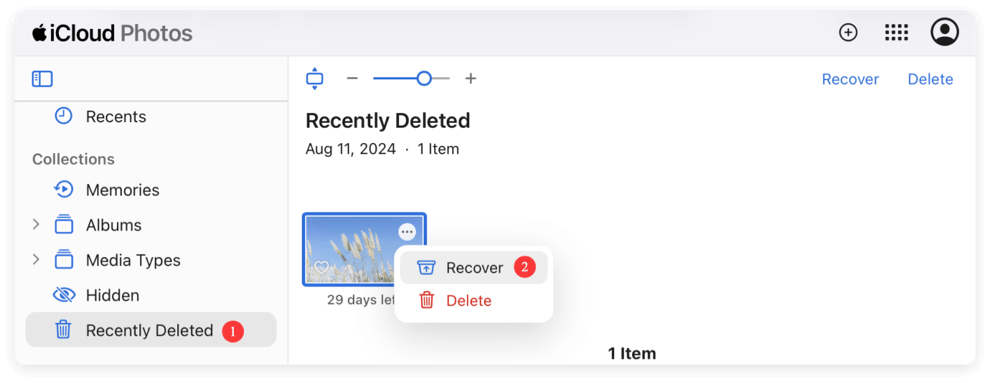
If the files you lost fall into these categories, recovery is straightforward—just select and restore.
Step 4: Recover Files From Local Backups
If your data is missing from iCloud, your next best bet is local backups.
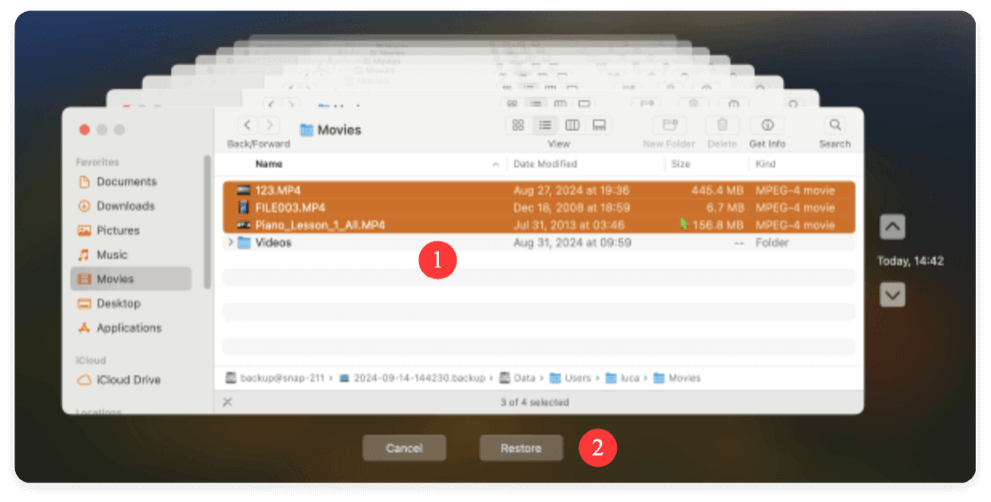
Time Machine Backup
Time Machine is Apple's built-in backup tool that automatically saves hourly, daily, and weekly copies of your Mac.
To restore files using Time Machine:
- Connect your Time Machine backup drive.
- Open the folder where the files were originally stored (e.g., Desktop or Documents).
- Launch Time Machine from the menu bar.
- Use the timeline on the right to go back to a date before you signed out of iCloud.
- Select the files and click Restore.
Manual Backups or External Drives
If you manually backed up files to an external drive, USB stick, or another cloud service (Google Drive, Dropbox, OneDrive), now is the time to check them.
Step 5: Use a Professional Data Recovery Tool
If your files aren't available in iCloud or local backups, using a professional data recovery tool may be your best chance to recover lost files. These tools can scan your Mac's storage for deleted or missing files, even if they were removed after signing out of iCloud.
When Data Recovery Tools Are Most Effective
- Files were stored locally on your Mac before signing out of iCloud.
- iCloud deleted local versions during the sign-out process.
- No other backups are available.
- You haven't written large amounts of new data to the same disk, which could overwrite lost files.
Choosing a Recovery Tool
Not all data recovery software is equal. Look for tools that:
- Support macOS and the file system you're using (APFS or HFS+).
- Offer deep scan capabilities for thorough searching.
- Allow previewing files before recovery, so you only restore what's needed.
- Have positive reviews and a reliable support system.
Popular options include:
Donemax Data Recovery for Mac – User-friendly, deep scanning, supports multiple file types and preview before recovery.
Do Your Data Recovery for Mac – Known for recovering photos, documents, and videos effectively.
Magoshare Data Recovery for Mac – Offers extensive scanning options and recovery from formatted or corrupted drives.
Steps to Recover Files Using Donemax Data Recovery for Mac
- Download and Install the Software
- Use a different drive than the one where your files were lost to avoid overwriting data.
- Follow installation instructions carefully.
- Select the Drive or Partition
- Open the recovery software.
- Choose the drive or partition that contained the lost files. This could be your main macOS drive or an external disk.
![Select the Drive]()
- Scan the Hard Drive
- Click the Scan button to start.
- The software will deeply scan the drive and thoroughly examines every sector.
![Scan the Drive]()
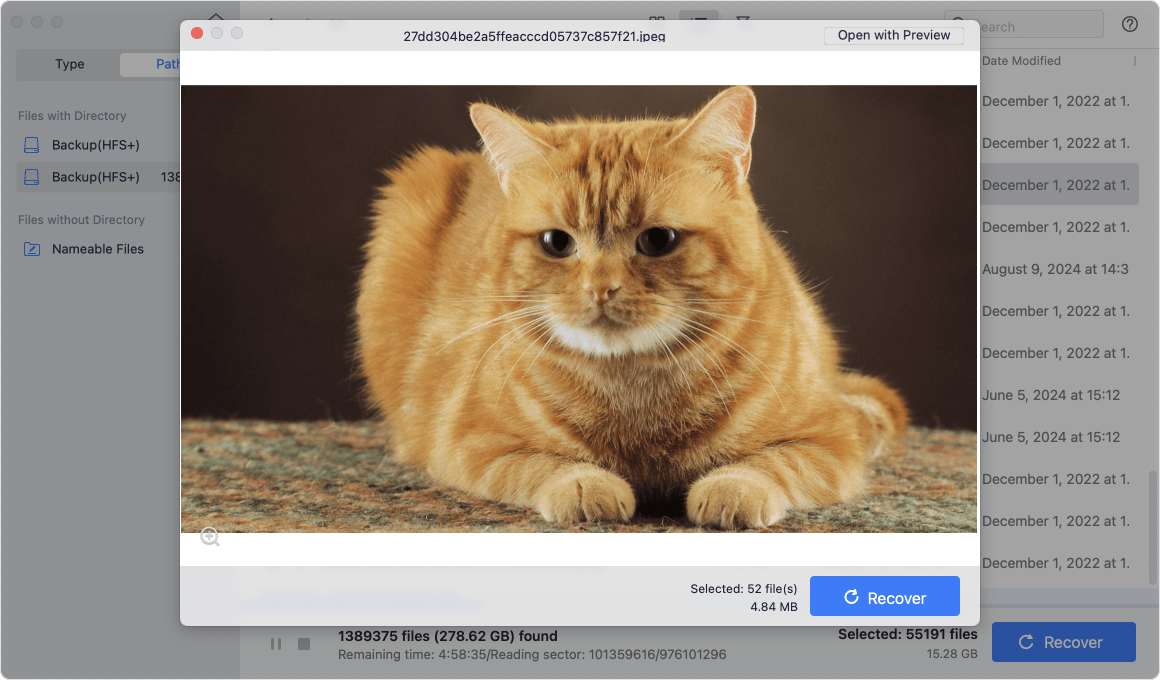
- Preview Recoverable Files
- Most tools display a list of detected files with thumbnails or file names.
- Verify the files before recovery to ensure you restore the correct ones.
![Preview the Files]()
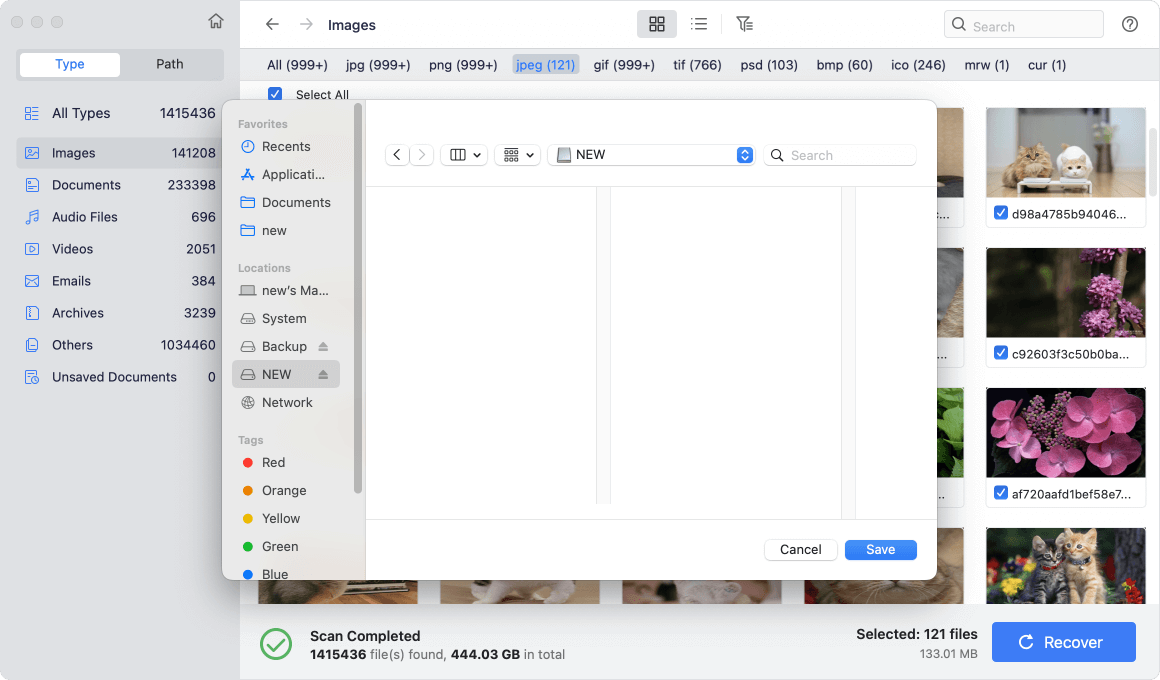
- Recover and Save Files
- Select the files you want to recover and click the Recover button.
- Save them to a different drive or external storage. Never save them back to the same drive immediately, as this can overwrite other lost files.
![Recover the Files]()
- Check Recovered Files
- Open and verify that documents, photos, and videos are intact.
- Rename files if necessary and organize them for future backups.


Tips for Successful Recovery
- Stop using the affected drive immediately: The more you write new data, the lower the chance of recovery.
- Perform recovery as soon as possible: The sooner you start, the higher the success rate.
- Keep multiple backups moving forward: Even after recovery, having a reliable backup strategy prevents future panic.
By using a professional data recovery tool correctly, even files that seemed permanently lost after signing out of iCloud can often be recovered, giving you peace of mind and restoring access to your important documents.
Prevent Future Data Loss When Signing Out of iCloud
Now that you've recovered your files, it's wise to take preventive measures for the future.
Back Up Before Signing Out
Always copy your Desktop and Documents folders to an external drive or another cloud service before signing out.
Enable Time Machine
Set up Time Machine with an external disk for automated backups. This ensures you can always roll back to an earlier state.
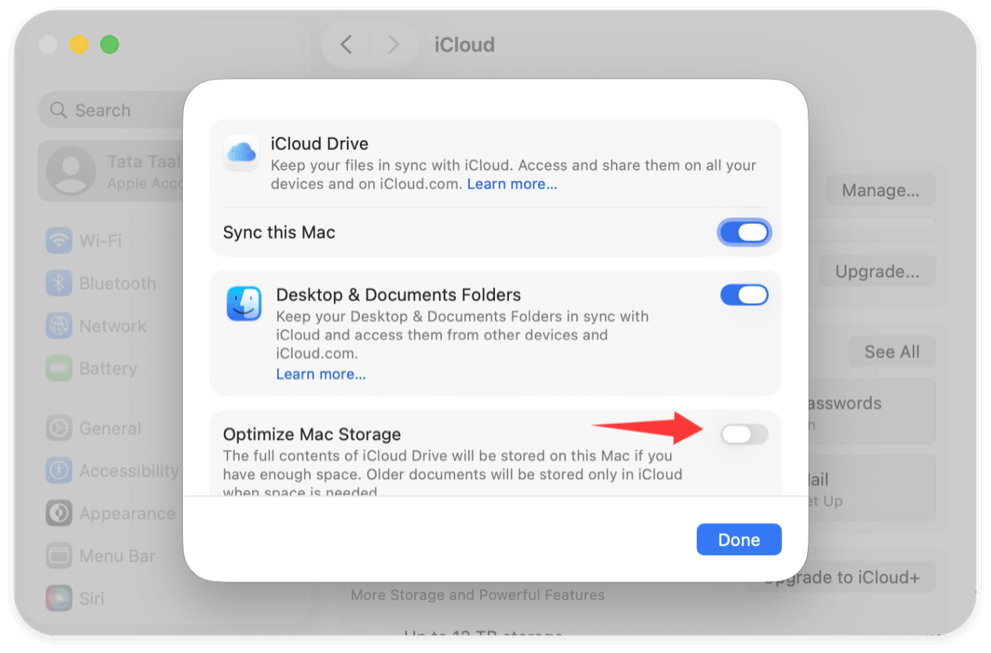
Disable Optimize Mac Storage
Go to Apple menu > System Settings > Apple ID > iCloud > Drive. Uncheck Optimize Mac Storage so files always remain on your Mac.
Use Additional Cloud Backups
Consider services like Dropbox, Google Drive, or OneDrive alongside iCloud. Multiple backups reduce the chance of total data loss.
Conclusion
Signing out of iCloud on a Mac can make your files appear to vanish, but in most cases, they are still recoverable. Start by checking iCloud.com and the Recently Deleted folders. If they're not there, re-sign into iCloud, check local backups like Time Machine, or use professional data recovery tools.
The key lesson is to always maintain a backup strategy. Before signing out of iCloud—or making any major changes to your Mac—ensure you have copies of all critical files. With proper precautions, you can avoid the panic of missing data and keep your files safe across devices.
Donemax Data Recovery for Mac
Donemax Data Recovery for Mac is one of the best Mac data recovery software. It is easy-to-use and can help in recovering deleted, formatted, inaccessible or lost data from Mac HDD/SSD, external disk, USB drive, SD card, camera or other storage devices.
Related Articles
- Nov 18, 2024How to Recover Lost Data After Reinstalling macOS? [4 Methods]
- Nov 11, 2024How to Recover Deleted Photos on Mac? 5 Solutions to Try
- Jan 14, 2025How to Recover Lost Data from Fusion Drive on Mac?
- May 19, 2025How to Recover Lost Data on M2 Mac? [4 Methods]
- Sep 25, 2025Top 5 Data Recovery Software for macOS Tahoe – Complete Guide
- Mar 26, 2025How to Recover Deleted Audio Files on Mac? Here Are 7 Proven Methods

Contributing Writer
Maria
Maria is one of the senior writers & editors of Donemax who lives and works in Sydney, Australia. She loves PC, Mac and Internet Technology. She has 6 years of writing articles about data recovery on PC/Mac, disk cloning solution, data eraser and computer OS optimization, etc. She is also interested in testing various software and digital products.

Editor in chief
Gerhard Chou
In order to effectively solve the problems for our customers, every article and troubleshooting solution published on our website has been strictly tested and practiced. Our editors love researching and using computers and testing software, and are willing to help computer users with their problems