Written byChristinaUpdated on Apr 18, 2025
How to Boot into macOS Recovery Mode on Mac Studio?
Approved byGerhard Chou
PAGE CONTENT:
- What Is macOS Recovery Mode?
- Why This Guide Focuses on Mac Studio?
- Before You Boot into macOS Recovery Mode on Mac Studio
- How to Boot into macOS Recovery Mode on Mac Studio (Apple Silicon)?
- Troubleshooting: Can't Enter Recovery Mode on Mac Studio?
- Best Practices After Entering Recovery Mode
- Conclusion
When your Mac Studio experiences technical issues, fails to boot properly, or needs a clean installation of macOS, macOS Recovery Mode becomes your go-to toolkit. Whether you're a power user or a beginner, understanding how to access this essential feature is vital for troubleshooting and maintenance.
In this detailed guide, we'll walk you through what macOS Recovery Mode is, how it works specifically on Mac Studio (which uses Apple Silicon), and what to do if you can't access it. Let's dive in.
What Is macOS Recovery Mode?
macOS Recovery Mode is a special boot environment built into your Mac's system that allows users to recover, repair, or reinstall the macOS operating system. It provides several crucial utilities for system maintenance and troubleshooting, including:
- Reinstall macOS: Easily download and reinstall the latest compatible version of macOS.
- Disk Utility: Check and repair internal or external storage devices.
- Restore from Time Machine: Revert your system to a previous working state.
- Terminal: Run advanced Unix commands for diagnostics or recovery.
- Safari: Access Apple support documentation online.
- Startup Security Utility (for Intel Macs): Manage firmware passwords and secure boot settings.
Since macOS Recovery is built into a separate system volume, it's available even if your main macOS installation is corrupted or won’t boot.
Why This Guide Focuses on Mac Studio?
Apple's Mac Studio uses Apple Silicon (M1, M2, or later), which slightly changes the way users boot into Recovery Mode compared to older Intel-based Macs. Traditional key combinations like Command (⌘) + R no longer apply. Instead, a new sequence involving the power button is used.
Because of this architectural difference, it's essential to follow the correct steps for Apple Silicon-based devices like the Mac Studio.
Before You Boot into macOS Recovery Mode on Mac Studio
Before jumping into the process, ensure the following conditions are met to avoid interruptions or issues during the recovery process.
1. Power Considerations
Make sure your Mac Studio is plugged into a power source. You don't want it shutting down mid-recovery due to low battery or power failure.
2. Backup Your Data
While Recovery Mode is generally safe, some actions - like erasing a disk or reinstalling macOS - can result in data loss. If possible, back up your data using Time Machine or clone your drive using third-party tools.
3. Know Your Apple ID and Password
If you're reinstalling macOS or erasing the system, you'll likely be prompted for your Apple ID during activation. This is part of Activation Lock, Apple's security feature that prevents unauthorized use of your Mac.
How to Boot into macOS Recovery Mode on Mac Studio (Apple Silicon)?
Accessing Recovery Mode on Apple Silicon Macs like the Mac Studio is simple but different from what longtime macOS users might be used to. Follow these exact steps:
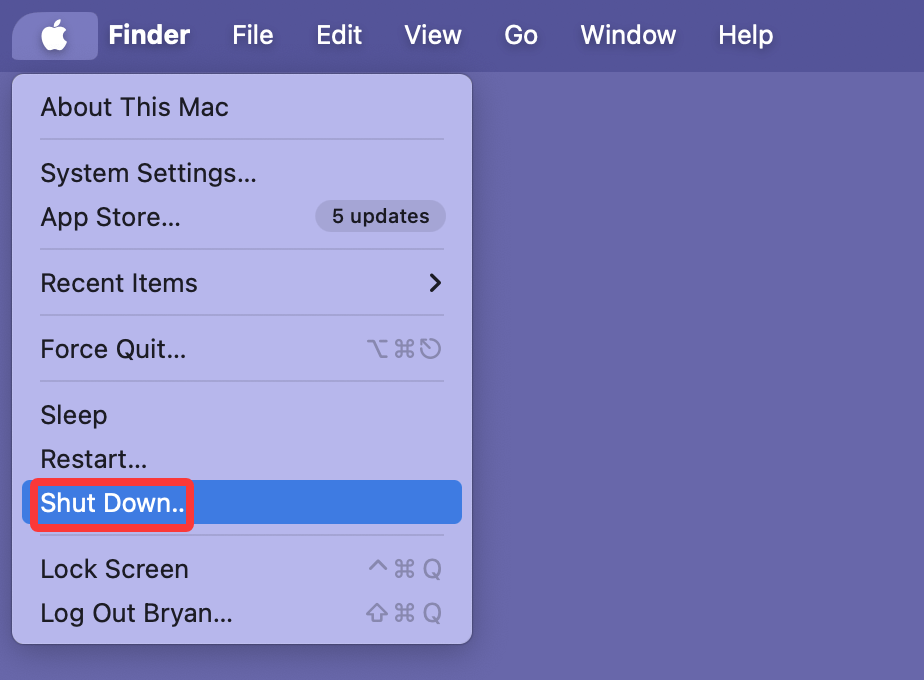
Step 1: Shut Down Your Mac Studio
Start by fully powering off your device.
- Click the Apple menu () > Shut Down.
![Boot into macOS Recovery Mode on Mac Studio]()
- Wait until the screen is completely black and the device is no longer making noise.
Step 2: Press and Hold the Power Button
Now press and hold the power button (also known as the Touch ID button if using Magic Keyboard with Touch ID).
- Keep holding it until you see the startup options screen, which says "Loading startup options…".
![Boot into macOS Recovery Mode on Mac Studio]()
- This may take around 5 - 10 seconds. Don't release early.

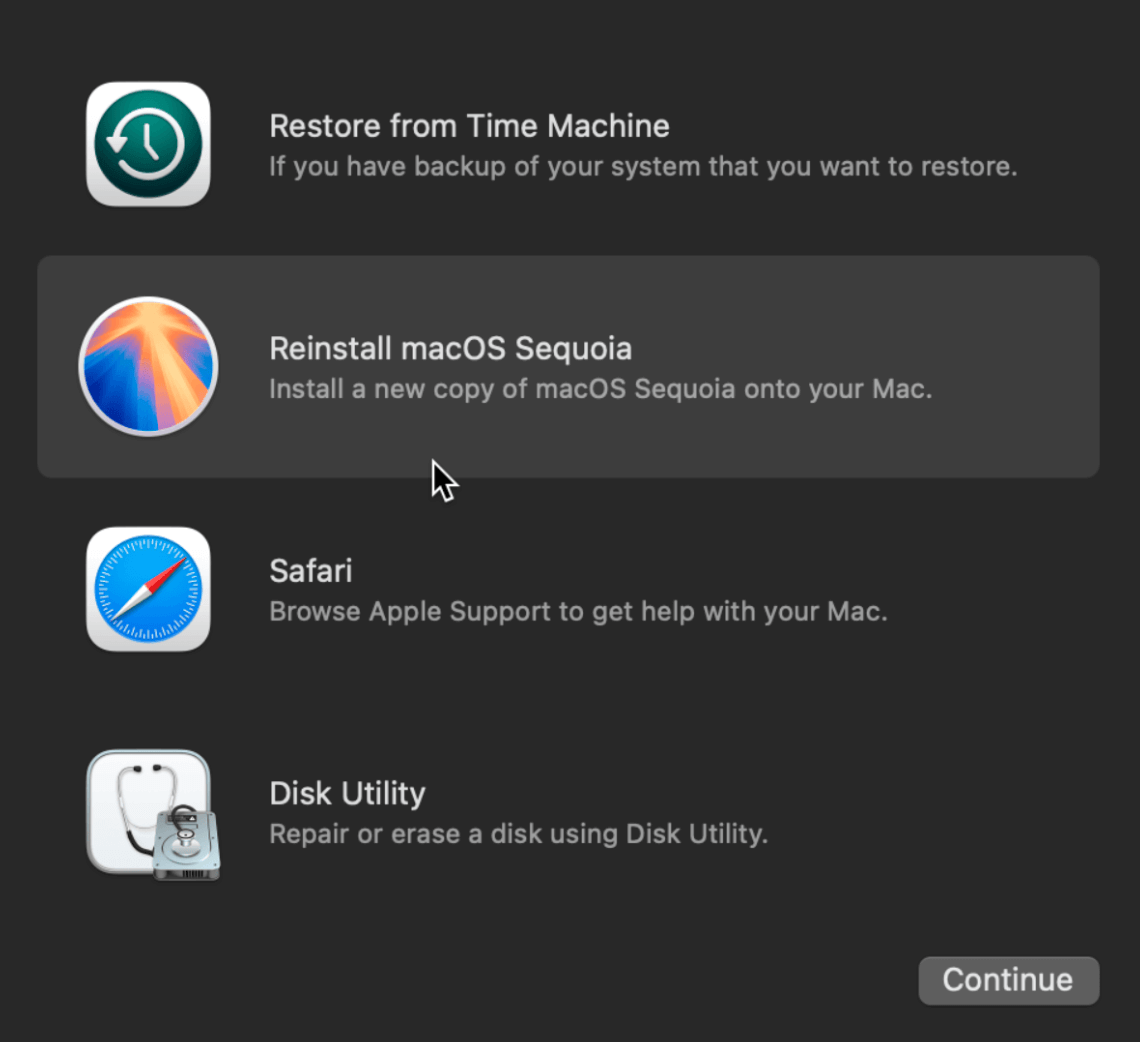
Step 3: Click Options
Once the startup options screen appears:
- Click on the gear icon labeled Options.
- Then click Continue.
![Boot into macOS Recovery Mode on Mac Studio]()

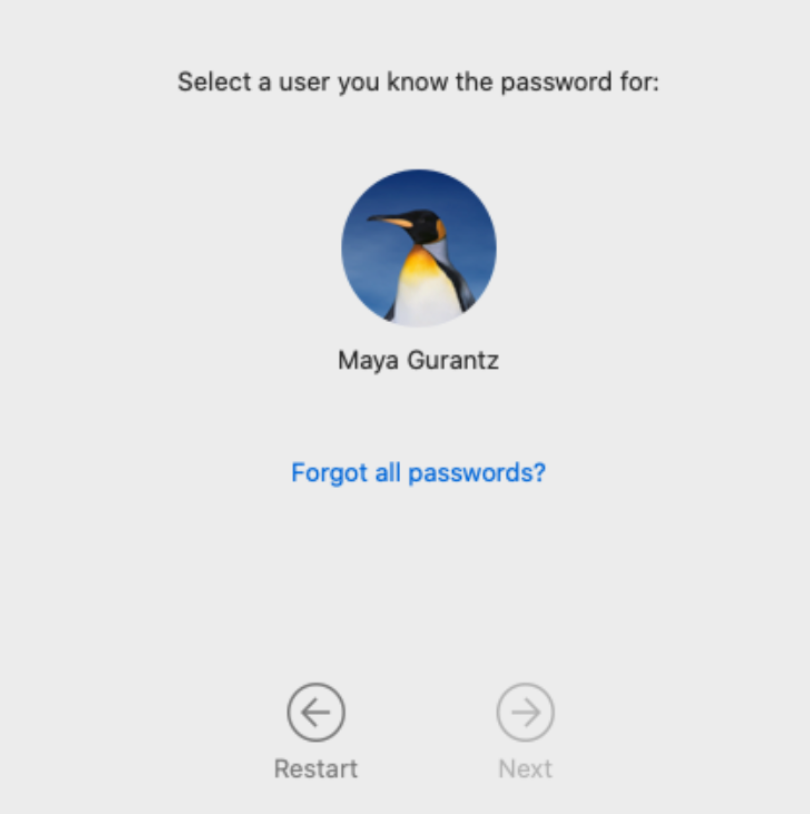
Step 4: Authenticate
You might be prompted to select an administrator account and enter the password. Do so to continue into the Recovery Mode environment.
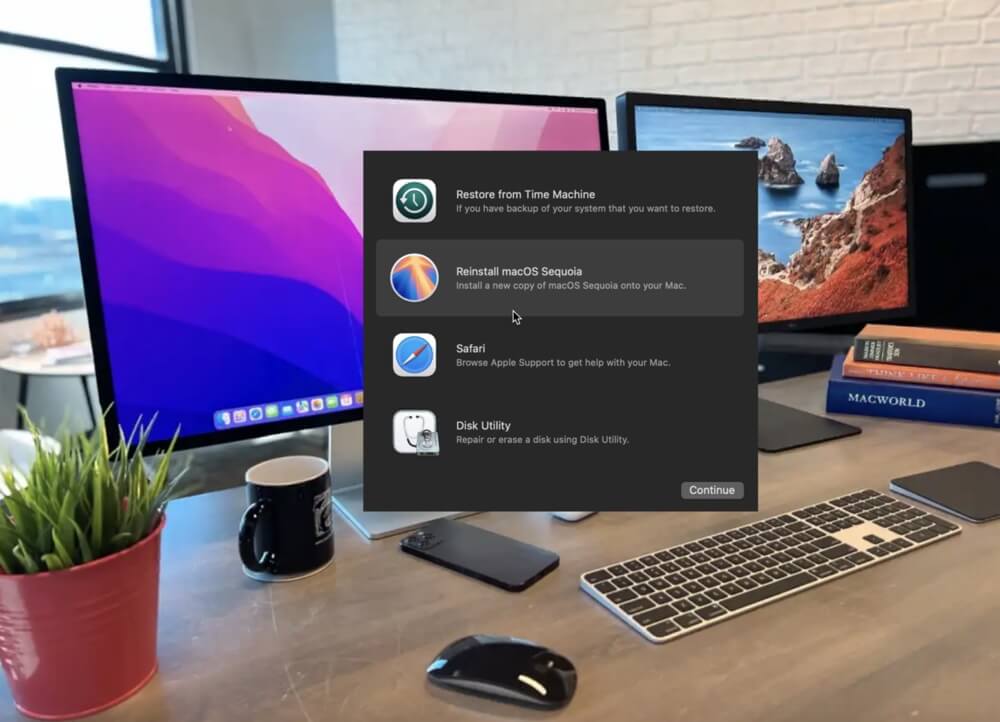
Step 5: You're in Recovery Mode!
After a short loading period, you'll enter macOS Recovery. From here, you can access all the tools we discussed earlier.
What Can You Do in macOS Recovery Mode?
Once you're inside macOS Recovery Mode on your Mac Studio, you'll be presented with the macOS Utilities window. This is your command center for performing essential recovery tasks. Whether you're solving a startup issue, preparing your Mac for resale, or simply reinstalling macOS, this environment is packed with powerful tools.
Here's a closer look at each utility and what you can achieve with them:
1. Reinstall macOS
Purpose:
To reinstall the macOS operating system without erasing your personal data or files.
When to Use:
- macOS is not booting properly.
- System files are corrupted.
- You’re experiencing strange bugs or performance issues.
- You want a fresh OS installation but wish to keep your apps and files.
Process Overview:
- Click Reinstall macOS Sequoia (or whatever version your Mac is running).
- Follow the on-screen instructions.
- Connect to Wi-Fi if prompted.
- The system will download and install the latest compatible version of macOS.
Pro Tips:
- Reinstalling does not erase your personal files by default - but always back up just in case.
- If you erased the drive beforehand, macOS will install cleanly as if it's a new machine.
- Installation can take 30–60 minutes depending on your internet speed.
2. Disk Utility
Purpose:
To view, verify, repair, erase, and partition internal or external drives.
When to Use:
- Your Mac Studio fails to boot and you suspect disk corruption.
- You're preparing the drive for a clean macOS install.
- An external drive is not mounting or shows errors.
- You want to securely erase your data before selling or transferring ownership.
Key Features:
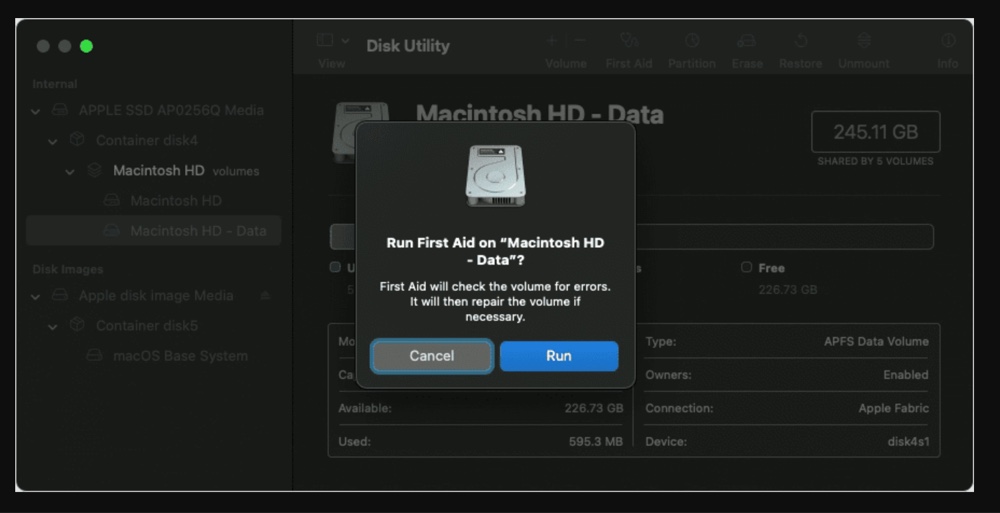
- First Aid: Runs a scan and repairs file system errors.
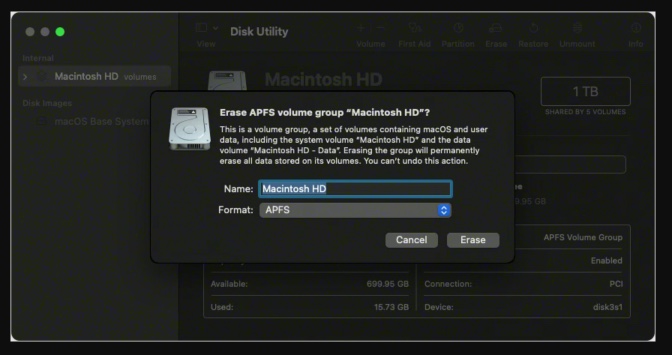
- Erase: Allows secure formatting of drives. Choose APFS for SSDs or Mac OS Extended (Journaled) for HDDs.
![Boot into macOS Recovery Mode on Mac Studio]()
- Partition: Split a drive into multiple volumes (useful for dual-booting).
Pro Tips:
- Always try First Aid before formatting the disk.
![Boot into macOS Recovery Mode on Mac Studio]()
- If you're getting frequent disk errors, consider replacing the drive even if repairs succeed.
- Use "Show All Devices" from the View menu to access the physical drive, not just volumes.
3. Restore From Time Machine Backup
Purpose:
To roll back your Mac to a previously saved state using Time Machine.
When to Use:
- You accidentally deleted critical files or apps.
- A system update introduced serious bugs.
- Your Mac was working fine a week ago, and now it’s not.
Process Overview:
- Connect your Time Machine backup drive.
- Select Restore from Time Machine Backup.
- Choose the desired date/version.
- Restore process will overwrite the current system state.
Pro Tips:
- This feature restores both the OS and user data, essentially cloning your past Mac.
- Keep frequent Time Machine backups, especially before OS upgrades.
- Ensure your backup is encrypted if you’re storing sensitive data.
4. Safari in Recovery
Purpose:
To access Apple Support or browse the web for solutions while in Recovery Mode.
When to Use:
- You're troubleshooting and need to look up Apple documentation.
- You want to download installation guides or check compatibility info.
- You need to access iCloud or your Apple ID online for verification.
Pro Tips:
- Safari in Recovery is sandboxed, meaning some websites may not function fully (e.g., no downloads).
- Bookmark useful Apple Support articles or keep them saved on a USB if you plan to work offline.
5. Terminal
Purpose:
For advanced users, Terminal gives direct access to the system's Unix shell.
When to Use:
- You want to run command-line utilities like diskutil, csrutil, or bless.
- You're an IT admin or developer performing advanced recovery or troubleshooting.
- You need to reset settings, mount drives manually, or bypass GUI issues.
Useful Commands:
- diskutil list – List all connected drives and volumes.
- csrutil status – Check the status of System Integrity Protection.
- resetpassword – Launch the password reset utility (also available via GUI).
Pro Tips:
- Mistyped commands can cause harm - only use Terminal if you're confident.
- You can even create users, mount remote volumes, or fix boot loaders through Terminal.
Troubleshooting: Can't Enter Recovery Mode on Mac Studio?
If you followed the steps but your Mac Studio doesn't boot into Recovery Mode, try the following troubleshooting tips.
1. Did You Hold the Power Button Long Enough?
- Many users mistakenly release the power button too soon.
- Make sure you hold the power button until you see "Loading startup options."
2. macOS Version or Firmware Issues
- A corrupted firmware or system may prevent access.
- If your system is badly damaged, Recovery Mode might not work at all.
3. Try Internet Recovery
Apple Silicon Macs don't have a separate Internet Recovery option. Instead, Recovery Mode auto-loads over the internet if the local recovery system is missing. You'll see a globe icon if this occurs.
Ensure you have a stable Wi-Fi or Ethernet connection for this to work.
4. Use Apple Configurator 2 (Advanced)
If Recovery Mode is completely inaccessible or corrupted:
- You can restore firmware using another Mac and Apple Configurator 2.
- Requires a second Mac, USB-C to USB-C cable, and some technical knowledge.
- Visit Apple's official guide for exact steps.
Differences Between Apple Silicon and Intel Macs
If you're transitioning from an older Intel-based Mac, here's a quick comparison to clear up any confusion:
| Feature | Intel Macs | Apple Silicon Macs (Mac Studio) |
|---|---|---|
| Boot to Recovery | Command + R during startup | Hold power button until options appear |
| Internet Recovery | Option + Command + R or Shift + Option + Command + R | Auto-loads if needed |
| Startup Manager | Option key | Hold power button |
| NVRAM Reset | Command + Option + P + R | Not needed; handled automatically |
Best Practices After Entering Recovery Mode
Once you're in Recovery Mode, keep the following tips in mind:
- Don't Erase the Disk Unless Necessary: If you're just reinstalling macOS, there's no need to format the drive.
- Use First Aid Before Reinstalling: Sometimes fixing disk errors avoids the need for a full reinstall.
- Secure Your Data: If you suspect a hardware issue, try to back up data before proceeding.
- Update macOS After Recovery: Once you're done, check for any updates to patch security and system bugs.
Conclusion
Knowing how to access and use macOS Recovery Mode on Mac Studio is an essential skill for any Mac user. Whether you're troubleshooting an unbootable system, repairing a damaged disk, or reinstalling macOS, Recovery Mode provides the tools you need - all without needing third-party apps or professional service.
Just remember the key differences for Apple Silicon Macs: instead of using a keyboard shortcut, hold the power button until startup options appear, then select "Options" > Continue.
By understanding this recovery environment and using it carefully, you can keep your Mac Studio running smoothly and confidently handle most system issues on your own.
Donemax Disk Clone for Mac
An award-winning disk cloning program to help Mac users clone HDD/SSD/external device. It also can create full bootable clone backup for Macs.
Related Articles
- Mar 21, 2025How to Use a Western Digital External Hard Drive on a Mac?
- Mar 21, 2025Run Wireless Diagnostics on Mac: A Complete Guide
- Mar 26, 2025Turn On or Turn Off Mac Firewall: A Complete Guide
- Jul 01, 2026How to Empty Trash on Mac Quickly (Shortcut & Auto-Clean)?
- May 11, 2026Can't Format or Erase an SD Card on Mac - 7 Solutions
- Oct 14, 2024Fix Error Code 100006 on Mac: A Complete Guide to Solving the Issue

Contributing Writer
Christina
Christina is the senior editor of Donemax software who has worked in the company for 4+ years. She mainly writes the guides and solutions about data erasure, data transferring, data recovery and disk cloning to help users get the most out of their Windows and Mac. She likes to travel, enjoy country music and play games in her spare time.

Editor in chief
Gerhard Chou
In order to effectively solve the problems for our customers, every article and troubleshooting solution published on our website has been strictly tested and practiced. Our editors love researching and using computers and testing software, and are willing to help computer users with their problems