
Written byStevenUpdated on Jul 01, 2026
6 Methods to Copy File Path on Mac
Approved byGerhard Chou
PAGE CONTENT:
- Method 1: Copy File Path from Finder Using Right-Click
- Method 2: Use Terminal to Get File Path
- Method 3: View Path Using "Get Info" Panel
- Method 4: Use Automator to Create a Quick Service (Advanced)
- Method 5: Use Finder's Address Bar (Path Bar or Go to Folder)
- Method 6: Use Third-Party File Managers or Clipboard Tools
- Tips to Copy File Path on Mac
- Conclusion
Copying the file path of a document, folder, or app on your Mac can be useful for troubleshooting, programming, file sharing, and system configuration. macOS doesn't always make this process obvious, but with a few simple tricks, you can access full file paths in Finder, Terminal, and other parts of the system.
This guide covers six methods to copy the full path of any file or folder on your Mac, including ways that work on macOS Tahoe, Sequoia, Sonoma, Ventura, and earlier versions. Whether you're a beginner or an advanced user, you'll find a method here that fits your workflow.
Method 1: Copy File Path from Finder Using Right-Click
This is the simplest and fastest method available in modern macOS versions.
- Open Finder and locate the file or folder.
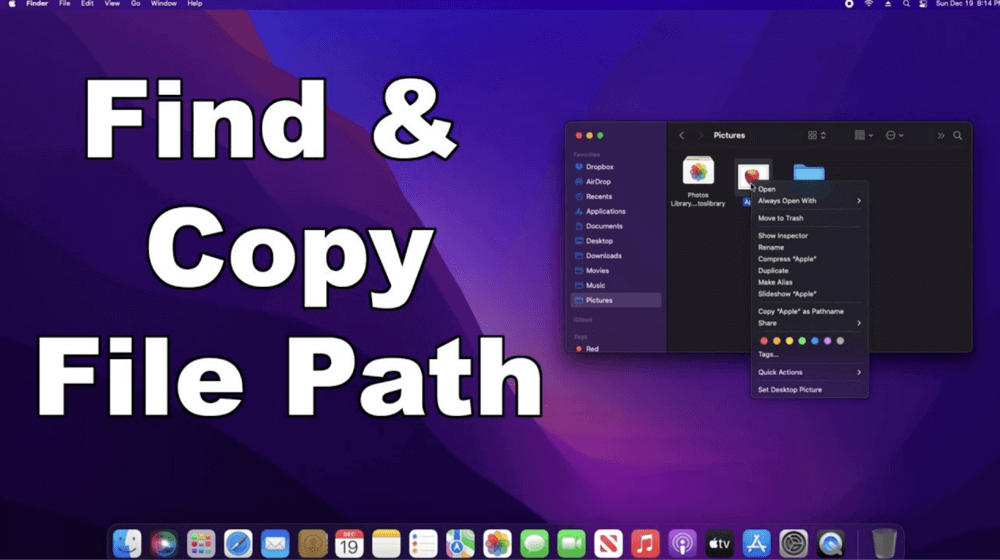
- Right-click on the item (or Control + click).
- Hold the Option key, and you'll see the menu item change from "Copy" to ➝ Copy [filename] as Pathname.
![copy the full path of any file or folder on your Mac]()
- Click it, and the full file path will be copied to your clipboard.
- Paste it into any app (TextEdit, Terminal, Notes, etc.).

When to Use:
- Ideal for casual users
- Best for quick copy-paste operations
macOS Compatibility: Works on macOS Big Sur or later
Method 2: Use Terminal to Get File Path
If you're comfortable with Terminal, this method is both visual and exact.
- Open Terminal from Launchpad or Spotlight.
![copy the full path of any file or folder on your Mac]()
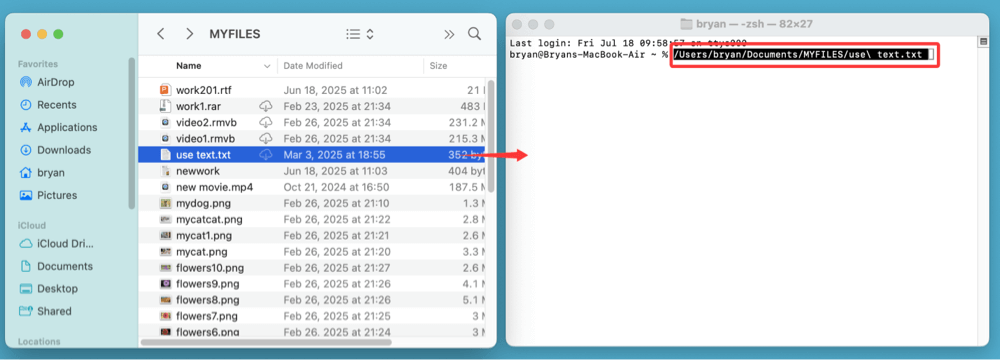
- Drag and drop the file or folder into the Terminal window.
- The full file path will appear instantly.
![copy the full path of any file or folder on your Mac]()
- Highlight and copy the path manually with Command + C.

Example Output:
/Users/bryan/Documents/MYFILES/use\ text.txt
Why Use This Method?
- Great for developers and power users
- Allows immediate use in shell scripts or commands
Method 3: View Path Using "Get Info" Panel
This method works visually but requires manual copying.
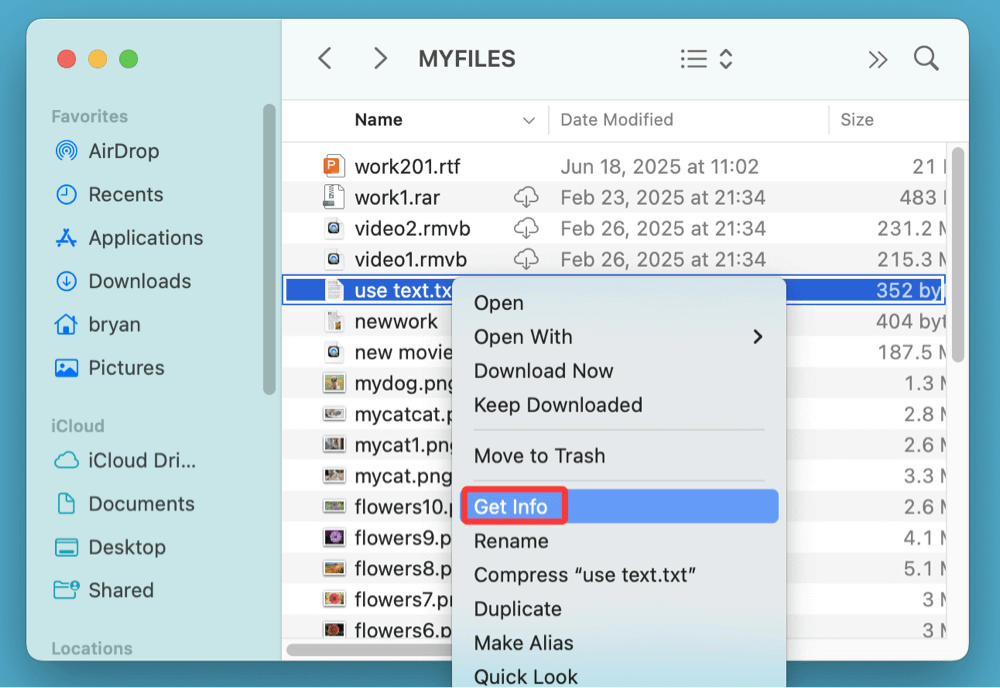
- Right-click the file or folder.
- Choose Get Info (or press Command + I).
![copy the full path of any file or folder on your Mac]()
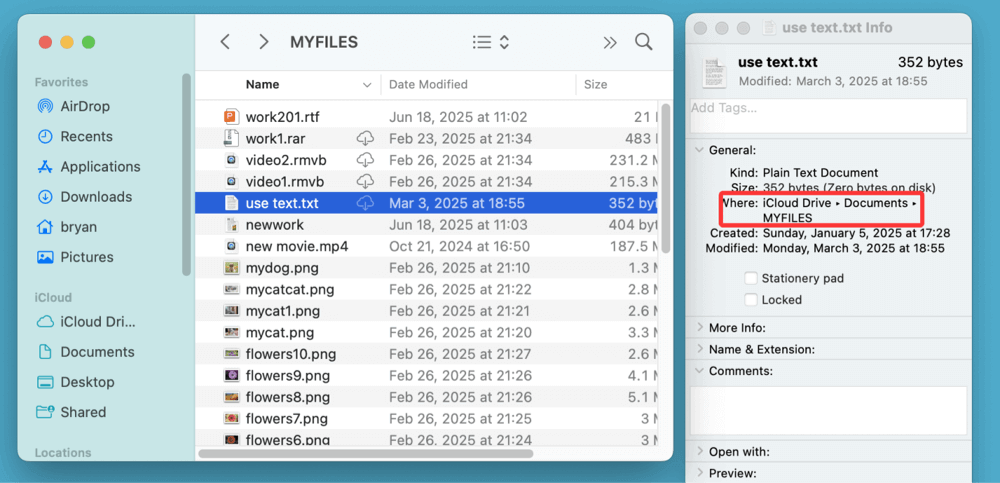
- In the info window, find the "Where" section under "General."
- This shows the folder path (not including the file).
![copy the full path of any file or folder on your Mac]()
- You can manually highlight and copy the path.
Limitations:
- Doesn't include the full file name
- Not ideal for advanced automation or scripting
Method 4: Use Automator to Create a Quick Service (Advanced)
If you're someone who regularly needs to copy file or folder paths and you want a one-click solution, Automator offers a powerful, customizable approach. By setting up a Quick Action (also called a Service in older macOS versions) using Automator, you can add a permanent right-click menu item called "Copy File Path" that works across all file types and folders - no need to remember keyboard shortcuts or hold the Option key.
This is especially useful for:
- Developers, system administrators, or QA testers
- Script writers who frequently need POSIX paths
- Anyone who wants to speed up repetitive file operations
Steps to Set It Up:
Step 1: Open Automator
- Navigate to Applications > Automator
- Or use Spotlight (Command + Space) and type "Automator"
![copy the full path of any file or folder on your Mac]()

Step 2: Create a New Quick Action
- Select File > New
![copy the full path of any file or folder on your Mac]()
- Choose Quick Action (or Service on older systems)
![copy the full path of any file or folder on your Mac]()

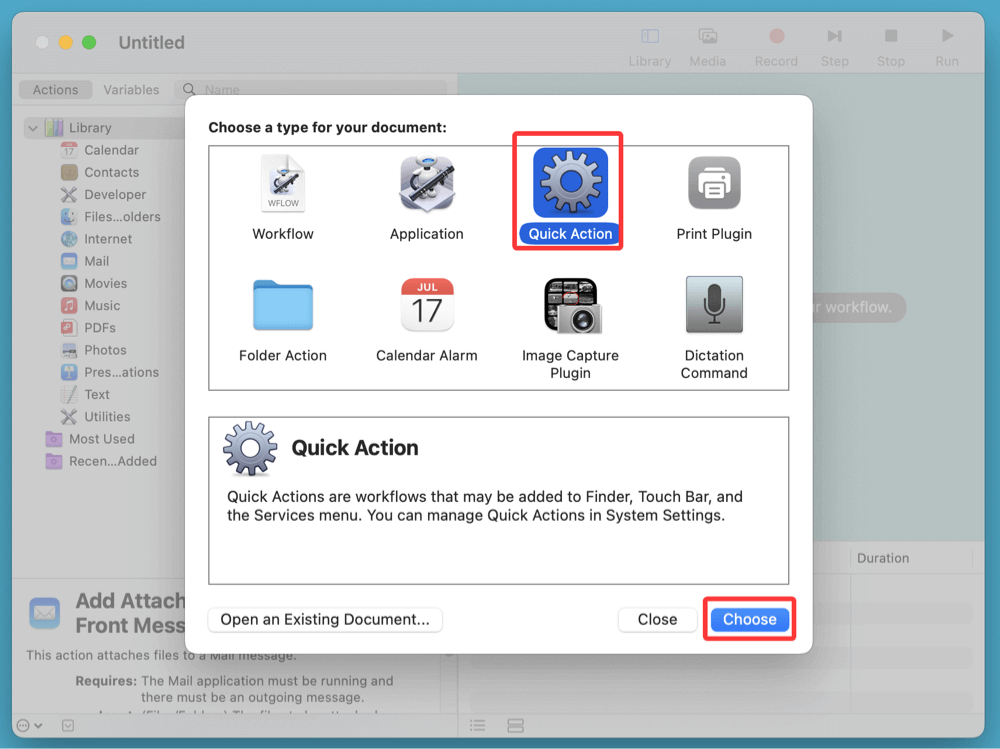
Step 3: Configure Workflow Input
- At the top of the workflow:
- Workflow receives current → Choose files or folders
- In → Select Finder
![copy the full path of any file or folder on your Mac]()
- This setup ensures the Quick Action appears only when right-clicking in Finder.
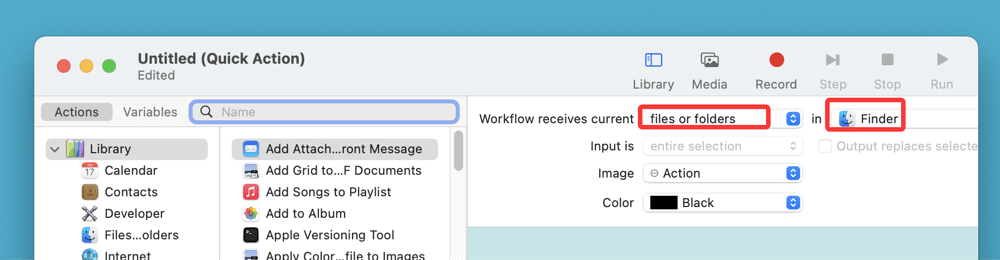
Step 4: Add a "Run Shell Script" Action
- In the Actions Library (left panel), search for "Run Shell Script"
![copy the full path of any file or folder on your Mac]()
- Drag it into the workflow area
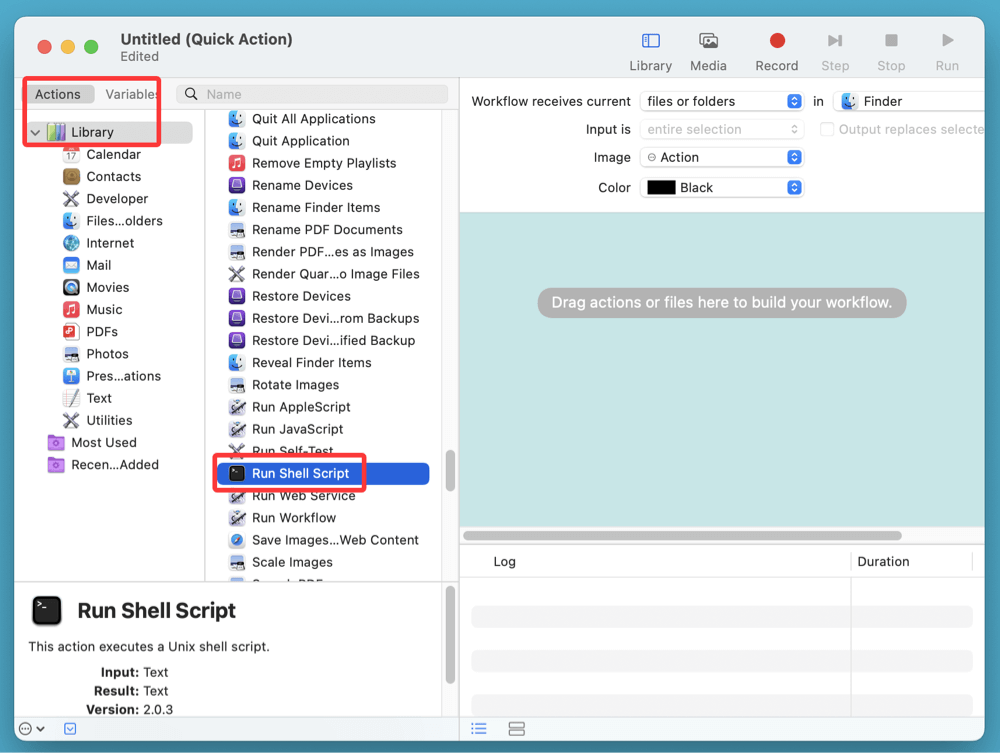
Step 5: Enter the Shell Script Code
- Use this code to copy the path(s) of selected files or folders to the clipboard:
for f in "$@"
do
echo "$f"
done | pbcopy - This loops through each selected item and pipes the full path(s) into the macOS clipboard.
Step 6: Save the Workflow
- Go to File > Save
- Name it something meaningful like "Copy File Path"
![copy the full path of any file or folder on your Mac]()
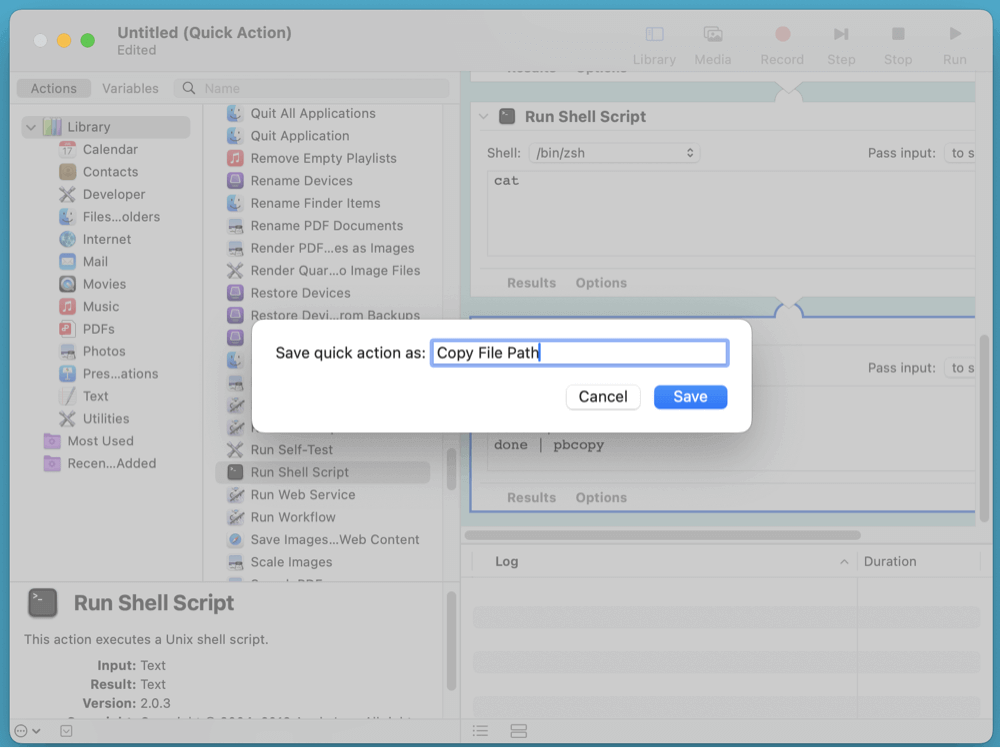
Once saved, the new action will appear in Finder's right-click context menu under Quick Actions or Services.
How to Use Your Custom File Path Copier
- Open Finder and locate the file or folder
- Right-click the item
- Hover over Quick Actions or Services
- Select Copy File Path
![copy the full path of any file or folder on your Mac]()

The full path will be copied to your clipboard immediately.
★ Advanced Option: Copy Only File Name or Directory Path
If you want more tailored behavior, like copying just the folder path or filename, modify the script:
To copy only the parent directory:
dirname "$@" | pbcopy
To copy just the filename:
basename "$@" | pbcopy
You can even create multiple workflows with different names like:
- Copy Folder Path
- Copy Filename Only
- Copy Relative Path (with extra scripting)
Why This Method Stands Out
While Option + right-click works well for most users, creating your own Quick Action gives you:
- Total control over formatting and behavior
- Consistency across all files and folders
- No reliance on keyboard modifiers
- Multi-item support
Once set up, it becomes part of your file management workflow - especially powerful for developers, IT professionals, or frequent Terminal users.
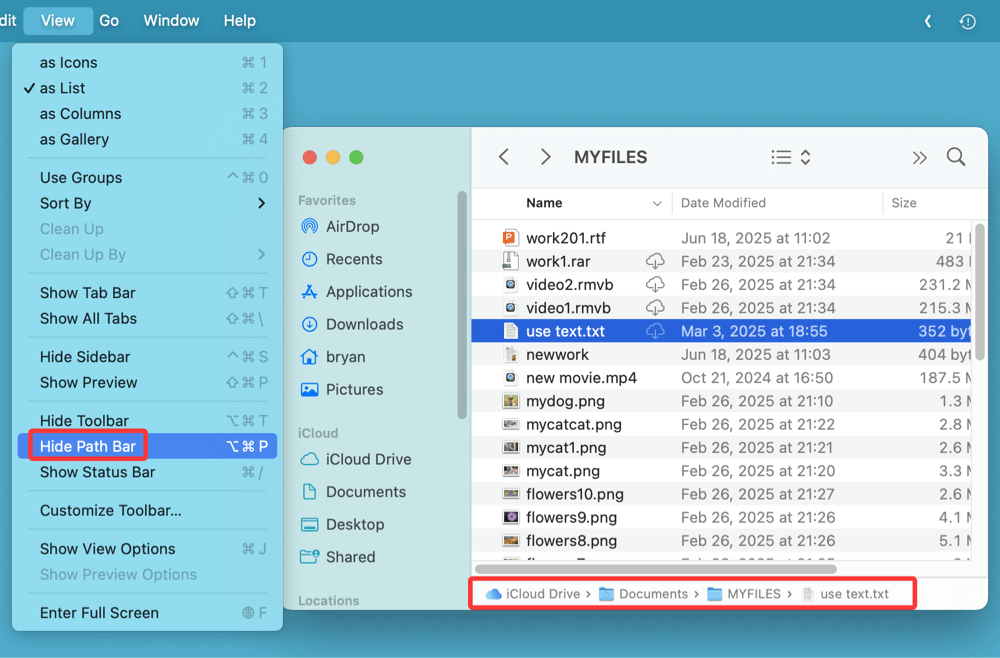
Method 5: Use Finder's Address Bar (Path Bar or Go to Folder)
Finder has a built-in path bar you can use to see and copy the file path.
Option A: Show Path Bar
- Open Finder
- Go to the menu: View > Show Path Bar
- The path will appear at the bottom of the Finder window
![copy the full path of any file or folder on your Mac]()
- Right-click the folder name in the bar and choose Copy
Option B: Command + Option + C Shortcut
- Select the file or folder in Finder
- Press Command + Option + C
- The full path is copied instantly to your clipboard
'/Users/bryan/Documents/MYFILES/use text.txt'
Best For:
- Users who want a consistent method without right-clicking
- Ideal for visual tracking of folder hierarchy
Method 6: Use Third-Party File Managers or Clipboard Tools
Apps like Path Finder, Commander One, or ClipMenu provide enhanced file navigation and copying features.
Popular Tools:
- Path Finder – Adds toolbar button to copy paths
- CopyPath – Lightweight utility for quick path copying
- ClipMenu – Stores and formats copied paths
When to Use:
- If you regularly work with file paths
- When macOS tools feel limited or repetitive
Tips to Copy File Path on Mac
Q1. How to Copy File Path on macOS Ventura or Later?
The methods described above work similarly on macOS Ventura, Sonoma...Tahoe or later, but you may notice subtle differences:
Changes in Context Menu Behavior:
- Right-click menus now include "Quick Actions" more prominently
- Some users report the "Copy as Pathname" option hidden or disabled by default
Workarounds:
- Make sure Finder has Full Disk Access under System Settings > Privacy & Security
- If Option + Right Click isn't showing "Copy as Pathname," restart Finder or try the Command + Option + C shortcut
Q2. Why You May Need to Copy a File Path?
Understanding how and when to copy a file path is valuable in many scenarios:
1. Using Terminal Commands
- File paths are essential for cd, ls, open, and other commands
- Example:
open "/Users/John/Documents/report.pdf"
2. Troubleshooting Software or Errors
- Tech support often asks for file paths to diagnose issues
3. Programming and Automation
- File paths are used in Xcode, scripts, IDEs like Visual Studio Code, and Python
4. Sharing Internal File Locations
- Share internal file paths with coworkers (e.g., on shared drives)
Q3. Common Mistakes When Copying File Paths on Mac
1. Not Holding the Option Key
- If you don't hold Option while right-clicking, you won't see "Copy as Pathname"
2. Spaces and Special Characters
- Paths with spaces need to be escaped in Terminal, e.g.:
/Users/John/My\ Files/notes.txt
3. Using Relative Paths Unintentionally
- Always check if the path is absolute (starts with /) or relative
4. Quotation Errors
- When using paths in scripts or Terminal, wrap paths in double quotes to avoid issues:
open "/Users/John/Documents/My Notes/plan.txt"
Tips for Power Users
- Set up a custom Automator action to copy relative paths or POSIX paths
- Use Keyboard Maestro to bind path-copying actions to hotkeys
- Store frequently used paths in Alfred workflows or clipboard managers
Conclusion
Whether you're troubleshooting a Mac, writing a script, or just trying to share a folder location with a teammate, copying file paths is a basic yet essential task. macOS offers several built-in ways to do it, each tailored to different user levels and needs.
For most users, right-click + Option > Copy as Pathname is the easiest. Power users may prefer custom Automator workflows or Terminal commands.
By mastering these methods, you'll improve your productivity and efficiency when working with macOS files and applications.
DMcleaner for Mac
Donemax DMcleaner for Mac is an award-winning Mac cleanup & maintenance application. It offers 10+ tools to help Mac users clean up junk data on Mac, uninstall unwanted apps & delete leftovers, shred files, delete duplicate files, free up disk space, speed up slow Mac, etc. It is also a smart switch manager for Mac, a powerful disk manager for Mac.
Related Articles
- Jun 23, 2026External Hard Drive is Read-Only on macOS 27 Golden Gate: How to Fix It?
- Apr 28, 2026Turn Off Notifications on Mac: Guide to a Distraction-Free Workspace
- Jul 27, 202510 Fixes for Command+S Not Working on Mac
- Jun 06, 2025Sabrent Rocket External SSD Not Mounting on Mac, Fix It Now
- Apr 17, 20268 Ways to Fix Mac Error Code -8062 (2026 Troubleshooting Guide)
- Nov 11, 2024How to Use Finder on Mac – A Complete Guide

Contributing Writer
Steven
Steven has been a senior writer & editor of Donemax software since 2020. He's a super nerd and can't imagine the life without a computer. Over 6 years of experience of writing technical solutions and software tesing, he is passionate about providing solutions and tips for Windows and Mac users.

Editor in chief
Gerhard Chou
In order to effectively solve the problems for our customers, every article and troubleshooting solution published on our website has been strictly tested and practiced. Our editors love researching and using computers and testing software, and are willing to help computer users with their problems