
Written byCoco LinUpdated on Apr 23, 2026
How to Create macOS Sequoia ISO File: The Complete Professional Guide
Approved byGerhard Chou
PAGE CONTENT:
With the release of macOS Sequoia, many tech enthusiasts, developers, and home users are eager to test the new features in a virtual environment or on multiple machines. Whether you are looking to run macOS Sequoia on VMware, VirtualBox, or simply need a versatile backup, learning how to create macOS Sequoia ISO files is an essential skill.
While Apple provides the installer through the Mac App Store, it doesn't come in an ISO format. In this guide, we will walk you through the professional yet simple process of downloading the installer and using Terminal to build your own ISO file.
Phase 1: Download the macOS Sequoia Full Installer
Before you can build an ISO, you need the source material. You must download the full "Install macOS Sequoia" application.
Method 1: The Mac App Store
1. Open the App Store on your Mac.
2. Search for "macOS Sequoia."
3. Click Get or Download. This will open the Software Update panel.
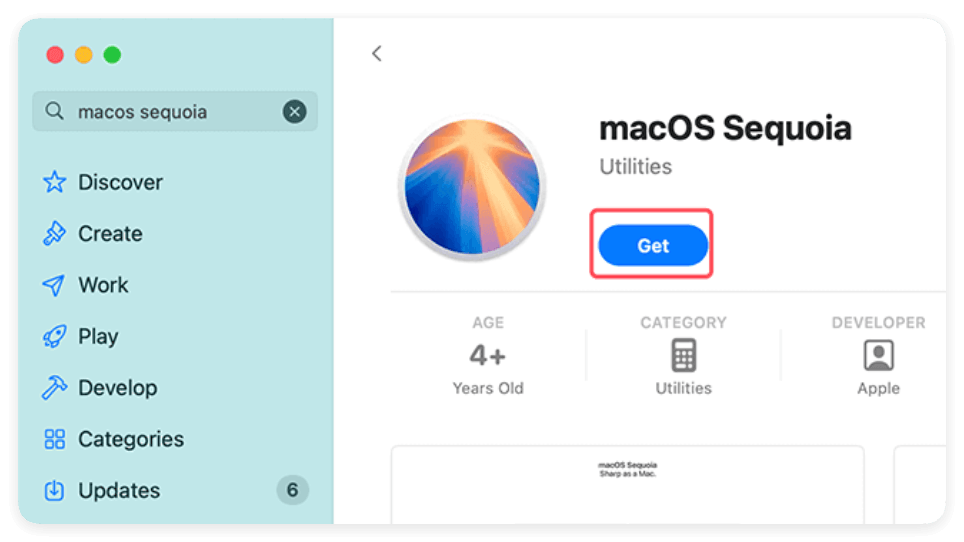
4. Once finished, the installer will appear in your Applications folder as Install macOS Sequoia.app.

Method 2: Terminal (For Advanced Users)
If the App Store is giving you trouble, you can force the download via Terminal:
softwareupdate --fetch-full-installer --full-installer-version 15.0
Phase 2: Create macOS Sequoia ISO using Terminal
Now that you have the installer, we need to convert it. Since macOS uses the .app or .dmg format, we use a series of Terminal commands to create a virtual disk, mount it, and convert it to a .iso file.
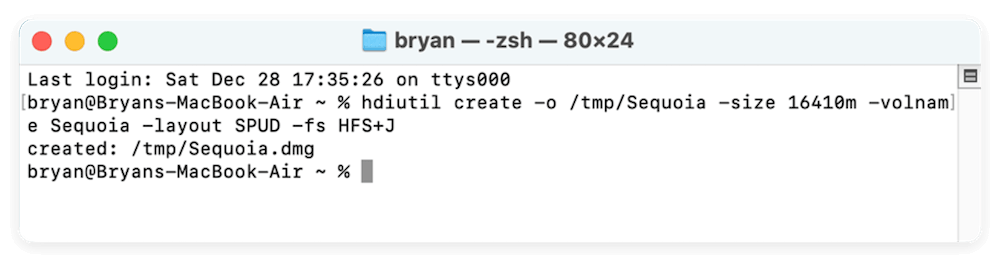
Step 1: Create a Blank Disk Image
We need to create a temporary "container" for the installer. Open Terminal (Command + Space, then type Terminal) and enter:
hdiutil create -o /tmp/Sequoia -size 16410m -volume Sequoia -layout SPUD -fs HFS+J
This creates a 16GB blank disk image in your temporary folder.
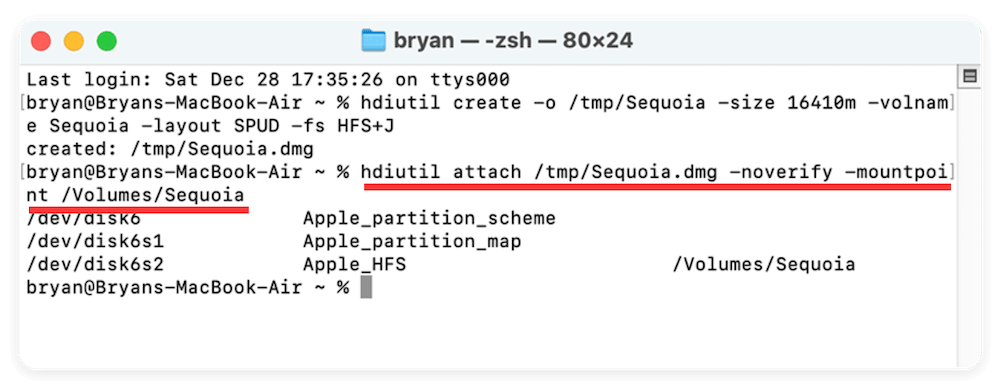
Step 2: Mount the Disk Image
Now, mount that blank image to your Mac:
hdiutil attach /tmp/Sequoia.dmg -noverify -mountpoint /Volumes/Sequoia
Step 3: Create the Installation Media
Use the official Apple "createinstallmedia" tool to copy the Sequoia files into our new disk:
sudo /Applications/Install\ macOS\ Sequoia.app/Contents/Resources/createinstallmedia --volume /Volumes/Sequoia --nointeraction
(You will need to enter your Mac login password to proceed.)
Step 4: Unmount and Convert to ISO
Once the copy process is 100% complete, unmount the volume:
hdiutil detach /Volumes/Install\ macOS\ Sequoia
Now, convert the .dmg file into a .cdr file:
hdiutil convert /tmp/Sequoia.dmg -format UTOto -o ~/Desktop/Sequoia.cdr
Step 5: Finalize the ISO
The last step is to change the file extension from .cdr to .iso:
mv ~/Desktop/Sequoia.cdr ~/Desktop/Sequoia.iso
Congratulations! You have successfully learned how to create macOS Sequoia ISO. The file is now sitting on your desktop, ready for use.
Phase 3: Using the ISO for Virtualization
The primary reason to create a macOS Sequoia ISO is for virtualization software.
- For VMware Users: When creating a new Virtual Machine, select "Install from disc image file (ISO)" and browse to the Sequoia.iso file on your desktop.
- For VirtualBox Users: Add the ISO to the Optical Drive settings in your VM configuration before booting.
Phase 4: Troubleshooting Common Errors
Even for pros, things can go wrong. Here is how to fix common hurdles:
"Not enough space": Ensure your Mac has at least 35-40GB of free space. The ISO creation process creates large temporary files.
"Permission Denied": Always ensure you use the sudo command when prompted, and make sure Terminal has "Full Disk Access" in your System Settings.
"Installer not found": Ensure the installer is named exactly Install macOS Sequoia.app and is located in your Applications folder.
Phase 5: FAQs – Everything You Need to Know
Technically, no. Apple's createinstallmedia tool only runs on macOS. However, you can create the ISO on a Mac and then transfer the finished .iso file to a Windows PC for use in VMware or VirtualBox.
macOS Sequoia is a large operating system. We recommend setting the disk image size to at least 16GB to ensure all components and the recovery partition fit properly.
Creating an ISO for personal use, such as testing software in a virtual machine or creating a backup for your own hardware, is generally permitted under Apple's EULA, provided you are running it on Apple hardware.
While the ISO contains the necessary files, running macOS on non-Apple hardware often requires additional "kexts" and bootloaders (like OpenCore or Clover) that are not included in a standard ISO.
While you can, it's easier to use the createinstallmedia command directly on a USB drive without converting it to an ISO first. The ISO format is specifically optimized for virtual disks and optical media.
Conclusion: Mastering the Sequoia Setup
The ability to create macOS Sequoia ISO files gives you the freedom to explore Apple's latest operating system in a safe, virtualized environment. By following the Terminal steps outlined above, you ensure a clean, error-free image that works across various platforms.
Despite some challenges along the way, such as handling permissions or managing large files, the process is straightforward with the right tools and knowledge. With this guide, you now have the steps and understanding necessary to create and work with macOS Sequoia ISO files. Now that your ISO is ready, you're all set to experience the future of macOS!
Donemax Disk Clone for Mac
An award-winning disk cloning program to help Mac users clone HDD/SSD/external device. It also can create full bootable clone backup for Macs.
Related Articles
- Dec 05, 2024Can't Install macOS Sonoma on My Mac, Why and How to Fix It
- Jun 10, 2026Can You Install macOS Tahoe on an Unsupported Mac?
- Aug 05, 2025Fix Error Code 36 on Mac: A Comprehensive Guide
- Jul 08, 2025How to Lock a Mac: Quick and Effective Ways to Secure Your Mac
- Jan 28, 20262026 Best 5 Disk Mounter for Mac
- Mar 17, 20257 Solutions to Fix Seagate Expansion Portable Hard Drive Not Mounting on Mac

Contributing Writer
Coco Lin
Coco has been a writer and a chief programmer at Donemax software since 2018. Over 10 years of experience of writing troubleshooting articles in the software industry, she is passionate about programming and loves to providing solutions to Windows and Mac users. Also she enjoys music and palying tennis in her free time.

Editor in chief
Gerhard Chou
In order to effectively solve the problems for our customers, every article and troubleshooting solution published on our website has been strictly tested and practiced. Our editors love researching and using computers and testing software, and are willing to help computer users with their problems