
Written byStevenUpdated on Jul 15, 2025
How to Enable and Disable Built-in Camera on Mac (Complete Guide)
Approved byGerhard Chou
PAGE CONTENT:
- Why You Might Want to Enable or Disable Your Mac's Camera?
- How to Check If Your Mac Camera Is Working?
- How to Enable the Built-in Camera on Mac?
- How to Disable the Built-in Camera on Mac?
- Common Issues and Troubleshooting the Mac Camera
- Using Third-Party Apps to Control Camera Access
- Frequently Asked Questions About Mac's Camera
- Conclusion
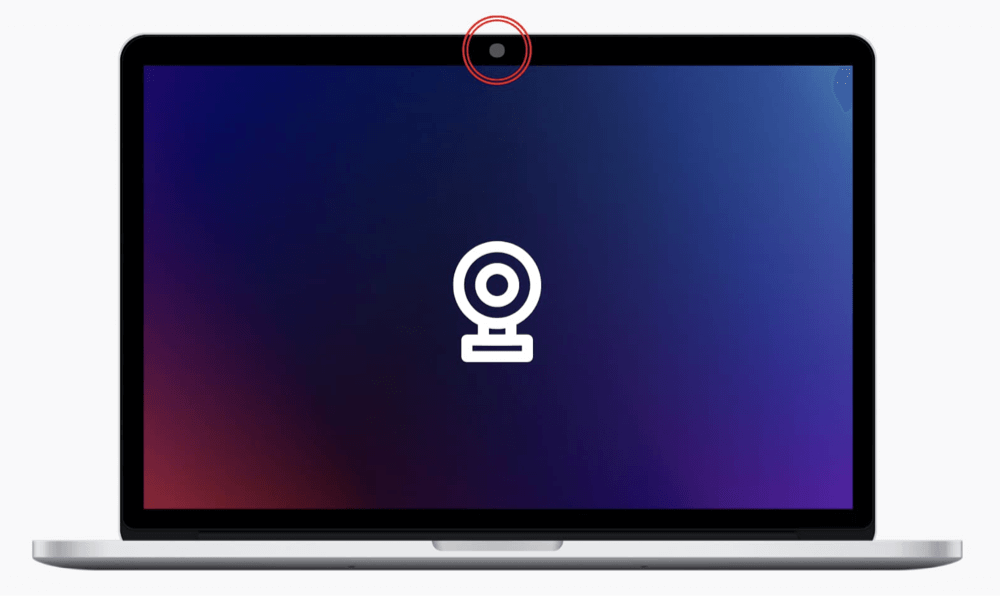
Apple's MacBook and iMac devices come equipped with a high-quality built-in camera, commonly known as the FaceTime HD camera. This camera is widely used for video conferencing, online meetings, virtual learning, content creation, and more. However, many Mac users may wish to disable or enable the camera for various reasons, including privacy concerns, troubleshooting, or limiting app permissions.
In this guide, you'll learn all the practical ways to enable or disable the built-in camera on a Mac, covering both newer and older macOS versions. Additionally, we'll explore privacy considerations, common camera-related issues, and third-party tools to manage camera access more effectively.
Why You Might Want to Enable or Disable Your Mac's Camera?
There are several situations where you might need to control your Mac's built-in camera:
- Privacy Concerns: To prevent unauthorized apps or malware from accessing your camera.
- Parental Controls: To restrict camera access for children.
- Troubleshooting: When the camera is malfunctioning or not recognized by apps.
- Temporary Restrictions: During presentations or focus work, where camera access is unnecessary.
Apple does not provide a simple on/off switch for the built-in camera, but users can control access through system settings, permissions, and advanced methods like Terminal commands.
How to Check If Your Mac Camera Is Working?
Before making any changes, it's useful to test whether your built-in camera is working correctly:
▼ Use Default Apps to Test the Camera
- FaceTime: Open the FaceTime app. If the camera is working, your video feed should appear.
- Photo Booth: Launch Photo Booth, which displays your camera feed immediately.
- Video Conferencing Apps: Apps like Zoom, Microsoft Teams, or Google Meet can also be used to test camera functionality.
▼ Signs the Camera is Disabled or Malfunctioning
- Apps show a black screen or error message.
- The green indicator light next to the camera does not turn on.
- The camera does not appear as an option in app settings.
If the camera is not working or you suspect unauthorized use, proceed to enable, disable, or troubleshoot using the steps below.
How to Enable the Built-in Camera on Mac?
In most cases, enabling your Mac's built-in camera involves adjusting privacy settings and granting permissions to apps.
1️⃣ Grant Camera Access via System Settings (macOS Ventura and Later)
For users running macOS Ventura (13) or newer:
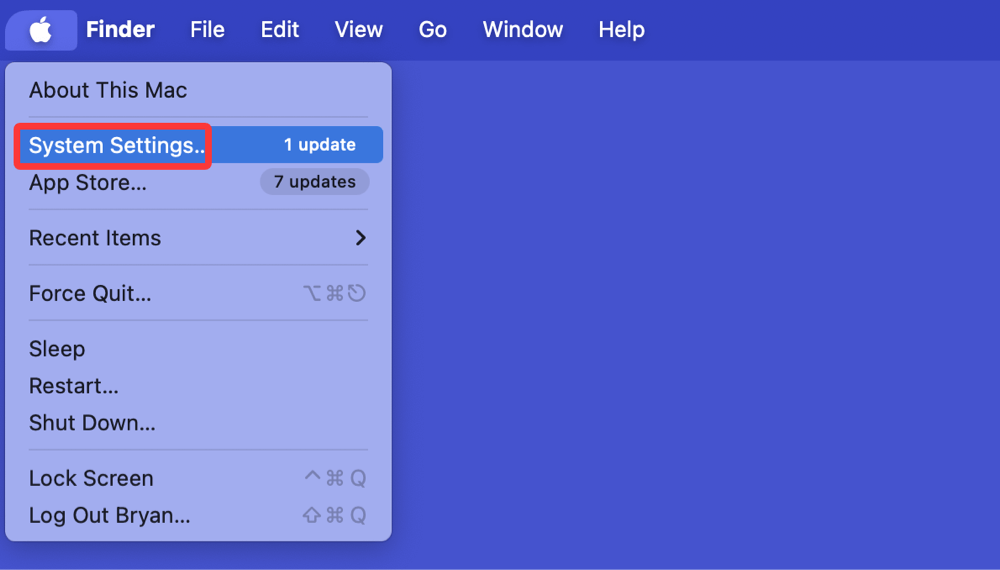
- Choose System Settings by clicking the Apple logo in the upper-left corner.
![enable built-in camera on Mac]()
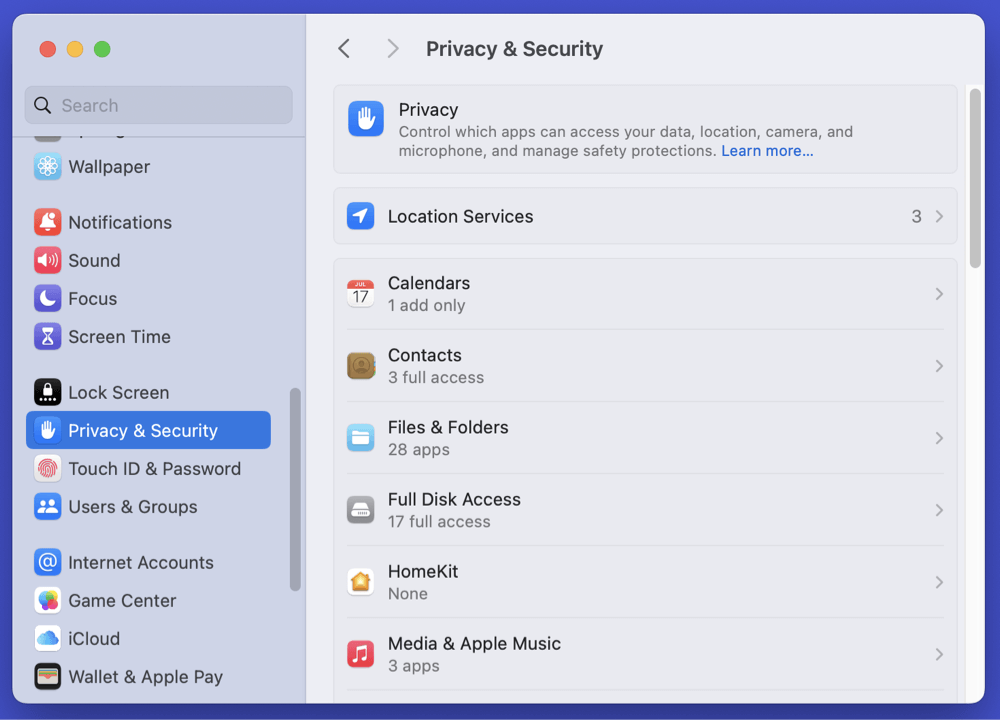
- Scroll down and choose Privacy & Security.
![enable built-in camera on Mac]()
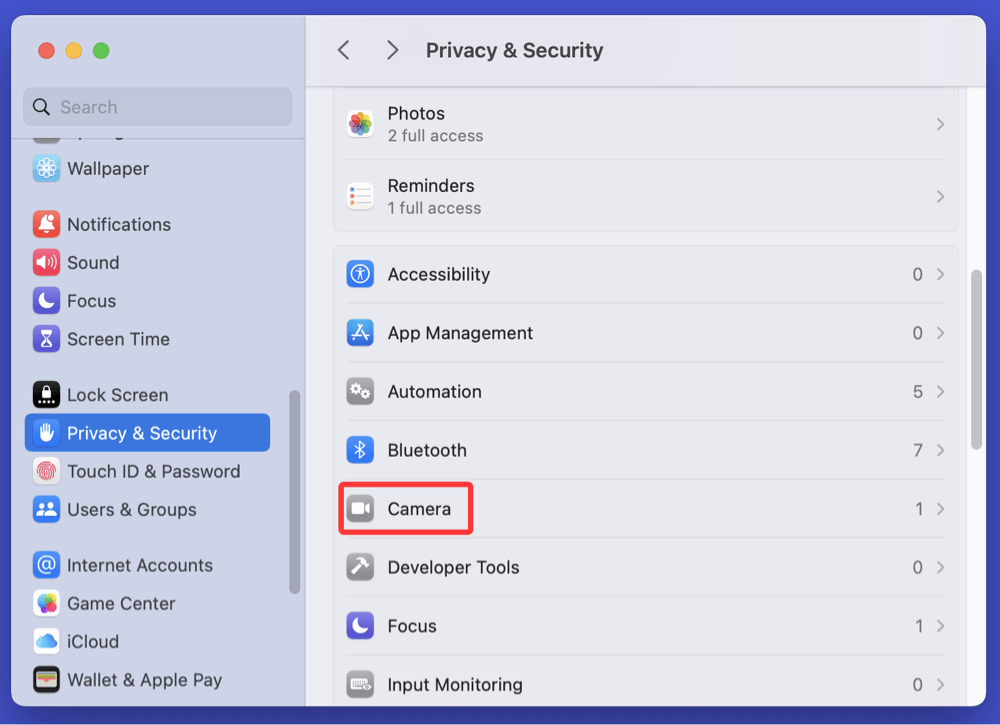
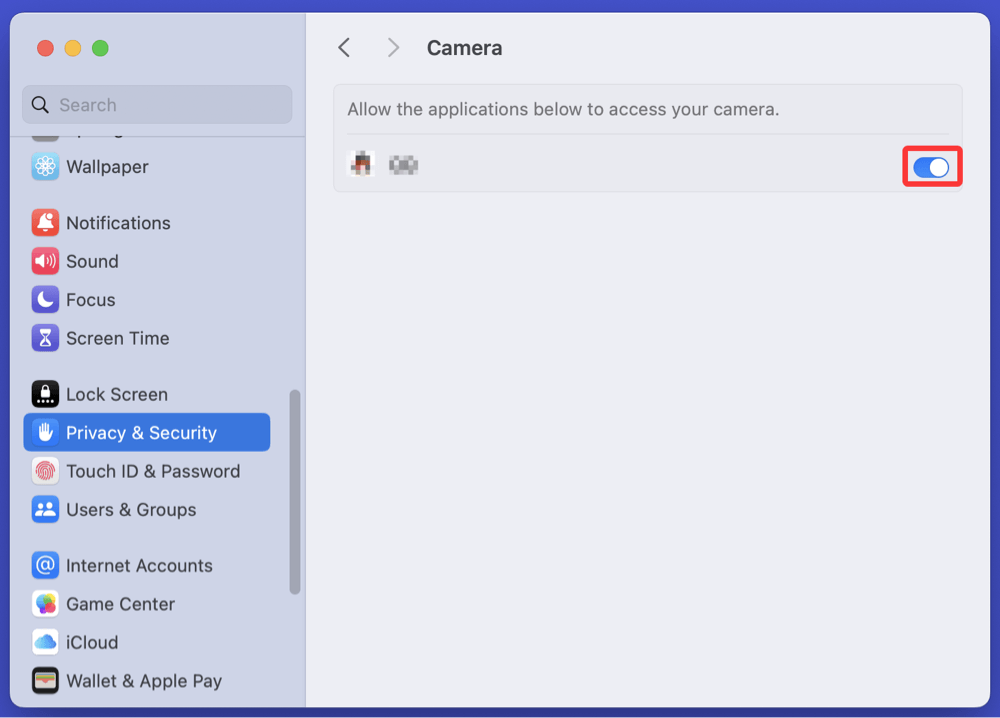
- Select Camera from the sidebar.
![enable built-in camera on Mac]()
- Toggle on the apps you want to allow access to the camera.
![enable built-in camera on Mac]()
If no apps appear or your desired app isn't listed, open the app first, and it should request permission to access the camera.
2️⃣ Grant Camera Access via System Preferences (macOS Monterey, Big Sur, Catalina)
For older versions of macOS:
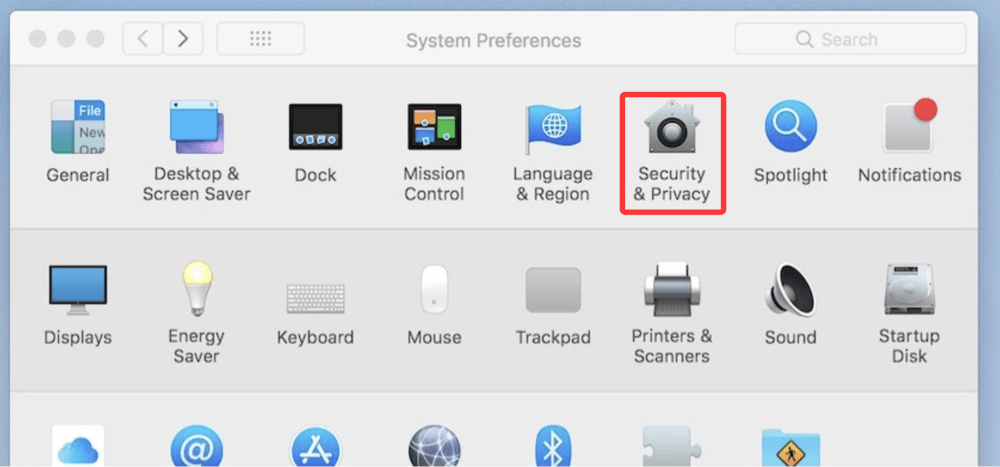
- Select System Preferences after clicking the Apple logo.
![enable built-in camera on Mac]()
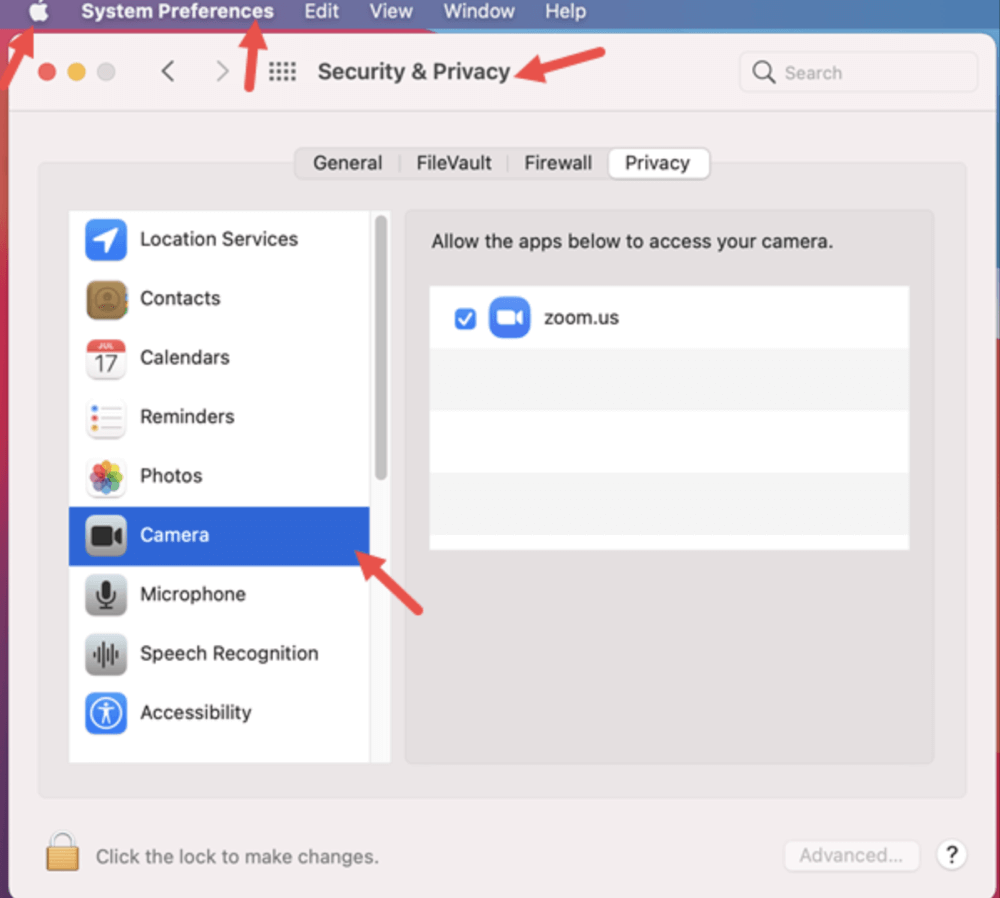
- Select the Privacy tab after selecting Security & Privacy.
![enable built-in camera on Mac]()
- From the list on the left, choose Camera.
- Check the box next to apps you want to grant camera access.
![enable built-in camera on Mac]()

💡 Note: You may need to click the padlock icon at the bottom-left corner and enter your admin password to make changes.
3️⃣ Restart Apps or Your Mac
Sometimes, apps fail to recognize the camera after changing permissions. To fix this:
- Quit and reopen the affected apps.
- Restart your Mac to apply system-wide changes.
How to Disable the Built-in Camera on Mac?
Disabling your Mac's built-in camera can prevent unauthorized apps from accessing your webcam. You can manage camera access through system settings, Terminal commands, or physical methods.
1️⃣ Revoke Camera Access via System Settings (macOS Ventura and Later)
To disable camera access for specific apps:
- Go to System Settings.
- Click Privacy & Security, then select Camera.
- Toggle off the apps you want to block from using the camera.
This prevents apps from accessing the camera until you re-enable them.
2️⃣ Disable Camera Access via System Preferences (Older macOS)
For macOS Monterey, Big Sur, Catalina:
- Open System Preferences, then go to Security & Privacy.
- Under the Privacy tab, select Camera.
- Uncheck the boxes next to apps you wish to block.
Again, the padlock icon at the bottom may require unlocking for changes.
3️⃣ Use Terminal Commands to Disable the Camera (Advanced Users)
For users with technical expertise or those who require advanced control, it is possible to attempt disabling the built-in camera using Terminal commands. However, this method comes with limitations and potential risks, especially on newer macOS versions where Apple has implemented strict system protections.
Understanding Kernel Extensions (Kexts) and Camera Functionality
The built-in camera on a Mac relies on system-level software components called kernel extensions (kexts). These kexts act as drivers, allowing the hardware to interface with macOS. By unloading the specific kext responsible for the camera, you can effectively disable the hardware temporarily, preventing apps and processes from accessing the camera.
- This method may not work on newer macOS versions due to System Integrity Protection (SIP).
- Disabling SIP weakens your system's defenses and is not recommended for regular users.
Example Terminal Command:
sudo kextunload /System/Library/Extensions/AppleCameraInterface.kext
To re-enable the camera:
sudo kextload /System/Library/Extensions/AppleCameraInterface.kext
Important Notes:
- SIP must be disabled to unload kernel extensions, which requires booting into Recovery Mode and modifying system settings.
- Misuse of Terminal commands can cause system instability.
- Proceed with caution and consult Apple Support if unsure.
4️⃣ Physically Block the Camera
A straightforward, non-technical method is physically covering the camera:
- Camera Slide Covers: Small plastic sliders that attach to your Mac and cover the lens when not in use.
- Tape or Stickers: Temporary but effective, though not aesthetically pleasing and may leave residue.
Physically blocking the camera provides peace of mind, especially against potential malware or unauthorized access.
Common Issues and Troubleshooting the Mac Camera
Even after managing settings, you might face camera issues. Here's how to troubleshoot:
1️⃣ Camera Not Detected by Apps
If apps cannot detect the camera:
- Confirm permissions are granted via System Settings or System Preferences.
- Quit and reopen the app.
- Restart your Mac.
- Update the app to the latest version.
2️⃣ Camera Access Prompt Not Appearing
If apps do not request camera access:
- Open the app and initiate a video call or recording feature.
- If no prompt appears, manually enable access in Privacy & Security settings.
3️⃣ Green Camera Light Stays On
The green indicator light turns on when the camera is active. If it stays on unexpectedly:
- Check for open apps using the camera.
- Force quit suspicious apps via Activity Monitor.
- Scan for malware using reliable security software.
4️⃣ Reset SMC and NVRAM/PRAM
Resetting system management settings can resolve hardware glitches:
Reset SMC (For Intel-based Macs):
- Turn Off your Mac.
- For ten seconds, press and hold the power button and Shift + Control + Option on the left side of the keyboard.
- Turn on your Mac after releasing all the keys.
Reset NVRAM/PRAM:
- Turn Off your Mac.
- Press Option + Command + P + R as soon as you turn it on.
- Release the keys after holding them for roughly 20 seconds.
For Apple Silicon Macs, resetting these settings requires turning off the device and waiting before restarting, as specific key combinations do not apply.
Using Third-Party Apps to Control Camera Access
For enhanced control, consider third-party tools:
1️⃣ Oversight by Objective-See
Oversight is a free app that monitors camera and microphone activity. It alerts you when apps attempt to access these devices, providing transparency and control.
Features:
- Real-time notifications for camera/microphone usage.
- Option to block unauthorized access attempts.
- Lightweight and user-friendly.
Website: objective-see.com/products/oversight.html
2️⃣ Parental Control and Security Tools
Apps like Net Nanny, Qustodio, or Kaspersky Safe Kids offer parental controls, including:
- Disabling camera access for children.
- Monitoring app activity.
- Setting time limits and usage restrictions.
Ensure any third-party tool is from a reputable source to avoid security risks.
Frequently Asked Questions About Mac's Camera
1. Can I Permanently Disable the MacBook Camera?
Technically, you can disable the camera through Terminal or physically block it. However, macOS does not offer a built-in permanent disable switch for the hardware.
2. Can I Disable the Green Camera Light?
No. The green indicator light is hardwired for security and turns on whenever the camera is active. It cannot be disabled separately from the camera itself.
3. What If My Camera Turns On Without Permission?
Unusual camera activity could indicate malware or unauthorized access. Immediately:
- Cover the camera.
- Check app permissions.
- Run a malware scan.
- Use tools like Oversight to monitor activity.
Conclusion
Your Mac's built-in camera is a valuable feature for video communication, but controlling its access is essential for privacy and security. Whether you want to enable or disable the camera, this guide provides methods suitable for both novice and advanced users:
- Adjust camera permissions in System Settings or System Preferences.
- Use Terminal commands with caution for advanced control.
- Physically block the camera for guaranteed privacy.
- Troubleshoot issues using resets and system updates.
- Enhance protection with third-party apps like Oversight.
By understanding how to manage your Mac's camera effectively, you can balance functionality with privacy and keep your system secure.
DMcleaner for Mac
Donemax DMcleaner for Mac is an award-winning Mac cleanup & maintenance application. It offers 10+ tools to help Mac users clean up junk data on Mac, uninstall unwanted apps & delete leftovers, shred files, delete duplicate files, free up disk space, speed up slow Mac, etc. It is also a smart switch manager for Mac, a powerful disk manager for Mac.
Related Articles
- Sep 21, 2024Disk Utility Cannot Repair A Disk, Fix It Now
- Nov 19, 2024How to Perform Clean Install of macOS Sonoma?
- May 12, 2025A Critical Software Update is Required for Your Mac: Fix It Now!
- Apr 07, 2025[6 Fixes] Fix Macintosh HD Greyed Out in Disk Utility: Step-by-Step Guide
- Jul 15, 2025How to Enter and Exit Full Screen on a Mac?
- Jul 12, 2024Can I Use CCleaner to Wipe Data Permanently on Mac?

Contributing Writer
Steven
Steven has been a senior writer & editor of Donemax software since 2020. He's a super nerd and can't imagine the life without a computer. Over 6 years of experience of writing technical solutions and software tesing, he is passionate about providing solutions and tips for Windows and Mac users.

Editor in chief
Gerhard Chou
In order to effectively solve the problems for our customers, every article and troubleshooting solution published on our website has been strictly tested and practiced. Our editors love researching and using computers and testing software, and are willing to help computer users with their problems