
Written byCoco LinUpdated on Apr 18, 2025
Couldn't Mount a Disk on Mac After Erasing It? Fix It Now
Approved byGerhard Chou
Tip: If you've erased the disk to NTFS, the disk may not mount on the Mac. You can installer an NTFS driver - such as Donemax NTFS for Mac on your Mac and run this driver to mount any NTFS disk on your Mac. It also can help you repair damaged drive or reformat corrupted disk on your Mac.
PAGE CONTENT:
If you've just erased a disk on your Mac using Disk Utility and now find it won't mount - you're not alone. This is a common issue that affects both internal and external drives, especially when using formats like APFS or HFS+. Whether you're trying to install a fresh version of macOS, set up a new external storage drive, or simply erase a volume for repurposing, a disk that refuses to mount can be frustrating. But don't worry - this guide will walk you through all the possible solutions, step by step.
Why Won't a Disk Mount After Being Erased?
When a disk refuses to mount, it means macOS recognizes the physical device but cannot read or access its file system. Erasing a disk should theoretically reset everything, but sometimes the process introduces new problems. Common causes include:
- File system corruption during the erase process
- A failed or incomplete erasure
- Incorrect partition scheme
- Issues with APFS containers or volumes
- macOS not being able to read the file system
- Hardware problems with the disk or its enclosure
Understanding the root cause is essential for applying the correct fix.
Preliminary Checks Before Troubleshooting
Before diving into deeper fixes, do a few quick sanity checks:
- Reconnect the disk – Safely unplug and re-plug the disk, using a different port or cable.
- Try another Mac – See if the disk behaves the same on a different machine.
- Check Disk Utility – Open Disk Utility from Utilities via Applications and look for the disk in the sidebar.
- Check System Information – Go to Apple Menu in About This Mac and further under System Report, and check under USB or SATA if the disk appears there.
![Check System Information]()
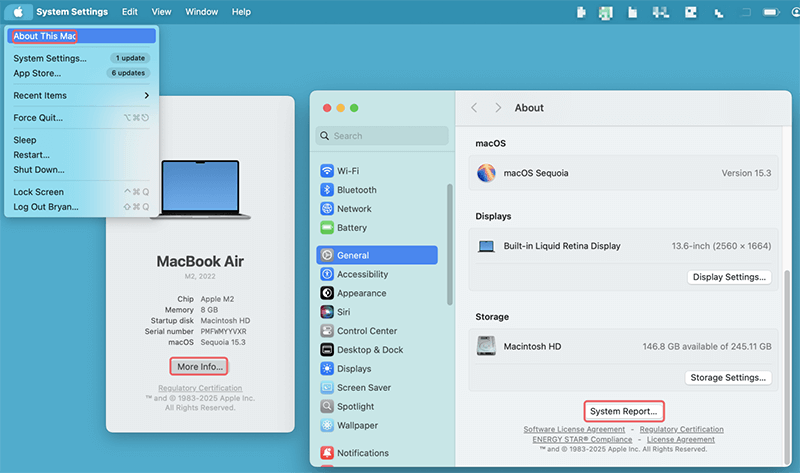
If the disk shows up but won't mount, the system sees it but can't read the volume. Time to fix that.
Fixes for Disk Won't Mount on Mac After Being Erased
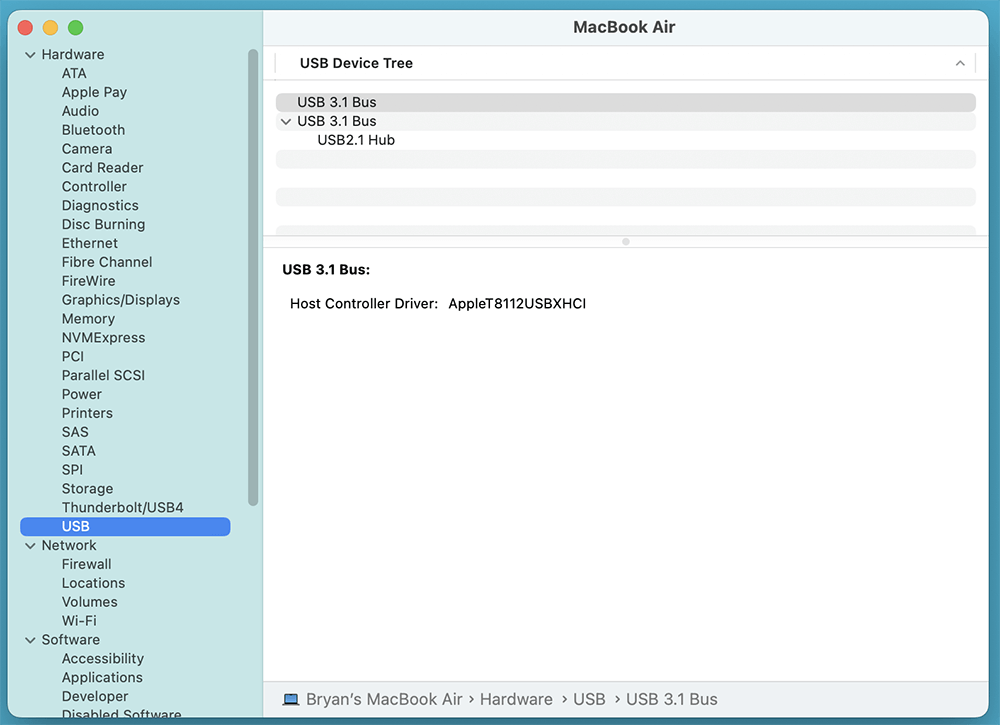
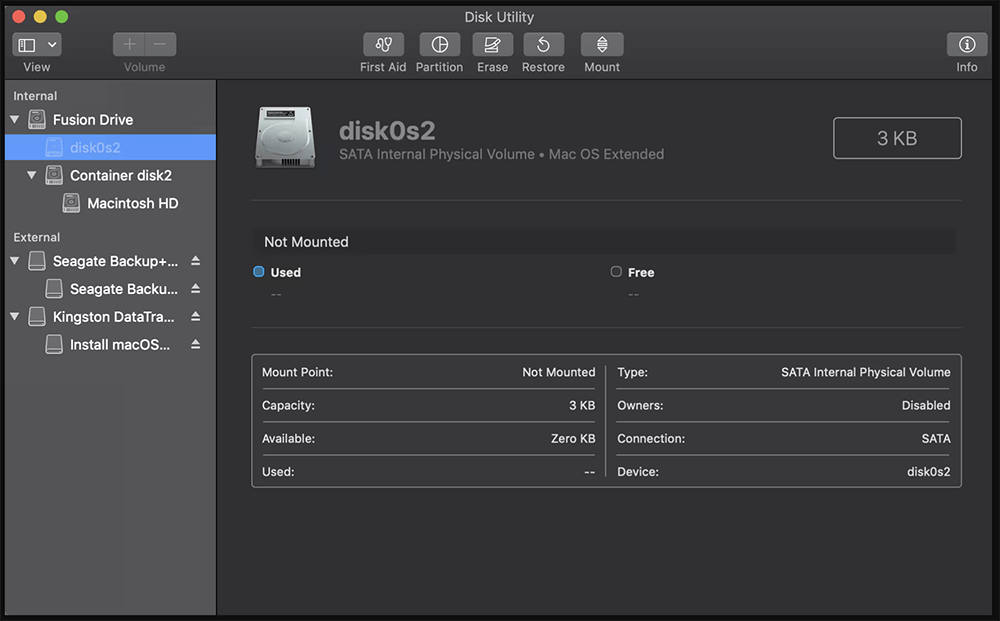
Fix 1: Manually Mount the Disk via Disk Utility
Sometimes the disk simply needs to be mounted manually.
Steps:
- Open Disk Utility.
- Select the unmounted volume or container on the left panel.
- Click the Mount button at the top.
![Manually Mount the Disk via Disk Utility]()
What if the Mount button is greyed out?
This indicates that macOS doesn't recognize a valid or complete file system on the disk - continue to Fix 2.
Fix 2: Run First Aid in Disk Utility
Disk Utility includes a built-in repair tool called First Aid.
Steps:
- Open Disk Utility.
- Select the affected disk or container.
- Click First Aid, then Run.
![Run First Aid in Disk Utility]()
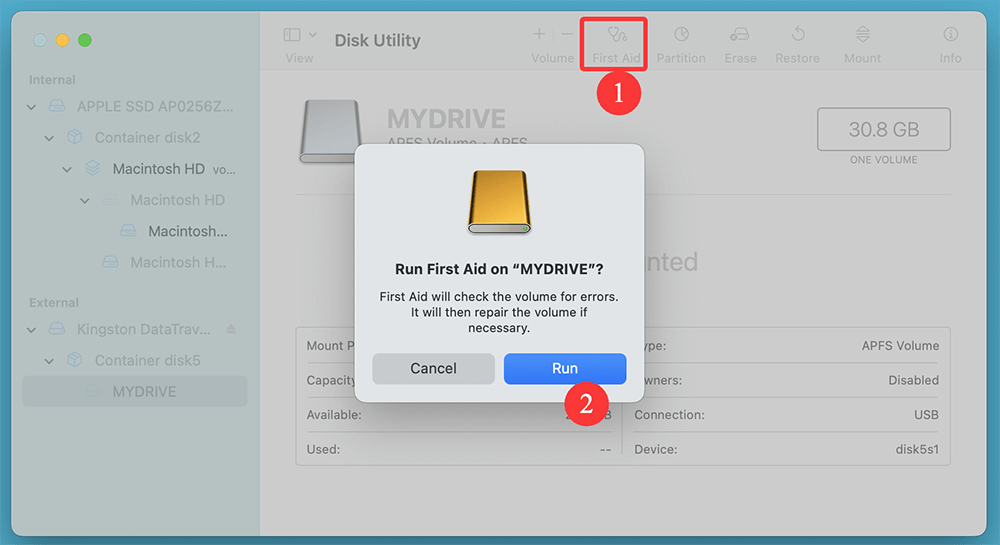
Interpreting Results:
- If First Aid reports "The volume appears to be OK" – try mounting it again.
- If it reports errors like "B-Tree node invalid" or "File system verify or repair failed" – it means the file system is damaged.
If First Aid fails, proceed to Fix 3.
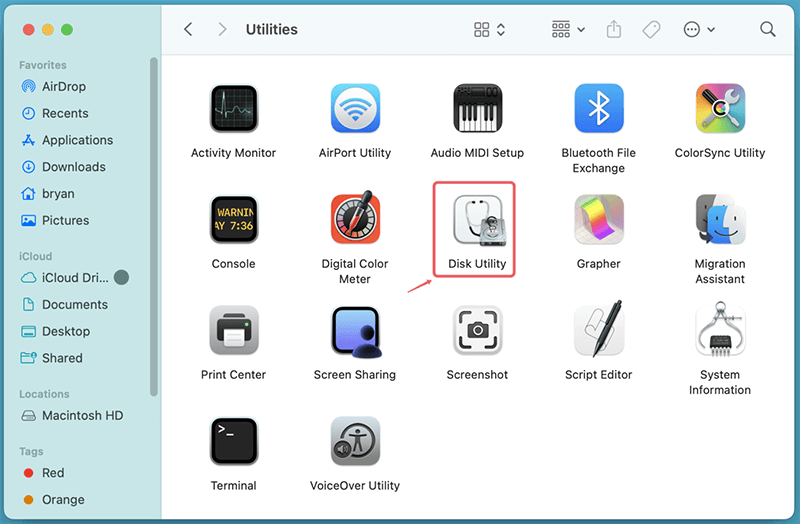
Fix 3: Mount the Disk via Terminal
When Disk Utility fails to mount a disk - either showing the option as greyed out or doing nothing upon clicking "Mount" - Terminal often provides more insight and control. Using macOS's powerful command-line tool, you can manually interact with the disk using the diskutil command. This is especially useful when dealing with erased disks that may have incomplete or incompatible file systems.
Step 1: Identify the Disk
Before mounting anything, you need to find the exact identifier for your disk.
- Open Terminal from Utilities via Applications.
![Open Terminal from Utilities via Applications]()
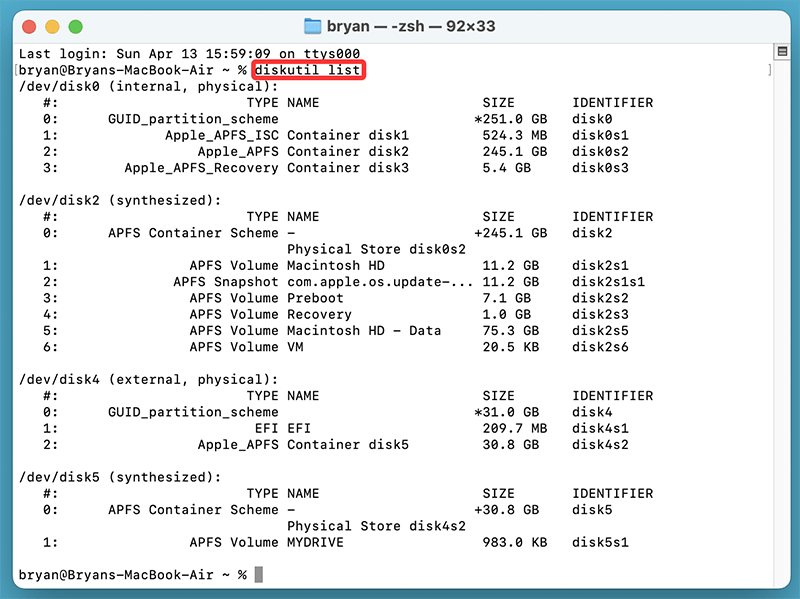
- Type the below command and press Enter:
diskutil list
![Type the below command and press Enter]()
- This will output a list of all storage devices and partitions connected to your Mac. Each disk will be listed with a unique identifier such as /dev/disk0, /dev/disk2, etc.
Step 2: Mount the Disk or Volume
Once you have identified the correct disk or volume, attempt to mount it using diskutil.
To mount the entire disk:
diskutil mountDisk /dev/disk4
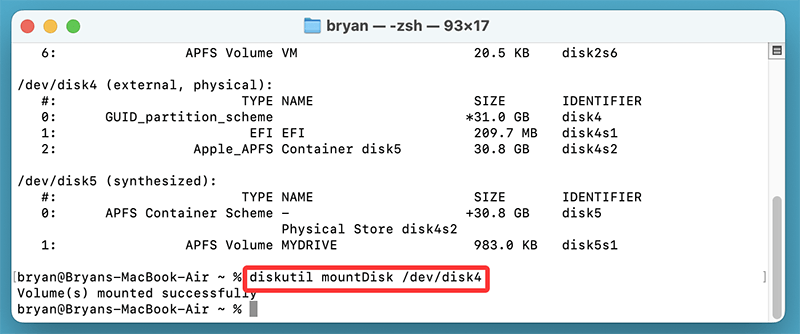
This command attempts to mount all mountable volumes on the disk.
To mount a specific volume:
diskutil mount /dev/disk4s2
This mounts only the specified volume (e.g., disk4s2).
Step 3: If Mount Fails, Try Repairing the Disk
If the disk fails to mount and you see an error like:
Volume on disk4s2 failed to mount; if it has a partitioning scheme, use "diskutil mountDisk"
You may want to run a repair command before retrying the mount.
diskutil repairDisk /dev/disk4
Or, if you know the specific volume:
diskutil repairVolume /dev/disk4s2
This attempts to repair any file system issues that may be preventing the disk from mounting.
Step 4: Try Mounting as Read-Only (Advanced)
If you suspect the disk has physical issues, try mounting it as read-only to prevent further damage:
sudo mount -o rdonly -t apfs /dev/disk3s1 /Volumes/TestMount
- Replace /Volumes/TestMount with a valid, existing directory.
- You may need to create that folder first:
sudo mkdir /Volumes/TestMount
Bonus: Use fsck_apfs for Deep APFS Repair
For APFS disks that won't mount or repair properly, you can try Apple's file system consistency check tool:
sudo fsck_apfs -n /dev/disk3s1
- The -n option means no modification - it's a safe check.
- You can use -y to automatically repair (use with caution).
Summary
Using Terminal gives you more detailed control over unmountable disks. Here's what to remember:
- Use diskutil list to identify your disk.
- Use diskutil mount or mountDisk to try manual mounting.
- Use repairDisk or repairVolume for potential fixes.
- Watch for meaningful error messages and try alternate mounting options.
- Consider advanced tools like fsck_apfs for APFS containers.
Fix 4: Reformat the Disk Properly via Terminal
If Disk Utility failed to set up the correct file system or partition map, re-erasing the disk via Terminal with explicit parameters may help.
Steps:
- In Terminal, use:
diskutil eraseDisk APFS DiskName /dev/diskX
- APFS is the disk's file system.
- DiskName is whatever name you want to give the disk.
- diskX is your disk identifier.
![Reformat the Disk Properly via Terminal]()
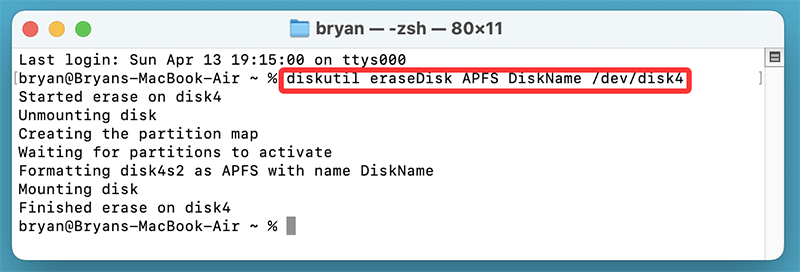
Or, if you're using HFS+, use:
diskutil eraseDisk HFS+ DiskName /dev/diskX
Why this works:
The above command fully wipes and sets a new GUID partition map, resolving any corrupted file system structures.
After this, open Disk Utility again and attempt to mount the volume.
Fix 5: Reset NVRAM and SMC
Sometimes, unrecognized disks may be the result of firmware issues related to NVRAM or SMC.
Reset NVRAM (Intel Macs):
- Turn Off your Mac.
- Switch it on, then push and hold right away:
Option + Command + P + R
- Release after holding for roughly 20 seconds.
Reset SMC:
For MacBooks with a T2 chip:
- Turn Off the Mac.
- After seven seconds of holding down Control + Option + Shift (right side), press and hold the Power button as well.
- Release all keys after holding them for an additional seven seconds.
- Wait a few seconds and turn the Mac on.
After resetting, try mounting the disk again.
Fix 6: Use Safe Mode or Recovery Mode
If macOS is having trouble during normal boot, Safe Mode or Recovery Mode might help.
Boot into Safe Mode:
- Shut down your Mac.
- For Intel-based Mac: Hold the Shift key immediately after turning it on. For Apple silicon Mac: Shut down the Mac, then press and hold Power button until it boots into macOS Recovery mode, select Macintosh HD, press and hold it, choose Continue in Safe Mode.
![Boot into Safe Mode]()
- Let go when you see the login screen.
- Try to open Disk Utility and mount the disk.

Use macOS Recovery:
- Reboot your Mac and hold Command + R (for Intel-based mac) or Power button (for Apple silicon Mac).
- Open Disk Utility from the Utilities menu.
- Try mounting the disk or re-erasing it again.
![Use macOS Recovery]()
Terminal is also available in Recovery Mode (Utilities > Terminal) for running diskutil commands.
Fix 7: Check for Hardware Issues
If none of the software methods work, consider hardware diagnostics.
For External Drives:
- Try a different cable or USB port.
- Use a different Mac.
- Swap the enclosure if it's a 2.5"/3.5" SATA drive.
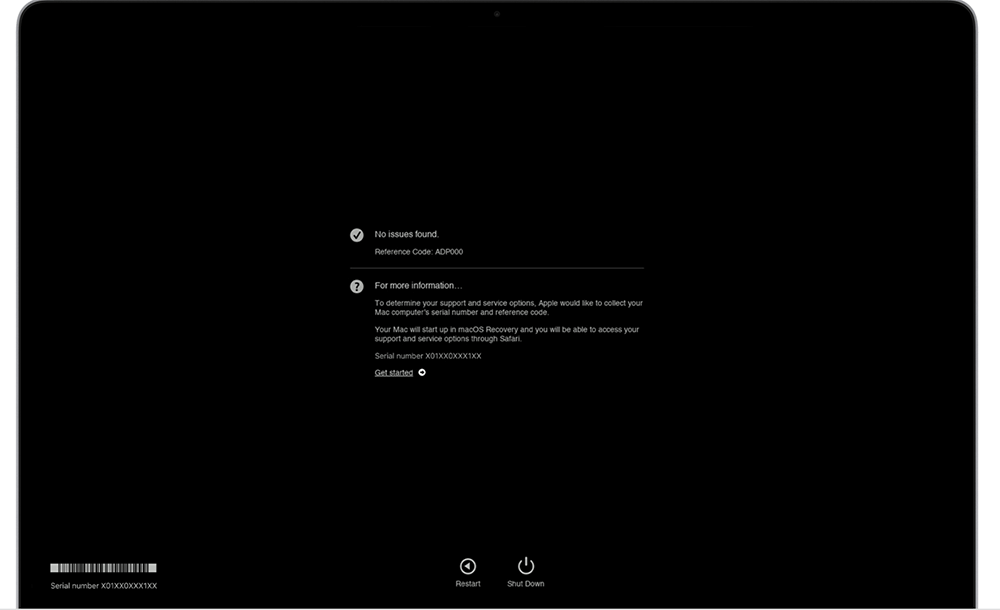
Run Apple Diagnostics:
- Disconnect all peripherals except keyboard and mouse.
- Turn Off the Mac.
- Switch it on and press D right away.
![Run Apple Diagnostics]()
- Let Apple Diagnostics run and check for issues related to storage or logic board.
If the drive doesn't show up in System Information, the issue may be physical - potentially requiring professional repair.
Optional Step: Recover Data from Unmountable Disk
If the disk contained important data before erasing and you now can't mount it, avoid writing more data and try recovery software:
Recommended Tools:
- Donemax Data Recovery for Mac
- Do Your Data Recovery for Mac
- Disk Drill for Mac
- EaseUS Data Recovery Wizard
- Stellar Data Recovery for Mac
Steps:
Step 1. Download and install the reliable Mac data recovery software - Donemax Data Recovery for Mac.
Step 2. Open Donemax Data Recovery for Mac, then select the unmounted disk.

Step 3. Click on Scan button to deeply scan the selected disk.

Step 4. Preview the files after scanning. Then select the wanted files, click on Recover button to save them.

Important: Do not reformat the disk again if you need to recover data - recovery is most effective before any new writing happens.
Related link: recover data from unmounted or erased disk on Mac.
How to Mount NTFS-formatted Disk on Mac?
If the disk is erased to NTFS file system, you can use Donemax NTFS for Mac to mount it on your Mac.
Step 1. Download and install Donemax NTFS for Mac on your Mac.
Step 2. Open Donemax NTFS for Mac, select the NTFS disk, click on Mount button to mount the NTFS disk on your Mac.
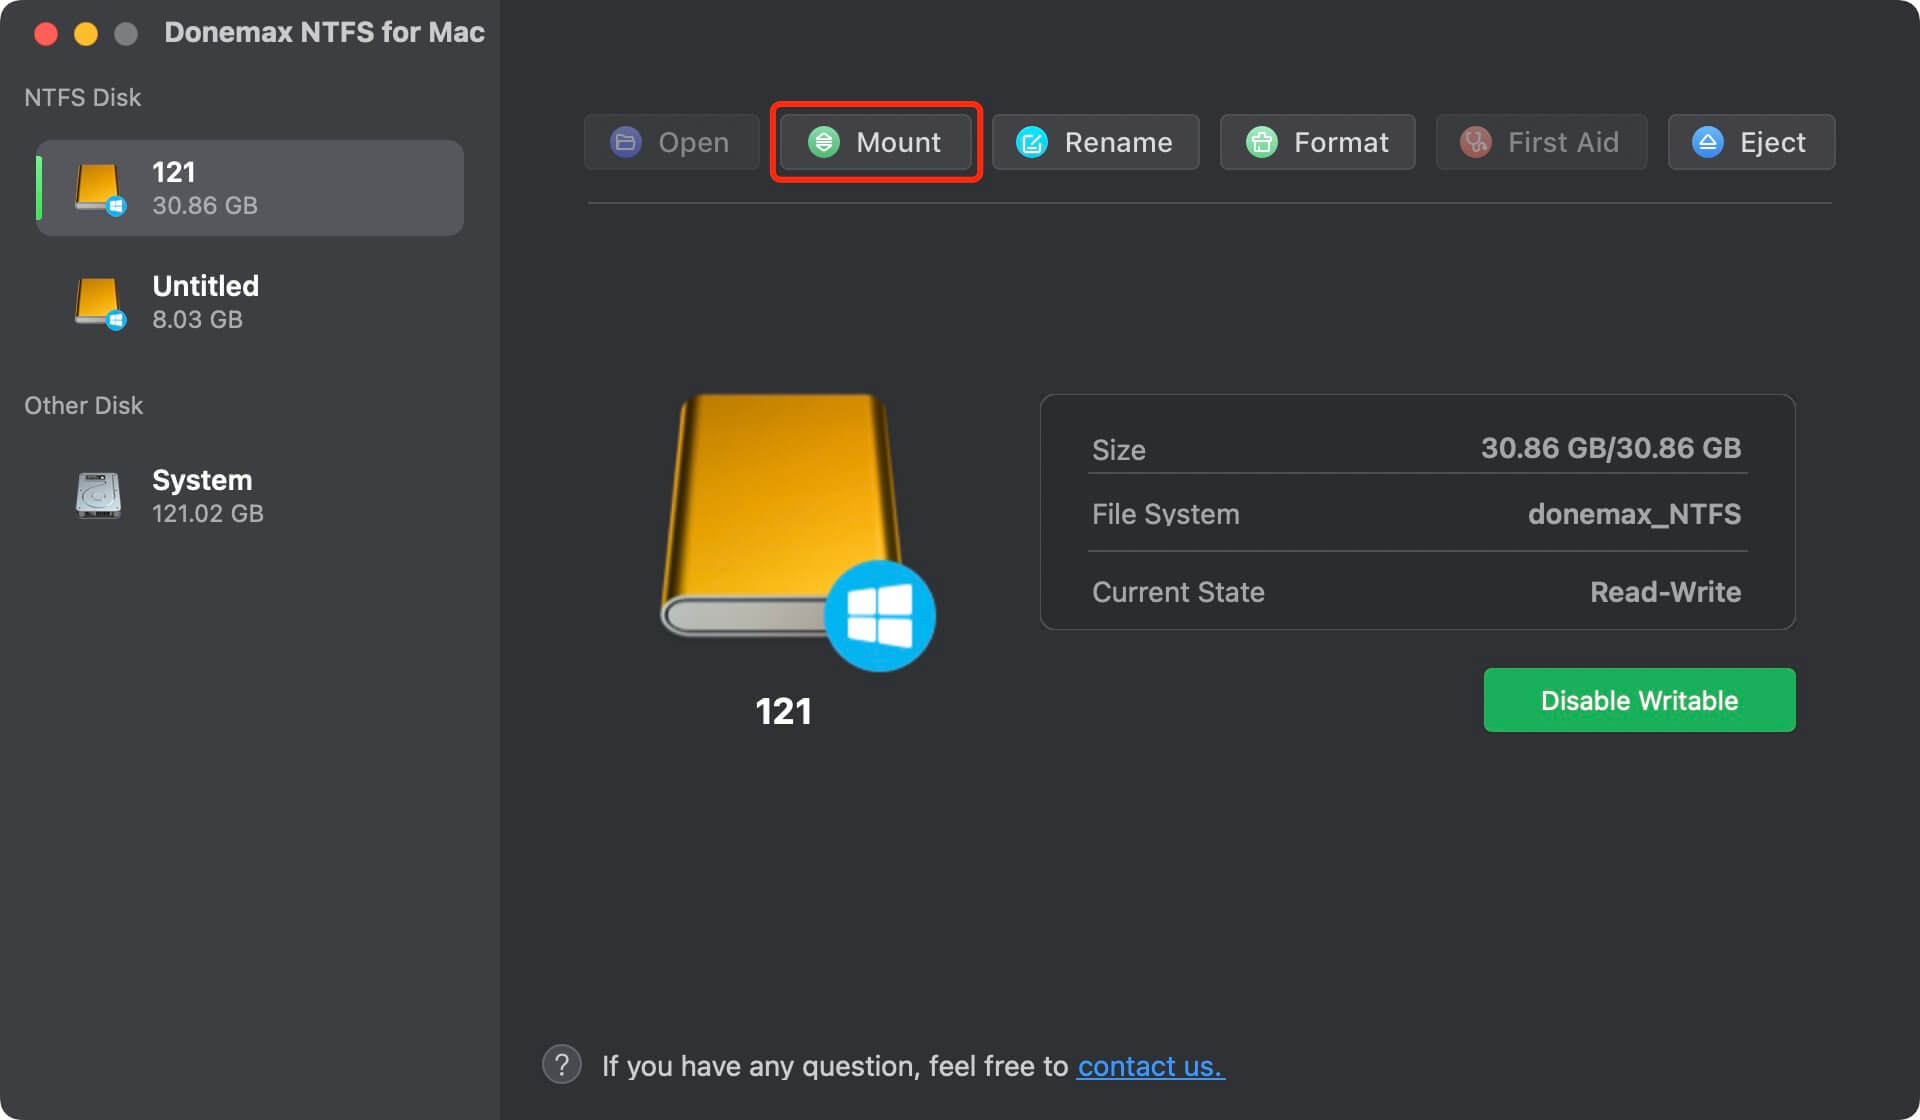
Step 3. Once the disk is mounted, click on Enable Writable button so that you can write data to the NTFS disk on your Mac without any limitation.

Conclusion
A disk that won't mount after erasing can be a serious annoyance, especially when you're trying to reuse or repurpose it. The good news is that in most cases, the issue is related to formatting or file system structure - problems that can usually be fixed with a little effort. Whether you go the GUI route with Disk Utility or use Terminal for deeper control, this guide provides a full toolbox of options to get your disk working again.
Key Takeaways:
- Always check the basics first - cables, ports, other Macs.
- Use First Aid to attempt a repair before reformatting.
- Terminal commands offer more control over mounting and erasing.
- If all else fails, consider hardware diagnostics or professional help.
- Use recovery tools only before rewriting to the disk if data loss is a concern.
If you found this guide helpful, consider bookmarking it or sharing it with others facing similar disk mounting issues. And if your situation doesn't match any of the scenarios above, drop a comment or reach out - there's almost always a fix!
Donemax NTFS for Mac
An easy-to-use NTFS for Mac tool to help you enable writable for NTFS drives on Mac so that you can read-write NTFS drives on Mac without any limitation. It also can help you mount, format, repair, rename, open drive on your Mac.
Related Articles
- Feb 17, 2025Fix XQD Card Not Showing Up or Not Mounting on Mac [10 Fixes]
- May 11, 2026Can't Format or Erase an SD Card on Mac - 7 Solutions
- May 26, 2026Fix macOS Tahoe Battery Drain: Complete Troubleshooting Guide
- Jul 02, 2025Why Can't Select Time Machine Backup Disk?
- Jul 27, 2025How to Lock and Unlock a USB Flash Drive on Mac?
- Jul 20, 2024How to Repair Unreadable USB Flash Drive on Mac Without Losing Data?

Contributing Writer
Coco Lin
Coco has been a writer and a chief programmer at Donemax software since 2018. Over 10 years of experience of writing troubleshooting articles in the software industry, she is passionate about programming and loves to providing solutions to Windows and Mac users. Also she enjoys music and palying tennis in her free time.

Editor in chief
Gerhard Chou
In order to effectively solve the problems for our customers, every article and troubleshooting solution published on our website has been strictly tested and practiced. Our editors love researching and using computers and testing software, and are willing to help computer users with their problems