
Written byChristinaUpdated on Feb 08, 2024
Lexar Portable SSD Is Read-Only on Mac, Fix It Now
Approved byGerhard Chou
PAGE CONTENT:
People who use Macs can store and send data quickly and safely with Lexar Portable SSDs. On the other hand, having your Lexar Portable SSD read-only on your Mac can be annoying and challenging. Because of this issue, you can't add new data to the SSD, which limits its features and usefulness. This guide will show you several steps to help you fix this problem and get full access to your Lexar Portable SSD on your Mac again.
If the Lexar Portable SSD on your Mac is set to "read-only," the system can't add new data to the drive. It could happen for several reasons, such as file system mistakes, permission problems, or damage to the SSD itself. Finding the root cause is essential for putting the correct answer into action.
How to Fix Lexar Portable SSD Read Only Error on Mac?
Fix1. Check the lock
The first thing you need to do is make sure the SSD's lock switch is not turned on. Some Lexar Portable SSD types have a switch that can be used to switch between read-only and read-write modes. If the switch is locked, move it to the open position and try to get to the SSD without it.
Fix2. Check To See If The File System Works
Make sure that macOS can read the file system format of the Lexar Portable SSD. Most Macs can read and write files in the HFS+ (Mac OS Extended) and APFS (Apple File System) forms. If the SSD is set up with a different file system, like NTFS, it might appear read-only on a Mac.
If the Lexar portable SSD has been formatted to NTFS, there are two solutions to fix the read-only issue:
#Solution 1. Use NTFS for Mac tool.
NTFS for Mac can help you add NTFS read-write support on Mac. If the Lexar portable SSD is a NTFS drive and you want to use it on your Mac, you can install a third-party NTFS for Mac software on your Mac, use it to enable writable for NTFS drives.
Step 1. Download and install an easy-to-use NTFS for Mac tool - Donemax NTFS for Mac.
Step 2. Make sure the Lexar portable SSD is connected to your Mac, open Donemax NTFS for Mac.
Step 3. Find and select the Lexar portable SSD, click on Enable Writable button. Then you can read-write the Lexar portable SSD on Mac without any limitation.

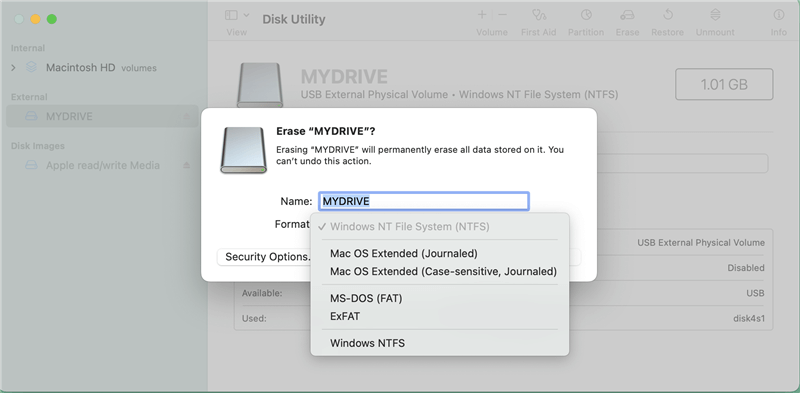
#Solution 2. Use Disk Utility.
Disk Utility can reformat the Lexar portable SSD to Mac-compatible file system. Make a backup of the Lexar portable SSD and then open Disk Utility.
Step 1. Go to Applications > Disk Utility, open this app.
Step 2. Select the Lexar portable SSD, click Erase. Select a file system.
- Mac OS Extended: for OS X 10.7 or later
- APFS: for macOS 10.13 or later.
- ExFAT: for both Windows and macOS.
![Lexar portable SSD read-only on Mac]()

Step 3. Then click Erase again. When it completes, click Done.
Fix3. Check The Disk's Permissions
The SSD can also be read-only if the disk rights are set wrong. Find the Lexar portable SSD on desktop, right-click it. Choose Get Info.
Under Sharing & Permission, set Read-only to Read-write.

Fix4. Use Terminal Commands
If the steps above don't fix the problem, you can use Terminal instructions to make macOS mount the SSD in read-write mode. Start up Terminal by going to Applications > Utilities > Terminal and typing the following:
sudo mount -uw /
When asked, press Enter and enter your user password. The root filesystem is remounted as readable by this command. Try to get into the Lexar Portable SSD again after running the code.
Fix5. Try it out on a different Mac
Test the SSD on a different Mac to see if it is only with your Mac or the SSD itself. If the SSD works fine on another Mac, the issue might be how your computer is set up or configured.
Fix6. Look for updates to the firmware
Lexar makes firmware updates for their SSDs from time to time to fix performance and compatibility problems. You should check for firmware updates for your SSD model on the Lexar website or, if it's accessible, by using the Lexar SSD Dashboard software. To put the firmware update on your SSD, if one is available, follow the steps given by Lexar. Firmware changes can sometimes fix read-only problems caused by bugs in the software or problems with how it works with macOS.
Fix7. Update your drivers and macOS
Ensure that your macOS and any tools that go with it are up to date. Outdated software can sometimes make external devices, like SSDs, ineffective. Go to the Apple menu, System Preferences, and Software Update to update macOS. Also, check the Lexar website to see if there are any driver changes for your SSD model. If there are, install them. After updating, turn your Mac back on and check if the problem remains by reaching the SSD again.
Fix8. Talk to Lexar Support
If none of the steps above fix the read-only problem, the SSD might have issues with its hardware or software. If this happens, contact Lexar's customer service for more help or a possible repair.
Recover Lost Data from Lexar Portable SSD on Mac
To make Lexar portable SSD become read-write on Mac, you may need to reformat it. However, it will erase all contents stored on the SSD. If you don’t have a backup, you will lose all your files. You can use a data recovery application to scan the Lexar portable SSD and get all lost files back.
Step 1. Download and install Donemax Data Recovery for Mac. This is a powerful Mac data recovery application which is able to recover deleted, formatted and lost data from any disk.
Step 2. Connect the Lexar portable SSD to your Mac, and open Donemax Data Recovery for Mac. Select the Lexar portable SSD to start data recovery.

Step 3. Click on Scan button to deeply scan the erased Lexar portable SSD. It will find all recoverable files.

Step 4. Once the scan is completed, you can preview all recoverable files. Then select the wanted files and save them.

FAQs About Lexar Portable SSD Read-only on Mac
1. How to fix Lexar portable SSD read-only on Mac?
If the Lexar portable SSD is not compatible with your macOS, you can use Disk Utility to format it to APFS, Mac OS Extended or ExFAT. And you also can use NTFS for Mac tool to help you enable writable for NTFS drives.
2. How to fix Lexar portable SSD not mounting on Mac?
Just open Disk Utility, find and select the Lexar portable SSD, then click on Mount button. Then check if the Lexar portable SSD is mounting. If not, click First Aid to repair the damaged Lexar portable SSD.
3. How to format a Lexar portable SSD for both Windows and macOS?
ExFAT is a file system that is fully compatible with Windows and macOS. Open Disk Utility, select the Lexar portable SSD, click Erase. Then select the ExFAT as the file system and click Erase again.
Conclusion:
If your Lexar Portable SSD is read-only on your Mac, it can hinder your work and make it harder to handle your data properly. Always make a copy of your important files before you try to fix a problem, and don't be afraid to get help from a professional if needed.
You can regain full access to your Lexar Portable SSD and use it confidently on your Mac if you are patient and don't give up. By following the steps in this guide for debugging, you can find and fix the thing that is causing the problem.
Related Articles
- Dec 06, 20242025 Best Samsung NTFS Driver for Mac
- Jun 23, 2025What Is NTFS for Mac? How to Use NTFS for Mac?
- May 19, 2025Fix External Hard Drive Read-Only on M1 Chip Mac
- May 22, 20257 Solutions to Fix Files Not Copying from Mac to External Drive or USB Drive
- Sep 19, 2025Read and Write to NTFS Drives on macOS Tahoe
- Jul 07, 2023How to Install NTFS for Mac Driver and Write Data to NTFS Drive without Formatting?

Contributing Writer
Christina
Christina is the senior editor of Donemax software who has worked in the company for 4+ years. She mainly writes the guides and solutions about data erasure, data transferring, data recovery and disk cloning to help users get the most out of their Windows and Mac. She likes to travel, enjoy country music and play games in her spare time.

Editor in chief
Gerhard Chou
In order to effectively solve the problems for our customers, every article and troubleshooting solution published on our website has been strictly tested and practiced. Our editors love researching and using computers and testing software, and are willing to help computer users with their problems