
Written byChristinaUpdated on Jan 06, 2025
Top 6 NTFS software for mac
Approved byGerhard Chou
Before we start: Is There a NTFS for Mac? The answer is No. A good NTFS app for Mac should provide fast, safe, and secure read and write access to Microsoft NTFS volumes on Mac. you can try Donemax NTFS for Mac.
PAGE CONTENT:
What is NTFS system?
The NT file system (NTFS), also known as the New Technology File System, is used by the Windows NT operating system to store, arrange, and seek files on a hard drive efficiently. NTFS was first made available as part of the 1993 Windows NT 3.1 upgrade. NTFS Format: Whatever Is It? In contrast to its rivals FAT32 and HPFS, NTFS places a greater emphasis on storage performance by using better compression, enhanced security through the use of user permissions not only on the Windows PC but also the specific files and folders stored in it, reliability by ensuring consistency of the files in case of a power outage, effective use of disc space using disc quotas, and maintaining the log of all files using the MFT to ensure that a thorough audit can be performed. Do you have inquiries about NTFS? Continue to read!
9 key features of NTFS
Some of the top characteristics of NTFS, which Microsoft utilizes as its default file system for Windows and Windows Server, are as follows:
- A b-tree directory structure for managing file clusters. This is significant because it enables efficient file sorting and organization.
- File-level encryption allows for the encryption of specific files and folders. A separate feature from full-disk encryption, which encrypts the entire drive as opposed to only specific files, is an encrypting file system.
- Ntfs allows system changes to be written to a journal or log before the actual changes are written since it is a journaling file system. In the event of any problem or failure, it enables ntfs to roll back earlier changes.
- In order to back up files that are presently in use, online backup service programmes and other backup solutions use volume shadow copy service.
- Users can create apps using transactional ntfs without having to take the chance of making changes that could or might not function.
- Access control lists, which let server administrators manage who can access which files.
- Integral file compression reduces file sizes and increases storage capacity.
- A naturally occurring file-naming pattern that permits lengthier file names and a variety of characters.
- Support for up to 16 eb hard drives. In some latest windows server versions, as well as for windows 8 and 10, it supports single files up to 256 tb.
How can we use NTFS system to work?
⭐️ NTFS technical information:
- Partitioning a hard drive
- Partitions are the divisions of files on a hard drive
- Every file stored by a specific operating system in each partition is tracked by the operating system
- Each file has a specified uniform size and is spread among one or more disc slots (on the hard disc)
- Each cluster has a size of 512 bytes to 64 kilobytes.
⭐️ It is applicable in these circumstances.
- Depending on what's most important to your organisation, you can decide how big the cluster should be
- Effective disc space utilisation
- How many disc accesses are need to access files
Drawbacks of NTFS
The main drawback of NTFS is that outdated equipment cannot use its cutting-edge features. Additionally, because NTFS was created to work with a Windows operating system, it isn't necessarily compatible with Mac or Android devices. For instance: Drives formatted in NTFS can be read by Mac OS systems, but they can only be written to NTFS via third-party software. In order to use NTFS storage systems, media equipment like DVD players, TVs, and digital cameras are probably too old.
Additionally, NTFS lacks a framework for ensuring file system performance and bandwidth, which can be problematic for some users.
How do I use my Mac Ventura to write to NTFS?
Because it is unstable, a free NTFS for Mac driver is best suited for sporadic use rather than as a long-term fix. The options for enabling writing access to your NTFS drive have been severely constrained since macOS Ventura fully rejected the free approaches. These are the 3 methods:
Method 1: On your device running macOS Ventura, enable write access by using a third-party NTFS for Mac application.
Method 2: Format the NFTS drive to APFS or FAT/exFAT for write capability on a machine running the macOS Ventura operating system.
You can simply format NTFS for Mac if your NTFS drive is empty or does not contain any significant data. Reformatting it to FAT32 or ExFAT is the simplest way to read and write to it. In contrast to NTFS, FAT32 and ExFAT work with both Windows and macOS, allowing you to read and write data to your disc in either system. Although both of the aforementioned file systems are compatible with macOS, you should be aware that the FAT32 format has some restrictions, such as the fact that it can only handle files up to 4GB in size. Furthermore, it is not as adequate as NTFS. Additionally, formatting will destroy all of the files currently on your drive; therefore, be careful to back them up first. Here is how to reformat an NTFS drive on a Mac:
Ensure that your Mac machine is connected to the NTFS drive.
- Find Disk Utility by going to Mac Launchpad > Other, then click on it to launch it. Additionally, you can open Disk Utility through Spotlight by pressing Command and Space at the same time, typing "Disk Utility" into the search field, and then pressing Return
- Select the NTFS drive in the left sidebar of the Disc Utility window
- Change the drive's format to FAT32 or ExFAT, rename it if necessary, then click the Erase option at the top
- Wait till the formatting procedure is finished.
You may now read and write to your NTFS drive on your Mac after formatting it. However, you might think about a different option if your NTFS drive has vital data on it. Just keep going!
Method 3: Use Windows installed on your Mac to access NTFS storage.
As far as I'm aware, reading NTFS files is completely supported since macOS Catalina. Without any problems, you can freely copy files from an NTFS drive to a Mac. However, regardless of the version of macOS, writing to NTFS is prohibited by default.You must use third-party libraries or applications, such as ntfs-3g (command line), mounty, paragon, or the sysgeeker programme, in order to obtain NTFS writing permission on a Mac. Follow my steps to do it.
- Install SYSGeeker NTFS for Mac on your macOS Ventura 13 machine by downloading it
- Connect your Mac to the NTFS drive
- Start up the SYSGeeker NTFS for Mac programme
- Choose the NTFS drive you want to write to in the Paragon NTFS for Mac dialogue
- The NTFS drive will mount once you click the "Mount" button.
Top 6 Best NTFS for Mac Reviews in 2025
Each app have it own pros and cons. Here is a full review of best NTFS in 2025 for Mac app you can find out:
| Donemax | Tuxera NTFS | NTFS-3G | SL-NTFS | iBoySoft NTFS for Mac | Mirvago NTFS Mac Mounter | |
| pros |
|
|
|
|
|
|
| cons |
|
|
|
|
|
|
| Recommendation rate | ⭐️⭐️⭐️⭐️⭐️ | ⭐️⭐️⭐️⭐️ | ⭐️⭐️ | ⭐️⭐️⭐️ | ⭐️⭐️⭐️⭐️ | ⭐️⭐️⭐️ |
Read everything thoroughly, then choose the best option for your present computer (model and macOS version). On the most recent macOS Monterey or M1 Mac, some of them might not be functional. Therefore, you should carefully read the review and avoid wasting time on any solutions that may not be appropriate for your particular situation.
Why do we consider Donemax to be the best option?
It's possible that you won't be able to load, edit, or add files after installing an NTFS drive on a Mac. However, you can use your NTFS drive on your Mac without limitations if you download Donemax NTFS. Apple and Intel-based Macs, including the M1 and M2 Macs, are both completely compatible with Donemax NTFS for Mac. Just choose Donemax NTFS to solve all the problem.
How to Use Donemax NTFS for Mac?
Activate Donemax NTFS for Mac. Get the NTFS for Mac permission from your Mac before using it for the first time. Then you can make all of your Mac's NTFS drives readable. Follow these four steps to use Donemax NTFS on mac.
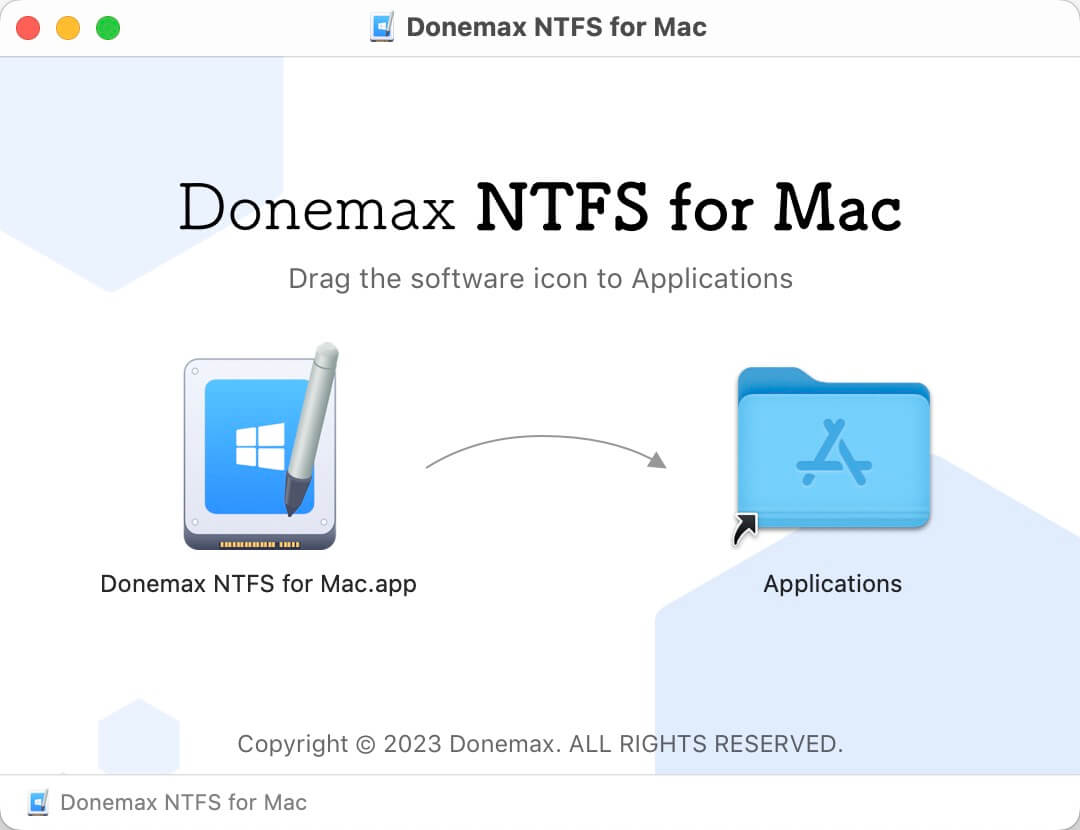
1. Download
- Open the Downloads folder, locate the.dmg file, and click it to install NTFS for Mac.
- Drag the application icon into the Applications box.
- Open the software from Launchpad.
- To activate it to the full version, click the Activation icon and then enter your licence code.
2. Get NTFS for Mac Permission from Your Mac
You can attach an NTFS drive to your Mac once Donemax NTFS for Mac has been installed and activated. Get the NTFS for Mac permission from your Mac before using it for the first time so that you can use it to allow Read-write for NTFS volumes on your Mac.
- ⭐️ For Intel-based or Apple T2 Security Macs:
- You may access Donemax NTFS for Mac from Launchpad. Click the attached NTFS drive under NTFS drive to open it. You can click "Enable Writable" after realising it is a Read-Only drive.
- Open System Preferences and navigate to General > Security & Privacy. On the Allow button, click.
- Launch Donemax NTFS for Mac once more, then restart your computer. Click "Enable Writable" once more. On your Mac, you can now read and write to the NTFS drive.

⭐️ For Apple silicon Macs:
- Locate the NTFS drive in Launchpad and click it to open Donemax NTFS for Mac. Select "Enable Writable" from the menu.
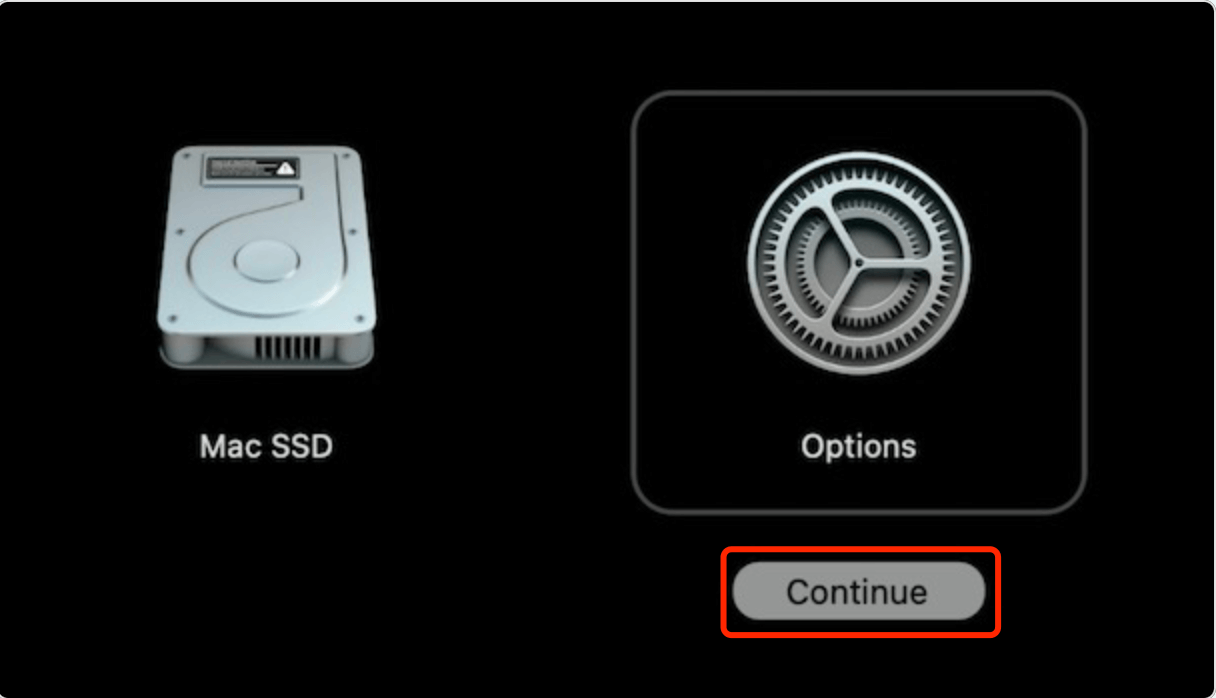
- Hold down the Power button when you restart your Mac to enter macOS Recovery mode. Click the Continue button after selecting Options.
![enter macOS Recovery mode]()
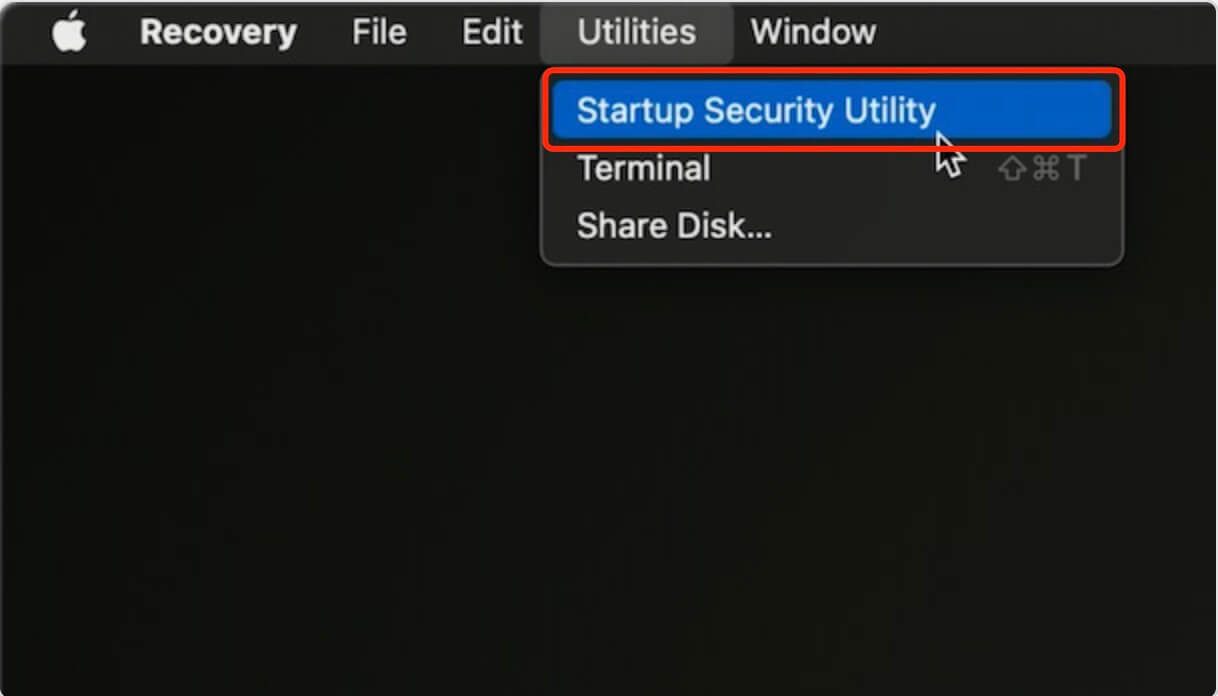
- "Startup Security Utility" can be found under Utilities.
![Startup Security Utility]()
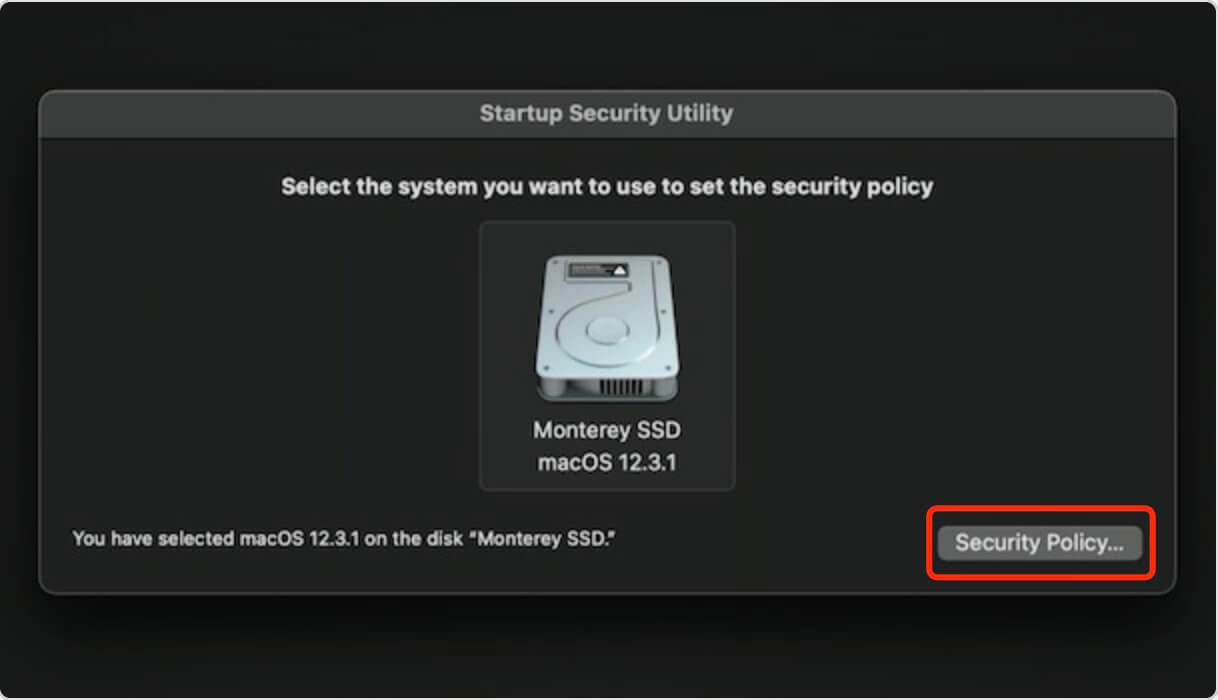
- Select the startup disk, click “Security Policy...”
![Security Policy]()
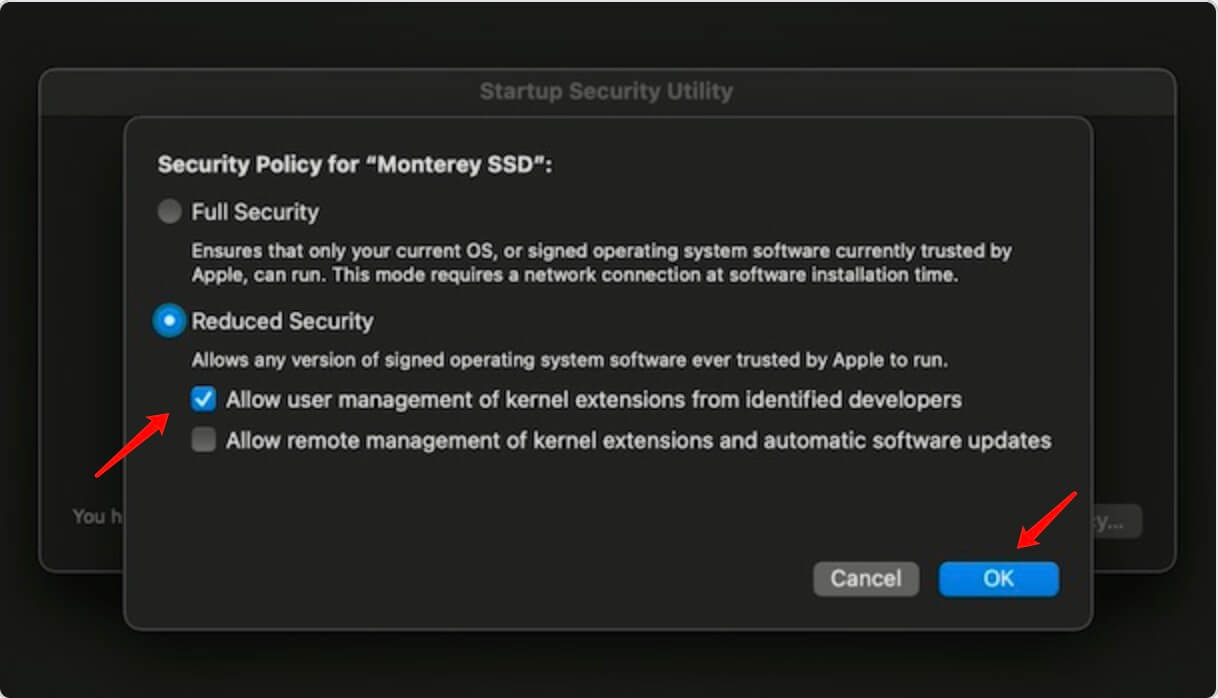
- Choose "Reduced Security" and "Allow user management of kernel extensions from identified developers" and then click "OK" to save your selections.
![Security Policy]()
- Open System Settings. Select Security from the Privacy & Security menu, then select Allow.
- You can utilise NTFS drives on your Mac without any restrictions if you restart it, launch Donemax NTFS for Mac, identify and pick the NTFS drive, and then click "Enable Writable".
![enable writable]()
3. Manage NTFS drives on Mac
You can determine if an external hard disc is an NTFS drive when you connect it to your Mac. Open Donemax NTFS for Mac, locate the drive, and select "Enable Writable" to make it an NTFS disc so you may write data to it and edit, move, delete, or add new data to it without any restrictions.
4. Manage other drives on Mac
You can access all of your Mac's non-NTFS drives under Other Disc, where you can also open, rename, format, first-aid, mount/unmount, and eject the drives.
Conclusion
Now that you have gone through passage, I would suggest you to pick any one of them based on whether the pros outweigh the cons for that tool, and start using it. But for saving a ton of your time, you can consider to install Donemax NTFS for Mac, they're great tool that you can consider among its alternatives
Donemax NTFS FAQs
Because Apple created its own distinct file system formats for storage devices, you cannot directly read or write to an NTFS drive on a Mac computer. Consequently, neither macOS nor Mac OS X officially support NTFS. So, can macOS read NTFS and use NTFS-formatted USB or external hard drives? Sure!
Two of these come to mind. One is that your external hard drive is NTFS formatted. For Windows, Microsoft NTFS is utilised, while Mac merely offers read support. The read-only permission for the external hard drive on your Mac is the other.
On macOS Ventura, how to enable full disc access. Select Full Disc Access under System settings > Privacy & Security. The security programme can be selected by clicking the addition (+) button and going to the Applications folder. Select Quit & Reopen if necessary.
Related Articles
- Dec 17, 2024Fix NTFS Drive is Not Recognized or Not Detected by Mac
- Sep 26, 2024Why Can't Format My External Hard Drive to NTFS on Mac? How to Fix It?
- Jul 12, 2024EaseUS NTFS For Mac Review And Best Alternatives
- Mar 12, 2025Fix Seagate Backup Plus Read-Only on Mac [4 Solutions]
- Sep 23, 2025Top 10 NTFS for Mac Software Review & Download [macOS Tahoe, M1/M2/M3/M4 Supported]
- Dec 03, 2024How to Format a Seagate or WD External Hard Drive to NTFS on Mac?

Contributing Writer
Christina
Christina is the senior editor of Donemax software who has worked in the company for 4+ years. She mainly writes the guides and solutions about data erasure, data transferring, data recovery and disk cloning to help users get the most out of their Windows and Mac. She likes to travel, enjoy country music and play games in her spare time.

Editor in chief
Gerhard Chou
In order to effectively solve the problems for our customers, every article and troubleshooting solution published on our website has been strictly tested and practiced. Our editors love researching and using computers and testing software, and are willing to help computer users with their problems