Written byChristinaUpdated on Sep 15, 2025
Upgrade Alienware Gaming Laptop SSD: A Complete Guide
Approved byGerhard Chou
Before we start: Before upgrading the SSD on Alienware laptop, you can clone the old SSD to the new SSD first, then you can replace the SSD without reinstalling the operating system.
PAGE CONTENT:
- Why Upgrade the SSD in Your Alienware Laptop?
- Types of SSDs and Compatibility with Alienware Laptops
- What You'll Need before Upgrading SSD on Alienware Laptop?
- How to Physically Upgrade the SSD on Alienware Laptop?
- Post-Upgrade Steps after Upgrading Alienware Gaming Laptop SSD
- Troubleshooting Common Issues
- Frequently Asked Questions (FAQs)
- Conclusion
Alienware laptops are among the most powerful gaming machines available on the market, built to deliver top-tier performance for hardcore gamers and creators alike. However, even the most powerful systems can hit bottlenecks—especially when it comes to storage speed and capacity. Whether you're running out of space for your massive game library or you want snappier performance, upgrading the SSD on Alienware laptop is one of the most effective improvements you can make.
This guide walks you through the process of upgrading the SSD in your Alienware laptop, from choosing the right drive to reinstalling your operating system or cloning your old drive. Let's dive into how you can supercharge your Alienware laptop's performance.
Why Upgrade the SSD in Your Alienware Laptop?
Alienware gaming laptops are usually equipped with high-performance SSDs, but storage technology evolves fast. You might need an upgrade for several reasons:
- Lack of Storage: Modern games easily exceed 100GB in size. Upgrading to a 1TB or 2TB SSD gives you more room for games, files, and media.
- Speed Enhancement: Newer SSDs offer significantly faster read/write speeds, reducing load times and boosting system responsiveness.
- System Stability: Older drives can slow down or become unreliable over time. Upgrading to a newer SSD ensures better reliability and longevity.
- Future-Proofing: Investing in a top-tier SSD now means your system will stay relevant longer without needing frequent upgrades.
Types of SSDs and Compatibility with Alienware Laptops
Before you buy a new SSD, it's crucial to check what your Alienware laptop supports. Most modern Alienware laptops use M.2 NVMe SSDs, though some older models might include or exclusively use 2.5-inch SATA SSDs.
M.2 NVMe SSD
- Extremely fast, compact, and ideal for modern Alienware models.
- Speeds can exceed 3,000 MB/s.
2.5-inch SATA SSD
- Larger in size and slower compared to NVMe.
- Still a great upgrade for older models.
How to Check Compatibility
- Visit Dell's support site and look up your laptop model.
- Use software like Speccy or check your BIOS to determine the interface.
- Open the back panel (if comfortable) to visually inspect the slot type.
What You'll Need before Upgrading SSD on Alienware Laptop?
To perform the SSD upgrade safely and efficiently, gather the following tools and components:
Hardware and Software Requirements:
- Compatible SSD (M.2 NVMe or 2.5” SATA)
- Precision screwdriver set
- Anti-static wrist strap (recommended)
- Thermal pad (optional for NVMe drives)
- External SSD/HDD (for backup)
- USB drive (for OS installation)
- Cloning software (Donemax Disk Clone, Macrium Reflect, Acronis True Image)
Backing Up Your Data
Before starting the upgrade, back up your important files. You can either:
- Copy files manually to an external drive or cloud.
- Use Windows Backup and Restore.
- Clone your existing drive using software like Donemax Disk Clone.
If you plan to do a fresh install of Windows, ensure all important data is safely stored elsewhere.
To avoid reinstalling Windows and reconfiguring everything after replacing the SSD on Alienware gaming laptop, it's highly suggested to clone the SSD directly. With Donemax Disk Clone, you can make a bootable clone. Then you can use the new SSD directly after upgrading the SSD.
Donemax Disk Clone
- Make an exact copy of your disk or partition.
- Create a bootable clone for the system drive.
- 100% reliable and easy-to-use cloning software.
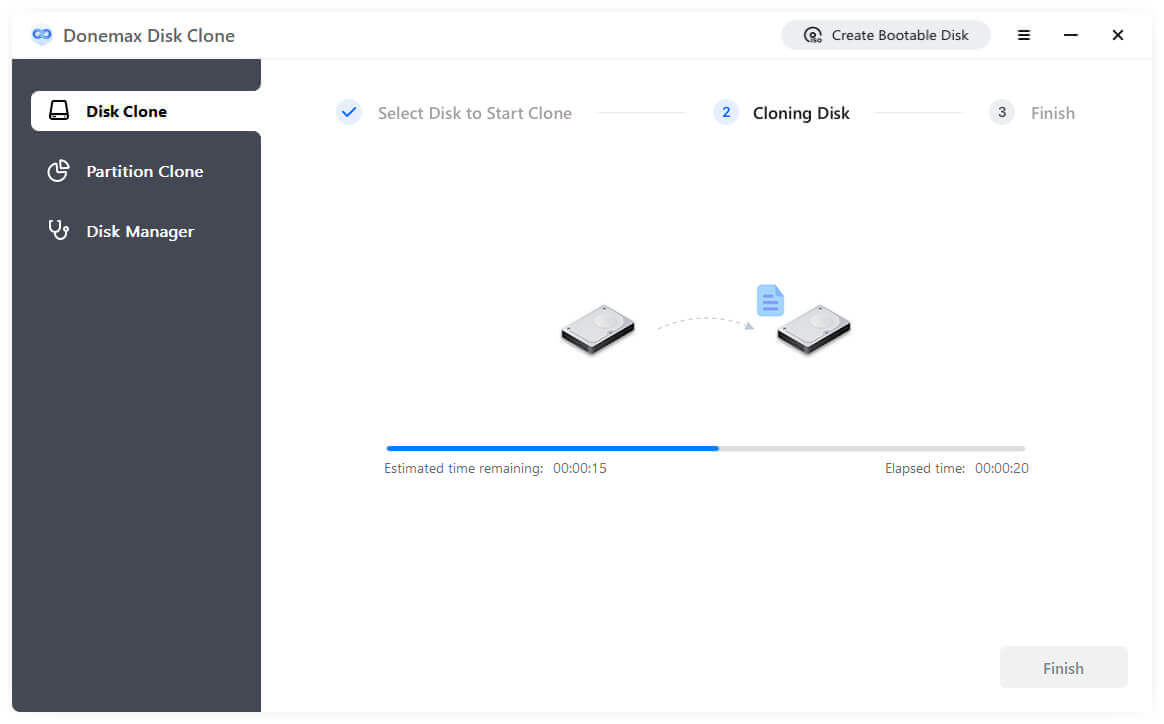
Here is a simple guide about how to clone the SSD on Alienware gaming laptop with the software Donemax Disk Clone:
Step 1. Run the software and choose Disk Clone mode. Select the original system SSD as the source drive and the new SSD as destination drive.

Step 2. Edit the disk layout to fully use the space on the new SSD. Tick "Check this options if the destination is SSD" checkbox.

Step 3. Start cloning the SSD. Once it's done, the new SSD will also be bootable.
Create a Bootable Windows Installer (If Reinstalling Windows)
If you're not cloning the old SSD, you'll need a bootable USB drive.
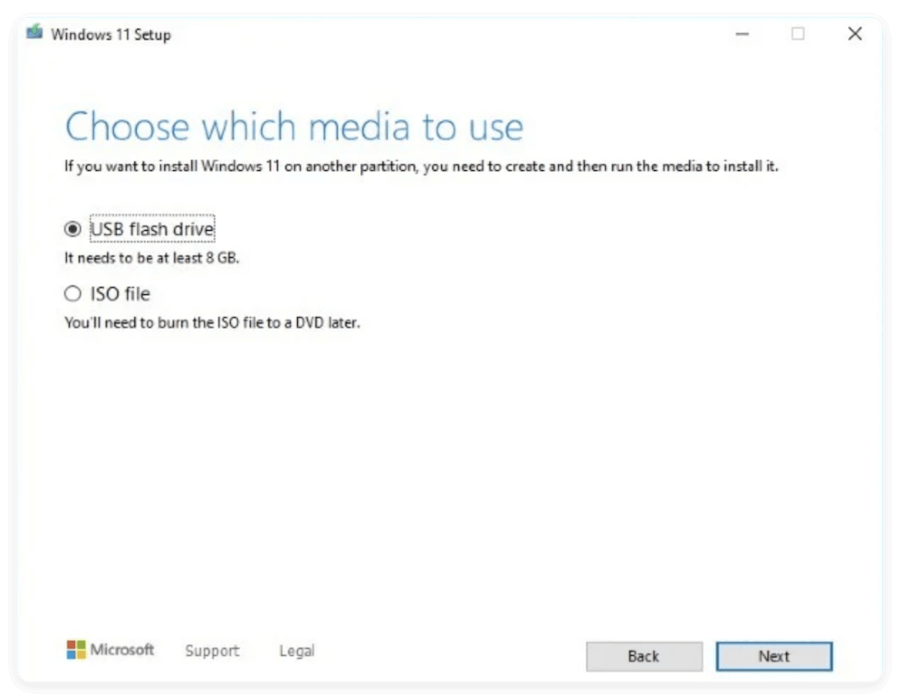
Steps to Create a Windows Installer:
- Go to Microsoft's official Windows download page.
- Download the Media Creation Tool.
- Insert a USB drive with at least 8GB capacity.
- Follow the on-screen instructions to create a bootable installer.
How to Physically Upgrade the SSD on Alienware Laptop?
Upgrading the SSD in your Alienware laptop involves accessing the internal components, which may seem intimidating at first—but with the right guidance, it's a relatively simple and safe process. Here's a detailed, step-by-step walkthrough:
Step 1: Power Down and Prepare
Before touching any internal components, make sure your laptop is fully shut down. Don't just put it to sleep or hibernate—perform a full shutdown. Then:
- Unplug the power adapter and remove any connected peripherals (external drives, mouse, keyboard, etc.).
- Discharge static electricity from your body by wearing an anti-static wrist strap or touching a grounded metal object. This protects sensitive components from electrostatic discharge (ESD), which can silently damage hardware.
- Work in a clean, clutter-free space—preferably on a non-carpeted surface.
Step 2: Open the Back Panel
Now it's time to access the SSD slot:
- Turn your laptop upside down, placing it on a soft cloth or mat to avoid scratches.
- Use a precision Phillips-head screwdriver to remove all screws from the bottom panel. Keep them organized—they may be different sizes or lengths.
- Some Alienware models have hidden or captive screws that don't fully come out—just loosen these as much as possible.
- Use a plastic spudger or guitar pick to gently pry open the back panel, starting at a corner or along the edge seam. Avoid using metal tools, which can damage the casing.
- Slowly lift the panel away. If you encounter resistance, check again for missed screws or clips.
📍 Tip: Take a photo of the internal layout before you proceed. It can be helpful for reference when reassembling.
Step 3: Locate and Remove the Existing SSD
Once inside, identify the SSD slot:
- M.2 NVMe SSD: A thin, rectangular chip-like drive usually held down by a small screw. It sticks out at a 30–40° angle.
- 2.5-inch SATA SSD: A larger, flat drive typically housed in a drive bay with a SATA data and power connector.
To remove the drive:
- For M.2 SSDs: Remove the retention screw. Gently pull the drive out horizontally—don't yank or bend.
- For 2.5-inch SSDs: Unplug the SATA cable. Slide the drive out of its bracket or tray. Some models use a drive cage secured by screws.
📍 Note: Be cautious not to touch the gold contacts or other exposed chips.
Step 4: Install the New SSD
Installing the new SSD is straightforward but requires gentle precision.
- For M.2 SSDs: Align the notched end of the SSD with the slot. Insert it at a 30–40° angle until fully seated. Gently press it down and secure it with the screw.
- For 2.5-inch SSDs: Insert the new drive into the bracket or tray (if applicable). Connect the SATA data and power cable securely. Slide it into the bay and fasten any securing screws.
📍 Optional but Recommended: If your M.2 SSD gets very hot (common with Gen 4 models), consider applying a thin thermal pad to help dissipate heat.
Step 5: Reassemble the Laptop
Once the new SSD is installed:
- Replace the back panel carefully, ensuring all clips and edges are aligned.
- Re-insert all screws in the correct order and tightness. Avoid overtightening, which can strip the threads or crack the chassis.
- Plug in your power adapter and peripherals.
You're now ready to power on the system and move on to OS installation or data cloning.
Post-Upgrade Steps after Upgrading Alienware Gaming Laptop SSD
After the SSD upgrade, complete the following steps:
1. BIOS Check
- Enter BIOS (usually by pressing F2 on boot).
- Ensure the new SSD is detected.
2. Windows Updates
- Run Windows Update to fetch the latest drivers and patches.
3. Dell Drivers and Utilities
- Visit Dell Support, enter your laptop model, and download:
- Chipset drivers
- Storage controller drivers
- Alienware Command Center
4. SSD Optimization
- Enable TRIM: TRIM ensures SSD longevity by properly managing data deletion.
fsutil behavior query DisableDeleteNotify
A return value of 0 means TRIM is enabled.
- Set power plan to High Performance in Windows.
- Disable scheduled defragmentation (not needed for SSDs).
Troubleshooting Common Issues
1. SSD Not Detected in BIOS
- Double-check physical installation.
- Try reseating the SSD.
- Reset BIOS to default settings.
2. Cloning Failed
- Make sure target SSD has equal or more capacity.
- Try different cloning software.
3. Windows Won't Boot After Upgrade
- Check boot order in BIOS.
- Ensure the SSD is properly initialized and partitioned.
4. Drive Appears but No Storage
- Use Disk Management to initialize and format the new drive.
Frequently Asked Questions (FAQs)
Can I use any SSD in an Alienware laptop?
No. Your laptop must support the SSD form factor (M.2 or SATA) and interface (NVMe or AHCI).
Will this void my warranty?
Typically, Dell allows RAM and SSD upgrades without voiding warranty. However, be cautious and avoid damaging components.
How long does the upgrade take?
The physical replacement takes about 15–30 minutes. Cloning or OS installation may take up to an hour.
Should I get Gen 4 NVMe for Alienware?
Only if your laptop supports PCIe Gen 4. Otherwise, Gen 3 SSDs are still excellent performers.
Conclusion
Upgrading your Alienware gaming laptop's SSD is a smart move to enhance performance, increase storage capacity, and extend the life of your machine. Whether you're a competitive gamer, content creator, or power user, faster storage means less waiting and more doing.
With the right tools, a bit of preparation, and the steps outlined in this guide, the upgrade process is straightforward—even for those new to laptop hardware. Don't forget to back up your data, handle components carefully, and follow post-upgrade optimizations to get the most out of your new SSD.
By investing in a high-performance SSD today, you're not just speeding up your laptop—you're future-proofing it for tomorrow's demanding software and games.
Donemax Disk Clone
An award-winning disk cloning program to help Windows users and Mac users clone HDD/SSD/external device. It also can create full bootable clone backup for Windows PCs and Macs.
Related Articles
- Nov 07, 2024Three Methods to Clone Old SSD to New SSD on Mac
- Nov 13, 2024Can I Recover Data If TRIM Is Enabled on My SSD Drive?
- Nov 05, 2024Why SSD Not Working and How to Fix Common SSD Issues
- Jan 14, 2025How to Fix Corrupted or Dead SSD Without Losing Data?
- Mar 19, 2025[3 Method] Securely Erase Seagate Ultra Compact SSD: A Comprehensive Guide
- Nov 05, 2024How to Upgrade HDD to SSD on Toshiba Laptop?

Contributing Writer
Christina
Christina is the senior editor of Donemax software who has worked in the company for 4+ years. She mainly writes the guides and solutions about data erasure, data transferring, data recovery and disk cloning to help users get the most out of their Windows and Mac. She likes to travel, enjoy country music and play games in her spare time.

Editor in chief
Gerhard Chou
In order to effectively solve the problems for our customers, every article and troubleshooting solution published on our website has been strictly tested and practiced. Our editors love researching and using computers and testing software, and are willing to help computer users with their problems