
Written byStevenUpdated on Jan 01, 1970
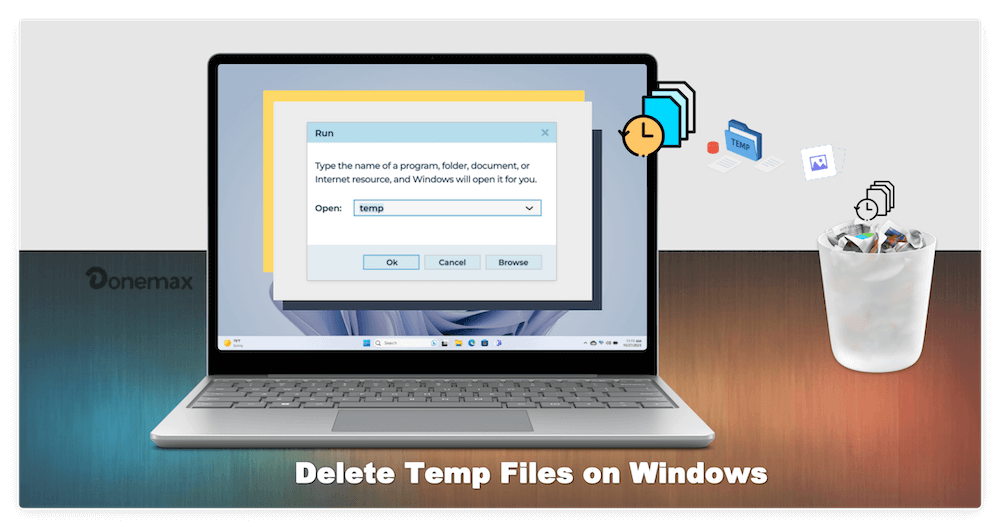
How to Delete Temp Files on Windows
Approved byGerhard Chou
Before we start: When deleting temp files, be careful to avoid deleting the needed files. If you unfortunately deleted the wrong files, you can still try to get them back with the reliable data recovery tool - Donemax Data Recovery.
PAGE CONTENT:
- What Are Temporary Files on Windows?
- Why You Should Delete Temp Files?
- How to Manually Delete Temp Files on Windows?
- Delete Temp Files Using Built-in Windows Tools
- Deleting Temp Files with Command Prompt or PowerShell
- Using Third-Party Tools to Delete Temp Files
- Automating Temp File Deletion on Windows
- Troubleshooting Temp File Deletion Problems
If your Windows PC feels sluggish, runs out of storage, or apps take forever to load, accumulated temporary files might be the culprit. Temp files are designed to store short-term data but often overstay their welcome, clogging your storage and impacting performance.
In this guide, you'll learn what temporary files are, why they pile up, and—most importantly—how to safely delete temp files on Windows 10, Windows 11, and older versions using built-in tools, manual methods, and trusted third-party cleaners.
What Are Temporary Files on Windows?
Temporary files (commonly called "temp files") are created by your system and applications during everyday tasks like installations, updates, browsing the web, or editing documents. They act as short-term storage to help processes run smoothly.
Types of Temp Files Include:
- System cache and logs
- Application temp files
- Browser cache and history
- Windows update leftovers
- Crash reports and dump files
- Setup temp files during software installations
While many of these files are essential during specific processes, they often linger long after they're needed, occupying storage space unnecessarily.
Common Temp File Locations on Windows
Windows stores temp files in multiple locations. Knowing these helps you target and delete them effectively:
- %temp% — User-specific temp files folder
- C:\Windows\Temp — System-wide temp files folder
- C:\Users[User]\AppData\Local\Temp — Application and process-specific temporary data
- Browser cache locations — Stored separately by browsers like Chrome, Edge, or Firefox
Why You Should Delete Temp Files?
Over time, these files can consume gigabytes of space, especially on systems with limited storage like SSDs or older HDDs. Here's why it's essential to remove them:
Free Up Disk Space — Temp files can take up several GBs of space over time.
Improve System Performance — A cluttered system slows boot times and application launches.
Resolve Software Conflicts — Corrupt or outdated temp files can cause apps to malfunction.
Prevent System Errors — Excessive temp files can cause low disk space warnings or update failures.
Regular temp file cleanup keeps your PC running smoothly and efficiently.
Precautions Before Deleting Temp Files
While deleting temp files is generally safe, keep these precautions in mind:
- Review Files Before Deletion — Only delete files you're confident are safe to remove.
- Skip In-Use Files — Files locked by Windows or apps should be skipped to avoid errors.
- Back Up Critical Data — Especially when using aggressive third-party cleaners.
- Avoid Random System Files — Stick to known temp file directories to prevent accidental system issues.
Windows protects critical files by default, but caution is always recommended.
How to Manually Delete Temp Files on Windows?
Manual deletion is quick, effective, and requires no additional software.
# 1. Using the Run Command
One of the fastest ways to access and clear temp files:
- To launch the Run dialog, press Win + R.
- Press Enter after typing %temp%.
- A folder will open containing user-specific temp files.
- Select all files by pressing Ctrl + A, then press Delete.
- Skip files in use—Windows will prevent deletion of active files.
Repeat for system temp files:
- Open Run again.
- Type C:\Windows\Temp and press Enter.
- Delete all files you can.
💡 Note: Some files are protected or in use by the system—it's normal if you can't delete everything.
# 2. Using File Explorer
For more control, navigate to temp file locations via File Explorer:
- Open File Explorer.
- Paste %temp% or C:\Windows\Temp in the address bar.
- Manually delete files you no longer need.
You can also clear specific temp folders within application directories, but only if you're confident they aren't needed.
Delete Temp Files Using Built-in Windows Tools
Windows provides integrated tools to handle temp files safely and efficiently.
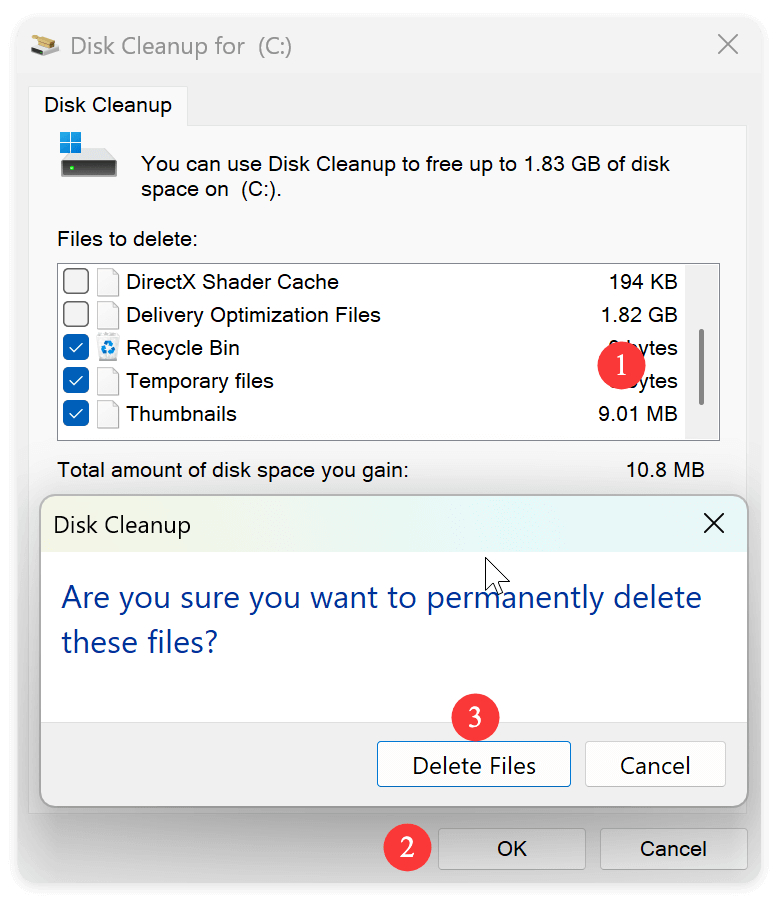
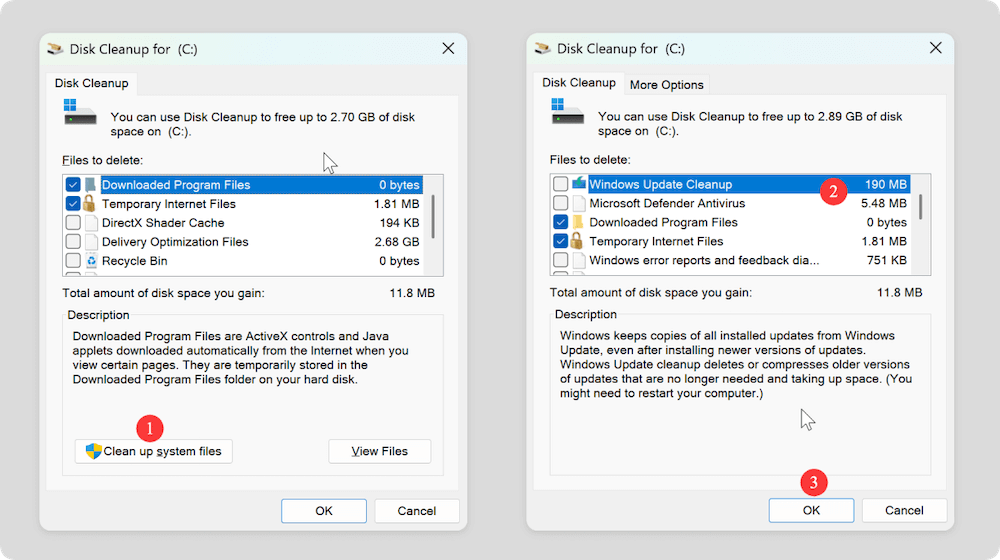
# 1. Disk Cleanup Utility
Disk Cleanup is a reliable, built-in tool that removes various junk files, including temp files.
How to Use Disk Cleanup:
- Open Disk Cleanup by typing it in and pressing Win + S.
- Select the drive (typically C:) and click OK.
- Check boxes for:
- Temporary files
- Downloaded Program Files
- Recycle Bin
- System-created Windows Error Reporting Files
- To confirm, click OK and then Delete Files.
For deeper cleaning:
- Click Clean up system files within Disk Cleanup to access additional cleanup options, such as:
- Windows Update Cleanup
- Device driver packages
- System Restore points
# 2. Storage Sense (Windows 10 & Windows 11)
Storage Sense is an automated Windows feature designed to help manage disk space by automatically deleting unnecessary files, including temporary files, system cache, and items from the recycle bin. It's a built-in, low-maintenance solution for users who want to keep their system clutter-free without manually performing cleanups.
Many users overlook this feature, but enabling Storage Sense can dramatically improve disk space management, especially on devices with limited storage, such as laptops with small SSDs.
How to Enable and Configure Storage Sense:
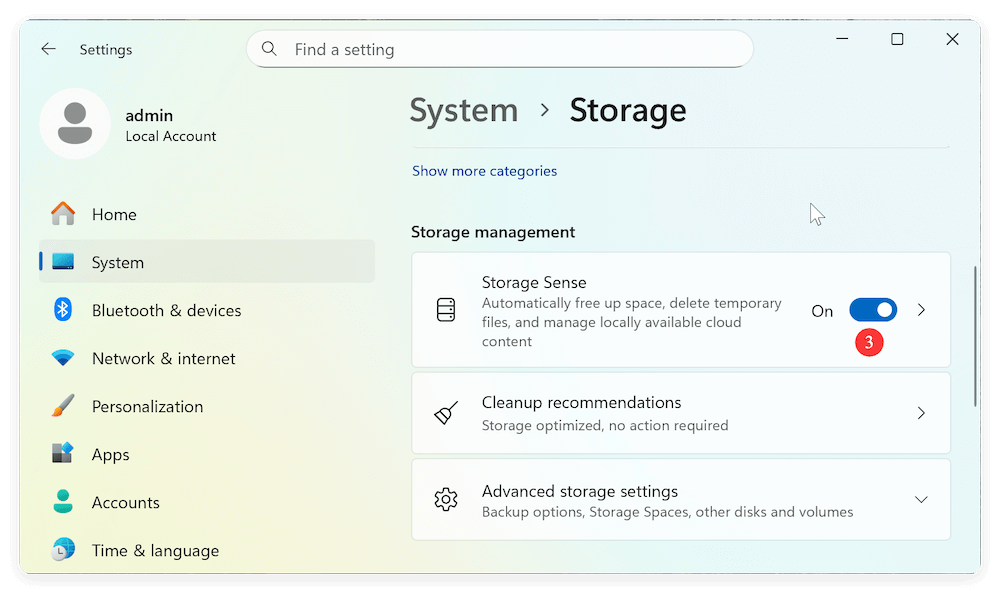
Step 1: Open Storage Settings
Click the Start Menu and select Settings (gear icon), or press Win + I to open Settings directly. Navigate to System > Storage.
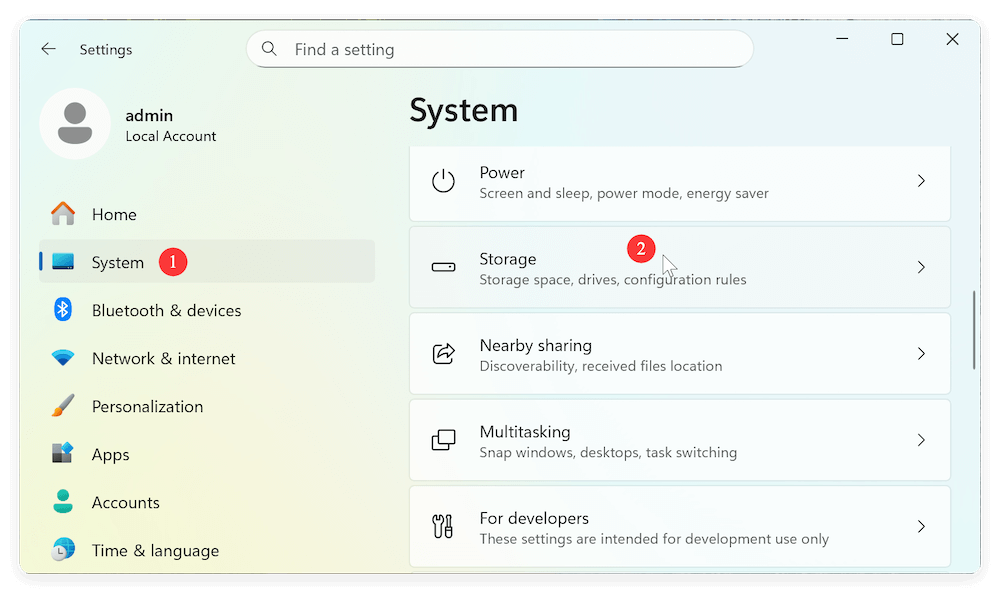
Step 2: Turn on Storage Sense
In the Storage section, you'll see an option labeled Storage Sense. Toggle the switch to On.
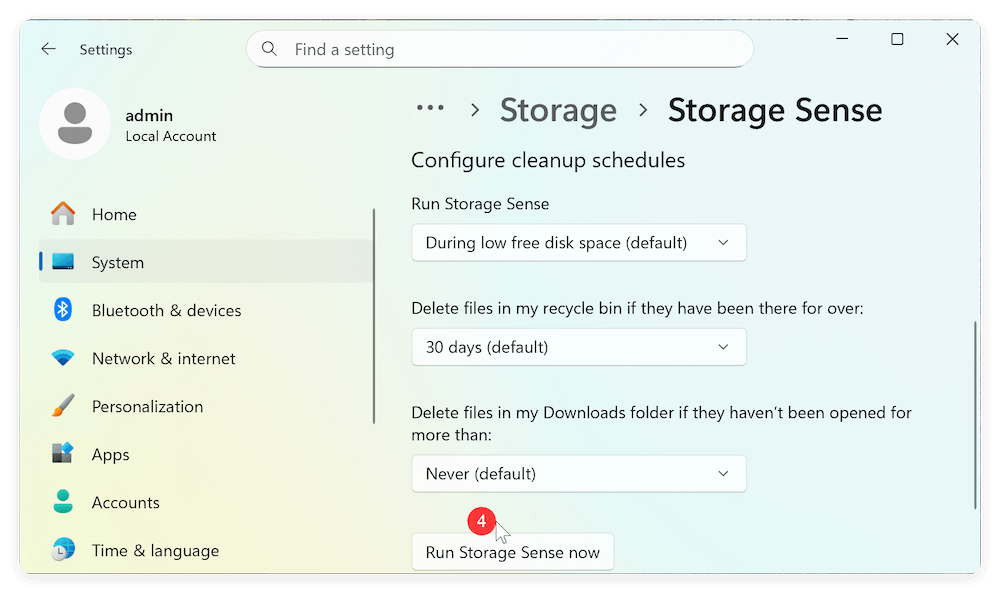
Step 3: Customize Storage Sense Settings
Click on Storage Sense and then you'll see several customization options, allowing you to control how and when Storage Sense runs. You can select to run it regularly. You can also click Run Storage Sense now button to start a cleanup manually.
Benefits of Storage Sense:
- Runs in the background automatically
- Frees up space without user intervention
- Keeps your system optimized regularly
Who Should Use Storage Sense?
Storage Sense is ideal for:
- Casual users who don't want to manually delete files
- Users with small-capacity SSDs struggling with low disk space
- Office workers, students, and anyone managing large downloads or frequent updates
- Gamers wanting to prevent temp files from slowing performance
Power users or IT administrators can combine Storage Sense with advanced tools like Disk Cleanup, PowerShell scripts, or third-party cleaners for even deeper system optimization.
Limitations of Storage Sense
While Storage Sense is convenient, it has a few limitations:
- It doesn't clean every temp file location, especially obscure software-specific caches.
- It may not clear third-party browser caches or logs from apps outside the Microsoft ecosystem.
- Users relying heavily on their Downloads folder must be cautious with automatic deletion settings.
Solution: Use Storage Sense in combination with manual cleaning methods (like %temp% deletion) or trusted third-party tools for maximum efficiency.
Deleting Temp Files with Command Prompt or PowerShell
Advanced users can leverage command-line tools for precise temp file management.
# 1. Command Prompt (CMD)
Steps to Delete Temp Files via CMD:
- Launch Command Prompt in Administrator mode.
- Enter the following commands to delete files within your user temp folder and clean system temp files:
del /q /f /s %temp%\*
del /q /f /s C:\Windows\Temp\*
Flags Explained:
- /q — Quiet mode (no confirmation prompts)
- /f — Force deletion of read-only files
- /s — Includes files in subdirectories
# 2. PowerShell Script for Temp File Cleanup
PowerShell enables automation and scripting for efficient cleanup. Here is how to clean up temp files with PowerShell:
- Open PowerShell as Administrator.
- Run the following commands to delete temp files.
Remove-Item -Path "$env:TEMP\*" -Recurse -Force
Remove-Item -Path "C:\Windows\Temp\*" -Recurse -Force
PowerShell is ideal for creating cleanup scripts or scheduling tasks for routine maintenance.
Using Third-Party Tools to Delete Temp Files
Several third-party utilities specialize in deep-cleaning junk files, including temp files, cache, and system clutter.
Top Recommended Tools:
1. CCleaner
- Popular, easy-to-use
- Cleans temp files, browser cache, and registry
- Offers scheduled cleanups
2. BleachBit
- Open-source alternative to CCleaner
- Deletes temp files, browser data, and app caches
- Privacy-focused with no hidden costs
3. Wise Disk Cleaner
- Lightweight and beginner-friendly
- Cleans temp files, system logs, and browser data
Pros and Cons of Using Third-Party Cleaners:
Pros
- Deeper and more comprehensive cleanup
- User-friendly interfaces
- Scheduled or one-click cleanup options
Cons
- Risk of deleting essential files if settings are misconfigured
- Some free tools may display ads or up-sell premium features
Always download software from official sources to avoid malware risks.
Automating Temp File Deletion on Windows
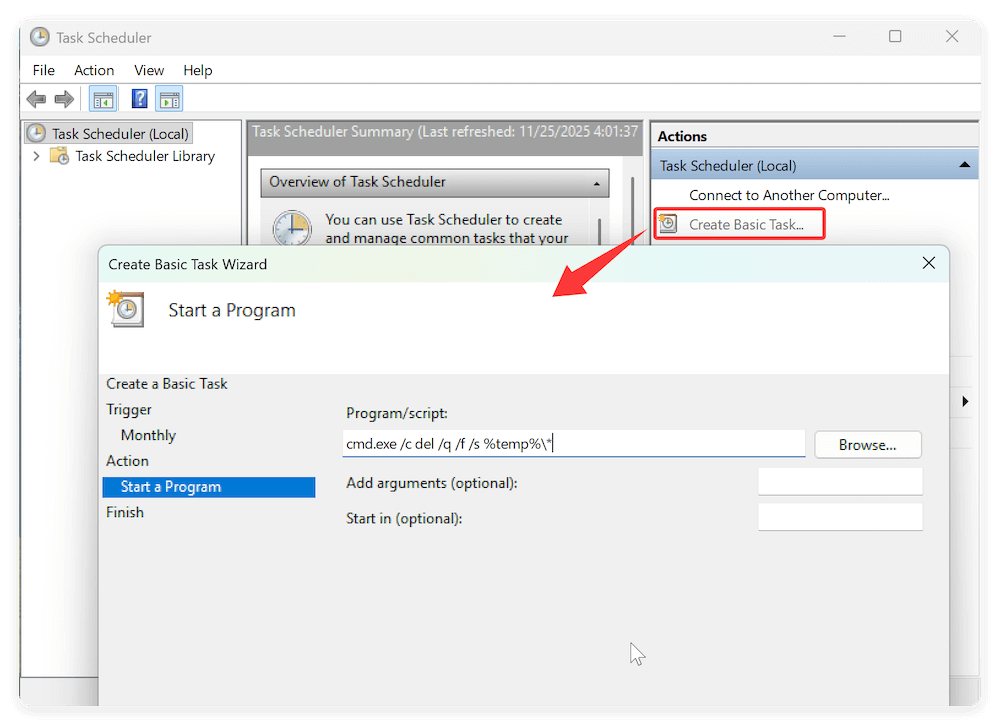
Automating cleanup ensures your system stays optimized without manual effort. Schedule automatic temp file deletion with Task Scheduler:
- Open Task Scheduler via the Start menu.
- Click Create Basic Task.
- Name the task (e.g., "Temp File Cleanup").
- Choose frequency (daily, weekly, etc.).
- For Action, select Start a Program.
- Enter the following for CMD cleanup:
cmd.exe /c del /q /f /s %temp%\*
- Complete setup, and the task will run automatically as scheduled.
For advanced users, PowerShell scripts can also be scheduled for automated temp file deletion.
Troubleshooting Temp File Deletion Problems
# 1. Cannot Delete Some Temp Files
You may encounter issues like: "File in Use" or "Access Denied" Errors. Here are some common and reliable solutions:
- Close all running applications.
- Reboot your PC and try again.
- Use Safe Mode for stubborn files.
- Use tools like Unlocker to force-delete files (advanced users only).
If system tools like Disk Cleanup or Storage Sense fail, third-party utilities often succeed in removing difficult temp files.
# 2. Wrong Files Were Deleted
When deleting temp files, some useful files might be removed wrongly. Especially when you clean up your drive with third-party tool. The tool would remove the files directly without putting them into the Recycle bin. In such a case, you cannot undo the deletion directly. How to get back the files deleted by mistake?
We suggest you use the professional data recovery software, such as Donemax Data Recovery. The software can recover the deleted or lost file in any situation. You can download the software and do the recovery immediately:
Donemax Data Recovery
- Recover deleted or lost files effectively in any case.
- Support data recovery for different file types.
- 100% safe and easy-to-use data recovery software.
Here are the steps to recover the deleted files with the software:
Step 1. Run the software and select the drive from where you deleted the files by mistake.

Step 2. Start a scan for the selected drive. The software will search for any possible missing files.

Step 3. Check and locate the deleted files after the scan is finished. Preview and select the wanted files, and then save the files to another drive.

Conclusion
It's necessary to delete the temp files on Windows. Deleting temp files is a simple yet highly effective way to:
- Free up valuable disk space
- Boost system performance
- Prevent slowdowns and errors
- Maintain a healthy, clutter-free Windows environment
Regular maintenance keeps your system responsive, organized, and running at peak performance.
Donemax Data Recovery
Powerful, safe & easy-to-use data recovery software. Easily and completely recover deleted, formatted, or other lost data. The tool supports PC, Mac, HDD, SSD, USB drive, camera, SD card, RAID and other storage devices.
Related Articles
- May 09, 2025Can't Find Recycle Bin on Windows Desktop? Here's How to Fix It
- Oct 23, 2024How to Initialize an External Hard Drive on Windows and Mac?
- May 08, 2026Windows Storage Sense: Guide to Automated Disk Cleanup
- Jun 24, 2025Files Become Shortcuts: How to Fix and Prevent It?
- Mar 13, 2025[5 Fixes] Fix Seagate One Touch SSD Not Showing Up on My Computer
- May 29, 2026What to Do if Disk Cleanup Is Not Working?

Contributing Writer
Steven
Steven has been a senior writer & editor of Donemax software since 2020. He's a super nerd and can't imagine the life without a computer. Over 6 years of experience of writing technical solutions and software tesing, he is passionate about providing solutions and tips for Windows and Mac users.

Editor in chief
Gerhard Chou
In order to effectively solve the problems for our customers, every article and troubleshooting solution published on our website has been strictly tested and practiced. Our editors love researching and using computers and testing software, and are willing to help computer users with their problems