Written byChristinaUpdated on Sep 12, 2025
Windows Safe Mode: The Complete Troubleshooting Guide
Approved byGerhard Chou
PAGE CONTENT:
Whether your PC is plagued with crashes, viruses, or software glitches, Windows Safe Mode is often the first and best step to diagnose and resolve the problem. It's a powerful troubleshooting environment built into every version of Windows, from XP to Windows 11. In this comprehensive guide, we'll explore everything you need to know about Safe Mode — what it is, when to use it, how to access it, and how to make the most of it.
What Is Windows Safe Mode?
Safe Mode is a diagnostic startup mode in Windows designed to launch the operating system with minimal drivers and services. It disables non-essential functions and third-party applications, allowing users to isolate and resolve issues that may be preventing the system from working properly in its normal state.
Safe Mode acts like a controlled testing zone for your system. With basic drivers (like VGA for graphics and default input/output functions), it helps determine whether an issue is related to Windows itself or external software, hardware, or drivers.
How Safe Mode Works?
When you boot into Safe Mode, Windows starts up with only the core services and drivers needed to function. This includes basic mouse, keyboard, and display drivers, while disabling advanced graphics, sound, networking (unless specified), and third-party startup applications.
Types of Safe Mode:
- Safe Mode - Loads the bare essentials. Networking is disabled, which is useful for offline virus removal or driver issues.
- Safe Mode with Networking - Same as above, but adds basic networking drivers and services. Use this when you need internet access for online tools and updates.
- Safe Mode with Command Prompt - Instead of launching the standard desktop, this opens a Command Prompt window. Best for advanced troubleshooting or when the GUI is corrupted.
When to Use Safe Mode
Safe Mode is invaluable for a wide variety of system problems. Here are the most common scenarios:
- Startup Failures: If Windows won't boot normally, Safe Mode can help isolate what's causing the failure.
- Uninstalling Buggy Software/Drivers: Sometimes, incompatible or buggy updates prevent normal startup. Safe Mode allows safe removal.
- Malware or Virus Removal: Many malicious programs are inactive in Safe Mode, making them easier to detect and remove.
- System Restore or Recovery: You can launch recovery tools from Safe Mode to roll back changes.
- Diagnosing Hardware Conflicts: By loading basic drivers, Safe Mode helps pinpoint whether a faulty driver is the culprit.
Limitations of Safe Mode
While Safe Mode is powerful, it does come with several limitations:
- No Full Graphics or Audio: The display will look basic because Windows uses default VGA drivers.
- Limited Functionality: Many apps (especially games or software requiring advanced drivers) won't run.
- No Internet in Basic Safe Mode: Unless you select "Safe Mode with Networking."
- Can't Fully Test Performance: Since services and drivers are disabled, you can't fully test how Windows will behave in a normal environment.
How to Boot into Windows Safe Mode?
A. For Windows 11/10/8
Newer versions of Windows made accessing Safe Mode a bit more complex but still manageable:
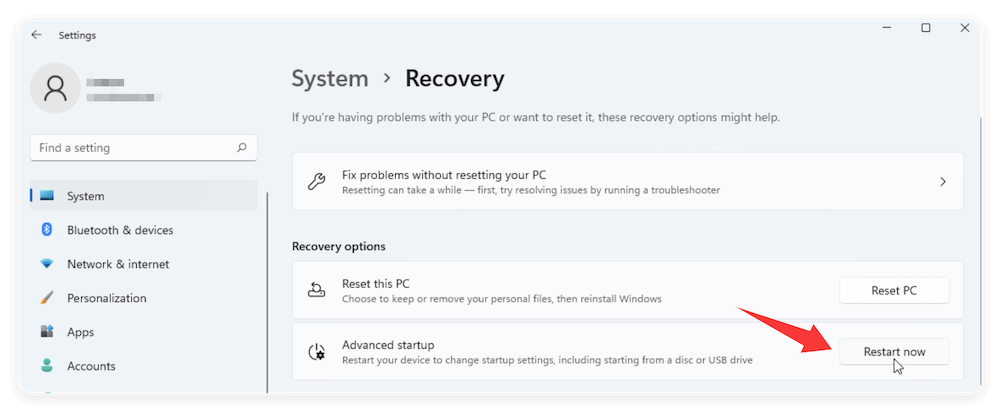
Method 1: From Settings
- Open Recovery from Update & Security via Settings.
- Select Restart now under Advanced Startup.
![Windows Safe Mode]()
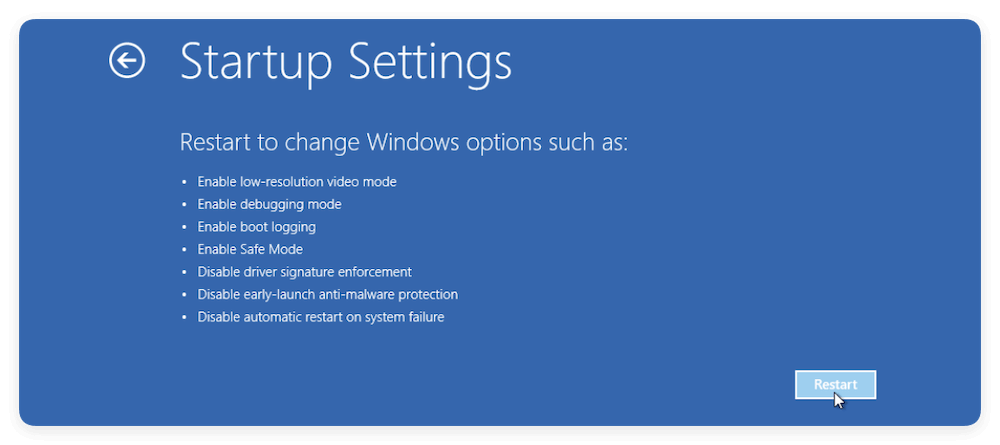
- On the blue screen menu, choose Troubleshoot → Advanced Options → Startup Settings → Restart.
![Windows Safe Mode]()
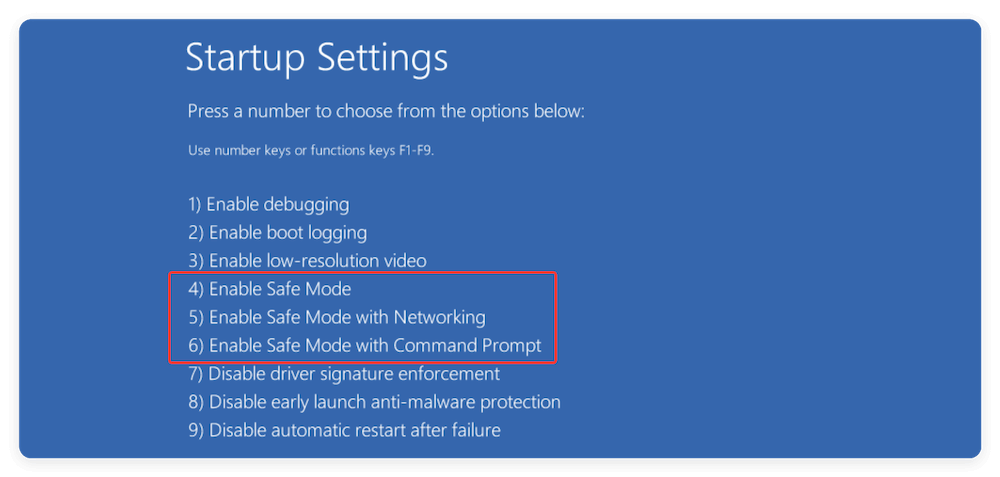
- After reboot, press the corresponding key (usually F4 for Safe Mode, F5 for Networking).
![Windows Safe Mode]()
Method 2: Shift + Restart
- Hold Shift while clicking Restart from the Start menu.
- Follow the same steps as above through Troubleshoot → Startup Settings.
Method 3: From a Black or Blank Screen
If your PC doesn't boot:
- Turn the PC off and on 2-3 times during boot to trigger Windows Recovery Environment (WinRE).
- Then follow the Troubleshoot steps above.
Method 4: System Configuration (msconfig)
- Type msconfig using Win + R, then press Enter.
- Under the Boot tab, check Safe boot, select Minimal or Network, and click OK.
- Restart your PC to boot into Safe Mode.
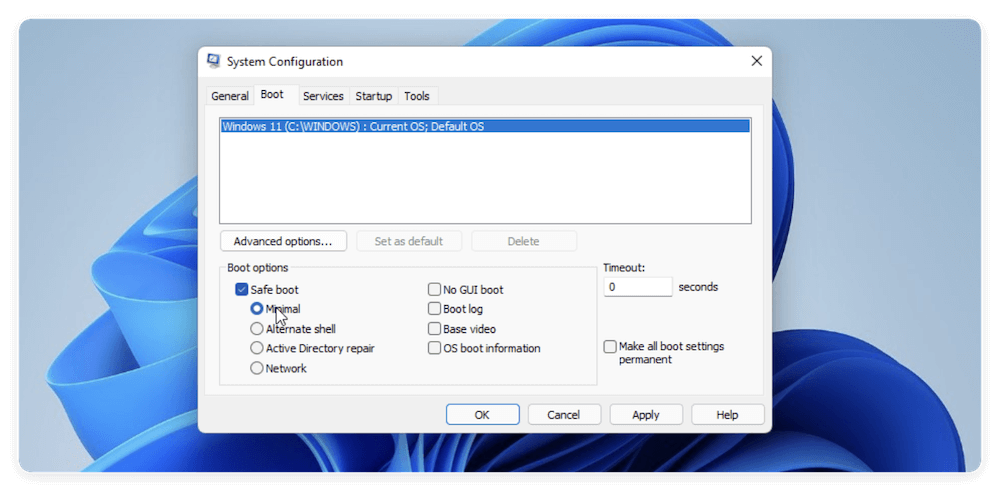
💡 Note: Don't forget to return and uncheck Safe boot afterward to boot normally.
B. For Windows 7/Vista/XP
Older versions use the F8 key:
- Restart your computer.
- Before the Windows logo shows, repeatedly press F8.
- Select the required Safe Mode option from the Advanced Boot Options panel.
- Press Enter.
What to Do in Windows Safe Mode?
Once you've successfully booted into Safe Mode, here are the most common and useful tasks to perform:
1. Run Antivirus and Malware Scans
Malware is often designed to hide itself or defend against removal when Windows is running normally. However, most malware does not load in Safe Mode, giving you an upper hand in detecting and eliminating threats.
Recommended steps:
- Install or update a reputable antivirus/malware removal tool like Malwarebytes, Microsoft Defender Offline, or Kaspersky Virus Removal Tool.
- Run a full system scan (not just a quick scan).
- Quarantine or delete any detected threats.
- Reboot into normal mode and run another scan to confirm removal.
💡 Tip: If your primary antivirus fails to detect the threat, use a secondary scanner like ESET Online Scanner or Sophos Virus Removal Tool (in Safe Mode with Networking).
2. Uninstall Problematic Software or Drivers
Many system crashes or boot loops are caused by newly installed software, updates, or drivers that interfere with core system operations.
To uninstall a program:
- Type appwiz.cpl using Win + R, then press Enter.
- Look for recently installed programs, right-click, and choose Uninstall.
To roll back or uninstall a driver:
- Select Device Manager by pressing Win + X.
- Add the appropriate device category (display adapters, for example).
- Choose Properties with a right-click on the device.
- Under the Driver tab, choose Roll Back Driver or Uninstall Device.
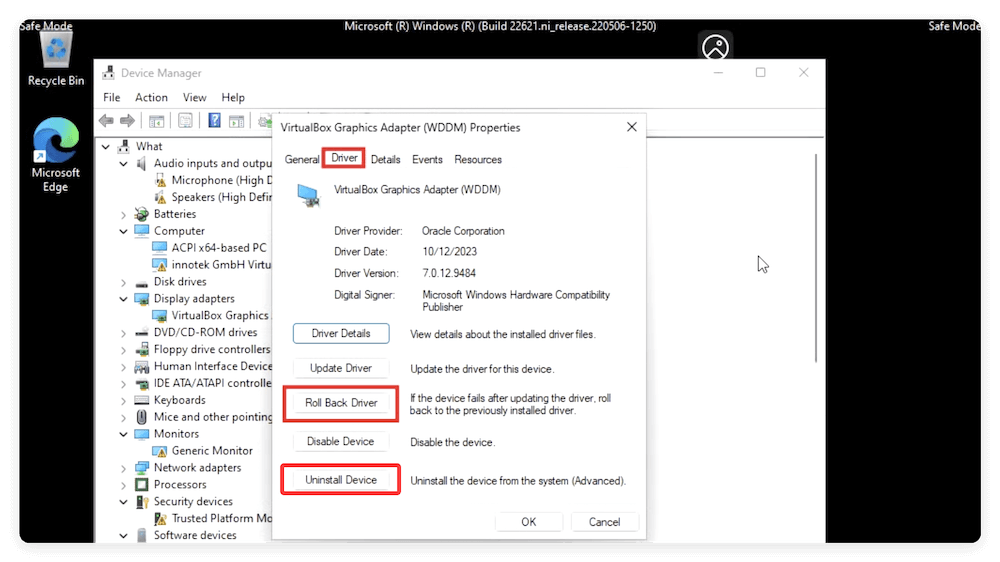
💡 Important: Make sure to restart your computer after uninstalling the problematic software or driver.
3. Perform System Restore
System Restore can roll your PC back to a time when it was functioning correctly, undoing recent changes to system files and registry settings — without affecting personal files.
- Type rstrui using Win + R, then press Enter.
- Select a restore point created before the issues began.
- Follow the prompts to complete the restoration process.
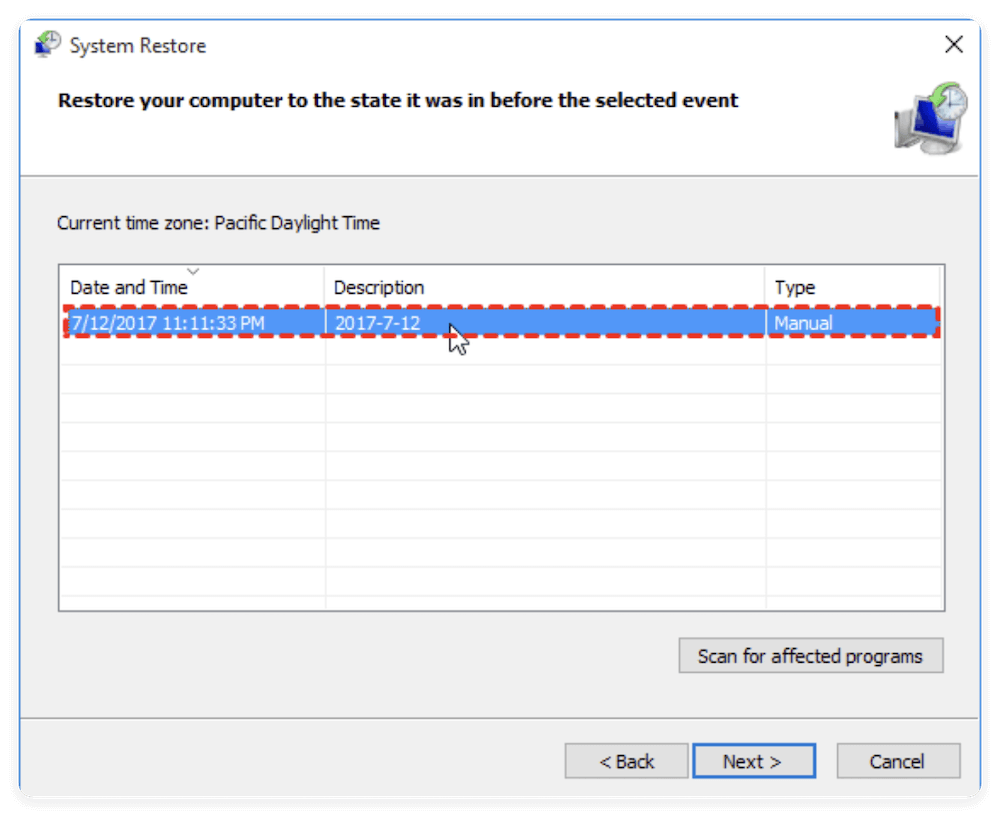
💡 Note: If you don't see any restore points, system protection might be disabled. Consider enabling it after fixing your current issue.
4. Use Event Viewer for Diagnostics
Event Viewer logs nearly every action your system performs, from service startups to application crashes. In Safe Mode, it can be especially useful to trace what went wrong during normal boots.
To use Event Viewer:
- Type eventvwr using Win + R, then press Enter.
- Navigate to Application from System via Windows Logs.
- Check for entries marked with red error icons or yellow warnings.
- Double-click on an entry for more details.
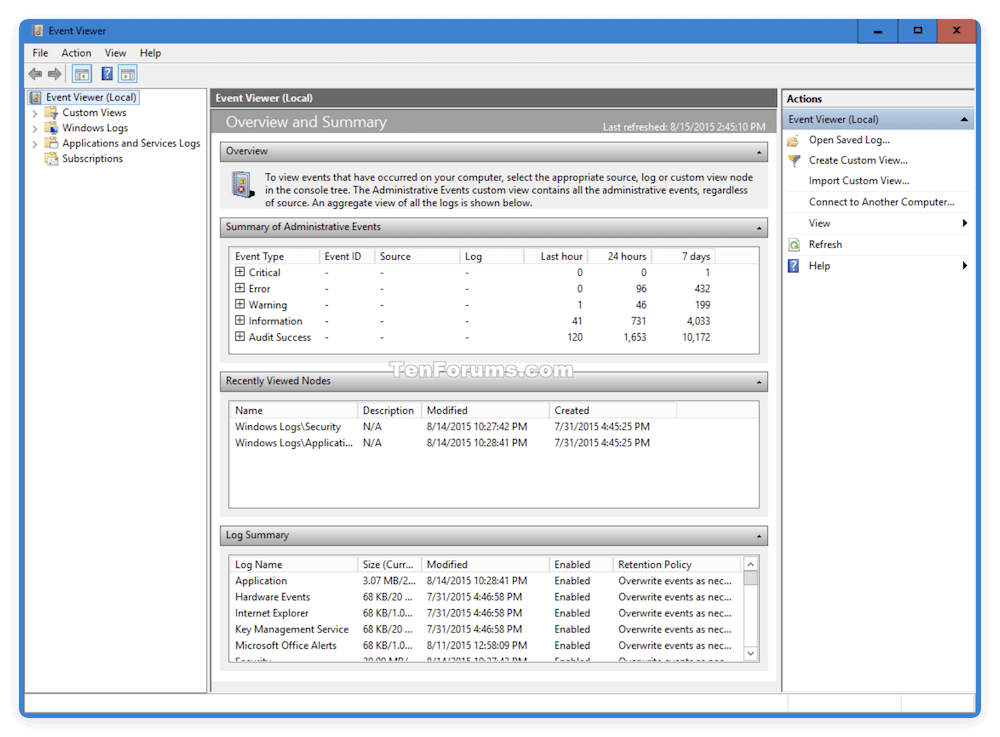
Use this information to identify faulty services, drivers, or applications that may need to be disabled or reconfigured.
5. Disable Unnecessary Startup Programs
Disabling startup programs can dramatically improve boot speed and eliminate background processes that cause errors or slowdowns.
Option A: Using Task Manager (Windows 10/11):
- Press Ctrl + Shift + Esc to open Task Manager.
- Go to the Startup tab.
- Right-click and Disable suspicious or unnecessary programs.

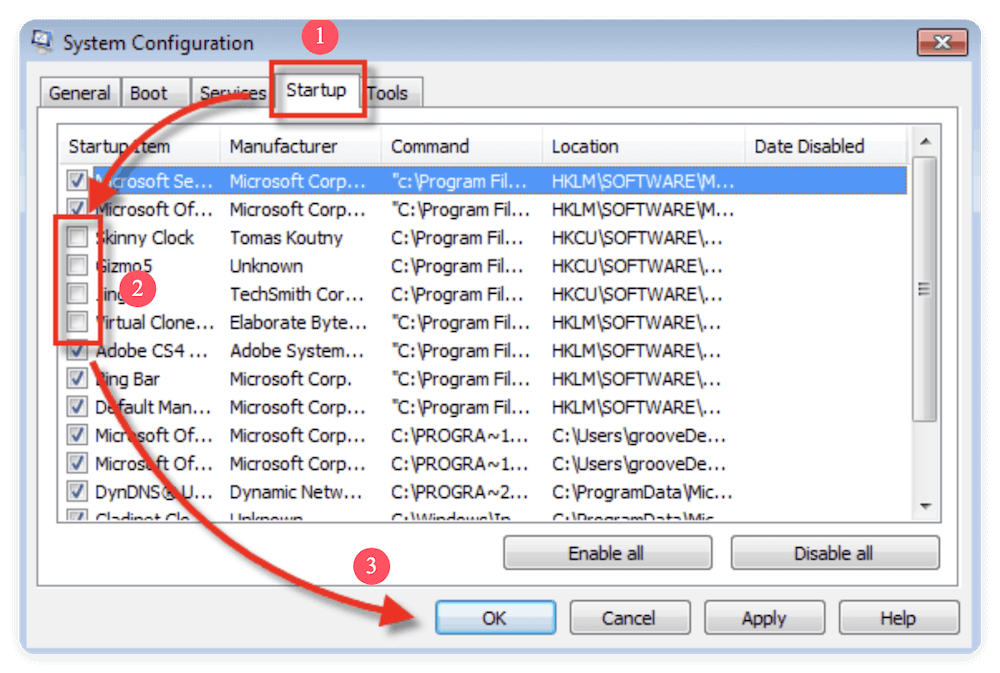
Option B: Using msconfig (All versions):
- Type msconfig using Win + R, then press Enter.
- Go to the Startup tab (In Windows 10/11, it redirects to Task Manager).
- Uncheck non-essential items.
- Apply and restart.
💡 Pro tip: Research each item before disabling to avoid turning off essential processes.
How to Exit Windows Safe Mode?
To return to normal mode:
Option 1: Just Restart
If you entered Safe Mode via Shift + Restart or F8, just reboot the computer normally.
Option 2: Disable from System Configuration
- Open msconfig.
- Go to the Boot tab.
- Uncheck Safe boot and restart.
Advanced Tips and Tools for Windows Safe Mode
For more complex scenarios, Safe Mode offers deeper access:
1. Use Command Prompt
In "Safe Mode with Command Prompt," you can:
- Run sfc /scannow to check for system file corruption.
- Use chkdsk to check and fix disk errors.
- Launch regedit (regedit.exe) to repair registry issues.
2. Enable Boot Logs
In msconfig, under the Boot tab, check Boot log to generate a list of drivers that load (or fail to) during boot. The log is saved in C:\Windows\ntbtlog.txt.
3. Use Networking Tools
If you're in Safe Mode with Networking, tools like Windows Update, browser-based malware removal tools, or cloud diagnostics become accessible.
Common Safe Mode Issues and Fixes
1. Safe Mode Won't Start
- Try a different method (e.g., Shift + Restart or boot from a recovery drive).
- If corrupted system files are suspected, use sfc /scannow or DISM /Online /Cleanup-Image /RestoreHealth.
2. Stuck in Safe Mode Loop
This usually happens if Safe boot was enabled in msconfig and not unchecked. Boot into Safe Mode again and disable it.
3. Files or Drivers Inaccessible
Some third-party storage drivers or services are disabled. Try "Safe Mode with Networking" or load missing drivers manually if you're advanced enough.
Conclusion
Windows Safe Mode remains one of the most essential tools for any user trying to recover a misbehaving system. It allows users to bypass unnecessary services and startup programs, making it easier to pinpoint root causes of issues — whether software-based, malware-related, or even hardware-linked.
By understanding how to access and use Safe Mode effectively, you can take control of system problems, perform advanced diagnostics, and recover your system without professional intervention.
Quick Recap:
- Safe Mode is a stripped-down version of Windows used for troubleshooting.
- It can be accessed in various ways depending on your OS version.
- Use it to run antivirus scans, remove problematic updates or drivers, and restore your system.
- Safe Mode is not meant for daily use — it's a recovery environment.
- Exit it easily by rebooting or changing settings in msconfig.
If, after using Safe Mode, you're still encountering issues — especially hardware failures or deep system corruption — it may be time to consult a technician or consider a full reinstall of Windows.
Related Articles
- Oct 11, 2024What Is Time Machine?
- Jun 20, 2025Windows User Folder: Everything You Need to Know
- Jul 20, 2026What Can Internet Recovery Mode Do on Mac?
- Jul 01, 2026Guide to the Library Folder on Mac: Everything You Need to Know
- Apr 30, 2025About Disk Management – How to Open and Use It on Windows 11/10?
- Jun 28, 2025Windows.old: What Is It & How to Delete It - Is It Safe?

Contributing Writer
Christina
Christina is the senior editor of Donemax software who has worked in the company for 4+ years. She mainly writes the guides and solutions about data erasure, data transferring, data recovery and disk cloning to help users get the most out of their Windows and Mac. She likes to travel, enjoy country music and play games in her spare time.

Editor in chief
Gerhard Chou
In order to effectively solve the problems for our customers, every article and troubleshooting solution published on our website has been strictly tested and practiced. Our editors love researching and using computers and testing software, and are willing to help computer users with their problems
Hot Donemax Products

Clone hard drive with advanced clone technology or create bootable clone for Windows/Mac OS.

Completely and easily recover deleted, formatted, hidden or lost files from hard drive and external storage device.

Certified data erasure software - permanently erase data before selling or donating your disk or any digital device.