Written byStevenUpdated on Oct 27, 2025
How to Recover Lost Data After Installing Windows 11 25H2?
Approved byGerhard Chou
Before we start: Donemax Data Recovery is a reliable recovery tool that can recover lost data after installing Windows 11 25H2. What's more, it's effective to recover deleted, formatted or lost data in other data loss scenarios on Windows 11.
PAGE CONTENT:
Microsoft's Windows 11 25H2 update introduces new features, performance improvements, and better security. However, as with many major OS updates, users have reported data loss issues — missing documents, photos, downloads, or entire folders disappearing after installation.
If you've recently upgraded and can't find your files, don't panic. In most cases, the data isn't permanently erased; it's just temporarily inaccessible or moved to another directory. This guide walks you through every possible method to recover lost data after installing Windows 11 25H2 update — safely and effectively.
Why Data Loss Happens After Installing Windows 11 25H2
Data loss after an operating system update is not uncommon. During the upgrade, Windows replaces core files, moves user profiles, and sometimes creates temporary system folders. Below are common causes:
- Interrupted or incomplete installation: Sudden shutdowns or power interruptions can corrupt files or reset partitions.
- Temporary user profiles: After the update, Windows may log you into a temporary profile that hides your actual files.
- Partition formatting: The upgrade may inadvertently format or overwrite partitions.
- Driver and compatibility issues: Updated drivers may fail to recognize storage locations or file paths.
- Windows.old deletion: The Windows.old folder, which temporarily stores your previous files, might have been deleted after the upgrade.
- Antivirus or third-party interference: Security software can quarantine or block migrated files.
Understanding the cause helps you choose the right recovery method.
Precautions before Data Recovery on Windows 11 25H2
Before attempting to recover files, follow these safety measures to avoid further damage:
- Stop using your PC immediately. Continued use may overwrite deleted files, reducing recovery chances.
- Don't install new software on the same drive. Install recovery tools on a different partition or external drive.
- Disconnect from the internet if automatic syncing is active to prevent overwriting OneDrive data.
- Check external backups. If you used OneDrive, Google Drive, or an external HDD, verify whether your files are still there.
- Prepare a safe storage location. Always recover files to another disk or USB drive — never the original source drive.
Once you've taken precautions, proceed with the recovery methods below.
Methods to Recover Lost Data After Installing Windows 11 25H2
Method 1: Check User Accounts and Temporary Profiles
Sometimes Windows 11 creates a temporary account during an update, making it look like your files have disappeared. In reality, they're stored in your original user folder.
Steps to find your old profile:
- Open Settings by pressing Windows + I
- Go to Family & other users via Accounts.
- Check if multiple profiles exist. Log out and sign in with your usual account.
- Open File Explorer, then go to C:\Users\.
- Look for another folder with your previous username.
If you find your files there, copy them to a safe location, such as an external drive.
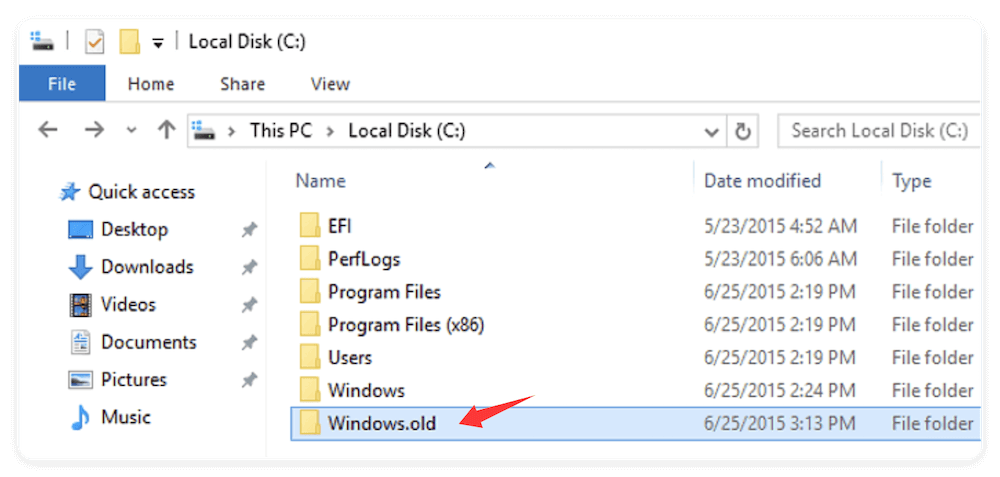
Method 2: Restore Files from the Windows.old Folder
The Windows.old folder is automatically created when upgrading to a new version of Windows. It stores system and user files from your previous installation, giving you a chance to restore them.
To recover from Windows.old:
- Open File Explorer and go to C:\Windows.old.
- Go to Users > [Your Username].
- Open subfolders like Documents, Pictures, Videos, or Desktop.
- Copy the files you need and paste them into your active user folder.
💡 Note: Windows automatically deletes Windows.old after 10 days to save space. If you can't find it, proceed to the next method.
Method 3: Restore Using File History or Backup & Restore
If you had File History or Backup & Restore (Windows 7) enabled before the upgrade, retrieving lost data becomes easy.
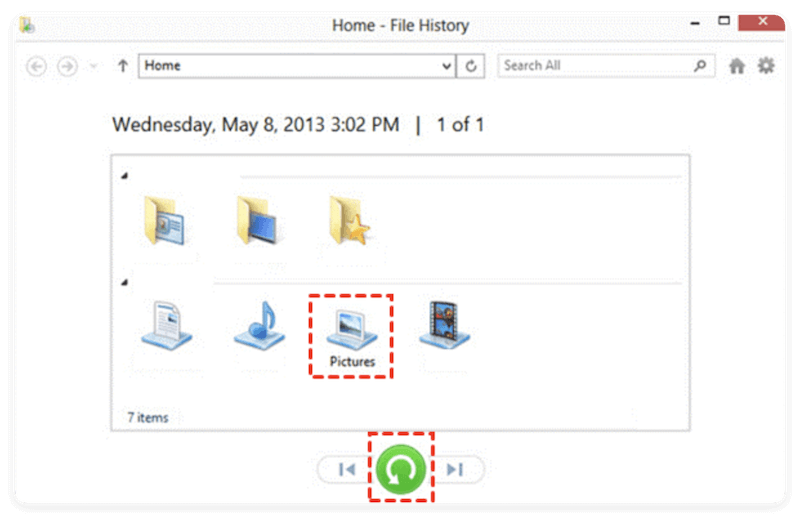
Using File History
- Open Control Panel (search it in Start menu).
- Click File History.
- Choose Restore personal files from the left panel.
- Browse through the available versions of your files and click Restore.
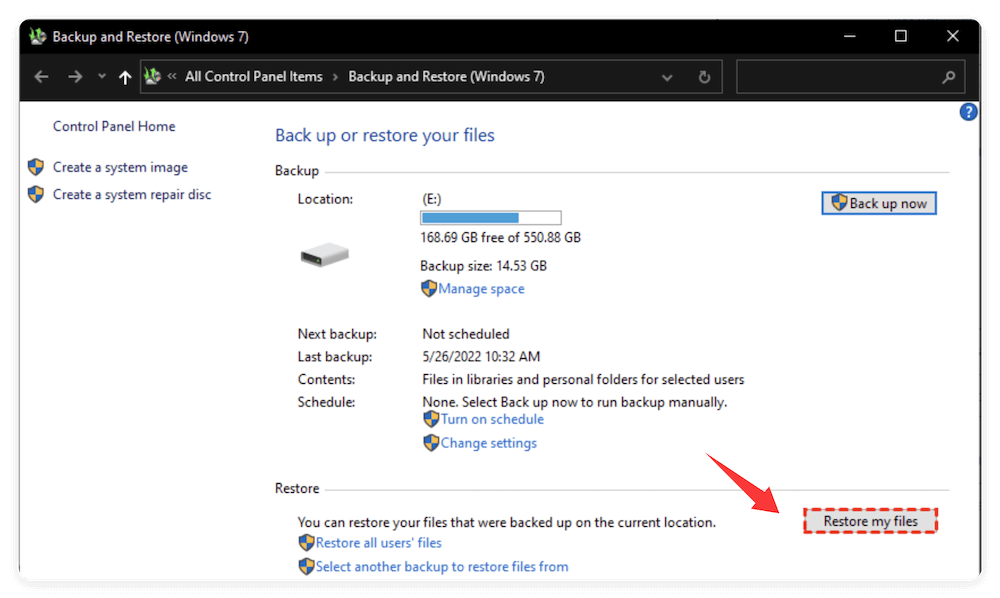
Using Backup & Restore (Windows 7)
- Go to Backup and Restore (Windows 7) under Control Panel.
- Select Restore my files or Restore all users' files.
- Comply the wizard to recover your data from the backup drive.
If you never set up backups, don't worry — move on to the next method.
Method 4: Use Windows Recovery Environment (WinRE)
The Windows Recovery Environment can help you revert to a previous system state before the update.
Access WinRE:
- Hold Shift and click Restart from the Start menu.
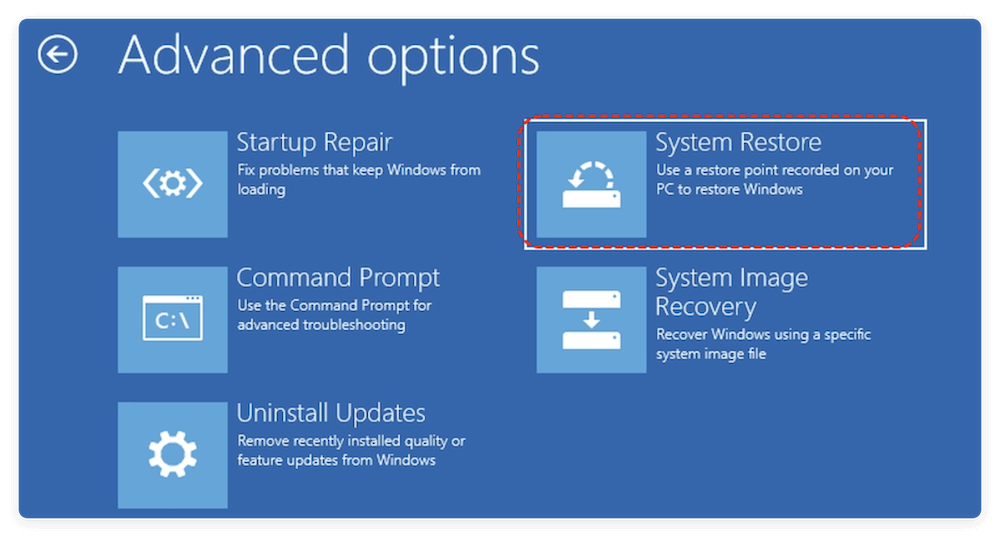
- Choose System Restore from Advanced Options via Troubleshoot.
![recover lost data after installing Windows 11 25H2]()
- Select a restore point created before installing Windows 11 25H2.
- Follow the instructions to complete the process.
![recover lost data after installing Windows 11 25H2]()
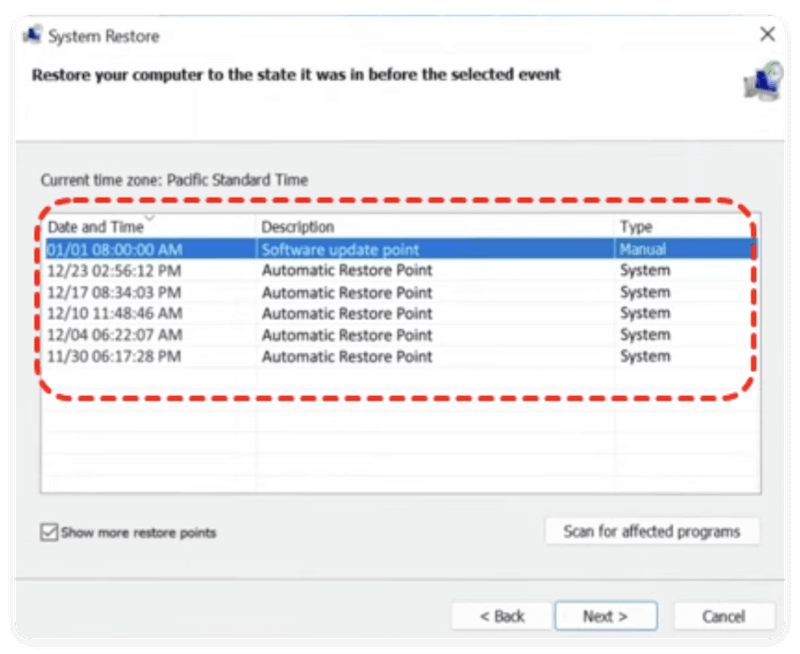
This can bring back system settings and sometimes restore file accessibility. However, personal files added after that restore point will not be affected.
Method 5: Check OneDrive and Other Cloud Backups
Many users forget that Windows 11 automatically syncs files with OneDrive, especially Desktop and Documents folders.
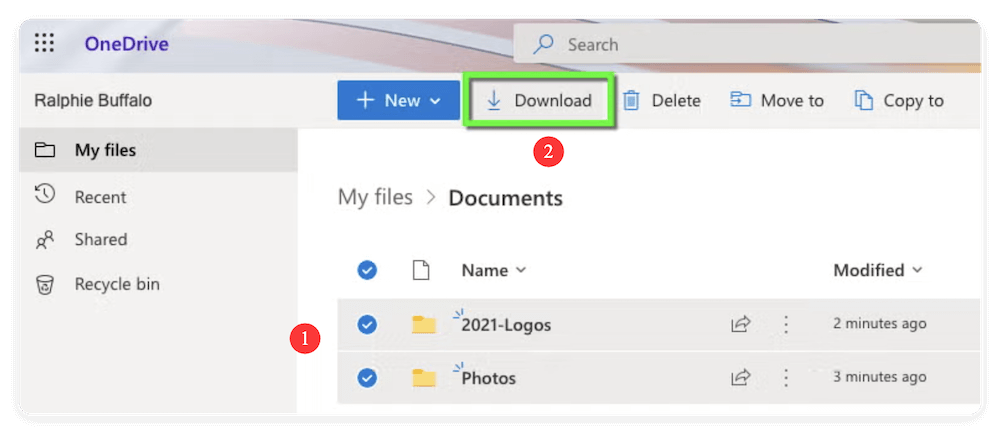
To recover from OneDrive:
- Open a browser and visit onedrive.live.com.
- Log in with your Microsoft account.
- Browse through the synced folders.
- Download the files you need.
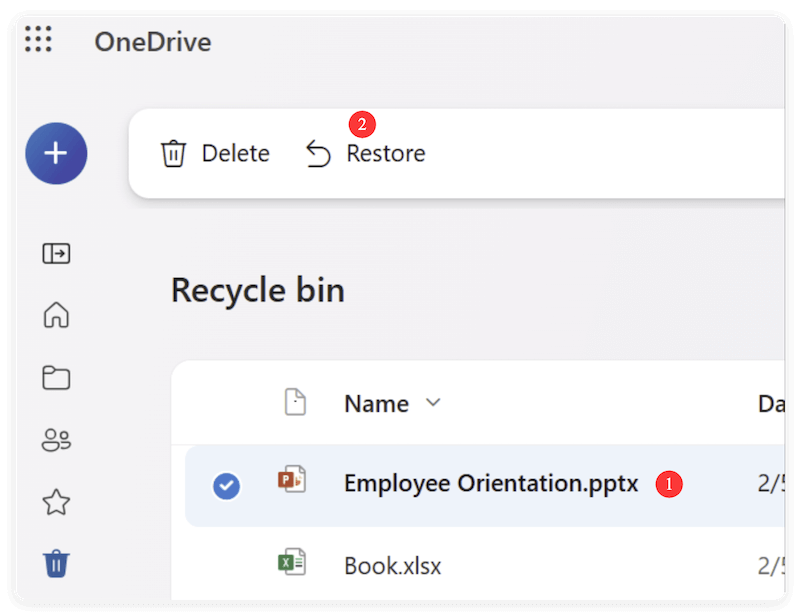
If the files were recently deleted, go to OneDrive Recycle Bin (accessible from the left sidebar) — items remain there for 30 days unless manually purged.
Other cloud backups to check:
- Google Drive
- Dropbox
- iCloud Drive
These platforms often auto-sync critical folders depending on user settings.
Method 6: Recover Data from External or Secondary Drives
If you had data stored on an external drive or USB stick before updating to Windows 11 25H2, that data may also appear missing or inaccessible due to driver or partition issues.
Steps to check:
- Press Windows + X and select Disk Management.
- Find your external drive — if it shows Unallocated, do not format it.
- Right-click and choose Change Drive Letter and Paths… → assign a new letter.
- If still inaccessible, run CHKDSK: (Replace X with your drive letter.)
chkdsk X: /f /r
If files remain missing, run recovery software like EaseUS or Stellar directly on the external drive.
Method 7: Command Prompt File Recovery (Advanced Users)
For users comfortable with command-line operations, Command Prompt can sometimes locate hidden files.
- Search cmd in Start, right-click, and choose Run as administrator.
- Type the below command: (Replace X with the drive letter where files are missing.)
attrib -h -r -s /s /d X:\*.*
- Press Enter to execute the command.
This command removes hidden and system attributes, making hidden files visible again in File Explorer.
Method 8: Recover Lost Data with Professional Data Recovery Software
If built-in methods fail and there is no backup data available anywhere, a third-party recovery tool can help. These programs scan your storage device for deleted or inaccessible data and let you restore it securely.
Recommended Data Recovery Tools:
- Donemax Data Recovery – user-friendly, supports all file types, and works with formatted or corrupted drives.
- Stellar Data Recovery – advanced deep-scan options with file preview.
- Recuva – recovers from internal, external, and USB drives efficiently.
How to use (data recovery steps with Donemax Data Recovery):
Step 1. Download and install the recovery tool on a different drive.
Donemax Data Recovery
- Fully compatible with Windows 11 and other versions.
- Recover deleted, lost data in any data loss cases.
- Effectively recover missing photos, videos, documents, etc.
Step 2. Launch the program and select the partition or drive where data was lost.

Step 3. Start a scan by clicking the Scan button. The software will search for the missing files from the drive.

Step 4. Preview found files to confirm they're intact. Choose a safe location (external drive or USB) to restore the files.

These tools can recover photos, videos, Office documents, emails, and other data types. If the other data recovery methods are not working, the data recovery software is the last chance to get back the lost files.
Troubleshooting Tips for Failed Recovery Attempts
If none of the above methods help:
- Use professional data recovery services. If your drive is physically damaged or severely corrupted, contact specialists like Ontrack or Seagate Data Recovery.
- Avoid repeated scans. Multiple scans can reduce the chance of successful recovery by overwriting sectors.
- Check Recycle Bin once more — it's surprisingly common for files to end up there post-update.
- Verify recovered files. Always open a few files after restoration to ensure they're not corrupted before deleting backups.
Preventing Data Loss in Future Windows 11 Updates
While recovery is possible, prevention is always better. Before installing major updates like Windows 11 25H2, take the following precautions:
- Create a full system backup. Use Control Panel > Backup and Restore (Windows 7) or third-party imaging tools like Donemax Disk Clone.
- Enable File History. Go to Settings > Update & Security > Backup and turn it on.
- Use OneDrive or another cloud service to sync essential folders automatically.
- Check disk health. Run chkdsk or Windows Security > Device performance & health before upgrading.
- Keep drivers updated and ensure sufficient storage space.
- Disconnect non-essential external drives to prevent accidental formatting.
Following these steps ensures that even if an upgrade fails, your data stays secure and recoverable.
Conclusion
Losing data after upgrading to Windows 11 25H2 can be frustrating, but it's often reversible. Start by checking for temporary profiles and the Windows.old folder. If those fail, try File History or a professional recovery tool to scan for deleted files.
To safeguard your data going forward, enable backups, use cloud storage, and perform regular system health checks before major updates. With these precautions, you can enjoy Windows 11 25H2's new features without worrying about losing your important files again.
Donemax Data Recovery
Powerful, safe & easy-to-use data recovery software. Easily and completely recover deleted, formatted, or other lost data. The tool supports PC, Mac, HDD, SSD, USB drive, camera, SD card, RAID and other storage devices.
Related Articles
- Feb 18, 2025[3 Methods] Recover Images and Videos from a Corrupted SD Card on Windows or macOS
- Dec 01, 2025Accidentally Saved Over a Document? Restore Previous Version
- Apr 14, 2026How to Recover Files Deleted by OpenClaw AI Agent?
- Feb 21, 2025How to Use Windows File History?
- Mar 11, 2025How to Recover Lost Data from Seagate Expansion Desktop Hard Drive? [4 Methods]
- Jun 20, 2025How to Recover Deleted ODT File (OpenDocument Text File)? [5 Methods]

Contributing Writer
Steven
Steven has been a senior writer & editor of Donemax software since 2020. He's a super nerd and can't imagine the life without a computer. Over 6 years of experience of writing technical solutions and software tesing, he is passionate about providing solutions and tips for Windows and Mac users.

Editor in chief
Gerhard Chou
In order to effectively solve the problems for our customers, every article and troubleshooting solution published on our website has been strictly tested and practiced. Our editors love researching and using computers and testing software, and are willing to help computer users with their problems