
Written byStevenUpdated on Jul 05, 2024
Samsung Portable SSD T9 Is Not Mounting on Mac, Fix It Now
Approved byGerhard Chou
PAGE CONTENT:
When you need to store important data on your Samsung Portable SSD T9, having problems with it not mounting on your Mac can be very annoying. It is known for being fast, reliable, and stylish, so many people choose the SSD T9. But sometimes technical problems make it so your Mac doesn't see the drive.
There are a lot of different steps in this guide that will help you figure out what's wrong and fix it, from simple checks to more complex fixes. Whether the issue is with the connection, software, or the formatting of the drive, these thorough steps will help get your Samsung Portable SSD T9 back up and running so you can view your data immediately.
Why Doesn't Samsung T9 SSD Mount on My Mac?
It often doesn't appear whether the Samsung T9 SSD is new or used on Mac. Someone bought a Samsung 840 EVO drive to improve their laptop, but they can't find it. The same thing can happen with both SanDisk and Crucial.
There are several reasons why your SSD T9 might not mount or not show up on your Mac:
- Connection Issue: An SSD usually won't appear on a Mac because the cables that link it may be loose, worn, or broken. Having trouble connecting can be fixed very fast.
- USB Port issue: A broken USB port is another reason. You won't be able to see your SSD if your USB port is broken.
- Mac OS problem: If any of the above reasons don't apply, you must check your macOS problem.
- SSD Problem: Sometimes, your SSD is broken or damaged, so it's not working or showing up. That doesn't happen very often, though.
Fix Samsung Portable SSD T9 Not Mounting on Mac
1. Check If the USB Connection Is Loose
Step 1: Use a different USB cord to connect the SSD and ensure the cable works.
Step 2: Make sure your connection works with your SSD by checking to see if it works.
Step 3: Try a different T9 SSD to USB adapter and make sure it works in a different drive.
Step 4: Connect the SSD to your Mac if the drive is C-type.
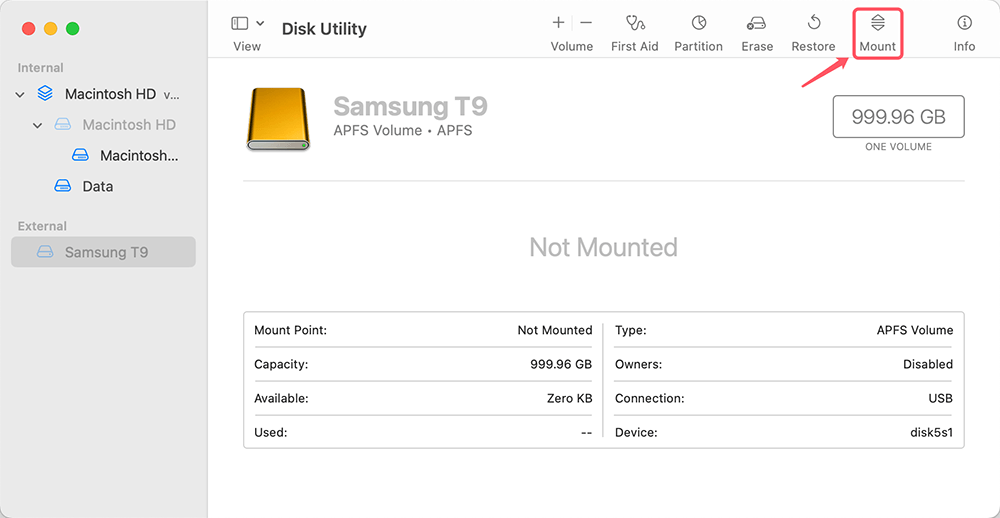
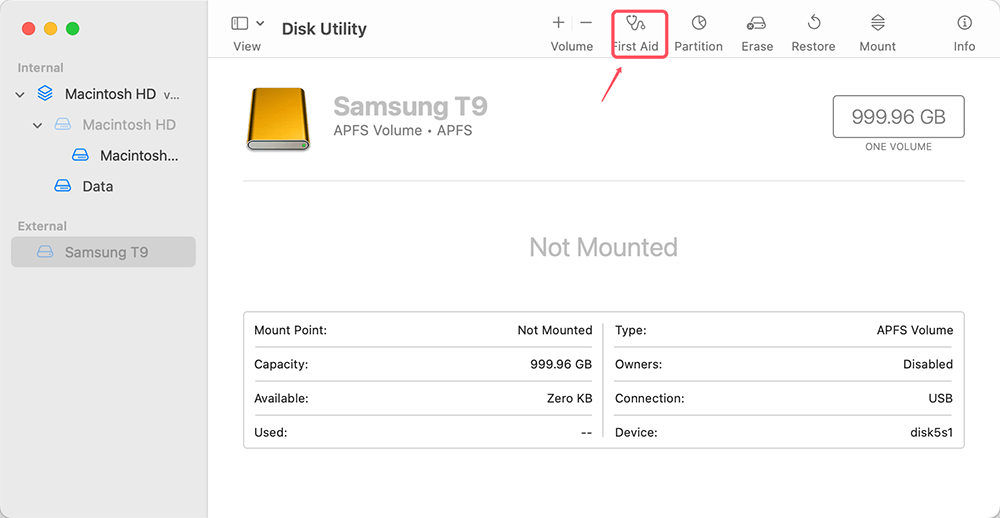
2. Mount Samsung T9 SSD in Disk Utility to Detect
If an SSD doesn't show up on a Mac, check Disk Utility to see if it's there. The drive will likely be fine if you find it in Disk Utility. Mounting and fixing the SSD may be possible with the help of Disk Utility. It may be broken if you can't find the SSD in Disk Utility.
Step 1: Launch Disk Utility from Launchpad > Other > Disk Utility.
Step 2: Check the left tab to see if the external disk exists.
Step 3: Select your Samsung Portable SSD T9 and click "Mount." After that, it should show up in the Finder under Devices.
3. Reset NVRAM/PRAM
NVRAM (non-volatile random-access memory) or PRAM (parameter RAM) can be reset to fix problems with external files.
1. Turn off your Mac.
2. When you turn it on, hold down the Option, Command, P, and R keys.
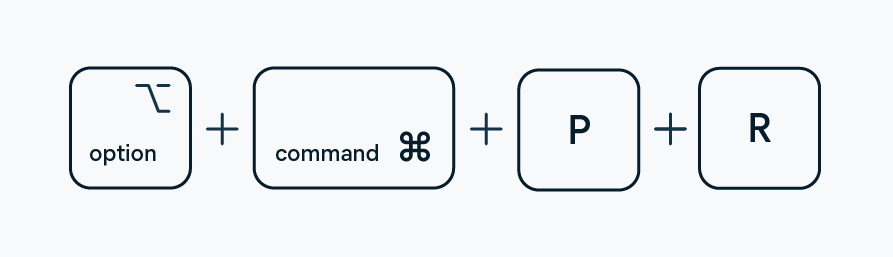
3. Hold the keys down for about 20 seconds, then release them. During this process, your Mac will restart.
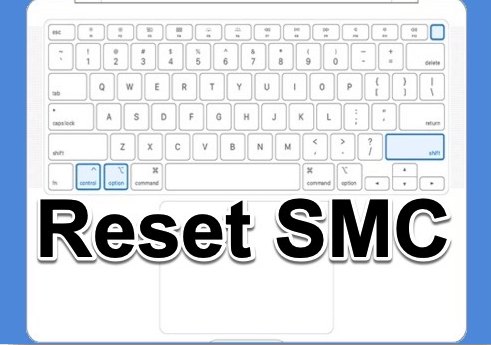
4. Reset the SMC (System Management Controller)
The SMC manages several hardware features and can assist with problems connected to external drives.
1. Turn off your Mac.
2. For MacBooks with batteries that can't be removed, press and hold Shift, Control, and Option on the left side of the keyboard for 10 seconds. Let go of all the keys and start up your Mac.
3. It's for desktop Macs: Take the power line out of the wall, wait 15 seconds, then plug it back in. Wait a few seconds, then turn on your Mac.
5. Format the Unmounted Samsung SSD T9 on Mac
When you format an external HDD on a Mac, it makes a new file system. All the data on the disk is removed during the formatting process. The disk is then marked as empty and ready to be used again. So, any mistakes that make it impossible to put the SSD on the Mac will be gone.

6. Fix Samsung SSD T9 Not Detected Errors with First Aid
There could be a problem with the hardware if the SSD is placed but still not visible on your Mac. In this case, you can use First Aid, a built-in tool for Macs, to fix the SSD error independently. Here are all the steps you need to take to give first aid:
Step 1: Open up Disk Utility.
Step 2: Click on the SSD that is grayed out on the left menu.
Step 3: Click on "First Aid" at the top.
Mount a Samsung portable T9 SSD on a Mac:
- Open Finder and go to Applications > Utilities > Disk Utility.
- Choose the unmounted SSD from the list on the left.
- Press the Mount or Erase button at the very top.
- Type a name into the pop-up box and choose a Format and Scheme.
Preventive Measures:
If you want to keep your Samsung Portable SSD T9 from having problems in the future, try these steps:
- Safely Eject the Drive: In the right way, always eject the drive before unplugging it.
- Regular Backups: Make sure you back up your important info often to avoid losing it.
- Use Quality Cables: Make sure you use high-quality USB connections that work with your computer.
- Update Software: Keep your macOS and any software that works with drives up to date.
How to Recover Lost Data from Unmounted Samsung Portable SSD T9 on Mac?
Mac data recovery software can help you recover lost data from unmounted Samsung Portable SSD T9 or erased Samsung Portable SSD T9. Just download and install the reliable Mac data recovery software - Donemax Data Recovery for Mac on your Mac.
Step 1. Connect the Samsung Portable SSD T9 to your Mac, then open Donemax Data Recovery for Mac, select the Samsung Portable SSD T9 to start data recovery.

Step 2. Click on Scan button to deeply scan the Samsung Portable SSD T9 and find all recoverable files including existing files, deleted files, erased files, etc.

Step 3. Once the scan is finished, the preview feature allows you to preview all recoverable files. Then select the wanted files and recover them.

NTFS Samsung Portable SSD T9 Not Mounting on Your Mac? Fix It with NTFS for Mac
If the Samsung Portable SSD T9 has been formatted to NTFS file system. It may not mount on your Mac. To fix this issue, you can reformat it to APFS, ExFAT or Mac OS Extended or use a third-party NTFS for Mac tool to allow your Mac to use NTFS drives on your Mac.
Step 1. Download and install Donemax NTFS for Mac on your Mac.
Step 2. Open Donemax NTFS for Mac, select the NTFS Samsung Portable SSD T9, click on Mount button.
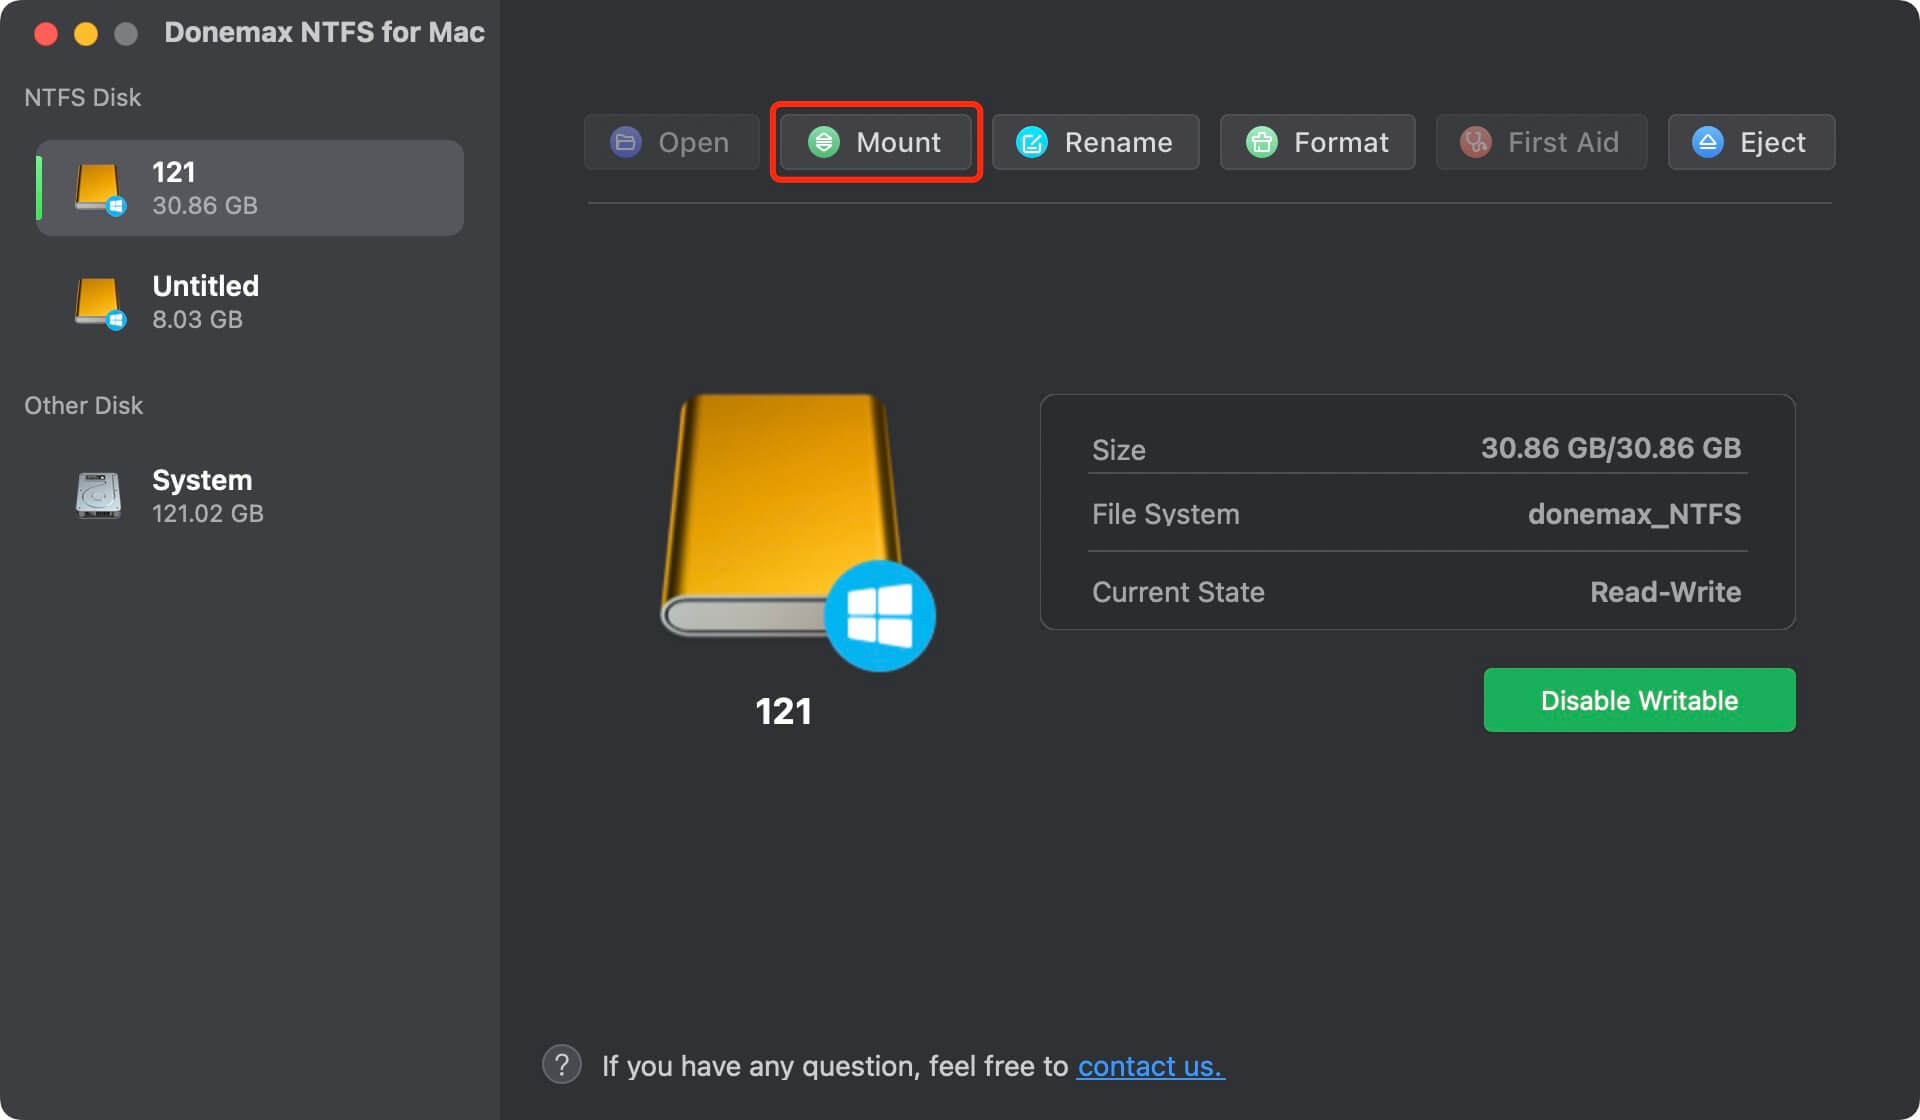
Step 3. To allow your Mac to read-write NTFS Samsung Portable SSD T9, just click on Enable Writable button.

Donemax NTFS for Mac also can help you reformat Samsung Portable SSD T9 or repair damaged Samsung Portable SSD T9 on your Mac.
Conclusion:
It can be frustrating when your Samsung Portable SSD T9 won't mount on your Mac, but you can fix the problem if you follow the right steps. This guide has everything you need to fix problems, from checking links and updating software to using Disk Utility and NTFS for Mac tool.
If the problems don't go away, getting help from a professional will keep your info safe. You can keep your SSD T9 working well and reliably by following these steps and taking preventative steps like properly ejecting the drive and making regular backups. That will keep your data safe and available.
Related Articles
- Apr 15, 2025Word Not Saving on Mac? Fix It Now!
- Apr 11, 2025Word Cannot Open the Document: User Does Not Have Access Privileges – How to Fix It on Mac?
- Feb 11, 2025How to Repair an xD Card: A Comprehensive Guide
- Apr 07, 2025How to Detect Disk Failure on Windows: Signs, Tools & Recovery Solutions
- Oct 19, 2023Fixed: Data Loss Due to Reinstalling Windows 11 or Other Windows Systems
- Jan 21, 2025Fix SD Card Won't Read or Open

Contributing Writer
Steven
Steven has been a senior writer & editor of Donemax software since 2020. He's a super nerd and can't imagine the life without a computer. Over 6 years of experience of writing technical solutions and software tesing, he is passionate about providing solutions and tips for Windows and Mac users.

Editor in chief
Gerhard Chou
In order to effectively solve the problems for our customers, every article and troubleshooting solution published on our website has been strictly tested and practiced. Our editors love researching and using computers and testing software, and are willing to help computer users with their problems
Hot Donemax Products

Clone hard drive with advanced clone technology or create bootable clone for Windows/Mac OS.

Completely and easily recover deleted, formatted, hidden or lost files from hard drive and external storage device.

Certified data erasure software - permanently erase data before selling or donating your disk or any digital device.