
Written byStevenUpdated on Mar 12, 2024
External Hard Drive Not Mounting on Mac mini, What to Do?
Approved byGerhard Chou
PAGE CONTENT:
Do you know how frustrating it is to plug in your external hard drive to your trusty Mac mini, which won't mount? Do not be afraid; you are not alone! Connectivity problems can be a pain, especially when you must get to important files or make backups. Not to worry, though, because this guide will show you easy ways to deal with this annoying issue.
Whether you want to remount your disk in Disk Utility or use a one-click option, we've got you covered. If that isn't enough, we'll also look at how to use Disk Utility to run First Aid and how to format your portable hard drive with a format that works with your Mac mini. Ready? Let's solve this problem and get your external hard drive working perfectly with your Mac mini again!
Fix External HDD or SSD Not Mounting on Mac mini
Don’t remove the external hard drive from your Mac mini, here are some solutions to help you fix the external hard drive not mounting on Mac mini issue:
Method 1: Mount an external drive in Disk Utility
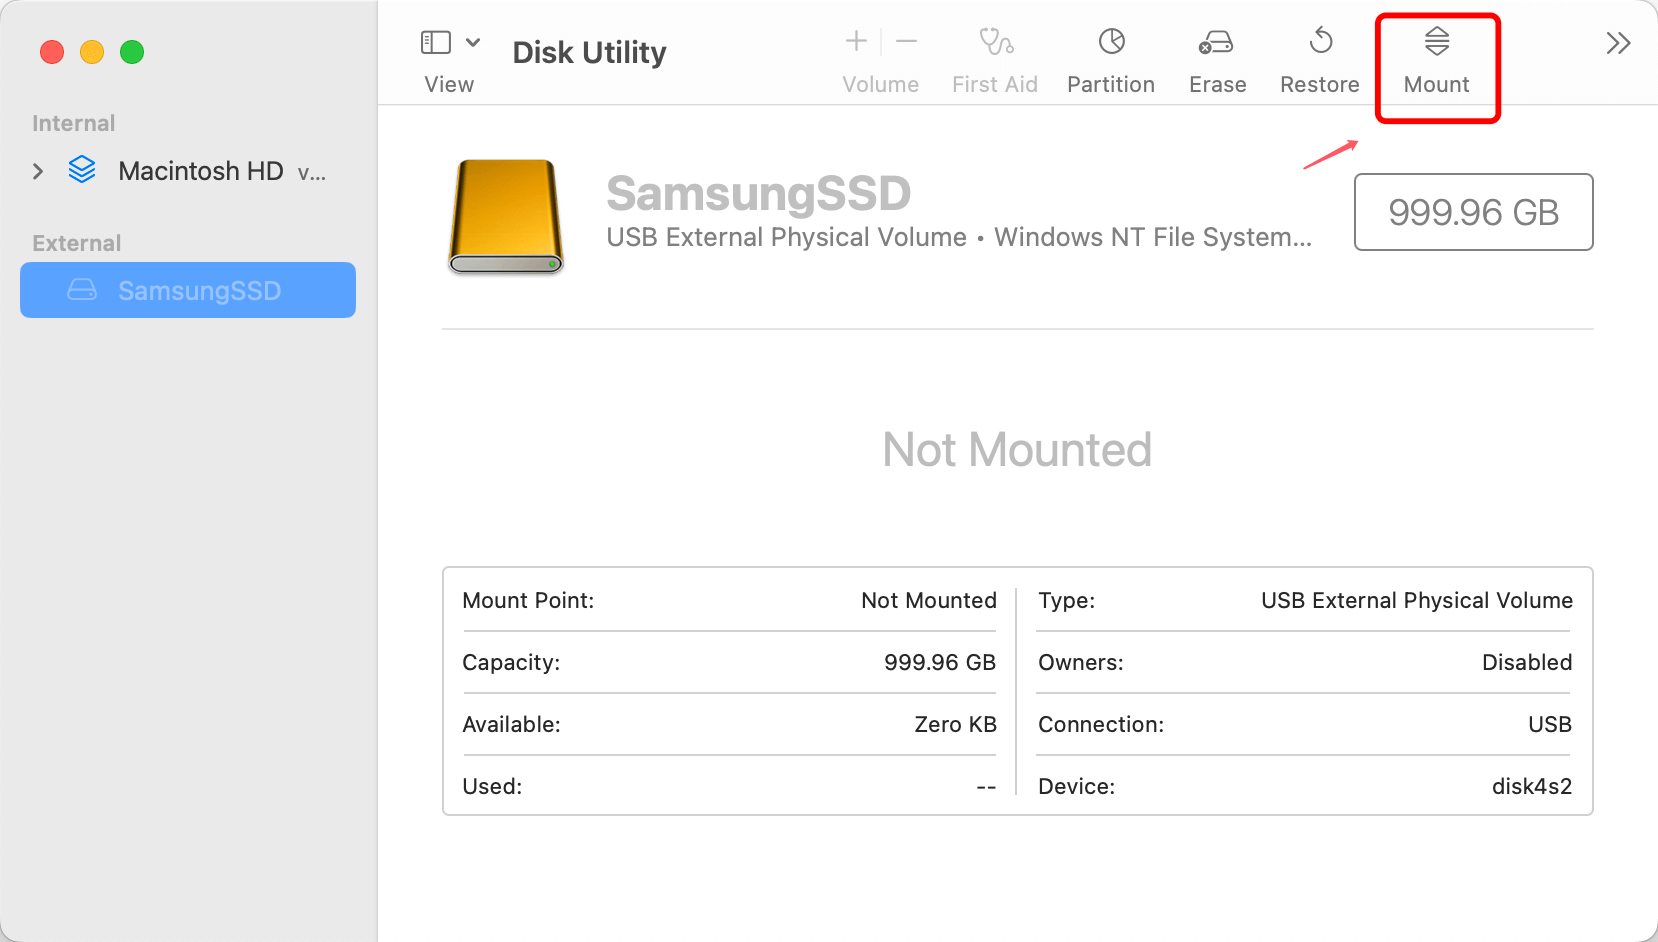
One of the first things you can try when your external hard drive doesn't mount on your Mac mini is to remount it using Disk Utility.
- Step 1. Click on Applications, Utilities, and Disk Utility to find it.
- Step 2. There is a list of possible drives on the left side of Disk Utility. This list has your portable hard drive on it.
- Step 3. Choose the "Unmount" in the Disk Utility window. Then, choose the external hard drive. To mount it again, click the "Mount" button after unmounting it.
![external hard drive not mounting on Mac mini]()
- Step 4. Check if the external hard drive reappears in Finder after you remount it. That means you were able to remount it.
- Step 5. To ensure it's working right, try getting to files on the external hard drive.
Method 2: Run First Aid in Disk Utility
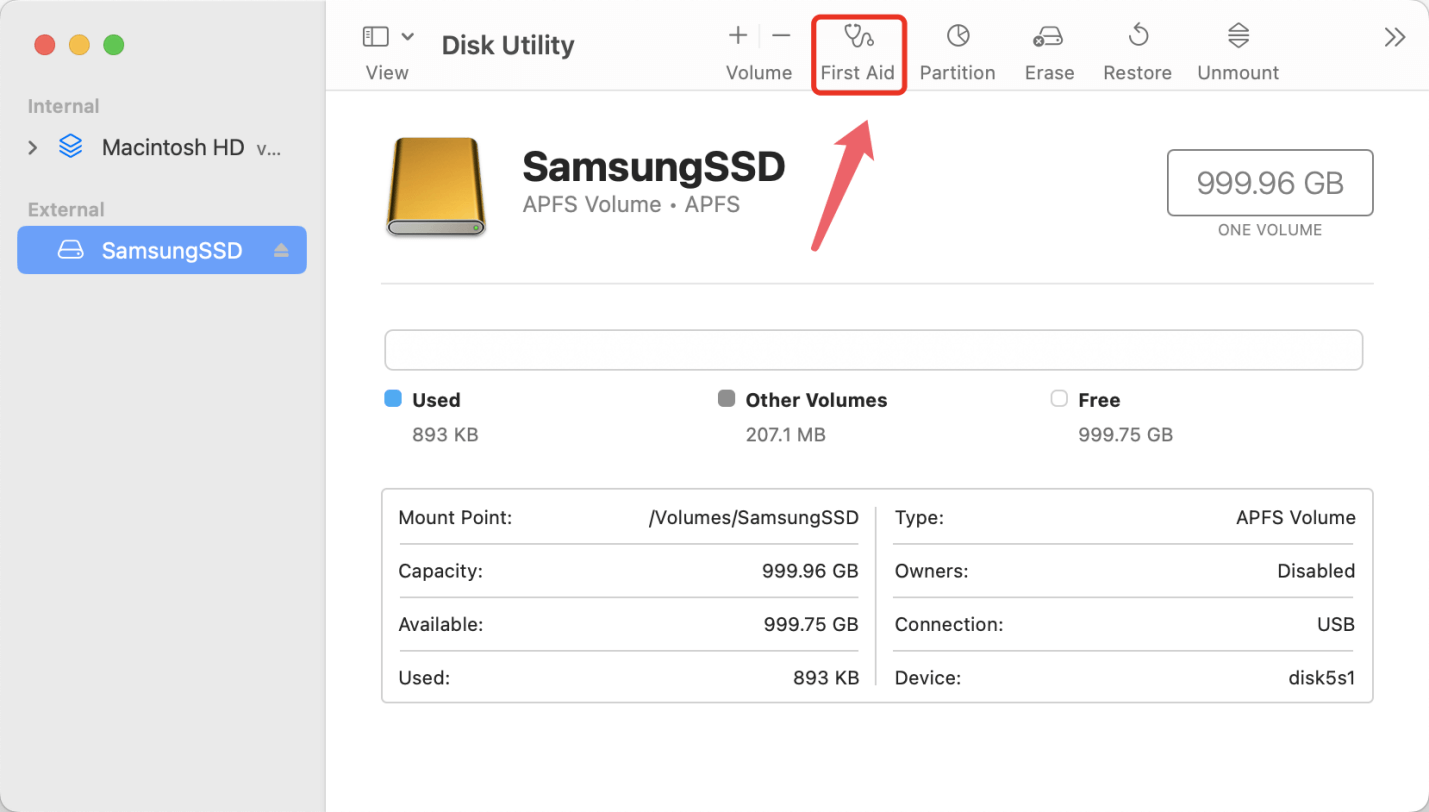
The "First Aid" tool in Disk Utility is meant to find and fix problems with disks. So, it becomes a good way to determine what's wrong with your external hard drive mounting.
- Step 1. Going to Applications > Utilities > Disk Utility will help you find Disk Utility.
- Step 2. Look for your external hard drive in the list of drives on the left side of Disk Utility.
- Step 3. A "First Aid" button can be seen in the Disk Utility window. Click it. It will pick your external hard drive.
- Step 4. To run First Aid on your portable hard drive, follow the steps on the screen. Computer Utility will look for problems with your computer and fix them.
![external hard drive not mounting on Mac mini]()
- Step 5. Check if your portable hard drive appears in Finder after running First Aid. If it does, the problem might be fixed.
Method 3: 1-Click to Mount and Enable External Hard Drive
If the external hard drive has been formatted to NTFS, a Windows based file system, the drive may not mount on your Mac mini. To solve this issue, you can use a NTFS for Mac tool to mount the external hard drive and enable writable for the NTFS drive.
Step 1. Download and install the reliable NTFS for Mac tool - Donemax NTFS for Mac. Then open it from Launchpad.
Step 2. Make sure the external hard drive is connected to your Mac mini and then open Donemax NTFS for Mac, select the external hard drive, click on Mount button.
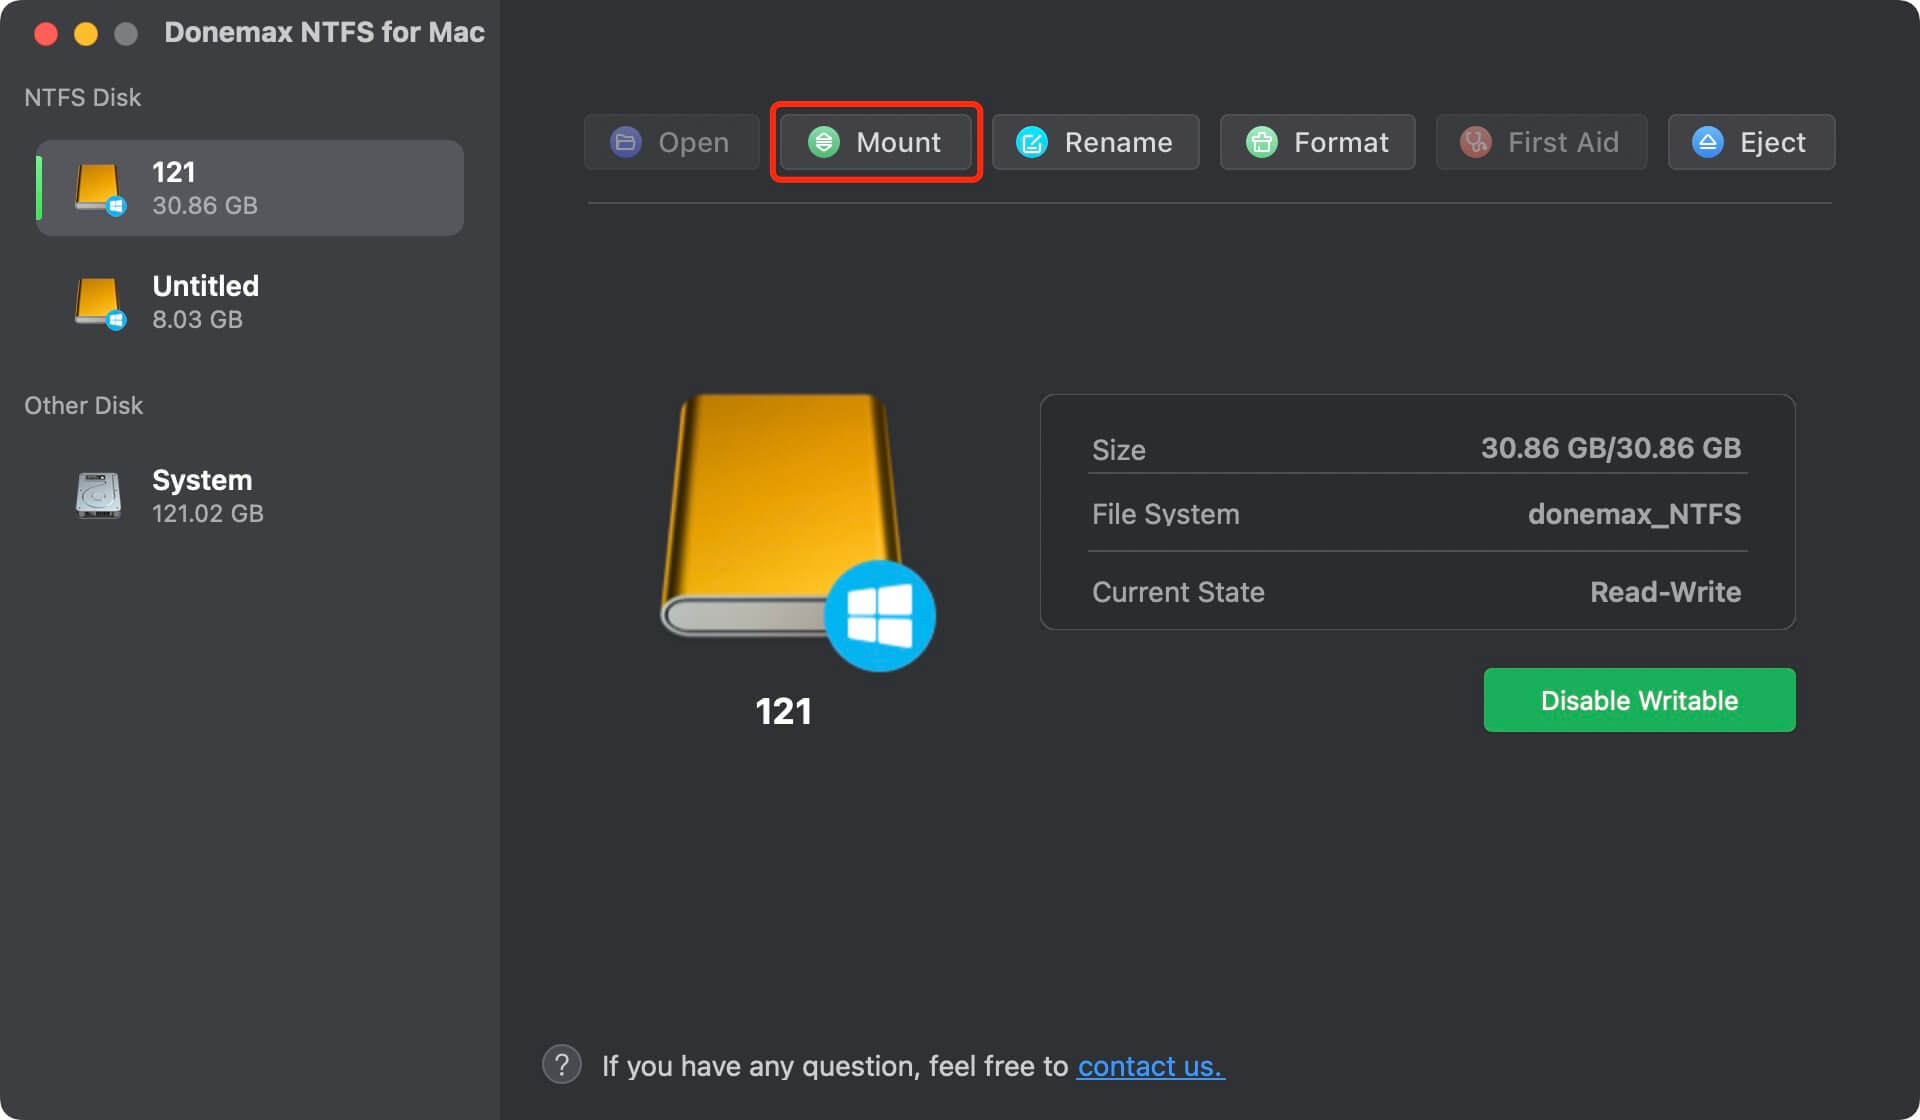
To enable your Mac to read-write NTFS drives, just click on Enable Writable button.

Donemax NTFS for Mac supports to mount APFS/ExFAT/FAT32 drive and repair disk, format external hard drive on Mac mini.
Method 4: Format External Hard Drive with a Mac-Supported Format
If none of the above solutions work to get your external hard drive to start, you can fix the problem by formatting it with a file system format that works with Macs using Disk Utility.
- Step 1. To find Disk Utility, go to Applications > Utilities > Disk Utility.
- Step 2. In Disk Utility, look for your portable hard drive on the left side of the screen.
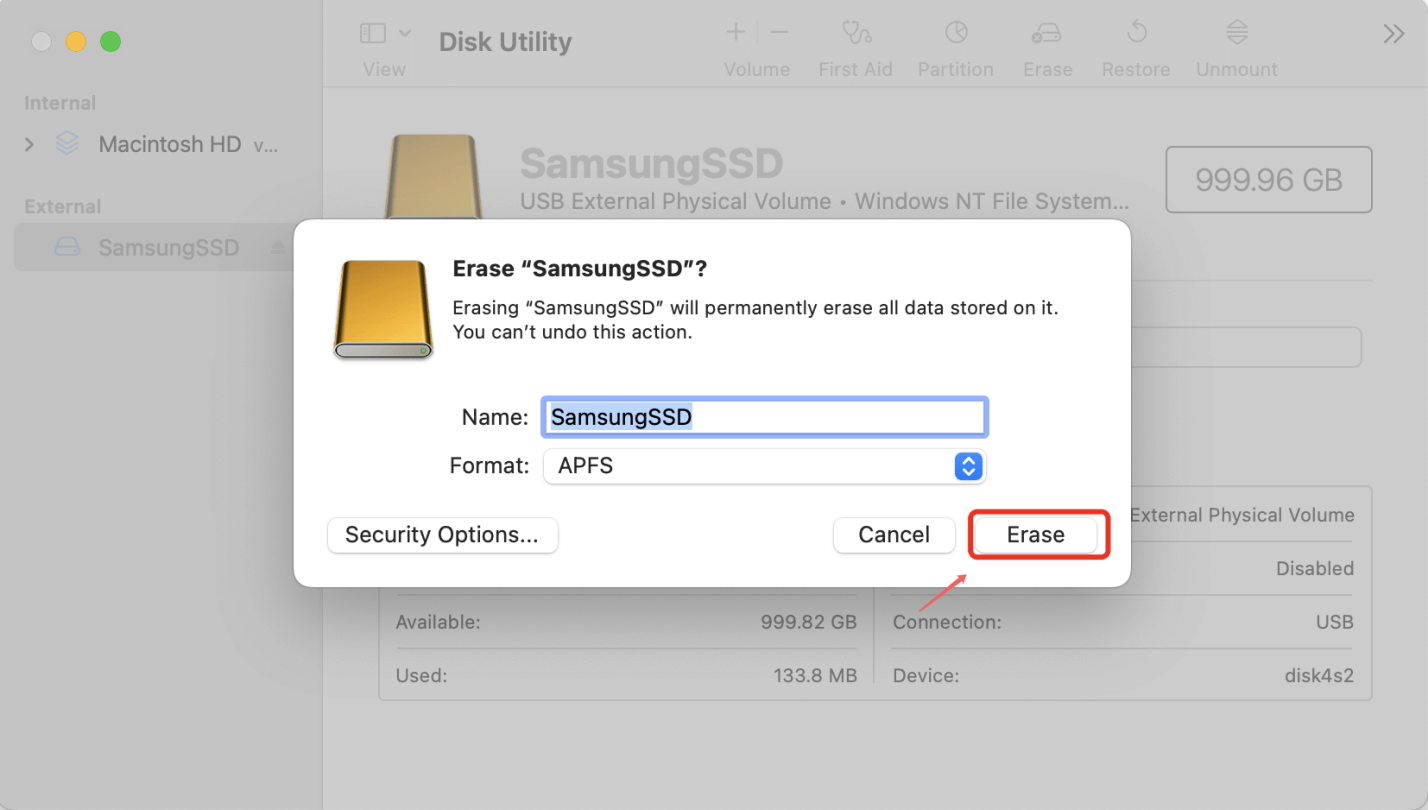
- Step 3. In Disk Utility, click the "Erase" button in the toolbar at the top of the window. It will pick your external hard drive.
![external hard drive not mounting on Mac mini]()
- Step 4. In the "Erase" box, pick a file system type that works with Macs, like ExFAT, APFS or Mac OS Extended (Journaled).
![external hard drive not mounting on Mac mini]()
- Step 5. Give your portable hard drive a name and set up any other options you want.
- Step 6. When you're done, click "Erase" to set up the chosen file system on your external hard drive.
- Step 7. Check to see if your portable hard drive shows up in Finder after you've formatted it. If it does, the problem might be fixed.

Recover Lost Data from Erased External Hard Drive on Mac mini
If you lose important data due to fixing unmounted external hard drive on Mac mini, don’t panic, data recovery software can help you unformat the external hard drive and get all lost data back. Stop writing data to the external hard drive and find a reliable recovery tool - such as Donemax Data Recovery for Mac to help you recover all lost data from the erased drive.
Step 1. Download and install Donemax Data Recovery for Mac on your Mac mini, then open it. Just select the external hard drive to start data recovery.

Step 2. This software is able to deeply scan the external hard drive and find all lost files. Just click on Scan button.

Step 3. Once the scan is completed, you can preview all recoverable files. Then select the wanted files and save them.

Conclusion:
Finally, having an external hard drive that won't mount on your Mac mini can be annoying. However, this is something that can be fixed. Following this guide's easy steps, you can successfully troubleshoot and fix the problem.
There is an option for everyone, whether you want to remount in Disk Utility, use third-party software like NTFS for Mac tool, run First Aid, or format with a file system that works with Macs. Remember to follow the steps and wait carefully. Your external hard drive should work perfectly with your Mac mini again.
FAQs About Fixing Unmounted External Hard Drive on Mac mini
1. How to mount an external hard drive on Mac mini?
- Connect the external hard drive to your Mac mini.
- Open Disk Utility.
- Select the external hard drive, then click on Mount button.
- If the Mount button is not available, just click Erase or First Aid to repair the external hard drive.
2. How to fix external hard drive not showing up on Mac mini?
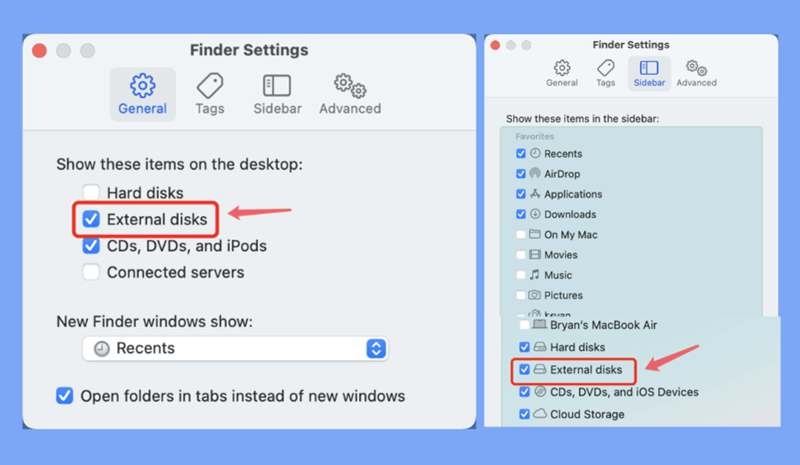
Just check the Finder Settings: open a Finder > Click Finder on Apple menu > Choose Settings. Then open Finder Settings window, click General and Sidebar, make sure External disks is selected.
3. How to use a NTFS drive on Mac mini without formatting?
- Download and install a NTFS for Mac tool - Donemax NTFS for Mac.
- Find and select the NTFS drive, click on Mount button.
- Click on Enable Writable button.
NTFS for Mac tool can help you mount external hard drive on Mac, format external hard drive on Mac and enable writable for NTFS drive on Mac so that you can read-write a NTFS drive on Mac without formatting it.
Related Articles
- Jun 06, 2025How to Use KIOXIA Portable SSD on Mac?
- Dec 19, 2024Why Is My SD Card Showing as RAW Drive? How to Fix RAW SD Card?
- Jan 04, 2024How to Use Samsung Portable SSD T9 for Windows and Mac?
- Jun 16, 2025How to Unlock USB Flash Drive?
- Jul 17, 2023What to Do If An USB Flash Drive Not Working on Mac?
- Jan 14, 2025Convert GPM (GUID Partition Map, GPT) Disk to MBR (Master Boot Record) on Mac

Contributing Writer
Steven
Steven has been a senior writer & editor of Donemax software since 2020. He's a super nerd and can't imagine the life without a computer. Over 6 years of experience of writing technical solutions and software tesing, he is passionate about providing solutions and tips for Windows and Mac users.

Editor in chief
Gerhard Chou
In order to effectively solve the problems for our customers, every article and troubleshooting solution published on our website has been strictly tested and practiced. Our editors love researching and using computers and testing software, and are willing to help computer users with their problems