PAGE CONTENT:
Would you like to know where your portable hard drive is? It's very frustrating when you plug in your trusted storage device and see that it's marked as "Untitled" and can't be seen on your screen. In this digital mess, you're not the only one.
You can fix your external hard drive if it's not working right, whether because of a bad link, a gap in compatibility, or a simple bug. Let's learn why your hard drive is hiding and how to get it out from behind.
Prepare to fix problems like a pro; you can return to your important files with just a few clicks. The case of the unnamed external hard drive needs to be solved, so put on your detective hat, and let's begin!
How to Fix External Hard Drive Showing Untitled
Step 1: Check the Connections
If an untitled external hard drive isn't showing up on your Mac, the first thing you should do is ensure all physical links are safe. Separate the USB or Thunderbolt cord from the external hard drive and your Mac, and then connect them again. The hub may be giving you trouble. If that's the case, connect the drive straight to your Mac's USB port.
Step 2: Use Different Ports and Cables to Test
A broken USB port or cable can sometimes cause trouble. Use a different cord to connect the external hard drive to a USB or port on your Mac. It means there is a problem with the first port or cable if the drive shows up when attached through a different one.
Step 3: Check the Power Source
If your portable hard drive needs power from an outside source, like a desktop HDD, ensure it's plugged in and working. The drive might not work right if the power sources are broken. Try plugging the drive into a different wall outlet or using a different power charger.
Step 4: Check Disk Utility
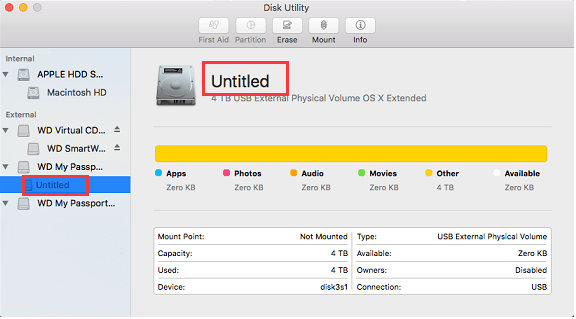
Mac OS X has a Disk Utility tool that lets you control disks and volumes. To see if Disk Utility can see the unnamed external hard drive, do the following:
- 1 > You can look for Disk Utility in Spotlight or go to Applications > Utilities to open it.
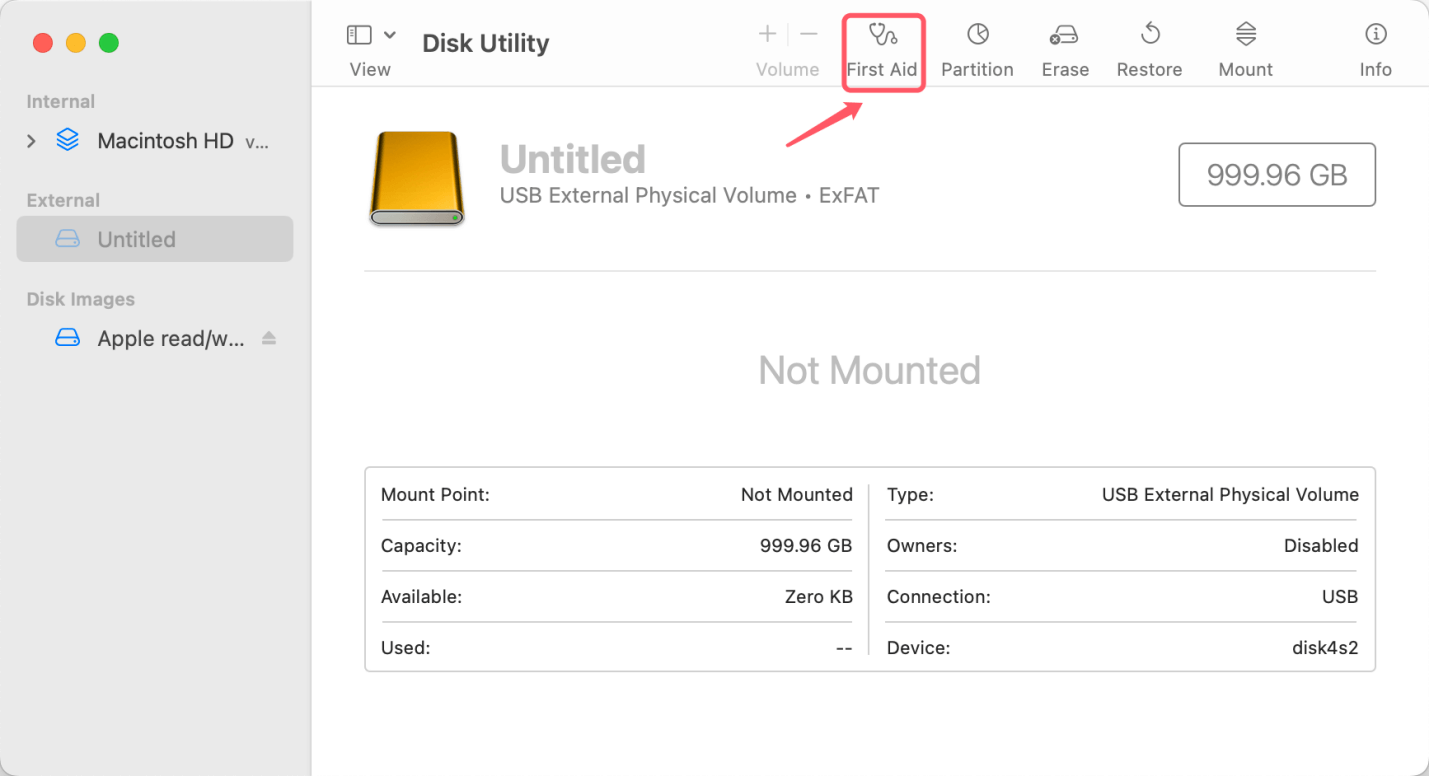
- 2 > Look for the external hard drive in the list on the left. If it shows up but the volume is grayed out or marked as "untitled," there is a problem with the drive's file system.
- 3 > Select the external hard drive to fix any disk problems, and then click the "First Aid" button.
![fix untitled drive on Mac]()
Step 5: Format the drive
If Disk Utility sees the unnamed external hard drive but can't mount it, erasing it might fix the problem. But erasing the drive will eliminate all the data, so be careful and only do it if you have a backup.
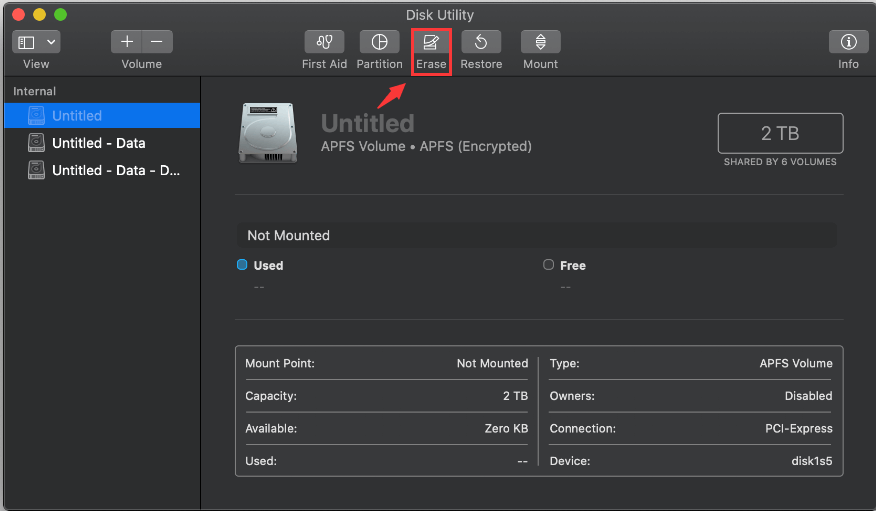
- 1 > In Disk Utility, find the external hard drive that doesn't have a name and click on it.
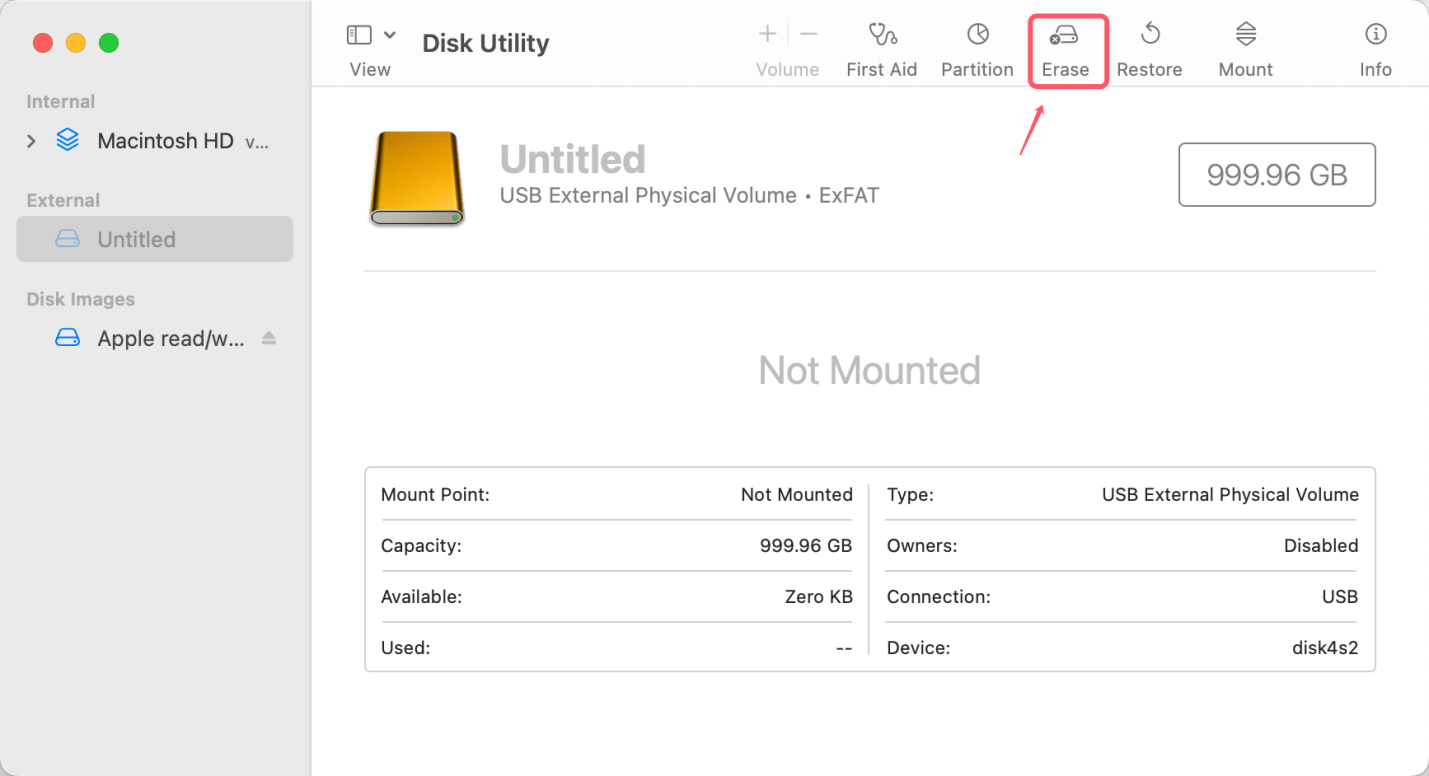
- 2 > In Disk Utility, click the Erase button at the top.
![fix untitled drive on Mac]()
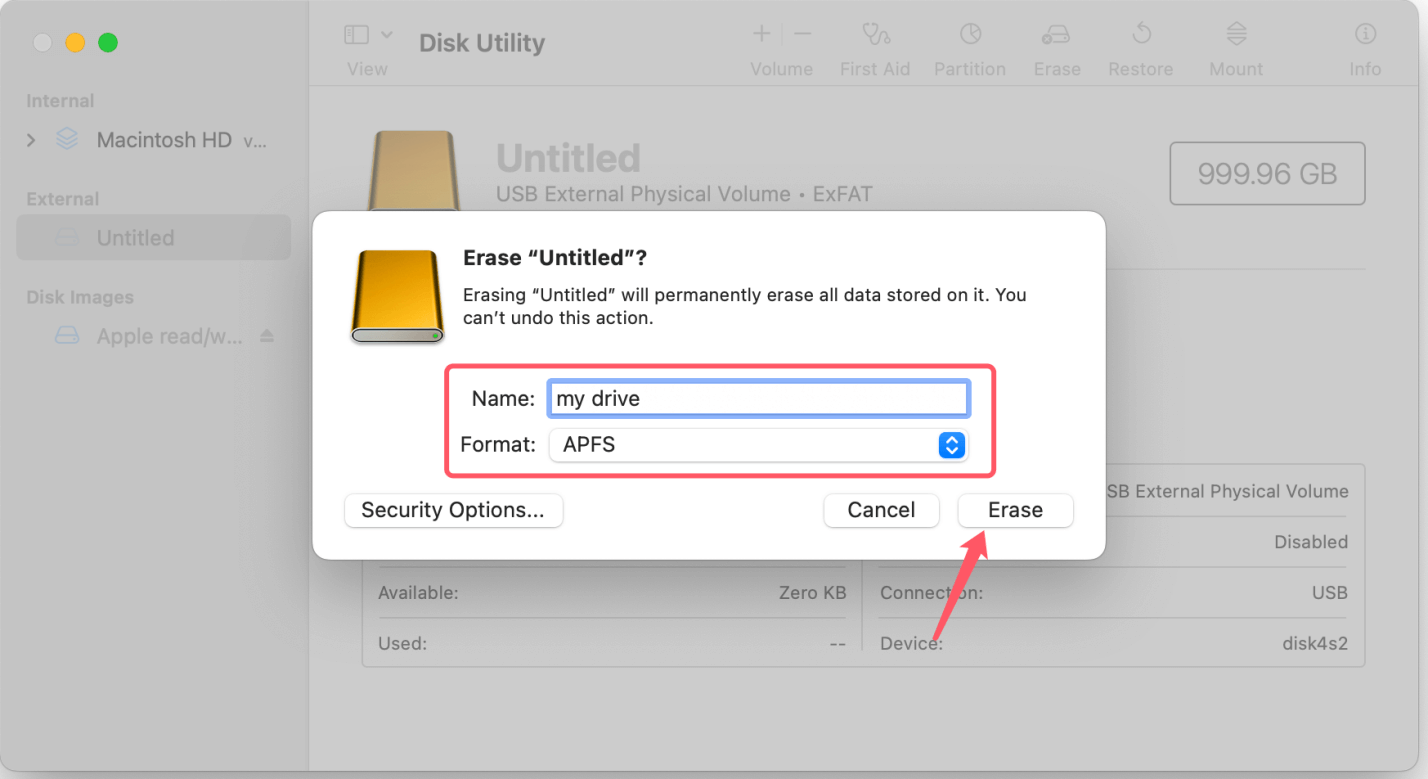
- 3 > Give the drive a name and choose a format that works with it, such as APFS or Mac OS Extended (Journaled).
- 4 > Click Erase again to erase the drive.
![fix untitled drive on Mac]()
Note: If you want to erase the startup disk, just start the Mac into macOS Recovery mode, then choose Options, click on Continue button. Use Disk Utility to erase the startup disk in macOS Recovery mode. After erasing the drive, just reinstall macOS on the Mac.
Step 6: Clear NVRAM, PRAM, and SMC
On Mac, problems with connectivity can sometimes be fixed by clearing the non-volatile random-access memory (NVRAM) or parameter random-access memory (PRAM) and the system management controller (SMC). Press Command, Option, P, and R until you hear the Mac's starting sound again. It will clear both NVRAM and PRAM. To reset the SMC, turn off your Mac and press and hold the power button for 10 seconds. Then, let go of the button and turn the Mac back on.
Check how to reset NVRAM/PRAM on Mac >>
Check how to reset SMC on Mac >>
Step 7: Check On A Different PC Or Mac
After following the steps above, if the unnamed external hard drive still doesn't appear on your Mac, connect it to either a Windows PC or another Mac. If it mounts correctly on another computer, the problem may be with the way your Mac is set up or the tools you're using. If you need more help, update your Mac OS to the latest version or call Apple Support.
Fix External Hard Drive Not Showing Up on Mac
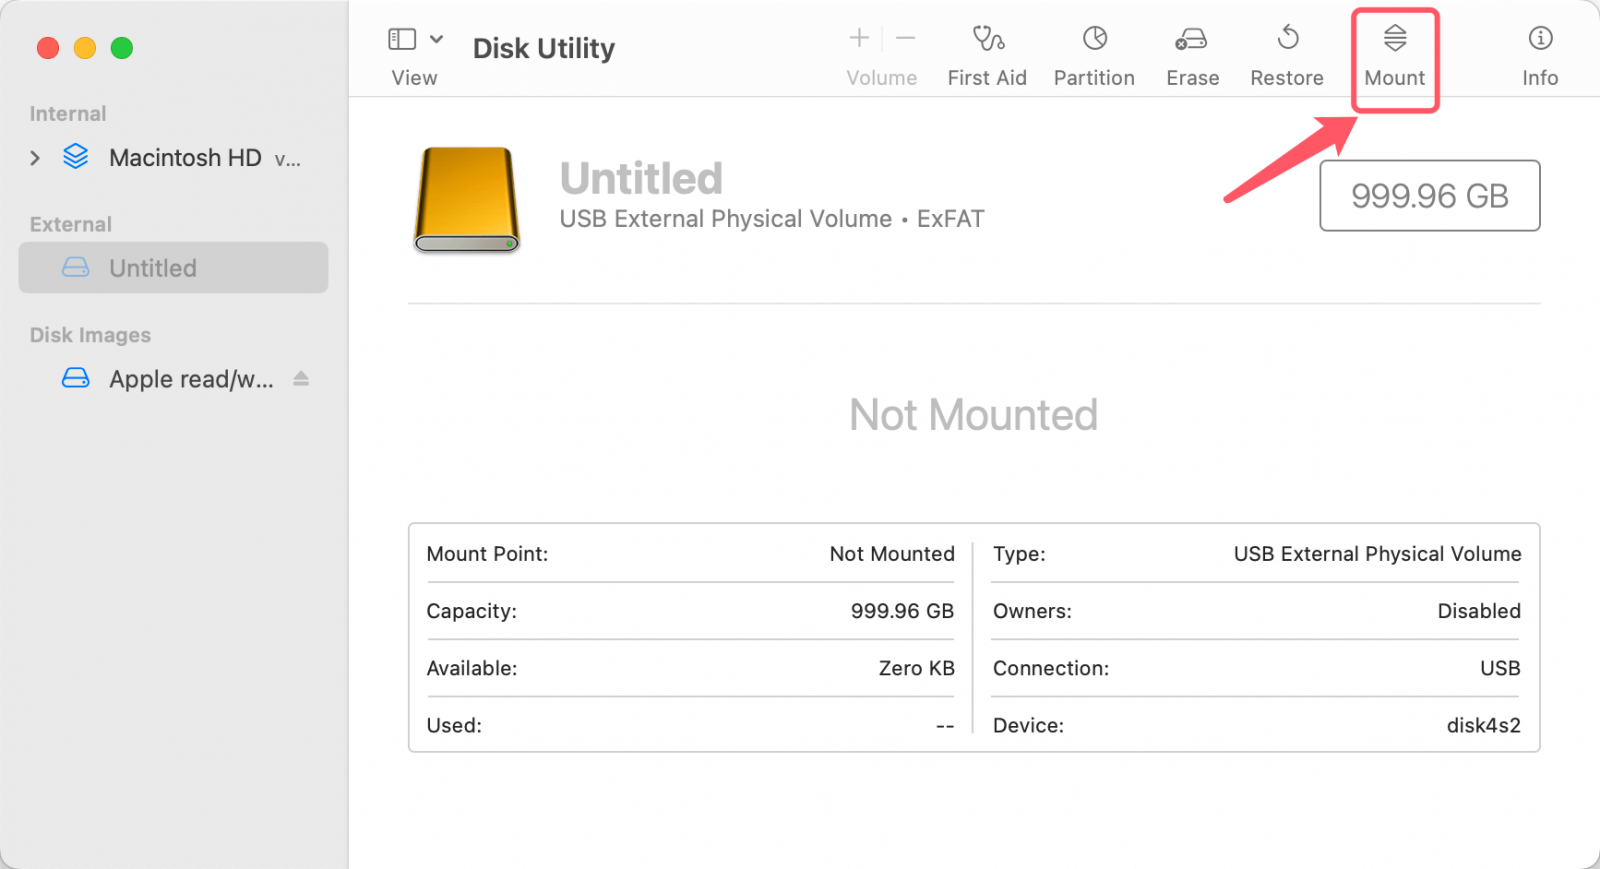
First of all, open Disk Utility, find the external hard drive and click on Mount button.
If it still does not work, check the Finder Settings:
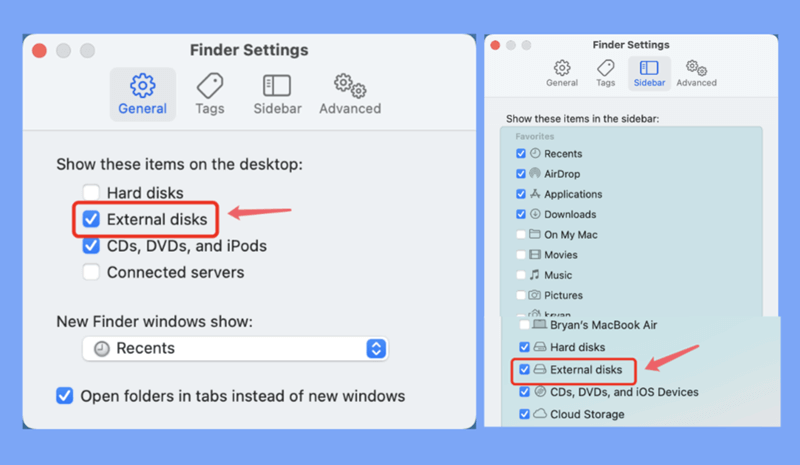
Step 1. Open a Finder on Mac, click Finder on Apple menu, choose Settings.
Step 2. Open Finder Settings, then click General and Sidebar, make sure External disks is selected.
Recover Lost Data after Fixing Untitled Drive on Mac
If you lose important data due to erasing the drive, you can use a data recovery app to help you get lost data back. Donemax Data Recovery for Mac is a powerful application which is able to easily and completely recover lost data from an erased or untitled drive on Mac.
Step 1. Download and install Donemax Data Recovery for Mac on your Mac, then run it from Launchpad.
Step 2. The data recovery software will list all drives, just select the erased drive to start data recovery.

Step 3. Click on Scan button to deeply scan the drive and find all recoverable files.

Step 4. Once the scan is completed, you can preview all recoverable files. Then select the wanted files and save them.

Conclusion:
Fixing an untitled external hard drive that won't appear on your Mac takes a step-by-step process. Following the steps, you can quickly find and fix common problems. Before you try to format or reset your device, have a copy of any important info. If the problem doesn't disappear, getting help from a professional or trying the drive on a different computer can give you more information.
If you are patient and don't give up, you can easily access the external hard drive and its important contents. If you keep looking into it and fixing problems, it won't be long before your external hard drive works again.
Related Articles
- Apr 25, 2025How to Reformat BitLocker Encrypted Hard Drive – A Comprehensive Guide
- Mar 19, 20252025 Guide: Fix WD External Hard Drive Not Mounting on Mac [11 Solutions]
- Mar 11, 2025How to Format a Seagate Backup Plus Drive on Windows or macOS?
- Dec 18, 2024External Hard Drive Works on Windows, but Not Working on Mac: 7 Solutions to Fix It
- Feb 09, 2025Fix Corrupted SanDisk Drive Without Losing Data: A Comprehensive Guide
- Mar 31, 2025[11 Fixes] Fix Seagate External Hard Drive Not Recognized by Mac – Guide 2025

Christina
Christina is the senior editor of Donemax software who has worked in the company for 4+ years. She mainly writes the guides and solutions about data erasure, data transferring, data recovery and disk cloning to help users get the most out of their Windows and Mac. She likes to travel, enjoy country music and play games in her spare time.

Gerhard Chou
In order to effectively solve the problems for our customers, every article and troubleshooting solution published on our website has been strictly tested and practiced. Our editors love researching and using computers and testing software, and are willing to help computer users with their problems
