
Written byLucienUpdated on Jul 03, 2025
How to Reformat Time Machine Drive?
Approved byGerhard Chou
Before we start: After upgrading to a new disk, you may need to reformat an old Time Machine backup disk. You can reset the disk for other usages. However, if you will resell or donate the drive, it's necessary to wipe data permanently with data wiping tool, like Donemax Data Eraser for Mac.
PAGE CONTENT:
The backup disk you use with Time Machine will eventually become full. While Time Machine is smart about backing up updated data, the storage device will eventually get full.
Time Machine will first back up everything on your starting Disk of Mac OS. After that, Time Machine stores backups every hour, every day, and every week. If you make changes to the same file several times, Time Machine save multiple copies of the file in your backup set. Then you can easily revert to an earlier version if necessary.
WWhen your backup disk becomes full, Time Machine will immediately begin erasing earlier copies, starting with the oldest. When this begins, you will receive a warning of the age of your oldest remaining backup. As long as Time Machine keeps the most current version in the backup, you likely don't need all the earlier versions of altered files.
What format does Mac Time Machine use?
Mac Time Machine uses disk in either APFS or APFS Encrypted. Users must first format a fresh disk as APFS if they pick a blank disk. But why exactly is the Time Machine format necessary?
A well-known file system format is the disk format. File system the arrangement of your files on the hard Disk. In addition, the format controls how your Mac's Time Machine interprets the disk drive's contents while reading and writing data. The quality of the Time Machine disk's format is, thus, crucial.
How to connect the Drive to the Time Machine?
Here are the steps to connect the disk in your new computer to your Time Machine:
Verify that you have successfully restored your backup onto the new computer. Verify once more that everything is on the internal disk, even though you should have all your backups.
First, locate where are the backups. You can access Time Machine backup database by double-clicking the 'Backups.backupdb' in Finder. Double-click if there is just one folder with your computer's name.
When you see the link labeled Latest at the bottom of the page, click it twice. At this point, double-click the directory that includes your hard drive's name.
Go to the View menu and pick Show Path Bar. You should notice something at the bottom of the Finder window.
★ Backup with Time Machine:
- When you plug in a freshly formatted external hard drive, macOS will ask whether you want to utilize it for Time Machine backups. In the resulting box, click Use as Backup Disk to launch Time Machine and begin the first backup. If no such prompt information, you can also manually switch to a different one. Go to System Settings (or System Preferences) > General > Time Machine.
Create a New Drive or Erase Your Backup Drive
As we've covered, Time Machine's ability to keep track of file revisions is a nice perk. You can utilize Time Machine to restore everything in the case of a disk failure. Also, you can go back to such old versions. If theyour data's historical versions is meaningless, formatting a new disk to starti over is a smart option.
Risky as it may be, wiping your current disk will leave you without a Time Machine backup until your new drive is ready. If the disk has already reached capacity, it will likely do so again, and soon, unless you remove some huge folders.
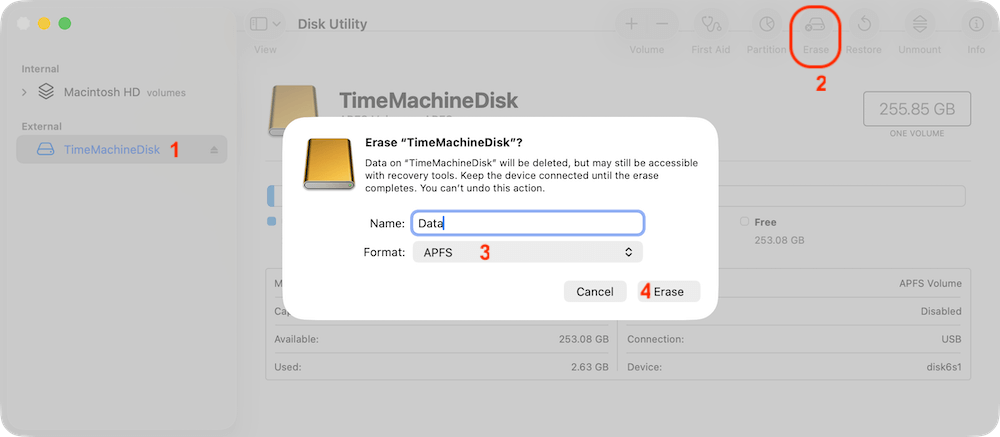
To process in this method, go to Applications folder, and then Utilities folder, open Disk Utility. Navigate to the Time Machine disk in the left pane, and click the Erase button. After that, choose the drive you just formatted in Time Machine's options. You might have to go to the Backup Disks section and choose it before you can remove it.
Getting a new, larger backup drive and starting again is simpler and more practical, if more costly. Connect the new drive, then go to Time Machine's options and click the Select Disk button.
Reformat Time Machine Drive with Donemax Data Eraser
Disk Utility can help you reformat Time Machine drive and remove the data on the drive . However, you can recover the data with data recovery software. To permanently wipe data before you sell/donate the Time Machine drive, use Donemax Data Eraser.
Donemax Data Eraser for Mac
- Format hard drive and wipe all data permanently.
- Destroy data securely to avoid data recovery.
- Support international data erasure standards.
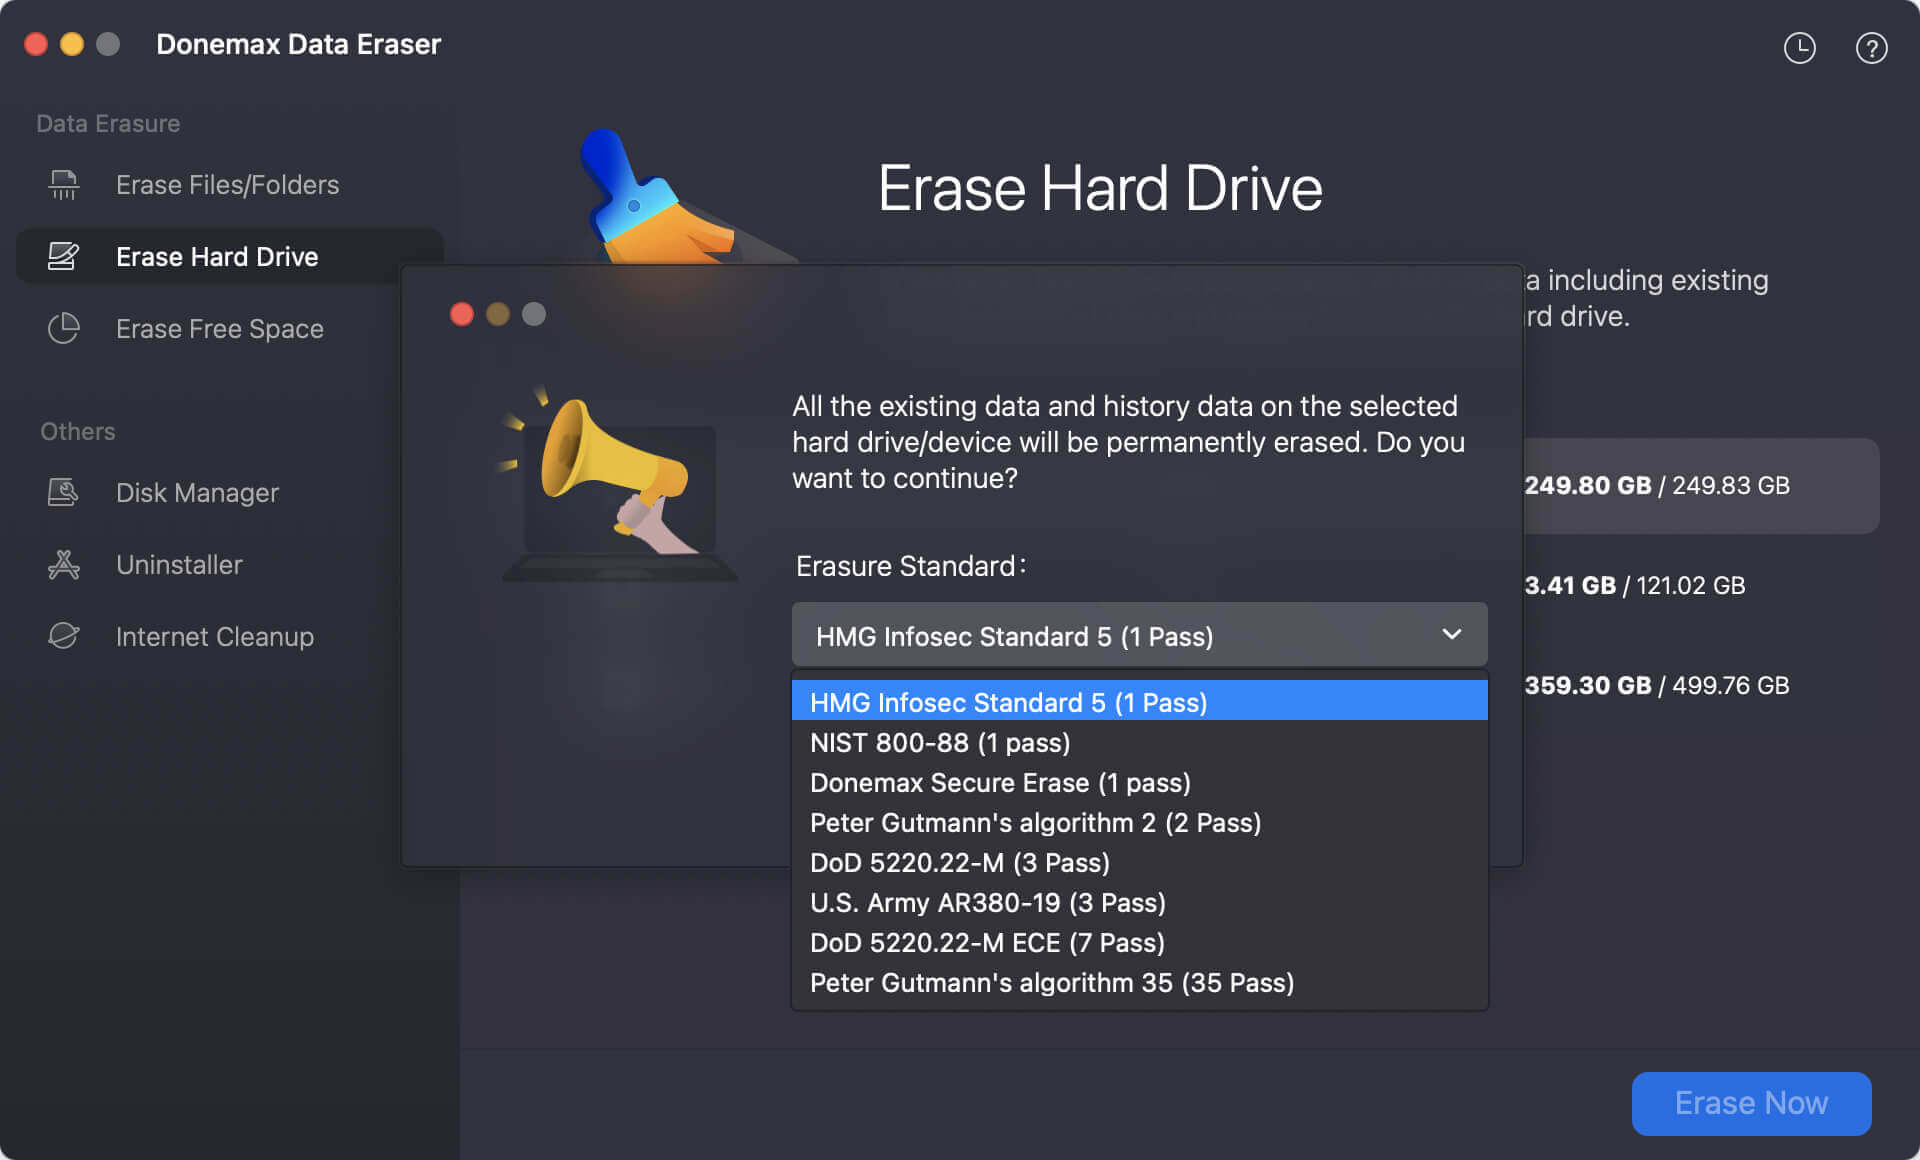
Donemax Data Eraser offers military/government level data erasure standards. It supports the following standards:
- HMG Infosec Standard 5 (1 pass)
- Peter Gutmann's algorithm 2 (2 passes)
- U.S. Army AR380-19 (3 passes)
- DoD 5220.22-M ECE (7 passes)
- Peter Gutmann's algorithm 35 (35 passes)
To permanently erase data from the Time Machine backup drive, try this software.
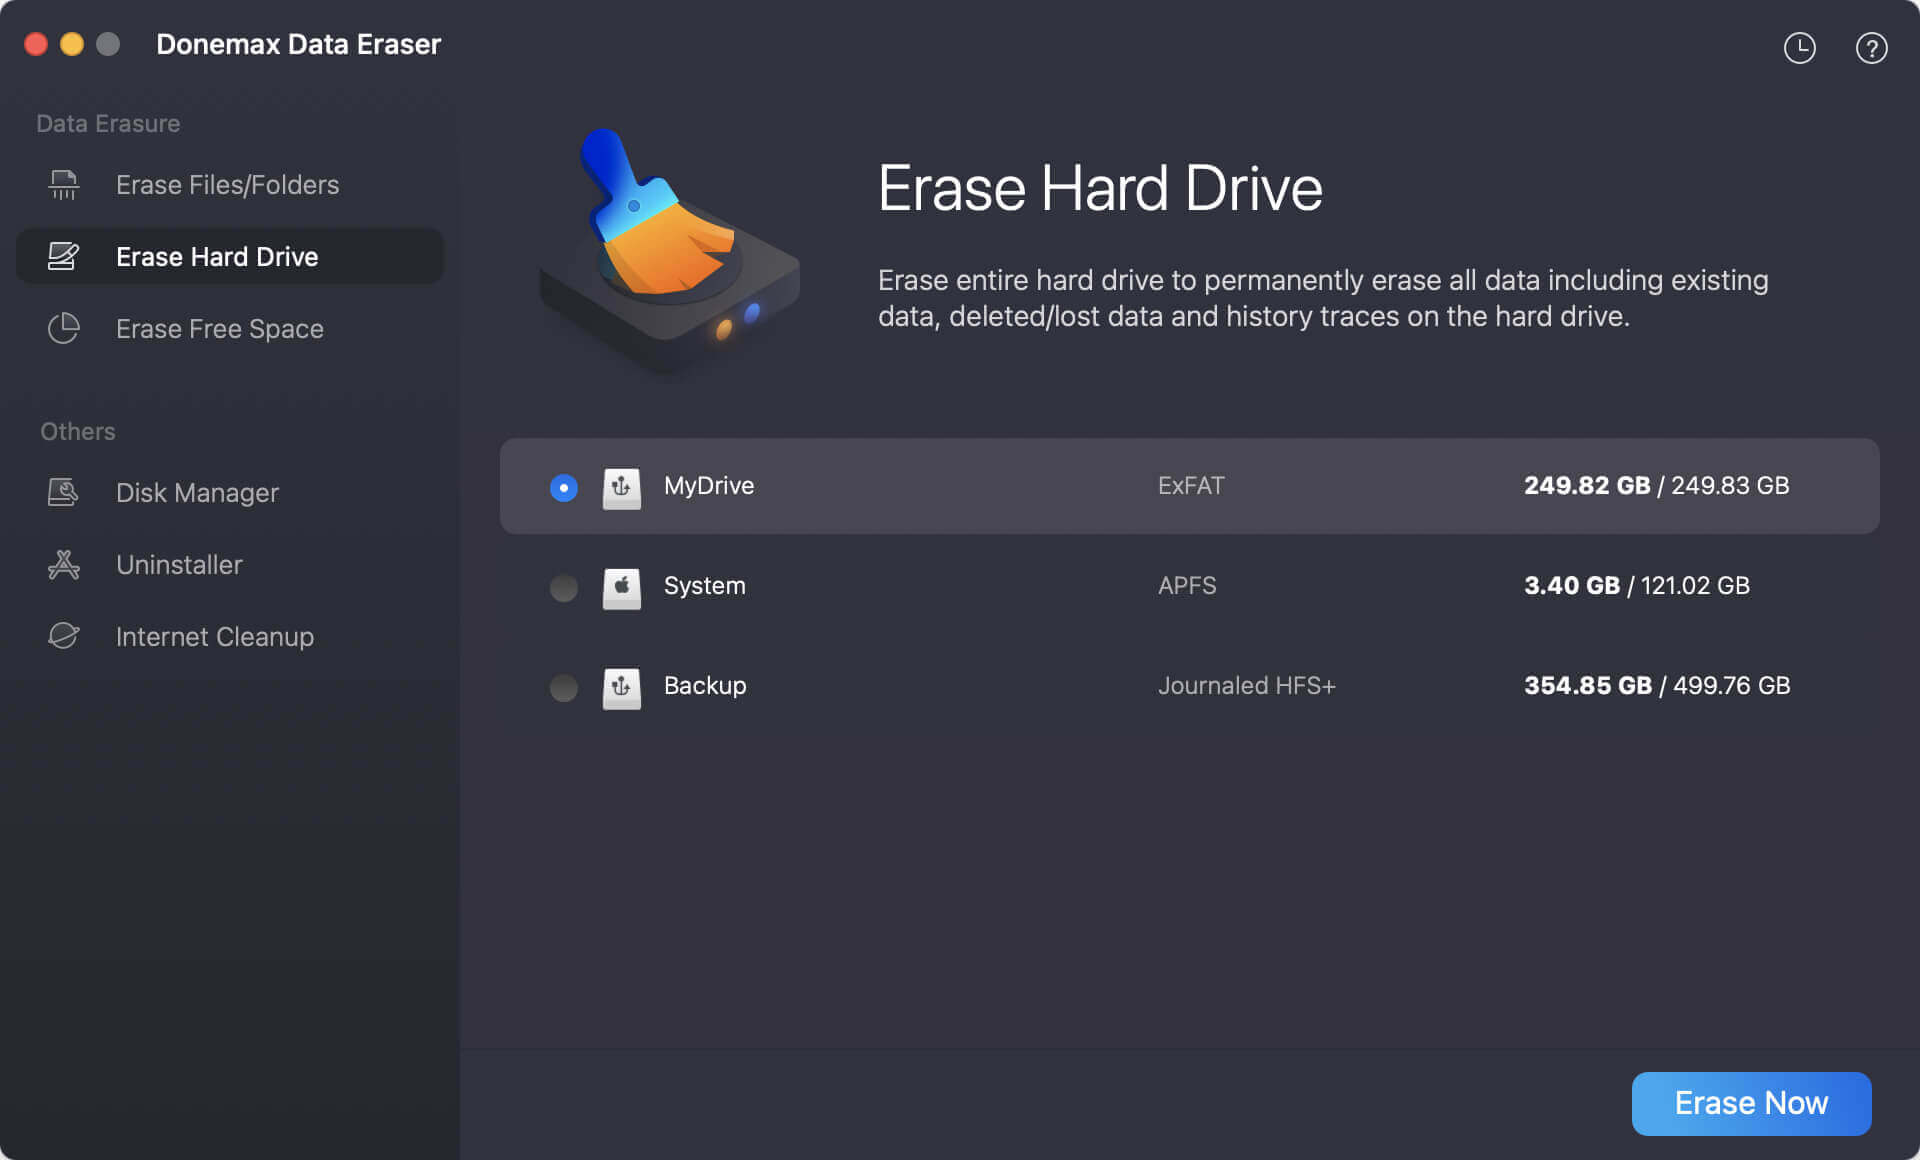
Step 1. Open Donemax Data Eraser and choose Erase Hard Drive mode.
Step 2. Select the Time Machine backup drive and click on Erase Now button.
Step 3. Choose a data erasure standard and then click Continue button to start the formatting and wiping process.
Then this software will format the Time Machine backup drive and wipe all data permanently.
Conclusion:
Your Mac has a built-in backup system called "Time Machine." Time Machine is compatible with local hard drives, Time Capsules, and supported network volumes on Macs.
When you connect an external hard drive to your Mac, operating system will ask to use it for Time Machine or not. Just choose "Use as Backup Disk." To encrypt your backups, only those who know the password may access them.
To reformat the Time Machine backup drive, just open Disk Utility, select the drive and choose Erase. Or, download a disk erasure software to help you wipe the Time Machine backup drive to permanently erase data from it.
Donemax Data Eraser for Mac
100% safe and powerful Mac data erasure program. It offers certified data erasure standards including U.S. Army AR380-19, DoD 5220.22-M ECE to securely and permanently erase data from Mac HDD/SSD and external storage devices, making data recovery impossible.
Related Articles
- Jan 04, 2026How to Format LaCie External Hard Drive for Mac?
- Jun 30, 2025How to Delete Backup Disk in Time Machine?
- Jan 12, 2024How to Format Kingston XS1000/XS2000 External SSD on Mac?
- Aug 03, 2023How to Fix A Corrupted Hard Drive on Mac?
- Dec 12, 20244 Methods to Fix Seagate External Hard Drive Read-Only on Mac
- Feb 20, 2025How to Repair Apacer USB Flash Drive Without Losing Data?

Contributing Writer
Lucien
Lucien is a writer and a chief programmer of Donemax software who has worked in the company for 5+ years. He has written much of the content on the site and devotes to providing troubleshooting and solution for Windows and Mac users including disk cloning, data recovery, migration, eraser, error fixes.

Editor in chief
Gerhard Chou
In order to effectively solve the problems for our customers, every article and troubleshooting solution published on our website has been strictly tested and practiced. Our editors love researching and using computers and testing software, and are willing to help computer users with their problems