
Written byCharlesUpdated on Sep 09, 2025
How to Delete A Partition on SSD without Losing Data?
Approved byGerhard Chou
Before we start: Before deleting a partition on SSD, it's necessary to back up or clone the partition with Donemax Disk Clone or other tools. Then you can safely delete the partition without losing data.
PAGE CONTENT:
SSDs have revolutionized data storage by providing faster speeds, increased dependability, and greater efficiency than conventional hard drives. While they excel in performance, managing partitions on SSDs can sometimes be necessary—whether to reorganize storage, prepare for a dual-boot setup, or fix software conflicts. However, this task comes with risks, especially if you want to delete a partition on SSD without losing data.

In this guide, we will explore everything you need to know about deleting a partition on SSD safely, without losing your data. From understanding SSD partitions to step-by-step deletion methods and post-deletion practices, this article covers it all.
Understanding SSD Partitions
Before diving into the technical steps, it's essential to understand what a partition is. A partition is a logical division of a storage drive, allowing you to separate data types, install multiple operating systems, or manage recovery environments. On an SSD, these partitions can include:
- Primary Partition: Contains the operating system or user data.
- Logical Partition: Resides within extended partitions, useful for organizing data.
- EFI System Partition (ESP): Used for booting UEFI-based systems.
- Recovery Partition: Contains tools and images for system recovery.
Managing partitions allows flexibility, but deleting them improperly can result in data loss or system failure. Therefore, it's crucial to identify which partition to remove and ensure it's not in use or essential for the OS.
Precautionary Steps before Deleting a Partition on SSD
Data loss often occurs not because the tools fail, but due to human error. To ensure that deleting a partition doesn't affect your files or operating system, follow these essential precautions:
1. Backup Your Data
Before making any modifications:
- Use Windows File History, OneDrive, or third-party tools like Donemax Disk Clone to back up your data.
- Store the backup on an external hard drive or cloud storage for added safety.
2. Identify the Partition You Want to Delete
Open Disk Management (diskmgmt.msc) and locate the target partition. Common naming conventions:
- OS partition: usually labeled "C:"
- Recovery partition: typically has no drive letter
- Data partitions: labeled as D:, E:, etc.
Never delete a partition unless you're 100% sure it doesn't contain vital files or OS components.
3. Check for Hidden/System Files
Sometimes, critical files or folders are hidden. Enable visibility in File Explorer:
- Go to View → Show → Hidden items
- Check for system files and confirm nothing critical resides in the partition you plan to delete
Methods to Delete a Partition on SSD without Losing Data
There are multiple safe ways to delete a partition on an SSD. Your choice depends on your comfort level with system tools and whether you're using Windows built-in utilities or third-party software.
Method 1. Using Windows Disk Management (Beginner-Friendly)
Windows has a built-in partition management tool that allows basic operations like deleting and extending volumes. Here's how to use it:
Step-by-Step:
- Press Windows + X and select Disk Management.
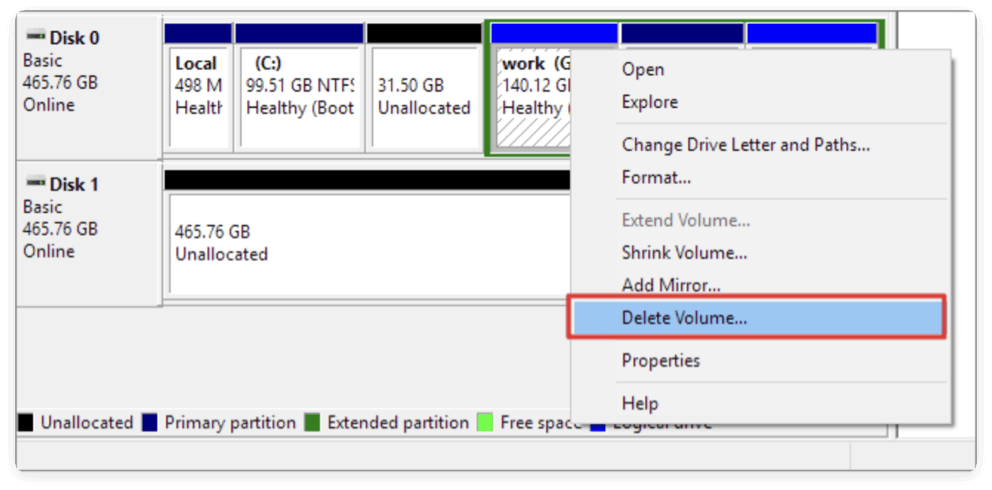
- Find the partition that you wish to remove. To delete the volume, right-click on it and select Delete Volume.
- Confirm the action in the pop-up warning. The partition will become Unallocated.
- You can now extend adjacent partitions or create a new one using the unallocated space.
Caution:
- You can't delete system or recovery partitions from here unless booted from external media.
- Adjacent partitions must be present to extend space.
Method 2. Using DiskPart (Command-Line Tool for Advanced Users)
DiskPart provides more control over disk partitions, but it requires extra caution.
How to Use DiskPart:
- Press Windows + R, type cmd, and run Command Prompt as Administrator.
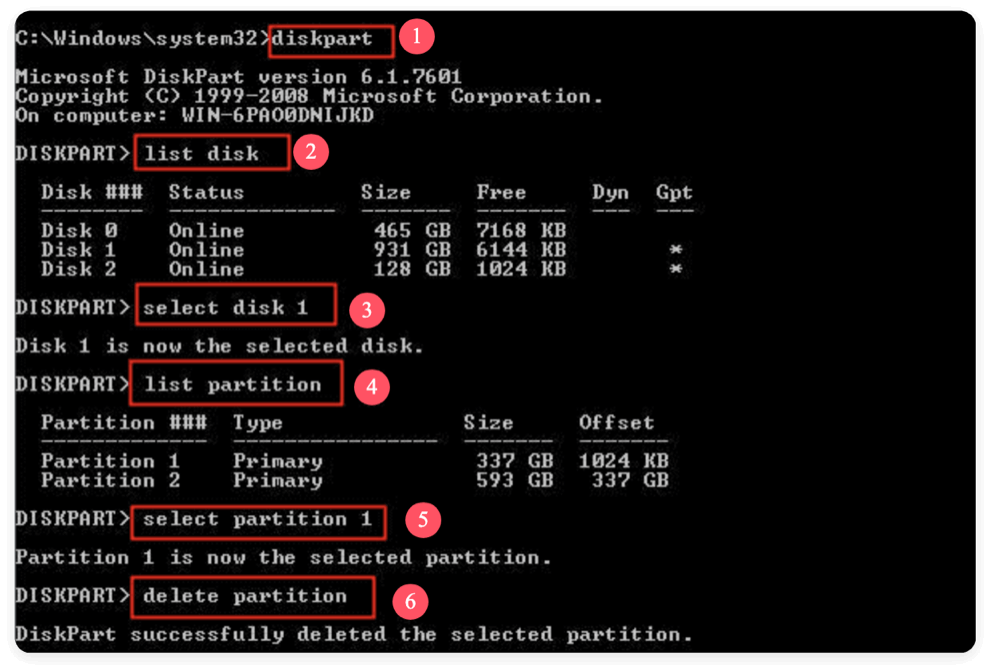
- Type diskpart and hit Enter.
- Type list disk to view available drives.
- Select your SSD: select disk 1 (replace 1 with your actual disk number).
- Type list partition to view all partitions.
- Select the target: select partition 1
- Delete it: delete partition
Additional Notes:
- To delete protected partitions (e.g., recovery), you may need to use delete partition override.
- Be 100% sure about the partition index to avoid deleting the wrong one.
Method 3. Using Third-Party Partition Tools (Safe and Feature-Rich)
Several third-party tools offer more advanced options, including preview modes and built-in data protection. These tools are ideal for beginners who want a safer and more intuitive experience.
Recommended Tools:
- MiniTool Partition Wizard
- AOMEI Partition Assistant
Steps (MiniTool Example):
- Download and install the software.
- Open the application and find your SSD.
- Choose Delete with a right-click on the target partition.
- Click Apply on the top-left toolbar to execute changes.
- The partition will be deleted, and space will show as unallocated.
These tools often include built-in recovery features in case something goes wrong.
Common Mistakes to Avoid
Avoid these pitfalls to ensure a smooth experience:
1. Deleting the Wrong Partition
Always double-check the partition label, size, and contents. Mistakes are hard to undo.
2. Not Backing Up Data
Even if you're only deleting a small partition, adjacent partitions or metadata could be affected.
3. Overwriting System or Boot Partitions
These may not appear as easily recognizable partitions. If deleted, your system won't boot.
4. Misusing DiskPart or Command-Line Tools
A single mistyped command can result in data loss. Use GUI tools if you're unsure.
5. Interrupting the Deletion Process
Avoid power outages or forced shutdowns during partition changes. Use a laptop on battery or ensure your PC is on a UPS.
How to Ensure No Data Is Lost while Deleting Partition on SSD?
Even with precautions, mistakes can happen. Here are several tips to minimize the risk of data loss:
1. Backup, Backup, Backup
We cannot emphasize this enough. Take a full system image, clone the partition, or at least back up your essential files.
2. Only Delete Non-Critical Partitions
If the partition contains your operating system, boot loader, or recovery files, deleting it will render your system unbootable. These partitions usually lack a drive letter or are marked as "System" or "Boot."
3. Use Tools with a Preview Mode
Third-party tools often let you preview operations before applying them. Use this to double-check your selection.
Post Steps after Deleting Partition on SSD
Once you've successfully deleted the partition, there are a few optional but important steps to follow:
1. Reallocate or Extend Unallocated Space
A. Extend an Existing Partition
If the unallocated space is adjacent to another partition (e.g., your C: drive), you can extend that partition to include the unallocated space.
Steps using Disk Management:
- Open Disk Management (Windows + X → Disk Management).
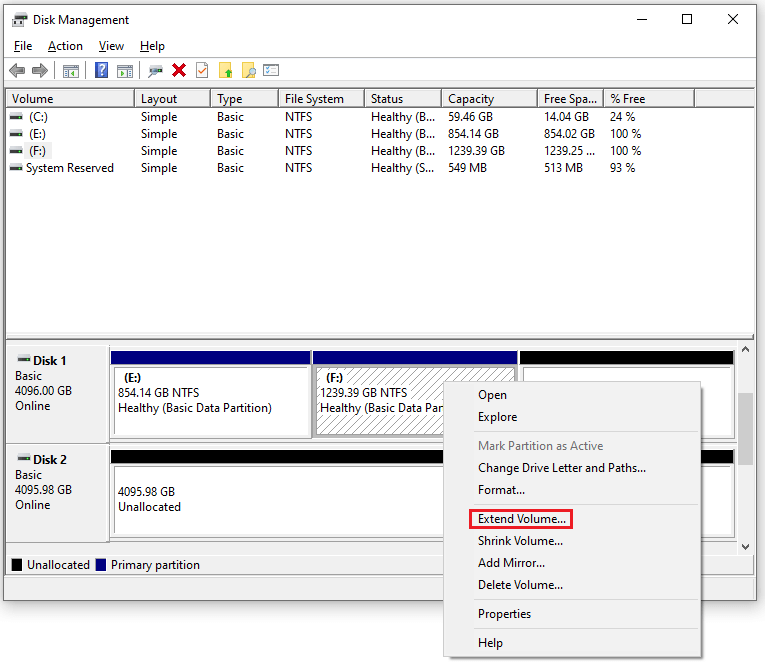
- Right-click the partition you want to extend (e.g., C:).
- Select Extend Volume…
![delete a partition on SSD safely]()
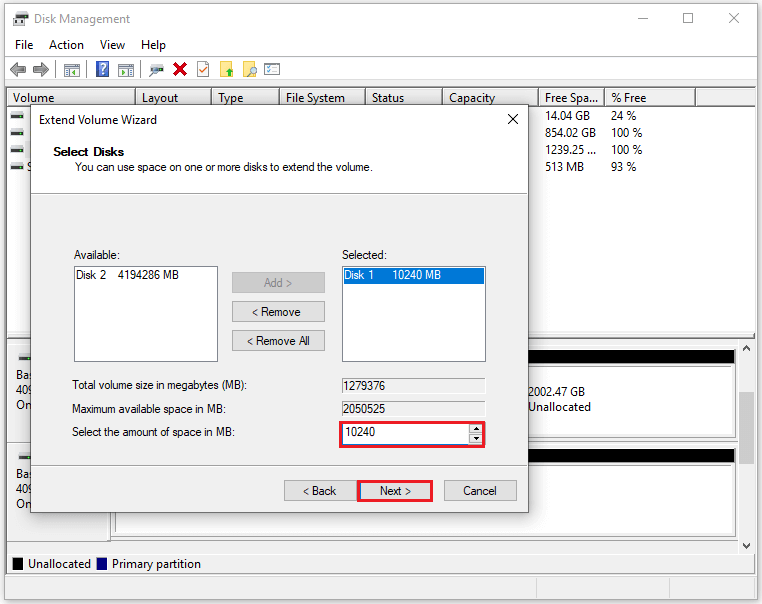
- The Extend Volume Wizard will open. Select the amount of space to add (usually the full size available) and click Next → Finish.
![delete a partition on SSD safely]()
💡 Note: You can only extend a partition if the unallocated space is immediately adjacent and to the right. If it's not, you'll need to use a third-party tool like MiniTool Partition Wizard or AOMEI Partition Assistant to move and merge partitions.
B. Using Third-Party Tools to Extend Non-Adjacent Partitions
When Disk Management won't let you extend due to unallocated space not being adjacent, third-party tools come to the rescue.
Example with MiniTool:
- Open MiniTool Partition Wizard.
- Right-click the partition you want to extend and select Extend.
- Choose the unallocated space, regardless of its position.
- Preview changes, click Apply, and confirm.
These tools allow dynamic resizing, moving partitions, and even reshuffling the partition map without data loss.
2. Create and Format a New Partition
If you prefer to keep the deleted space separate rather than merging it, you can create a new partition.
Steps to Create and Format a New Volume:
- Go to Disk Management.
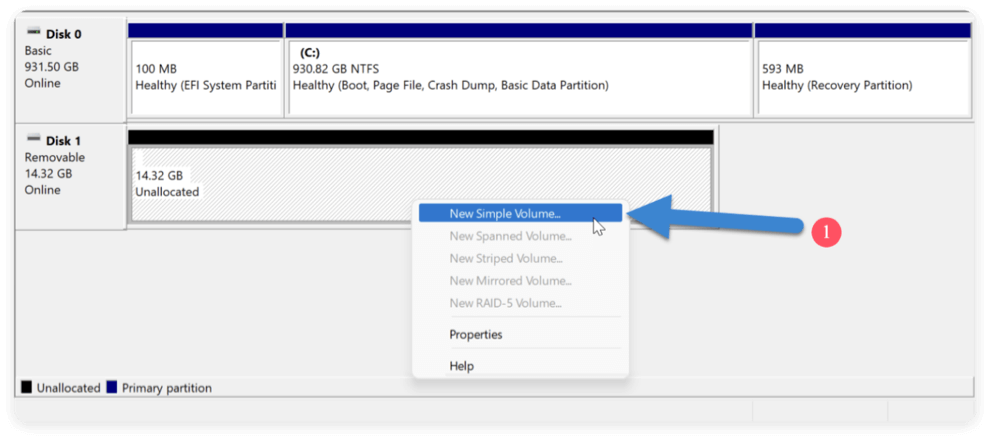
- To enable New Simple Volume, right-click on the Unallocated space and choose it.
![delete a partition on SSD safely]()
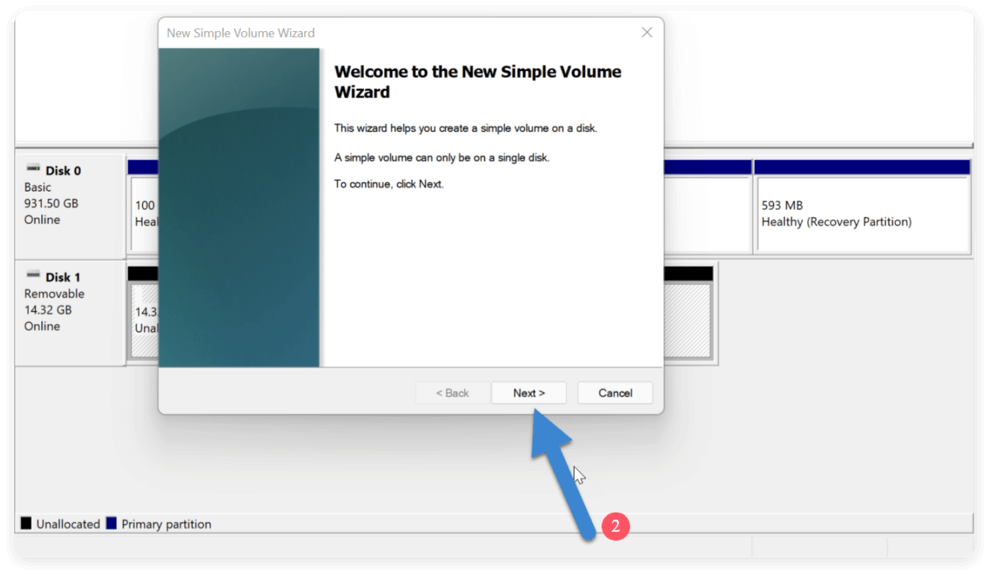
- It will launch the New Simple Volume Wizard.
![delete a partition on SSD safely]()
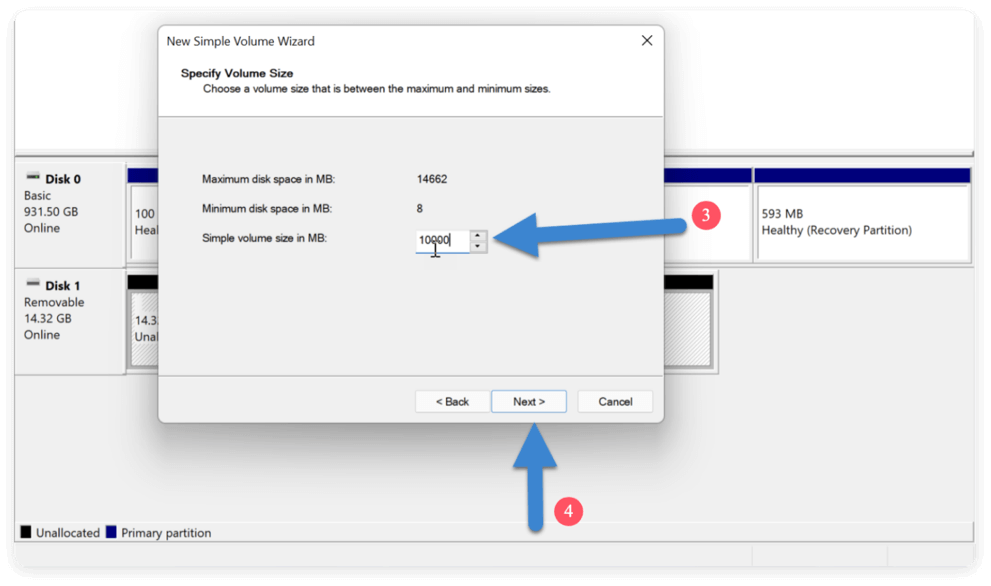
- Use the entire area or specify the new partition's size.
![delete a partition on SSD safely]()
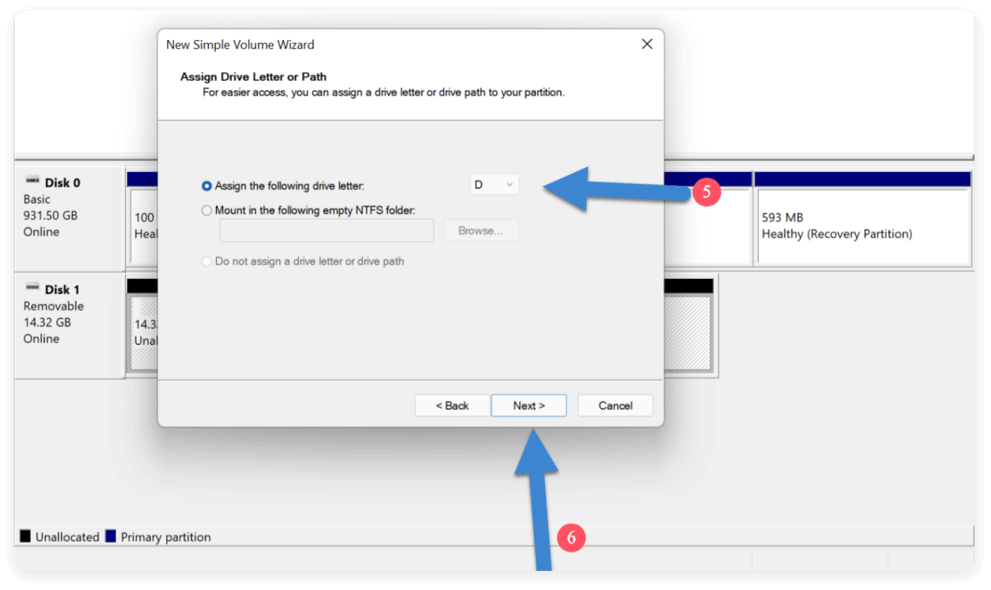
- Designate a drive letter, such as D: or E:.
![delete a partition on SSD safely]()
- Choose NTFS as the file system (ideal for Windows) and keep the default allocation unit size.
- Name the volume (e.g., "New Storage") and check Perform a quick format. Click Next → Finish.
![delete a partition on SSD safely]()
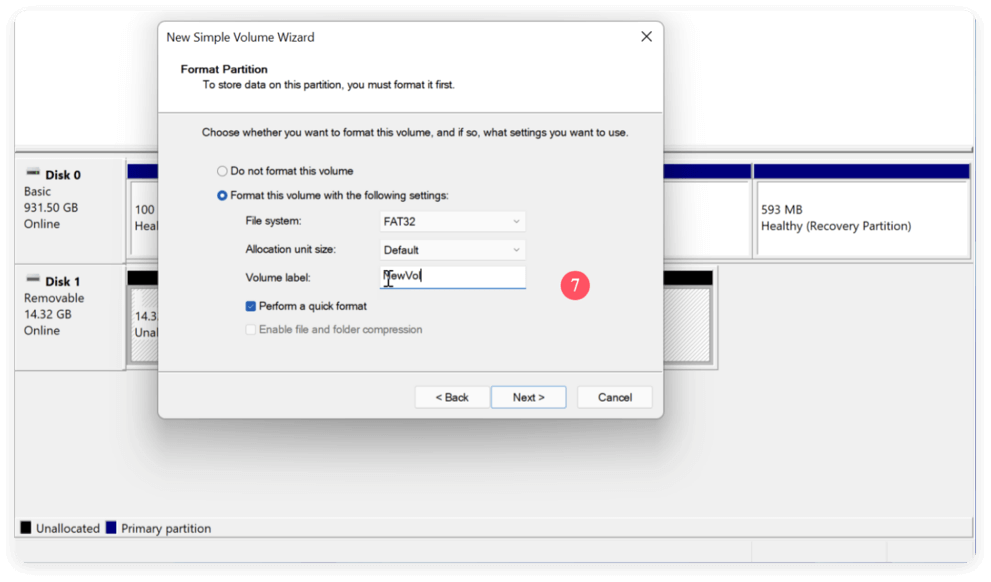
Your new partition will now appear in File Explorer, ready for use.
3. Check SSD Health and File System Integrity
Making major changes to disk partitions can sometimes lead to hidden issues. It's a good idea to verify the SSD's health and ensure the file system is intact.
A. Use Windows CHKDSK Utility
CHKDSK (Check Disk) scans your drive for file system errors and attempts to fix them.
Command to run:
chkdsk C: /f
- C: is the drive letter to check.
- /f tells CHKDSK to fix any found errors.
You may be prompted to schedule the scan on the next reboot if the drive is in use.
B. Use SSD Manufacturer Tools
Many SSD manufacturers offer specialized software to monitor drive health:
- Samsung SSDs: Samsung Magician
- Crucial SSDs: Crucial Storage Executive
- Western Digital SSDs: WD Dashboard
These tools typically offer:
- SMART monitoring (Self-Monitoring, Analysis and Reporting Technology)
- Temperature and wear level indicators
- Firmware updates
- Performance optimization
C. Use Third-Party Diagnostic Tools
For an independent health check:
- CrystalDiskInfo – Free tool to display SSD health status.
- Hard Disk Sentinel – Offers real-time monitoring and alerts.
- GSmartControl – Provides detailed SMART data with health predictions.
4. Update Your Backups and Disk Map
After deleting or resizing partitions:
- Recreate your backup image to reflect the new disk structure.
- Update your partition layout documentation (if you maintain one).
- If using backup software with incremental backups, you may need to reconfigure backup paths due to changes in drive letters or volume GUIDs.
5. Reboot and Confirm Changes
Finally, reboot your system to let Windows adjust to the changes in the partition table. After reboot:
- Open File Explorer and ensure your drives are accessible.
- Open Disk Management to verify partition structure.
- Launch your most important apps or services to check for issues.
Conclusion
Deleting a partition on an SSD doesn't have to be risky or complicated—as long as you take the right precautions and use the appropriate tools. Whether you're reorganizing your drive or preparing for a new setup, the key to success is understanding what you're modifying, backing up data, and proceeding methodically.
For most users, the safest approach is to use a third-party partition manager that offers a visual interface and rollback options. However, built-in tools like Windows Disk Management or DiskPart work just as well for those comfortable with a bit more complexity.
Partition management is a powerful way to maintain and optimize your SSD, but with great power comes the responsibility of safeguarding your data. So take your time, plan carefully, and you can confidently delete a partition on your SSD—without losing a single file.
Donemax Disk Clone
An award-winning disk cloning program to help Windows users and Mac users clone HDD/SSD/external device. It also can create full bootable clone backup for Windows PCs and Macs.
Related Articles
- May 14, 2025Fix Error Code 0xc0000225 on Windows 7/8/10/11& Mac
- Sep 01, 2025How to Fix Dead WD External HDD or SSD?
- Apr 18, 2025How to Format a Drive to exFAT by Using CMD (Command Prompt - diskpart)?
- Jul 02, 2025Format 32GB/64GB/128GB/256GB SD Card to ExFAT/FAT32
- Apr 29, 2026How to Initialize SSD on Windows 11/10: Ultimate 2026 Guide
- Mar 06, 2026How to Reinstall macOS Tahoe – Complete Guide 2026

Contributing Writer
Charles
Charles, who lives in Sydney, Australia, is an editor & writer of Donemax Team. He is good at writing articles related with Apple Mac computers, Windows operating systems, data recovery, data erasure, disk clone and data backup, etc. He loves reading and playing tennis in his spare time and is interested in testing new digital devices such as mobile phones, Macs, HDDs, SSDs, digital cameras, etc.

Editor in chief
Gerhard Chou
In order to effectively solve the problems for our customers, every article and troubleshooting solution published on our website has been strictly tested and practiced. Our editors love researching and using computers and testing software, and are willing to help computer users with their problems