
Written byCharlesUpdated on Apr 29, 2026
How to Initialize SSD on Windows 11/10: Ultimate 2026 Guide
Approved byGerhard Chou
Before we start: Follow the guide to initialize an SSD smoothly on Windows 11/10 in different scenarios. If there are data loss, recover the data first with Donemax Data Recovery, and then initialize or fix the SSD.
PAGE CONTENT:
You've just unboxed a brand-new, lightning-fast SSD. You plug it into your PC, boot up Windows, and... nothing. The drive doesn't show up in "This PC." Before you panic and think the drive is broken, take a breath—it's likely just "uninitialized."
Initializing an SSD is the digital equivalent of "registering" a new book in a library. Without that initial stamp, Windows doesn't know how to read or write to it. In this guide, we'll walk you through how to initialize SSD on Windows using the easiest methods possible, while ensuring your data stays safe.
What Does It Mean to Initialize an SSD?
When you initialize an SSD, you are setting up its partition style. This tells Windows where the drive begins and ends. During this process, you'll choose between two styles:
- GPT (GUID Partition Table): The modern standard. It's required for Windows 11 and drives larger than 2TB.
- MBR (Master Boot Record): The "classic" version for older computers (pre-2015).
Summary Table: GPT vs. MBR
Feature |
GPT (Recommended) |
MBR (Legacy) |
|---|---|---|
Max Capacity |
Up to 18 EB (Exabytes) |
2 TB |
Partition Limit |
Up to 128 |
4 Primary |
Compatibility |
Windows 11, 10, UEFI |
Windows XP/7, Older BIOS |
|
Reliability |
High (Stores multiple copies) |
Low (Single point of failure) |
🪧 Pro Tip: If you're using a modern PC or Windows 11, always choose GPT.
Method 1: Using Disk Management (The Easiest Way)
For 99% of home users, Disk Management is the best tool. It's built into Windows and provides a visual interface that's hard to mess up.
Step 1: Open Disk Management
Right-click the Start button and select Disk Management. Alternatively, press Windows + R, type diskmgmt.msc, and hit Enter.
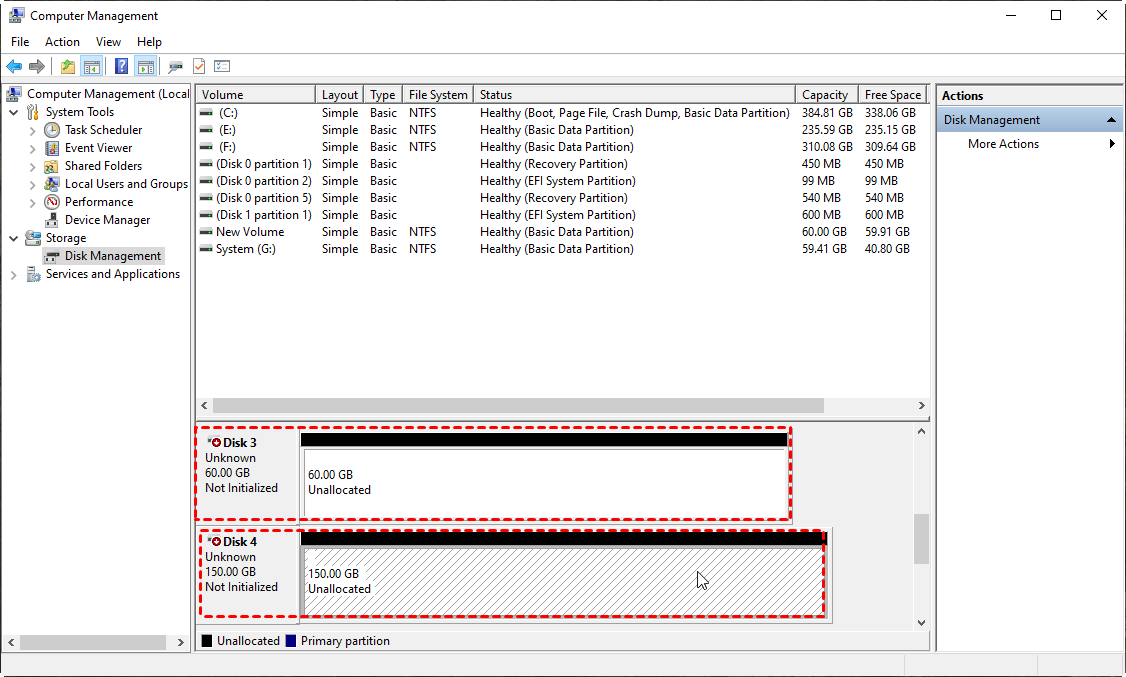
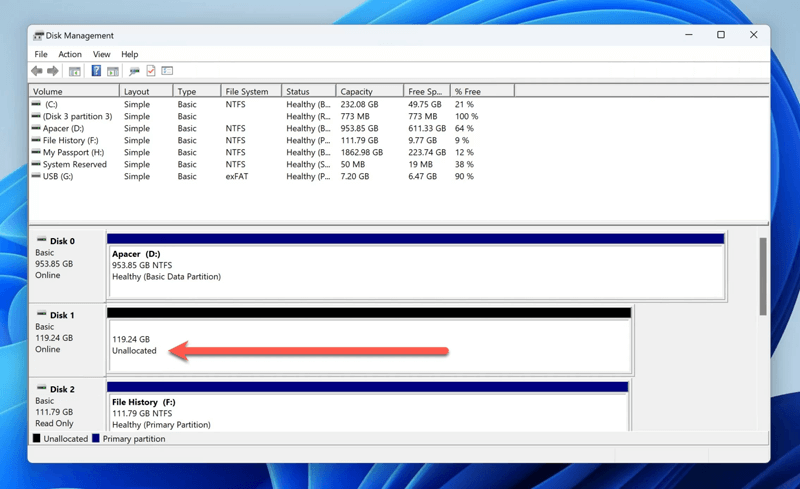
Step 2: Locate the "Unknown" Disk
Once the window opens, scroll down. You'll see a disk labeled as "Disk [Number], Unknown, Not Initialized" with a black bar representing unallocated space.
Step 3: Trigger the Initialization
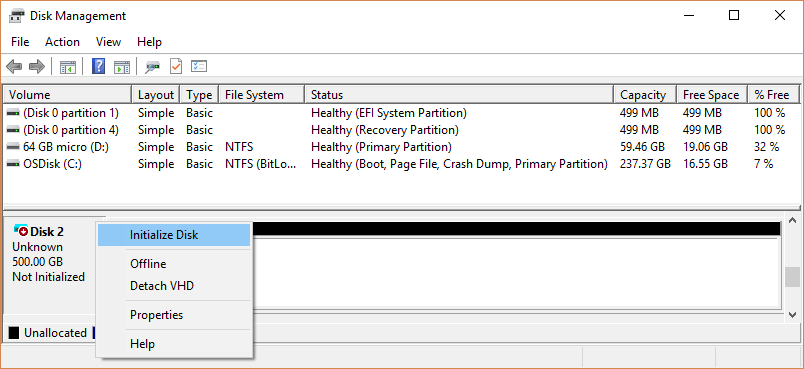
Usually, a popup will appear automatically saying "You must initialize a disk before Logical Disk Manager can access it." Or you can manually start the initialize process:
- Select the disk. Right click it and choose Initialize Disk.
![initialize SSD on Windows 11/10]()
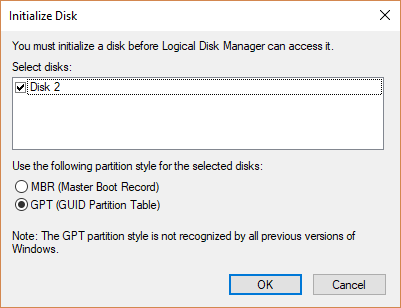
- Choose GPT (GUID Partition Table) or MBR (Master Boot Record). Click OK.
![initialize SSD on Windows 11/10]()
Once initialized, the disk will show as Online and Unallocated.
Step 4: Create a New Volume (Making it Usable)
The drive is now initialized, but it still won't show up in File Explorer until it has a "Volume."
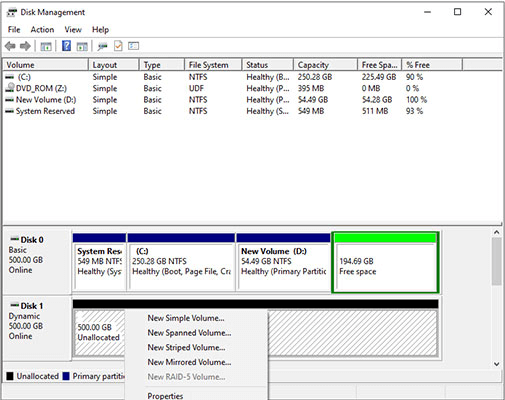
- Right-click the Black Bar (Unallocated space). Select New Simple Volume.
![initialize SSD on Windows 11/10]()
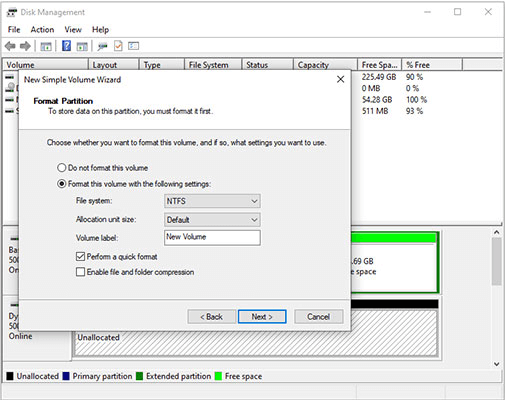
- Follow the wizard: click Next, assign a drive letter (like E: or F:), and choose NTFS as the file system. Click Finish.
![initialize SSD on Windows 11/10]()
Now, your SSD is ready to store games, photos, and files!
Method 2: Using DiskPart (For Power Users)
If Disk Management freezes or gives you an error, the Command Prompt (DiskPart) is your best friend. It's more powerful and can "force" an initialization.
💡 Warning: Be extremely careful to select the correct disk number, as this method can wipe data instantly if you pick the wrong drive.
- Type cmd in the Start search, right-click it, and Run as Administrator.
- Type diskpart and press Enter.
- Type list disk to see all connected drives. Look for the one that matches your SSD's size.
- Type select disk X (Replace X with your disk number, e.g., select disk 1).
- Type clean (This wipes any hidden corrupted partitions).
- Type convert gpt.
- Type create partition primary.
- Type format fs=ntfs quick.
- Type assign to give the partition a drive letter.
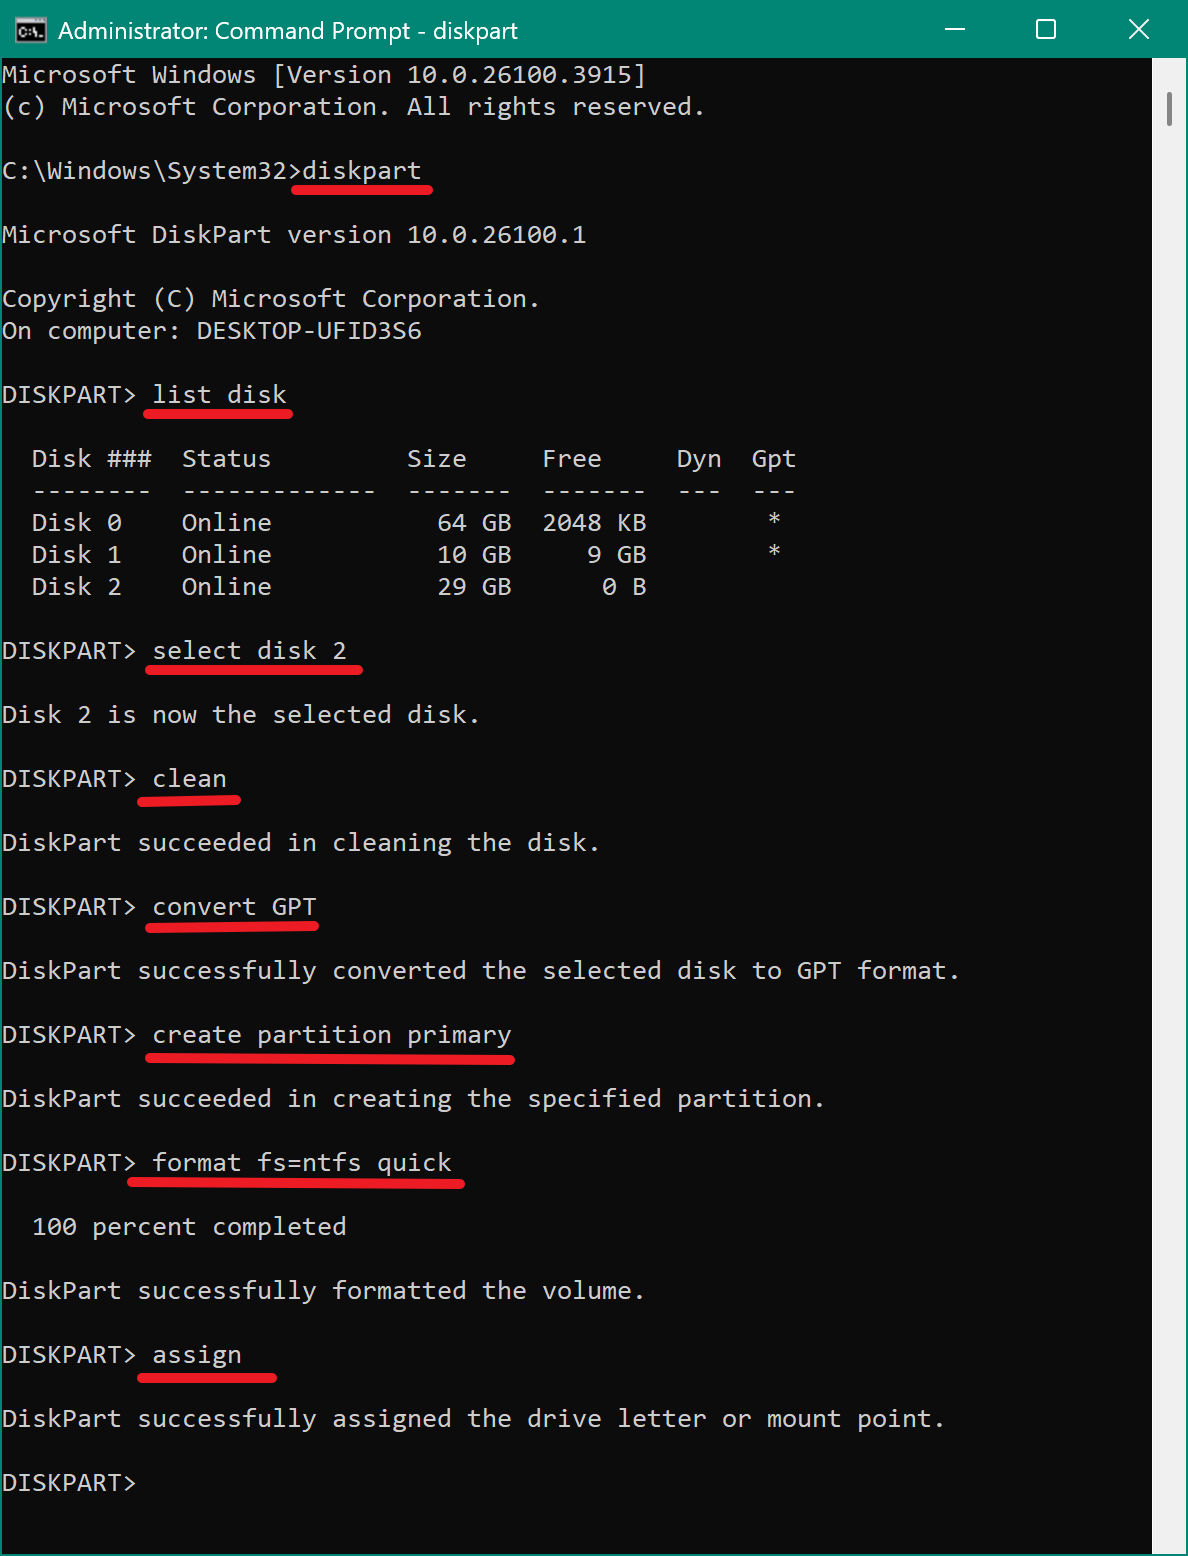
Done! Your SSD is now active and formatted.
Method 3: How to Initialize SSD Without Losing Data
Sometimes, an old SSD suddenly says "Not Initialized." This usually happens due to a corrupted partition table. Do NOT initialize it yet, as that will wipe your files.
Safety First: Recover Data Before Fixing
If your drive contains family photos or work documents, use a tool like Donemax Data Recovery. It can scan "Uninitialized" or "Unallocated" spaces to find your files before you perform the "clean" or "initialize" commands.
Donemax Data Recovery
- Reliable data recovery software for Windows 11/10/8/7 and macOS systems.
- Recover lost data from SSD, HDD, USB flash drive, memory card, etc.
- Easy-to-use and 100% safe data recovery tool.
The software is easy to use with intuitive interface. You can get back the lost files from the uninitialized disk quickly with only a few clicks. Here is how:
Step 1. Start the software by double clicking the shortcut from the desktop. Then just select the uninitialized SSD where you lost data.

Step 2. The software will search for all the possible recoverable files from the SSD after you click on the Scan button.

Step 3. Donemax Data Recovery will list all the found files once the scan is completed. Preview and check to locate the wanted files. Click Recover button to save the files to another drive.

Once your data is safe, go back to Method 1 or Method 2 and initialize the disk.
Troubleshooting: "Initialize Disk" is Grayed Out?
If you right-click the disk and the option to initialize is grayed out, or the SSD isn't detected at all, try these fixes:
- Check the Connection: For SATA drives, swap the cable. For NVMe SSDs, try re-seating the drive in its slot.
- Update Drivers: Open Device Manager, expand Disk drives, right-click your SSD, and select Update driver.
- Check BIOS: Ensure your computer's BIOS/UEFI settings recognize the hardware. If it doesn't show up in BIOS, the drive may have a physical hardware failure.
- Use a Different USB Port: If it's an external SSD, plug it directly into the motherboard (the back of the PC) rather than a USB hub.
Conclusion
Learning how to initialize SSD on Windows is a skill every PC owner should have. Whether you are adding a second drive for gaming or upgrading your laptop's speed, the process is usually a simple 30-second task in Disk Management.
Quick Recap:
- New drives must be initialized to be seen by Windows.
- GPT is the standard for modern systems.
- Always recover data first if an old drive suddenly asks to be initialized.
If you're still having trouble, or if your SSD was previously used and is now showing errors, using a professional utility like Donemax Data Recovery can save you hours of frustration.
Donemax Data Recovery
Powerful, safe & easy-to-use data recovery software to easily and completely recover deleted, formatted, inaccessible and lost data from PC, Mac, HDD, SSD, USB drive, camera, SD card, RAID and other storage devices.
Related Articles
- May 10, 2025How to Find BitLocker Recovery Key (Unlock Password)?
- Oct 24, 2023How to Use FileVault to Encrypt A Hard Drive on Mac?
- Sep 09, 2025How to Delete A Partition on SSD without Losing Data?
- May 13, 2025How to Install A New SSD on Lenovo Laptop?
- Mar 17, 2025Should I Install Windows 11 24H2? How to Install Windows 11 24H2
- Jan 30, 2026How to Create a bootable USB installer for macOS?

Contributing Writer
Charles
Charles, who lives in Sydney, Australia, is an editor & writer of Donemax Team. He is good at writing articles related with Apple Mac computers, Windows operating systems, data recovery, data erasure, disk clone and data backup, etc. He loves reading and playing tennis in his spare time and is interested in testing new digital devices such as mobile phones, Macs, HDDs, SSDs, digital cameras, etc.

Editor in chief
Gerhard Chou
In order to effectively solve the problems for our customers, every article and troubleshooting solution published on our website has been strictly tested and practiced. Our editors love researching and using computers and testing software, and are willing to help computer users with their problems