Written byChristinaUpdated on Sep 16, 2025
Top 5 Methods to Format External Hard Drive on Windows 11
Approved byGerhard Chou
Before we start: Here are different methods to format external hard drive on Windows 11. If you will resell or give away an old external hard drive, ensure to format it and wipe data permanently with Donemax Data Eraser.
PAGE CONTENT:
Are you trying to format an external hard drive on Windows 11 but don't know where to start? Don't worry—I've been there too. Formatting might sound complicated, but Windows 11 makes it simple with built-in tools. Let me walk you through the methods to format an external hard drive on Windows 11 so you can organize, secure, or repurpose your storage quickly.

First, formatting erases all data and sets up a fresh file system so your drive works smoothly. Whether you want to switch between Windows and Mac (hello, exFAT!) or fix a corrupted drive, this guide has you covered.
I'll show you five easy methods—like using File Explorer or PowerShell—so you can pick what suits your comfort level. Just remember: always back up your files first to avoid losing precious photos, videos, or documents!
What Does Formatting a Drive Do?
When you format a drive, you set up a file system on that drive while erasing existing data. It Organizes the hard drive or SSD into specific structures so your operating system knows where to store and find files later.
Think of it like building shelves and organizing a library. The shelves are the file system allowing data storage, while formatting wipes the books clean so the library starts fresh.
Benefits include:
- Erase all personal/sensitive files for security when selling or disposing of the drive
- Resolve file system errors and misconfigurations causing crashes or malfunctions
- Allow usage with other operating systems like macOS or Linux distributions
- Prepare for new storage purposes like backups, gaming storage, media library, etc.
Drawbacks:
- Permanently delete all existing files and folders on the drive (be sure to backup data first!)
- On SSDs, excessive formatting can shorten the lifespan by using up rewrite cycles
In summary, formatting erases data while setting up structured file systems for operating system and software usage. It prepares the drive for reliable storage usage.
When Should You Format an External Drive?
You may want to format external storage devices like USB flash drives, SD cards, HDDs, and SSDs in the following situations:
- New Out-of-Box External Drive: Brand new drives come unformatted and require initialization before use.
- Converting File Systems: Changing from NTFS to exFAT for macOS and Windows cross-compatibility.
- Troubleshooting Issues: Fixing file system errors, misallocated space, or hardware malfunctions causing crashes.
- Wiping Sensitive Data: Erasing personal and confidential data forever when selling, losing or disposing of the drive.
- Preparing for New Use Cases: Getting drives ready for backups, gaming libraries, media storage, ReadyBoost, and more.
- Migrating Data to New Drives: When cloning old drives or transferring data to freshly purchased ones.
External Drive File System Options
Windows supports four main file systems when formatting external removable media and hard drives:
| File System | Compatibility | Max File Size | Notes |
|---|---|---|---|
| NTFS | Windows only | 16 EB | Required for boot/system drives. Offers file compression and permissions. Read-only by default on macOS. |
| exFAT | Windows, macOS, Linux | 16 EB | Great for external storage with both PC and Mac computers. No file permissions. |
| FAT32 | Windows, macOS, Linux | 4 GB | Legacy file system. Useful for devices with limited storage. |
| ReFS | Windows Server and Pro only | 1 YB | Resilient File System for protection against corruption. |
Our Recommendations:
- Use NTFS for external Windows-only drives
- Choose exFAT for cross-platform compatibility
- Stick to FAT32 for extremely old/legacy hardware
Top 5 Methods to Format External Hard Drive on Windows 11
Next, let's explore step-by-step formatting methods using Windows' easy built-in tools.
Method 1: Formatting Using File Explorer
The easiest way to format any drive on Windows is by using File Explorer's graphical interface. Here's a quick step-by-step guide:
- Open File Explorer by pressing Win + E on your keyboard.
- Locate your external drive in the left sidebar under This PC or Computer. Right click on the drive.
- Choose Format from the menu.
![Choose Format from the menu]()
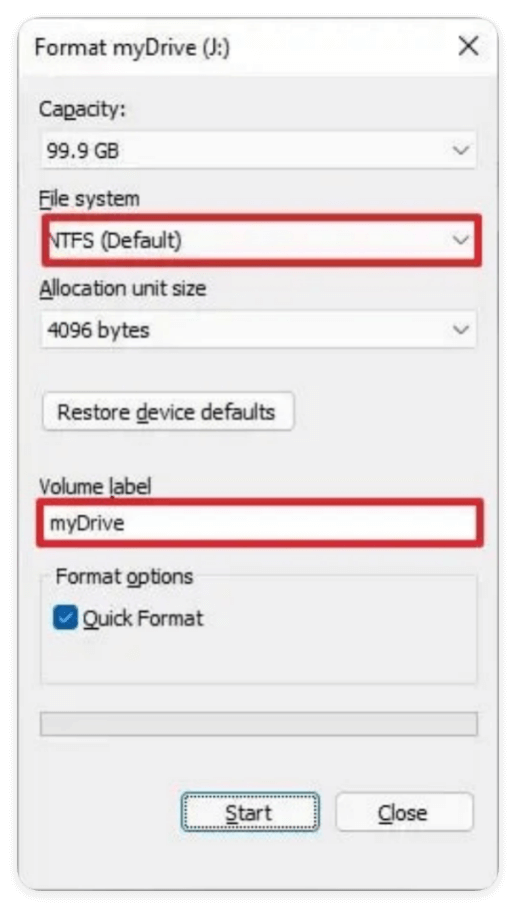
- Adjust settings:
- File System: Pick NTFS, exFAT, FAT32
- Allocation Unit Size: Default is ideal for most uses
- Volume Label: Optional drive name
- Check "Perform a Quick Format" to finish faster
- Click Start > OK to confirm and begin formatting
![Click Start > OK to confirm and begin formatting]()

That's all there is to it! This approach works great for casual everyday formatting needs.
However, more advanced use cases like resolving errors, deep wiping data, or configuring multiple partitions may require alternative solutions. Keep reading for other built-in tools.
Method 2: Formatting Drives in Disk Management
Windows includes a powerful utility called Disk Management capable of handling more complex storage config tasks. Follow these steps:
- Press Win + X and launch Disk Management.
- Locate your external drive in the bottom panel. Right click on its partition (or unallocated space).
- Choose Format from the menu.
![Choose Format from the menu]()
- Pick your desired file system and allocation unit size. Give a volume label like "Backup Drive" if desired.
- Enable "Perform a quick format" then click OK.
![Enable 'Perform a quick format' then click OK]()
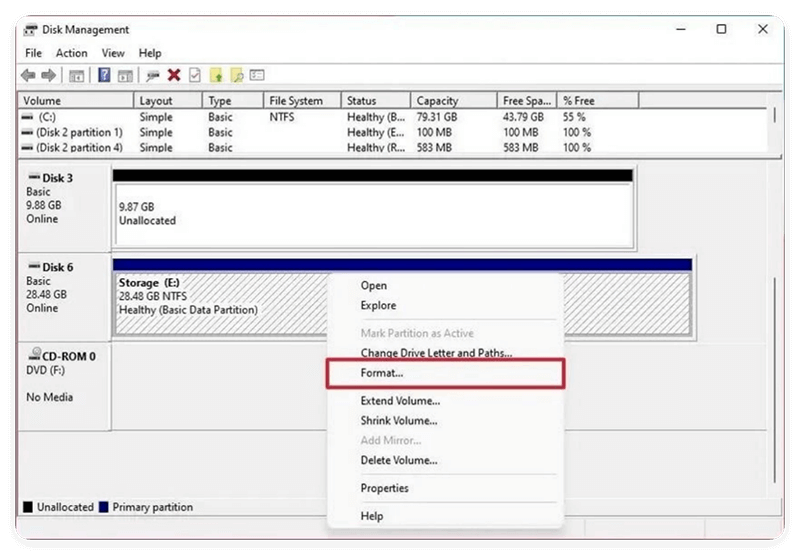
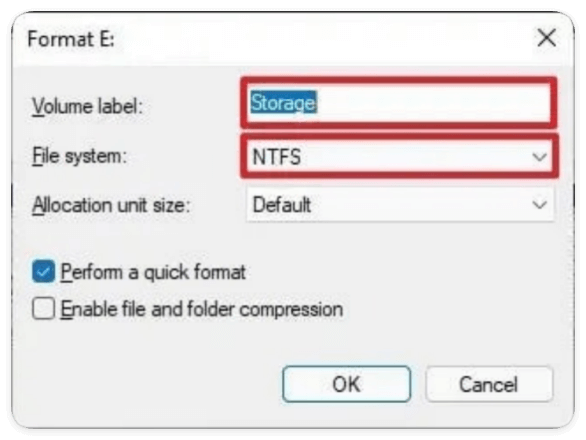
The Format dialog box presents additional capabilities too like embargoing bad sector detection during scans. Once configured, click OK to format the partition or space.
Use cases for Disk Management:
- Resolving incorrectly allocated spaces or partitions
- Converting between MBR and GPT styles
- Creating multiple partitions with separate formats
- Wiping drives by overwriting data
In summary, File Explorer serves simple quick formatting needs while Disk Management unlocks advanced capabilities. Next we'll cover the command line.
Method 3: Formatting Drives via Command Prompt
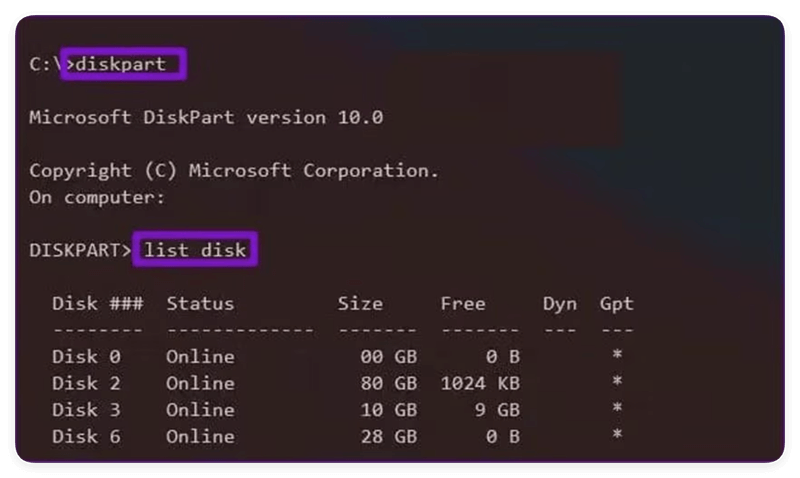
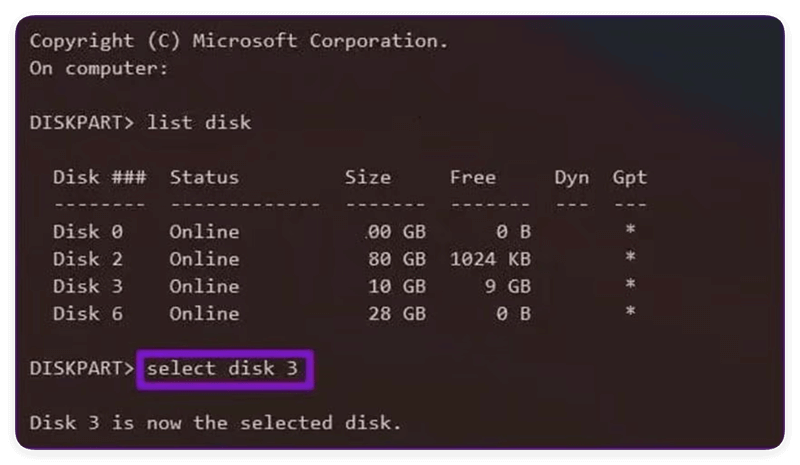
For power users comfortable on the Windows command line, formatting drives is easily achievable through the diskpart tool. Here's a walkthrough:
- Type cmd into the search bar. Right click on Command Prompt and Run as Administrator.
- Type diskpart and press Enter to launch the partition manager.
- Next type list disk to view available drives. Identify your external drive's number based on storage capacity.
![Formatting Drives via Command Prompt]()
- Enter select disk # replacing # with your disk number from the previous step. This selects the target drive to format.
![Formatting Drives via Command Prompt]()
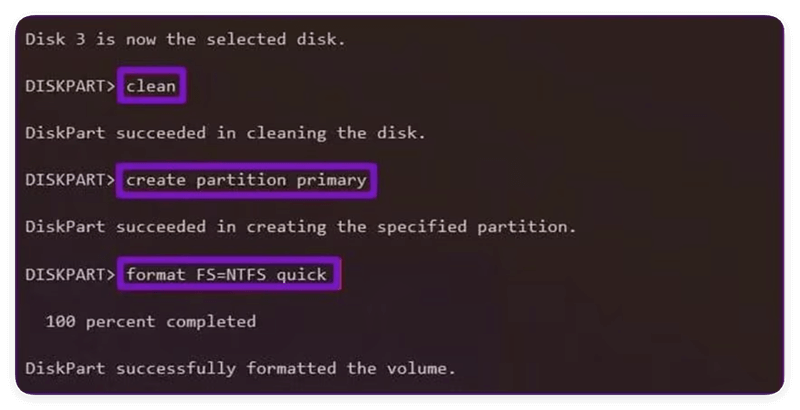
- Run clean to wipe all existing partitions and data off the drive.
- Issue create partition primary to create a new primary partition on the empty space.
- Finally format it by entering format fs=ntfs quick or another [file system]. Replace ntfs with fat32 or exFAT as needed.
- When completed, close diskpart by typing exit
![Formatting Drives via Command Prompt]()
This command line method enables formatting drives via automated scripts – extremely useful for IT administrators.
Method 4: Formatting with Windows PowerShell
Similarly, Windows Powershell provides another scriptable approach. Follow these steps:
- Launch an elevated PowerShell prompt by searching for it in Windows, right clicking the app, and selecting Run as Administrator.
- First, type Get-Disk and note your external drive's Disk Number based on storage capacity.
- Enter Clear-Disk -Number # | Clear-Disk -RemoveData changing # to your disk number gathered previously. This wipes all partition data.
- Next create a new primary partition filling the full drive space with New-Partition -DiskNumber # -UseMaximumSize | Format-Volume -FileSystem NTFS -NewFileSystemLabel "Backup Drive"
![Formatting with Windows PowerShell]()
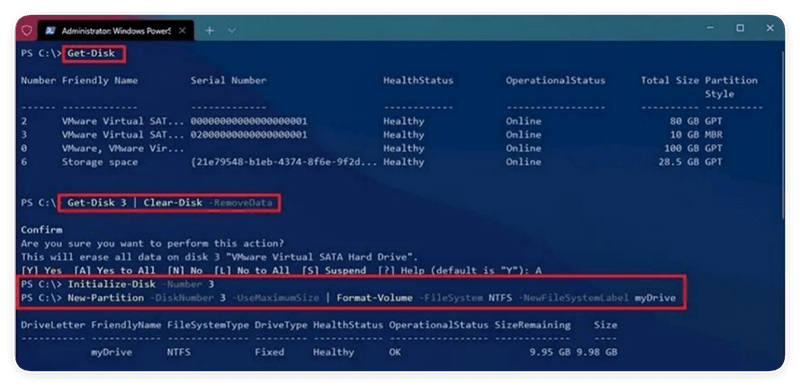
Replace formatting details as needed for the file system or drive name.
PowerShell offers the same automation benefits as the Command Prompt method. But it does involve slightly more complex syntax.
Method 5: Using Third-Party Formatting Tools
Beyond the built-in options, many excellent free and paid third-party tools exist for formatting drives as well. Top recommendations include:
- Donemax Data Eraser: User-friendly UI with added features, like permanent data erasure, program uninstaller, browser cleanup tool, etc.
- MiniTool Partition Wizard: Packed with capabilities like resize, copy, wipe, and rebuild partitions along with excellent format customization.
- AOMEI Partition Assistant: Approachable yet advanced formatter for many storage management tasks, even RAID and dynamic disk volumes. Contains data recovery utilities too.
Third-party tools work very well when you need added features like reliable partition resizing, cloning and imaging drives, or recovering lost files pre-format. They provide more customization for tailored use cases compared to Windows' simpler native options.
The one downside is potential instability or privacy concerns inherent with less vetted software. Stick to well-established names like the recommendations above for best results.
Here we will show you how to format external drive and wipe data permanently with Donemax Data Eraser.
Step 1. Download the software and install it on your computer.Connect the external hard drive and run the software.
Donemax Data Eraser
- Format hard drive and wipe data permanently.
- 100% safe to erase data and avoid data recovery.
- 3 modes to shred files or wipe drive data flexibly.
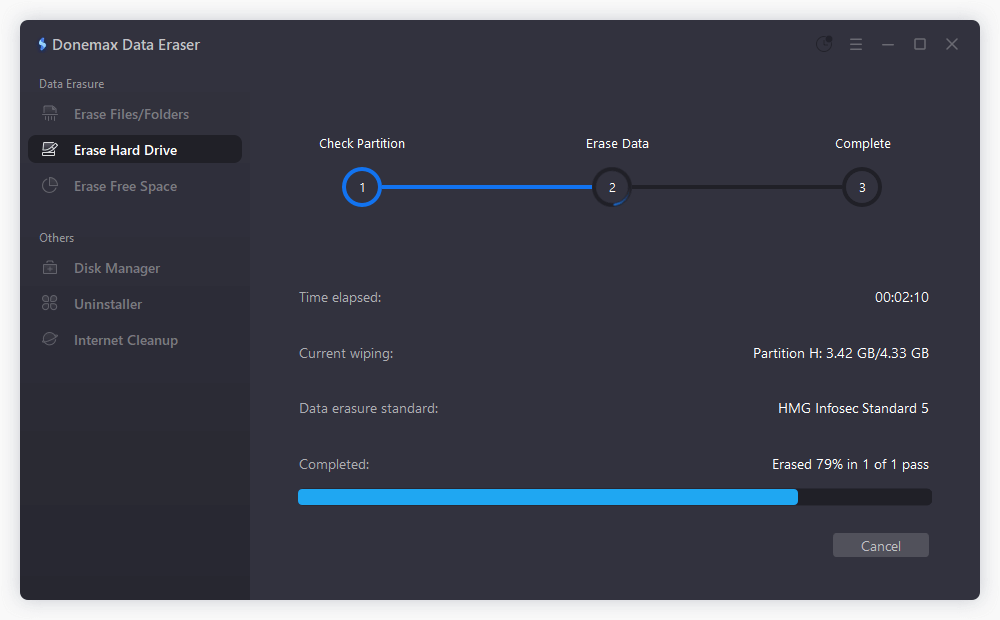
Step 2. Change to Erase Hard Drive. Select the external hard drive you want to format and click Erase Now button.

Step3. Then you will be asked to select a data erasure method to wipe data from the drive while formatting it.
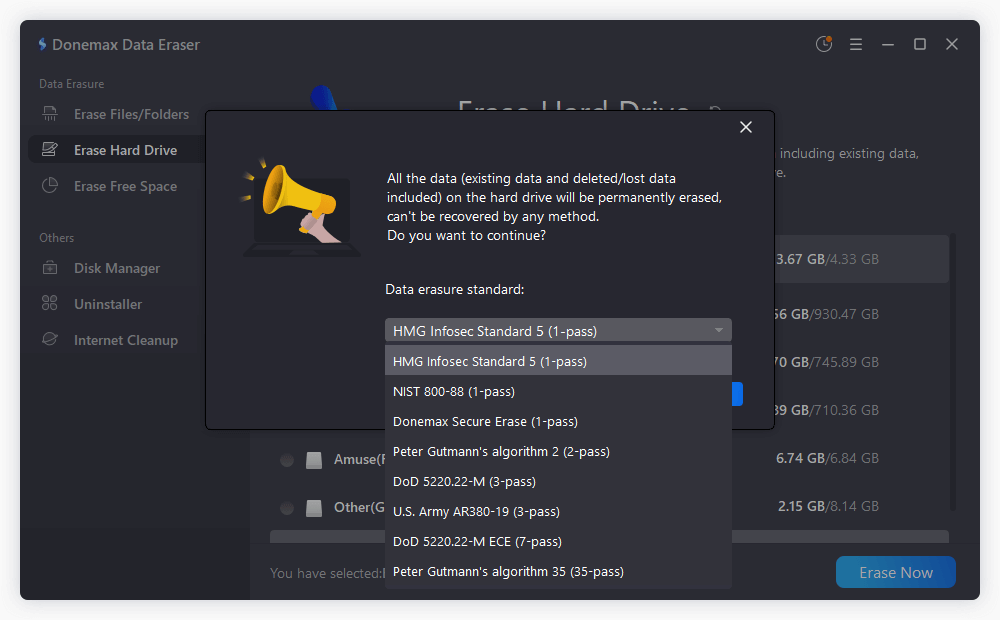
Step 4. Click Continue button and the software will begin to format the hard drive and wipe data permanently. Once it's finished, the drive is formatted and all data is gone forever.
You can use the software to format and wipe an external hard drive on Windows 11 before you resell or donate it. It's safe to keep your privacy information from data breach.
Troubleshooting Common External Drive Format Problems
While the formatting process usually runs smoothly, occasional issues can arise. Drive detection issues sometimes happen when cables, ports, or drivers need updating. Write protection errors typically occur from accidentally enabling physical read-only locks on drives. RAW file system errors indicate corrupted partition structures in need of repairs. Insufficient space or cluster errors happen when formatting fails midway and needs reattempting. Finally, overheating can damage drives from excessively heavy read/write workloads over time.
Here are some more common external drive formatting issues and fixes:
- Drive not detected by Windows issues can often be resolved by trying new cables or ports, initializing disks properly to GPT or MBR styles, or updating motherboard drivers.
- "Access denied" write protection errors arise from accidentally enabling physical read-only locks on drives preventing writes. These need disabled for full read/write access.
- For multi-partition drives or spaces showing RAW file system errors indicating corruption, try formatting over RAW spaces again or using third-party tools to rebuild damaged partition tables from scratch.
- Errors about insufficient space, clusters, or allocation units mean the initial format failed partway through. Rerunning a Full format scan instead of Quick may help rescale available space accurately. Pre-defragmenting optimizes allocation units as well.
- Finally, heat and hardware damage from excessive drive use can occur by overworking external HDDs/SSDs beyond safe thresholds. Monitoring drive health and giving occasional rest periods is recommended.
Final Thoughts
In summary, Remember to pick an appropriate file system based on intended cross-platform usage and storage limits.
Quick Formats work great for consumer use, while Full Formats help troubleshoot errors by scanning bad sectors for data protection. When in doubt, exFAT strikes an excellent balance compatible with nearly all modern Windows PCs and Macs for external removable disks.
Feel free to revisit this article anytime you need a refresher on properly wiping, initializing and managing external storage upgrades or migrations. Formatting may sound intimidating, but Windows 11 makes it straightforward.
FAQs about Formatting Hard Drive on Windows 11
1. Can I recover files after formatting a drive?
Sometimes, using data recovery software like Recuva or Data Rescue within days before too much new data overwrites them. But results vary wildly – don't rely on this working once a format starts.
2. What file system should I use to format my drive?
NTFS works great for external Windows-only drives. exFAT enables cross-platform Windows & Mac use. FAT32 works with nearly all devices but only supports up to 4GB file sizes.
3. Why does my drive keep saying Read-Only under properties?
Likely the external drive has a physical lock toggle switched on accidentally preventing writes. Switch it off to enable full read/write access again. This often happens after connecting drives between many devices.
4. Can I use this drive with my Playstation/Xbox console?
Yes! The PS5, PS4, Xbox Series X|S, and Xbox One support exFAT for external removable media up to 16TB. Enabling that file system allows storing games directly on the drive to play.
Donemax Data Eraser
One of the best data erasure programs can permanently delete data. It works on PCs, Macs, HDDs, SSDs, USB drives, digital cameras, and other devices. Once the tool erases the data, no one cannot recover it by any method.
Related Articles
- Mar 27, 2025How to Use BitLocker on Windows 11?
- May 10, 2025How to Find BitLocker Recovery Key (Unlock Password)?
- Oct 09, 2025Disable iPhone Apps in macOS Tahoe Spotlight Search
- Dec 16, 2025Transfer Photos from Sony Digital Camera to Mac
- Feb 17, 2025Fix External Hard Drive Not Responding Without Losing Data [6 Solutions]
- Aug 21, 2025How to Use GIMP Clone Tool?

Contributing Writer
Christina
Christina is the senior editor of Donemax software who has worked in the company for 4+ years. She mainly writes the guides and solutions about data erasure, data transferring, data recovery and disk cloning to help users get the most out of their Windows and Mac. She likes to travel, enjoy country music and play games in her spare time.

Editor in chief
Gerhard Chou
In order to effectively solve the problems for our customers, every article and troubleshooting solution published on our website has been strictly tested and practiced. Our editors love researching and using computers and testing software, and are willing to help computer users with their problems