
Written byCharlesUpdated on Aug 21, 2025
How to Use GIMP Clone Tool?
Approved byGerhard Chou
PAGE CONTENT:
GIMP (GNU Image Manipulation Program) is a powerful, open-source photo editing tool used by designers, photographers, and hobbyists alike. One of the most versatile tools within GIMP is the Clone Tool, which allows users to copy pixels from one part of an image to another. This function can be used to remove unwanted objects, fix blemishes, repair old photographs, or even duplicate parts of an image.
In this detailed guide, we'll walk you through everything you need to know about using the GIMP Clone Tool — from understanding its features to using it in real-world scenarios.
Introduction to the Clone Tool in GIMP
The Clone Tool is a brush-based tool that allows you to sample (copy) a specific part of an image and paint it onto another area. This technique is incredibly useful for:
- Removing people or objects from backgrounds
- Repairing scratches, dust, or blemishes in old photos
- Duplicating textures or features
- Cleaning up scanned documents or artworks
The Clone Tool is similar in function to the Stamp Tool in Photoshop, offering similar flexibility with a free and open-source approach.
What Is the Clone Tool and How Does It Work?
The Clone Tool works by sampling pixels from a source area and applying them to a destination area using a brush. The source area remains unchanged; it simply provides the data for what gets painted elsewhere.
- You can define the source point by holding down Ctrl (or Cmd on macOS) and clicking the area you want to clone.
- You then release the key and paint with your mouse or stylus to apply those copied pixels elsewhere.
- The tool tracks the relative position between the source and the brush as you paint, allowing for dynamic cloning.
Clone Tool vs. Healing Tool:
While both tools are used for retouching, the Healing Tool blends the source pixels with the surrounding area to match texture and lighting. The Clone Tool, on the other hand, is more literal—it directly copies pixels without blending, giving you full control over what is transferred.
Steps to Use Clone Tool in GIMP
Preparing Your Image in GIMP
Before using the Clone Tool, it's important to set up your project properly:
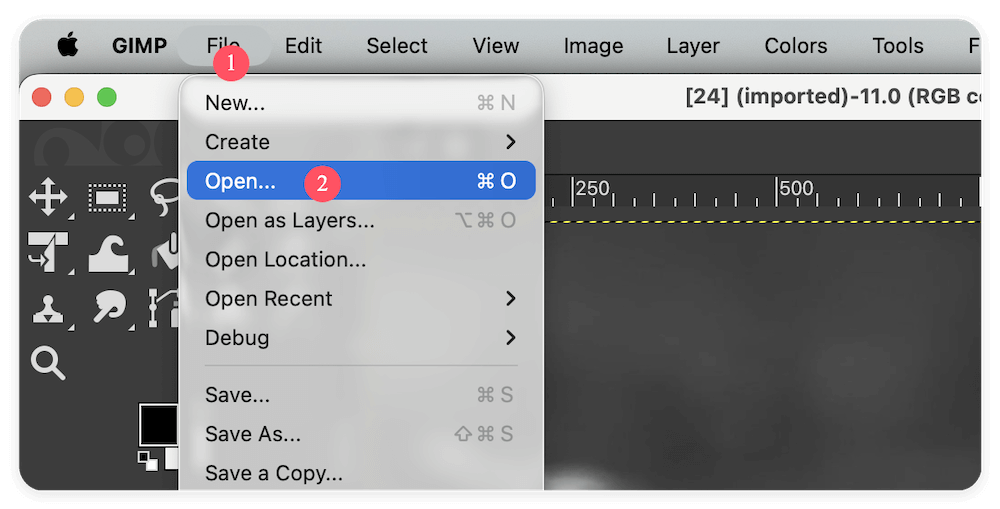
Open Your Image: Launch GIMP. Go to File > Open and select your image.
Create a Duplicate Layer: To preserve the original image, duplicate the layer. In the Layers panel, right-click on your image layer and select Duplicate Layer. Work on this duplicate to ensure non-destructive editing.

Zoom In for Precision: Use Ctrl + Mouse Wheel or the Zoom Tool to closely inspect the area you plan to edit.
Accessing the Clone Tool in GIMP
To activate the Clone Tool:
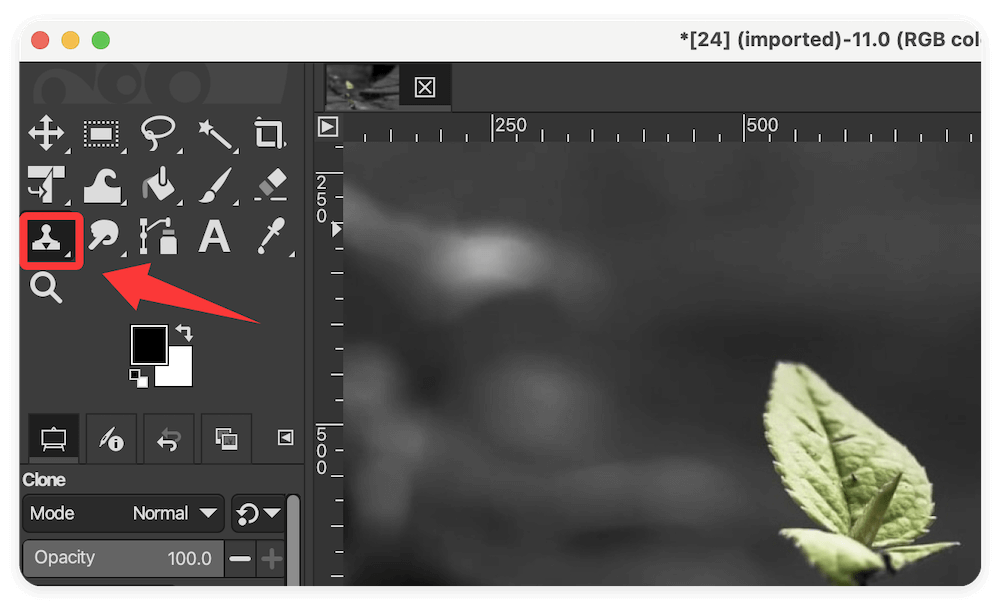
Method 1 – Toolbox: Look for the stamp icon in the toolbox (if it's not visible, you can enable it from Edit > Preferences > Toolbox).
Method 2 – Keyboard Shortcut: Press C on your keyboard.
Once activated, your cursor will change to a circular brush with a crosshair at the center, indicating it's ready to sample and paint.
Configuring the Clone Tool Settings
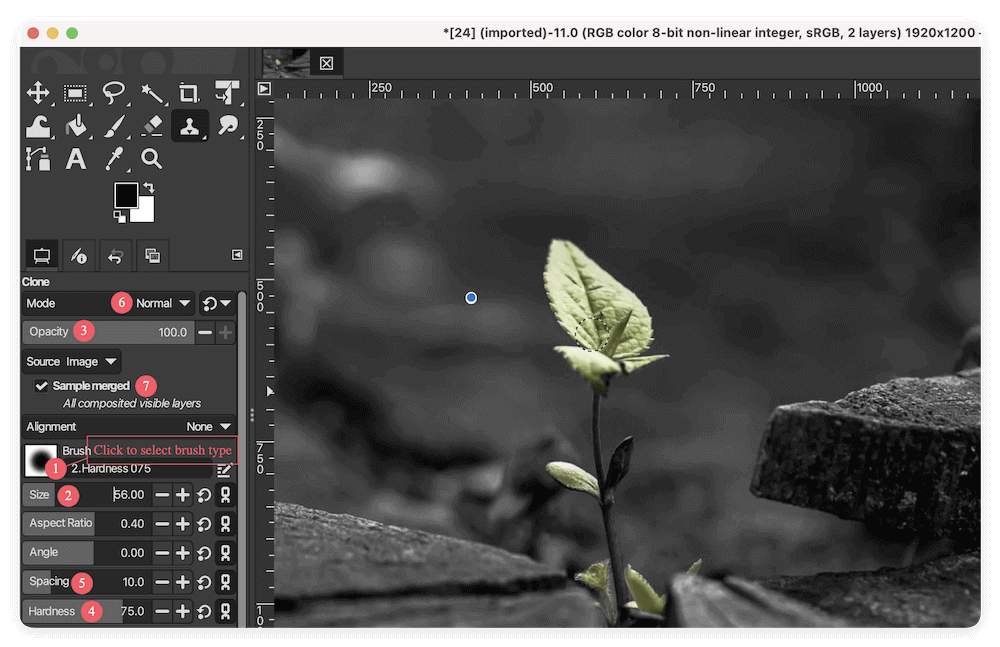
The Clone Tool comes with a variety of customization options, visible in the Tool Options area under the toolbox.
Brush Type and Size: Choose a brush from the drop-down menu. Softer brushes are better for blending, while hard-edged brushes offer precise control. Adjust the Size slider based on the area you're editing.
Opacity and Hardness: Opacity determines how strongly the cloned pixels are applied. Hardness controls the edge softness of the brush. Lower hardness = more feathered edges.
Spacing: Controls the distance between brush dabs. Lower spacing gives smoother strokes, which is useful for retouching.
Clone Mode:
- Aligned: The source and destination remain aligned as you paint.
- Non-Aligned: Each stroke starts with the same source point.
Sample Options:
- Current Layer: Only samples pixels from the active layer.
- All Layers: Useful if you want to clone based on visible results rather than a single layer.
How to Use the Clone Tool: Step-by-Step
Using the Clone Tool effectively is all about understanding the workflow and practicing control over your brush settings, alignment, and source selection. Below is a more detailed, hands-on breakdown of how to use the Clone Tool in GIMP.
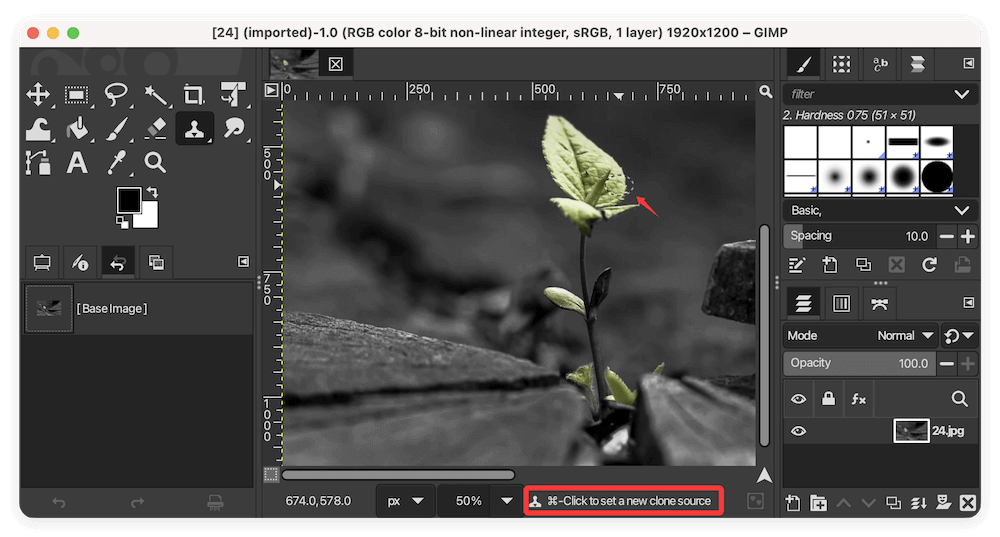
Step 1: Define the Source Point
Before you can start cloning, you need to tell GIMP which area of the image it should copy from. This is done by setting a "source point."
How to Set the Source Point:
- Activate the Clone Tool by pressing C or selecting it from the toolbox.
- Hold down the Ctrl key (or Cmd on macOS).
- Click on the part of the image you want to clone. This defines the source point — GIMP will pull pixel data from this location.
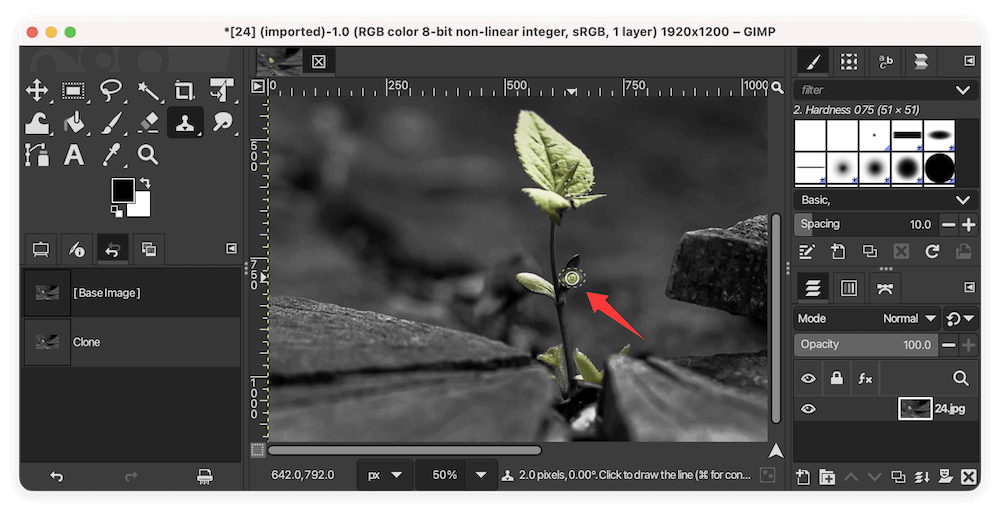
Step 2: Begin Cloning on the Target Area
After setting your source, move your cursor to the area you want to fix, remove, or duplicate. Start painting with your mouse or stylus. As you paint, GIMP copies pixels from the source point and applies them to the target area.
Key Behaviors:
- The source moves along with your brush stroke (when "Aligned" is selected).
- GIMP displays a crosshair over the source area as you paint, so you can see what's being sampled in real-time.
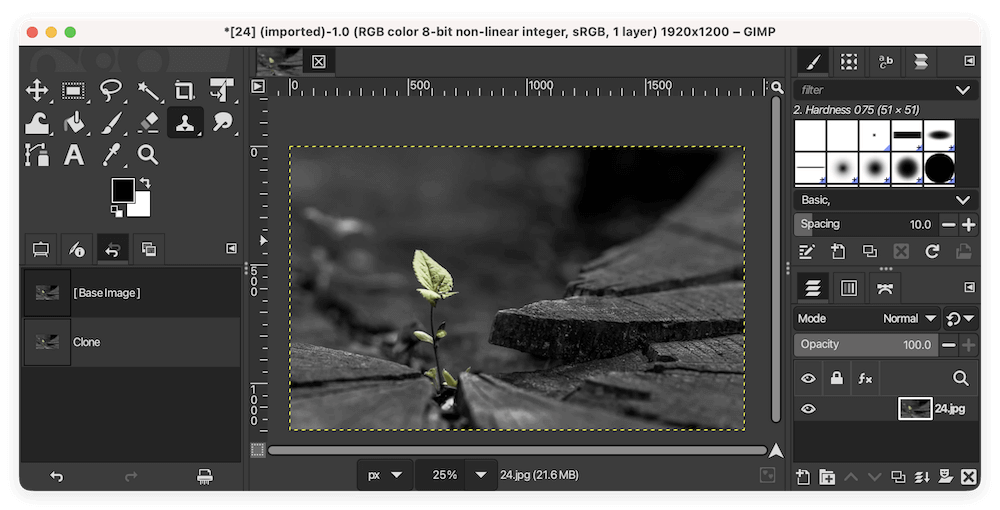
Step 3: Fine-Tune and Evaluate
Once you've completed the cloning pass:
- Zoom out to inspect the full image.
- Toggle the cloned layer on and off to compare before/after.
- Use the Undo function (Ctrl + Z) liberally to reverse small mistakes.
- You can also use the Smudge Tool or Blur Tool to smooth transitions if necessary.
Save Frequently and consider exporting versions as backups during long editing sessions.
Common Tasks and Scenarios:
A. Removing Unwanted Objects from Backgrounds
Let's say there's a power line, trash can, or person in a scenic photo that you want to remove:
- Zoom into the area for better visibility.
- Set a source point near the object using Ctrl + Click on nearby background (e.g., grass or sky).
- Use a soft, medium-sized brush to paint over the object.
- Repeat the sampling process from different nearby areas to avoid visible cloning patterns.
Alternate sample points frequently to keep the cloned area looking natural.
B. Retouching Facial Blemishes or Skin Imperfections
The Clone Tool can be used to clean up portraits and skin textures:
- Use a soft round brush, small in size.
- Lower the opacity to around 50–60% for more natural blending.
- Sample skin from an area close to the blemish that has similar tone and lighting.
- Paint gently over the blemish using short strokes.
If you're working with skin or organic textures, always use subtle strokes and reduce brush hardness to avoid harsh edits.
C. Repairing Tears and Dust in Scanned Photos
For restoring old family photos or artwork scans:
- Create a new transparent layer above the original image.
- Set the sample mode to "All Layers" in Tool Options.
- Set your source point from a clean area.
- Carefully clone over tears, scratches, or dust spots.
- Adjust your brush size often to fit small creases or large missing sections.
💡 Tip: Combine Clone Tool with Healing Tool for smooth blending around the edges of repairs.
Tips and Best Practices for Clean Results
- Use small brush sizes for detailed work and tight spaces.
- Zoom in for accuracy and zoom out periodically to assess the full image.
- Blend with soft edges to avoid obvious patches.
- Change the clone source often to avoid repeating patterns or obvious cloning artifacts.
- Work on a new transparent layer when possible, especially for complex compositions.
Troubleshooting Common Clone Tool Issues
⚠️ Issue: Clone Tool Not Working
- Check Layer Selection: Ensure the correct layer is active and visible.
- Opacity Setting: Verify the opacity is not set too low.
- Wrong Source Point: You may have forgotten to set or reset the source.
⚠️ Issue: Blurry or Patchy Results
- Brush hardness may be too low.
- Sampled area may not match lighting or texture of the target.
⚠️ Issue: Cloning Bleeds Over Edges
- Use smaller brushes near sharp edges or create selections to limit clone areas.
Alternatives and Advanced Options
Healing Tool:
- Ideal for blending small blemishes where lighting and texture continuity matter.
- Found next to the Clone Tool and uses a similar method (Ctrl + click to sample).
Resynthesizer Plugin:
- A powerful content-aware plugin that can automatically fill in areas based on surrounding textures.
- Best for large object removal or complex textures.
Perspective Clone Tool:
- Clone in perspective-adjusted planes.
- Useful for architecture or surfaces at angles (e.g., editing text or patterns on angled walls).
Conclusion
The Clone Tool in GIMP is one of the most powerful features for image retouching and manipulation. With a bit of practice, it becomes an essential part of any editing workflow—whether you're removing imperfections, fixing old photos, or doing creative image composition.
To get the best results:
- Work on a duplicate layer.
- Choose the right brush and opacity.
- Continuously adapt your source points.
- Don't be afraid to zoom in and refine your edits.
By mastering the Clone Tool, you unlock the ability to make professional-level edits with nothing more than free software and a little patience.
Related Articles
- Dec 26, 2024Format a WD External Hard Drive for Both Windows and macOS
- Sep 16, 2025Top 5 Methods to Format External Hard Drive on Windows 11
- Apr 10, 2026How to Upgrade Windows 8/8.1 to Windows 10 for Free (2026 Guide)
- May 19, 2025Clean Install macOS Ventura: A Comprehensive Guide
- May 14, 2025Fix Error Code 0xc0000225 on Windows 7/8/10/11& Mac
- Jul 02, 2025Format 32GB/64GB/128GB/256GB SD Card to ExFAT/FAT32

Contributing Writer
Charles
Charles, who lives in Sydney, Australia, is an editor & writer of Donemax Team. He is good at writing articles related with Apple Mac computers, Windows operating systems, data recovery, data erasure, disk clone and data backup, etc. He loves reading and playing tennis in his spare time and is interested in testing new digital devices such as mobile phones, Macs, HDDs, SSDs, digital cameras, etc.

Editor in chief
Gerhard Chou
In order to effectively solve the problems for our customers, every article and troubleshooting solution published on our website has been strictly tested and practiced. Our editors love researching and using computers and testing software, and are willing to help computer users with their problems