The best iTunes alternative - reliable and easy-to-use iOS data transfer & data management software.
Quick Navigation:
- Method 1: How to Transfer Photos from an iPhone to a Mac Using the Photos Application
- Method 2: How to Use Image Capture to Transfer Photos between an iPhone to a Mac
- Method 3: Instructions for transferring photos from an iPhone to a Mac Using AirDrop
- Method 4: Transfer Data between iPhone/iPad/iPod touch and Mac Using DMtrans
Photos often occupy a significant percentage of your iPhone's storage space. You may wish to transfer images from your iPhone to your Mac and then delete them from your iOS device in order to free up some space on your iPhone.
Alternatively, you may just wish to import images from your iPhone to your Mac in order to create a backup in order to minimize data loss. In some cases, you also want to important images, messages or videos from your Mac to your iPhone/iPad/iPod touch. Here are some effective methods to help you transfer data between iOS device and your Mac.
Method 1: How to Transfer Photos from an iPhone to a Mac Using the Photos Application
The fact that both your iPhone and your Mac are Apple devices means that there are built-in programs on your Mac that make transferring photos between your iPhone and your Mac a breeze. One of these apps is the Photos app.
Photos is a Mac application that allows you to manage and edit photos. Using it to import images from an external device, such as your iPhone, is also beneficial. As a result, when you wish to transfer images from your iPhone to your Mac, Photos may be able to assist you.
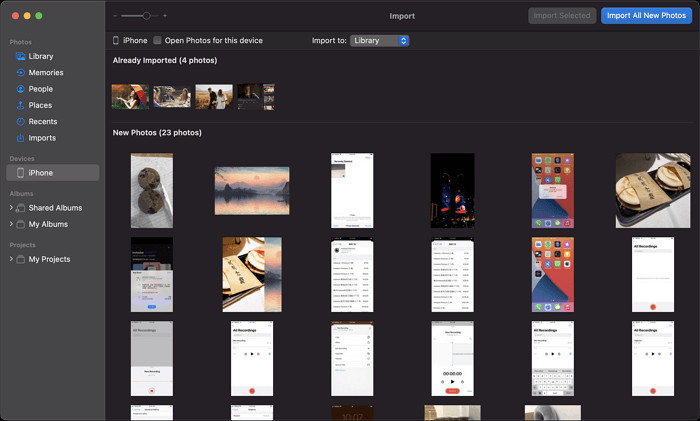
To transfer images from your iPhone to your Mac, follow these steps:
Step 1. The first step is to connect your iPhone to your Mac and unlock your iOS device.
Step 2. Open Photos on your Mac and choose your iPhone from the "Devices" drop-down menu.
Step 3. On your iPhone, choose "Trust" and then enter the passcode if necessary, as instructed.
Step 4. All of your images are now visible on your iPhone. When you wish to transfer images from iPhone to Mac, either click "Import All New Photos" or choose the objects you want to transfer and then click "Import [number] Selected".
By selecting "Import to", you can specify a different storage location.
Method 2: How to Use Image Capture to Transfer Photos between an iPhone to a Mac
Image Capture is yet another built-in software that allows you to transfer photographs from your iPhone to your Mac.
The distinction between Photos and Image Captures is that Photos functions more like a photo management software, whilst Image Captures functions more like a photo transfer application.
Image Capture may also be used to transmit photographs and movies from cameras or other devices that have a built-in camera, in addition to your iPhone.
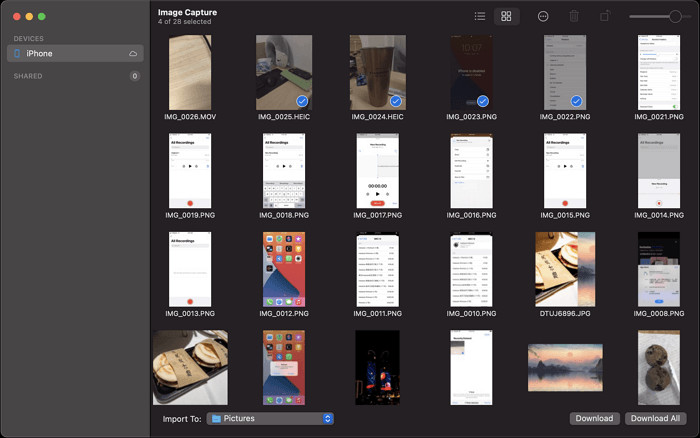
To transfer images from your iPhone to your Mac, follow these steps:
Step 1. Connect your iPhone to your Mac using a USB cord in the first step.
Step 2. Verify that your iPhone is unlocked and that it has been granted permission to trust the computer.
Step 3. Launch Image Capture and choose your iPhone or iPad from the left-hand panel to complete the process.
Step 4. Select "Import to" from the drop-down menu and the folder where you want to save the photographs.
Step 5. Select images from your iPhone and then select "Download" or "Download All" to transfer them to your Mac computer.
Method 3: Instructions for transferring photos from an iPhone to a Mac Using AirDrop
If you only need to transfer a limited number of images. This is the case. In such a situation, employing AirDrop is the most appropriate option.
It is possible to transmit photographs, videos, contacts, webpages, and other files between two AirDrop-compatible devices via the AirDrop file-sharing service, which is available on practically all Apple products.
When it comes to moving photos from iPhone to Mac, this will undoubtedly be of assistance.
To transfer images from your iPhone to your Mac, follow these steps:
Step 1. Open the Control Center on your iPhone and toggle AirDrop on or off.
Step 2. On the Mac, open the Finder and select "Go" > "AirDrop" from the drop-down menu.
Step 3. If necessary, turn on Wi-Fi to activate AirDrop functionality. (Ascertain that your devices can locate each other by configuring your devices to be detected by "Contacts Only" or "Everyone".
Step 4. On your iPhone, go to Photos and choose the photos you wish to transfer, then hit the "Share" button to complete the process.
Step 5. Select "AirDrop" from the drop-down menu and tap the name of the Mac.
The photographs will be received on your Mac if you click "Accept" in the AirDrop box that appears. Following that, you may review the images taken with your iPhone by going to the "Downloads" folder.
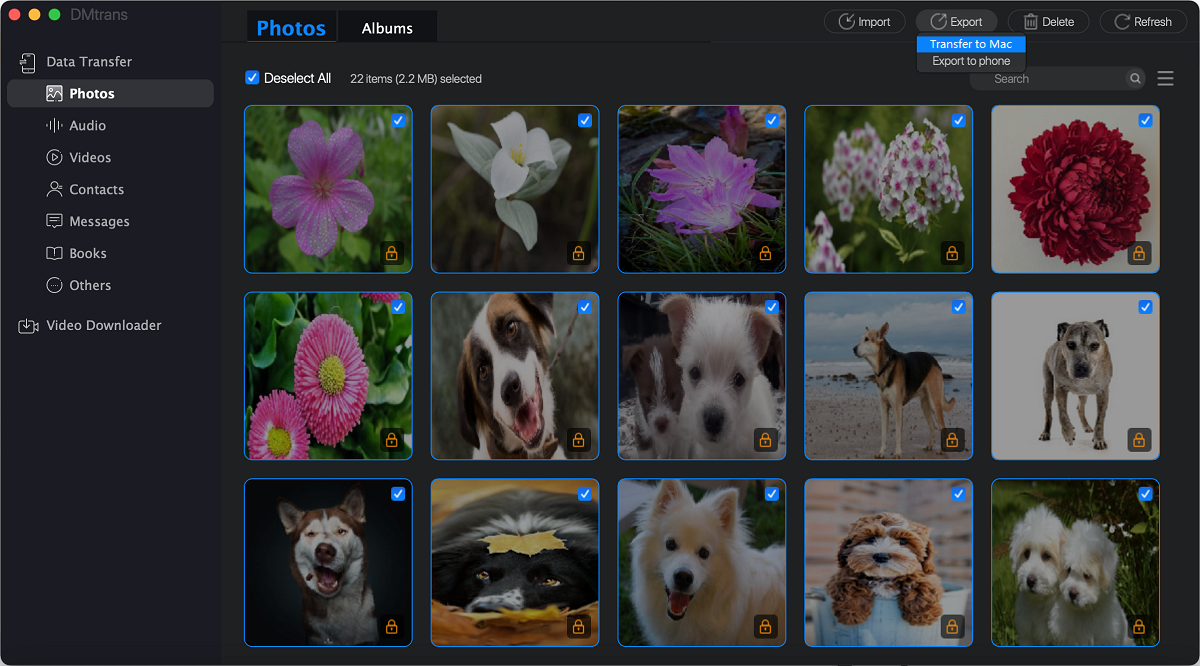
Method 4: Transfer Data between iPhone/iPad/iPod touch and Mac Using DMtrans
If you want to quickly transfer messages, images, videos, audio or other data between Mac and iOS device (iPhone, iPad, iPod touch), you can try iOS data transfer application - such as DMtrans for Mac. This iOS data transfer application can help you manage iOS data on Mac and easily transfer data between iPhone/iPad/iPod touch and Mac computer.
DMtrans - iOS data transfer software
- Best iOS data transfer software & iOS data manager for Mac.
- Quickly transfer images, videos, audio files and other iOS data between iOS device and Mac.
- Move, delete, edit iOS data on Mac.
For example, if you want to transfer images between iPhone and Mac, just run DMtrans for Mac and connect your iPhone to this Mac.
Open DMtrans for Mac, then choose “Photos”. Click 'Import' to import photos from iPhone to your Mac; Click 'Export' to export photos from your iPhone to your Mac.