Written byCoco LinUpdated on Oct 23, 2025
Mac Photo Recovery: 4 Effective Ways
Approved byGerhard Chou
Before we start: Photos may be deleted or lost accidentally due to some issues. There are some methods to get back the lost photos. If you don't have backup and the Trash was emptied, you can still use the software Donemax Data Recovery for Mac to get back the deleted or lost photos.
PAGE CONTENT:
Photos on Mac might be lost due to some multiple reasons. Hardware problem, bad sectors, file system corruption, operation error, system crash, virus infection, or other issues may lead to data loss on Mac. Fortunately, there are still some methods to get back the lost files.

If photos on Mac get lost for any reason, don't worry. The article will show you some Mac photo recovery solutions to help you. If the deleted or lost photos on Mac are not damaged/overwritten, there should be a great chance to retrieve the photos successfully. We will also introduce the powerful software - Donemax Data Recovery for Mac - to help you recover photos or other files on Mac.
Main Causes for Photo Loss on Mac
There are many reasons will result in external device not showing up on Mac, such as:
There are different reasons will cause photos get lost on Mac. Intentionally or unintentionally operations, unexpected issues, human errors, or other issues will lead to photo loss on Mac. Here are some main and common issues that will cause photo loss:
- Deleting photos accidentally. It will happen to nearly everyone. You may delete photos by accidental or some others delete your photos unintentionally.
- Format drive by mistake. Please ensure to be careful to erase/format drive on Mac. Especially, if there are many disks connected, you may format the wrong disk and lose photos on the disk.
- Partition get lost/deleted. If you find the disk is shown as unallocated in Disk Utility, the partition should be deleted or lost due to other issues. Then the photos on the partition are also lost.
- File system corrupted. File system of volume on Mac will be damaged for some issues. Then the partition will not be accessible and photos on the partition will not be accessed directly.
- Data loss during data transfer. Sudden power outage, disk connection interruption, or unplug disk unintentionally during data transfer will cause issues and make the photos get loss.
- Virus infection. Virus is one reason that will cause data loss. Many users may suffer virus infection and lose photos or other files on Mac.
The mentioned reasons or some other unknown issue will cause photo loss. However, the lost photos on the drive are not deleted/lost permanently. If you haven't added new data or do other changes to the drive after data loss, there should be no problem recovering the lost photos on Mac.
4 Solutions to Recover Deleted/Lost Photos on Mac
How to recover the lost photos on Mac easily? Actually, there are some solutions that can recover lost photos effectively and quickly in different situations on Mac. Please check and choose a proper solutions as follows to help you recover the lost photos based on your own case.
Solution 1. Recover deleted photos from Photos app.
Mac users often use Photos app to manage the photos on Mac. If you also deleted the photos from Photos or another location organized by Photos app, you can try to check and recover the deleted photos in Photos app directly.
1) Run the Photos app and find "Recently Deleted" option.
2)You will find the photos that are deleted recently. Please check and choose the files that you want to recover and click "Recover" button to restore them.

After the process is done, you can then find the photos in the original location directly.
💡 Tip: The photos in "Recently Deleted" folder will only be preserved for 30 days. If you have deleted the photos for a long time, you may not be able to find the deleted photos here.
Solution 2. Restore deleted photos from Trash.
Also, if you don't use Photos app and deleted photos in Finder, you can also try to find the deleted photos in Trash. Then you can easily restore the deleted photos from Trash.
1) Please find and open Trash from Dock. The photos you deleted are in Trash. If the Trash is not emptied, you can find the deleted photos.
2) Check and choose the photos in Trash, right-click the selected photos and click "Put Back" to restore them back to the original location. Also, you can also drag the photos from Trash to another location directly.

💡 Tip: If the Trash was emptied or the photos were deleted with the keys option + command +delete, you cannot restore the deleted photos in this way.
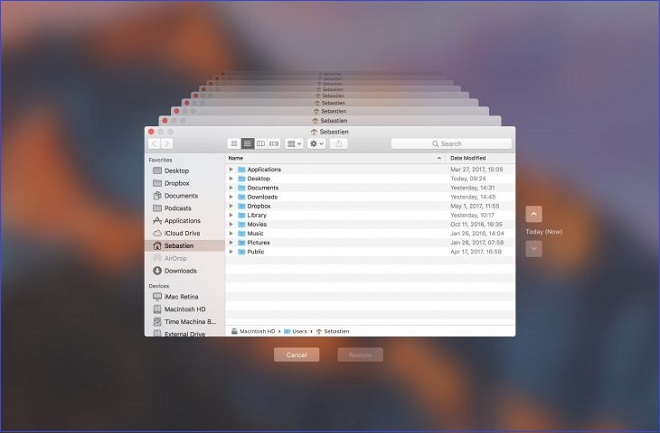
Solution 3. Recover deleted photos from backup.
Should you have Time Machine backups for the deleted photos on Mac, you are able to restore the deleted photos easily from the Time Machine backups.
1) Connect your Time Machine backup drive to the Mac and start Time Machine app.
2) Check the time and preview the files to find the proper version of the backups that contains the deleted photos.
3) Choose the photos that you want to restore, click the "Restore" button to restore the photos on Mac.
💡 Tip: This method can only work if you have the photos backed up in the Time Machine backup. Otherwise, you can only try the other method to recover the lost photos, like using data recovery software.
Solution 4. Recover deleted/lost photos with data recovery software.
The first 2 solutions can only recover the deleted photos on Mac. The solution 3 can only work if you have backed up the photos before. However, if the deleted files were deleted permanently and there is no any backup for your lost photos, these solutions cannot help you recover these files effectively.
How to recover lost photos effectively in such a case? We suggest you use Donemax Data Recovery for Mac to recover the lost photos. It's able to recover lost photos effectively in different data loss scenarios.
You can do as follows to recover deleted or lost photos with this data recovery software on Mac.
Step 1. Download and install the data recovery software.
Step 2. Start the software and choose the drive where you lost data.

Step 3. Scan the drive and search for lost photos.

Step 4. Recover the lost photos after the scan is done.

💡 Note: Please check and ensure to save the recovered photos to another drive instead of the same drive where you lost the photos.
Tips for successful data recovery:
To ensure the deleted or lost photos could be recovered successfully as more as possible, please pay attention to the following tips:
- Stop using the drive once you found the photos were deleted or lost on Mac.
- Don't add data to the drive after data loss to avoid further damage to the lost data.
- Immediately recover data after data loss. The sooner you take action, the higher your chances of recovery success.
- Save recovered data to another drive to avoid damage the data.
How to Avoid Losing Photos on Mac?
It's really bad experience when photos were deleted or lost. It's able to recover the photos successfully in some cases. However, it would be bad if there is no chance to retrieve the missing photos.
So it's important to protect the photos from being lost in the future. Here are some suggestions:
1. Regularly back up photos
Usually back up your Mac including photos with Time Machine. Or manually upload the photos to iCloud or other cloud services. Copy and save photos to an external hard drive as offline backup is also good solution.
2. Confirm twice before deleting photos
Before deleting photos, check and confirm if the right photos are the ones you want to delete. Also, you can first place them to Trash or something alike. Then you can have a chance to undo the deletion if necessary.
3. Be careful when clean up the Mac storage space
When clean up the Mac storage space with macOS built-in or third-party tools, it's essential to check and confirm the important files will not be removed.
4. Check the hard drive status to avoid issues
It's a good habit to check the status of hard drive regularly. If a hard drive is used for a long time, there might be issues. Replace the old drive if there are issues found.
5. Protect your Mac with anti-virus tool
To protect your data from being infected by virus or malware, install a reliable anti-virus software.
Conclusion
To keep your photos safe, we suggest you first make backup regularly. Also, please ensure to think twice before you permanently deleted photos or any other files on Mac. Besides, if you unfortunately deleted/lost photos, please stop using the drive or adding new data to the drive to avoid further damage to the lost data. At last, please download and use the most reliable software Donemax Data Recovery for Mac to recover the delete/lost photos immediately. The software can recover photos and other files, like videos, documents, audio, and so on.
Donemax Data Recovery for Mac
Donemax Data Recovery for Mac is one of the best Mac data recovery software. It is easy-to-use and can help in recovering deleted, formatted, inaccessible or lost data from Mac HDD/SSD, external disk, USB drive, SD card, camera or other storage devices.
Related Articles
- Nov 04, 2024How to Recover Lost Data After Factory Reset a Mac?
- Mar 26, 2025How to Recover Deleted .dmg File on Mac? [7 Methods]
- Jun 06, 2023How to Recover Files from Emptied Trash on Mac?
- Sep 15, 2025How to Recover Lost Data from CF Card on Mac?
- Apr 22, 2026Top 6 Free Undelete Software for Mac: Complete Guide (2026)
- May 18, 2024Mac Documents Folder Emptied or Missed Suddenly – How to Recover Lost Files?

Contributing Writer
Coco Lin
Coco has been a writer and a chief programmer at Donemax software since 2018. Over 10 years of experience of writing troubleshooting articles in the software industry, she is passionate about programming and loves to providing solutions to Windows and Mac users. Also she enjoys music and palying tennis in her free time.

Editor in chief
Gerhard Chou
In order to effectively solve the problems for our customers, every article and troubleshooting solution published on our website has been strictly tested and practiced. Our editors love researching and using computers and testing software, and are willing to help computer users with their problems