
Written byStevenUpdated on Sep 08, 2025
Word AutoRecovery on Mac – A Complete Guide
Approved byGerhard Chou
Before we start: Donemax Data Recovery for Mac is a reliable tool to recover unsaved, deleted, or lost Word documents and other files. The software is easy to use and effective to recover missing files.
PAGE CONTENT:
Losing an unsaved Microsoft Word document is a frustrating experience, especially when hours of work seem to vanish in a blink due to a sudden crash or power outage. Fortunately, Microsoft Word on Mac is equipped with a safety net known as AutoRecovery—a feature that can save the day by retrieving your work, even if you didn't get a chance to hit "Save." This article will guide you through everything you need to know about Word AutoRecovery on Mac, including how it works, where to find recovered files, and what to do when it doesn't work.

What is Word AutoRecovery on Mac?
AutoRecovery is a built-in feature in Microsoft Word designed to automatically save copies of your documents at regular intervals while you work. Unlike the manual "Save" function, AutoRecovery does not overwrite your main document. Instead, it creates temporary backup versions that can be used to recover unsaved data after an unexpected interruption such as a system crash, power failure, or application freeze.
The primary goal of AutoRecovery is to minimize data loss. It's especially useful in scenarios where you might forget to save your document, or when Word closes unexpectedly. However, it's important to note that AutoRecovery is not a replacement for the "Save" function. If you manually close a document and choose not to save changes, AutoRecovery data is deleted.
Where Are AutoRecovered Word Files Stored on Mac?
AutoRecovered files are stored in a hidden folder deep within the Library directory of your Mac user account. Understanding where these files are stored can help you recover lost work manually if Word doesn't display a recovery prompt after a crash.
Default File Location
On a Mac, AutoRecovery files are usually saved in the following path:
~/Library/Containers/com.microsoft.Word/Data/Library/Preferences/AutoRecovery
How to Configure AutoRecovery Settings in Word on Mac
Proper configuration of AutoRecovery can ensure better protection against data loss. Here's how you can manage these settings:
Enable AutoRecovery
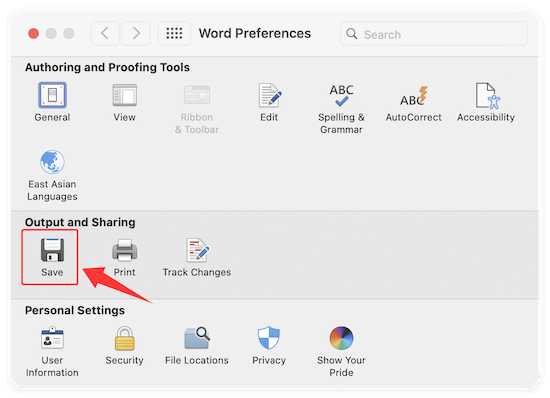
- Open Microsoft Word. Click on Word > Preferences. Select Save.
![Word AutoRecovery on Mac]()
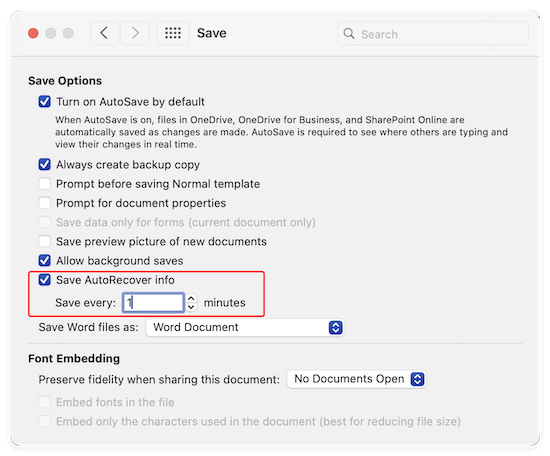
- Make sure the box for "Save AutoRecover info" is checked.
- Set the interval according to your preference (every 5 or 10 minutes is recommended).
![Word AutoRecovery on Mac]()
Best Practices
- Don't set the interval too long. A 20-minute interval could result in losing significant work.
- Make sure Word has the necessary permissions to write files to the AutoRecovery directory.
- Regularly check that the setting remains enabled after Word updates.
How to Recover Unsaved Word Documents Using AutoRecovery
Losing your Word document can feel like a catastrophe, but Microsoft Word's AutoRecovery feature is often your best chance at getting your work back. Depending on the situation, you can either recover the file automatically when you reopen Word or manually search for the AutoRecovery files on your Mac. Let's walk through both approaches in greater detail.
Method 1: Use Word's Built-in Document Recovery Pane
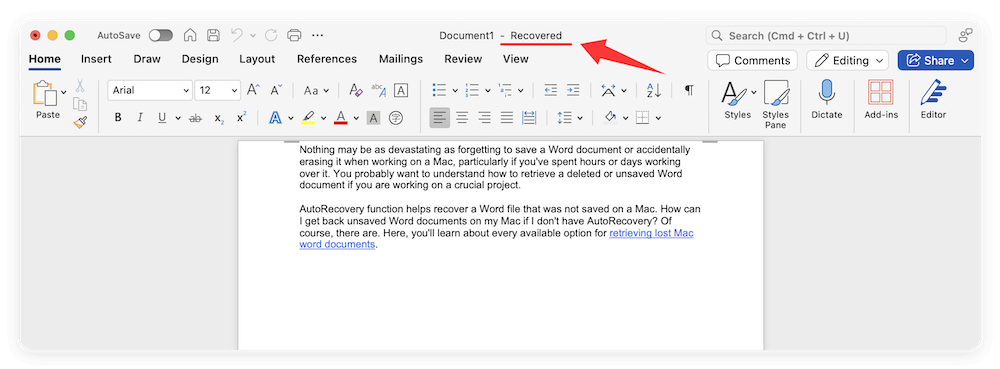
When Microsoft Word crashes or is forced to shut down unexpectedly, it typically show the unsaved document the next time you open it.
- Reopen Microsoft Word.
- If AutoRecovery is active, the recovered document should appear automatically. It will be named something like "Document1 - Recovered".
![Word AutoRecovery on Mac]()
- Review it to confirm your recent changes are intact.
- Go to File > Save As and save the document to a secure location.
- Rename the file to avoid overwriting an older version.
💡 Tip: If you see multiple versions of the document, open each to determine which is the most recent or complete.
Method 2: Manually Locate AutoRecovery Files via Finder
If Word doesn't show the recovery pane or fails to launch correctly, you can still try to retrieve the document manually from your Mac's file system.
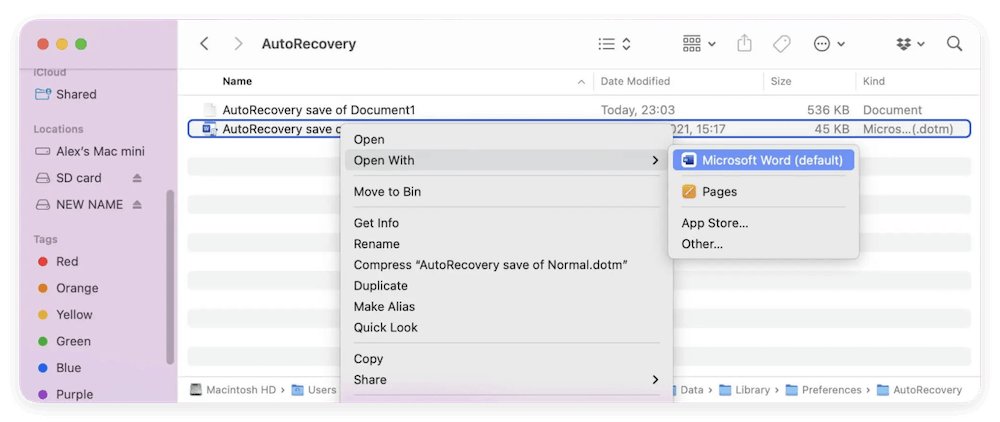
- Open Finder. In the top menu bar, click Go > Go to Folder.
- Paste the following path and press Enter:
~/Library/Containers/com.microsoft.Word/Data/Library/Preferences/AutoRecovery
- You'll see files named like "AutoRecovery save of Document1", or the actual title of your file if it had been named once before.
- Double-click or drag it into the Word icon on your Dock. Or right click the document and select Microsoft Word to open it.
![Word AutoRecovery on Mac]()
- Choose File > Save As, and give it a meaningful name to avoid future confusion.
Troubleshooting Tips for Manual Recovery:
- No files in the AutoRecovery folder?
- Try checking again after Word has been open for a few minutes. Sometimes Word doesn't immediately flush the files after a crash.
- Files won't open?
- If you receive an error or if the file appears corrupted, try changing the file extension to .docx and reopen it.
- Still nothing found?
- Expand your search using Terminal or a third-party file search utility to find fragments of Word files in the system's temporary directories.
What to Do If AutoRecovery Doesn't Work
Sometimes AutoRecovery may fail to restore your file, or it may seem like no recovered documents are available. Here are some common reasons and solutions:
1. AutoRecovery Feature is Disabled
If you or someone else turned off AutoRecovery, no backup files will be created. To verify:
- Open Word and go to Word > Preferences > Save.
- Ensure that "Save AutoRecover info every X minutes" is checked and set to a reasonable interval (e.g., every 5 minutes).
2. File Was Never Saved Initially
AutoRecovery only creates backup files for documents that have been saved at least once. If you created a new file and never saved it manually, Word may not generate an AutoRecovery file.
3. File Was Overwritten or Deleted
If you opened and saved the document after a crash, the AutoRecovery copy is deleted. Also, automatic cleanups or disk optimization tools may remove AutoRecovery files.
4. Corrupted AutoRecovery File
Sometimes the backup file might be corrupted or unreadable. If opening it in Word fails, try copying the file and renaming its extension to .docx, then opening it again.
Alternative Ways to Recover Unsaved or Lost Word Documents
AutoRecovery is great, but it's not the only way to recover documents. If it fails, here are several backup options you can try:
1. Use Time Machine
If you use Time Machine for backups:
- Navigate to the folder where the file was last saved.
- Open Time Machine from the menu bar.
- Scroll through backups to find an earlier version of the file.
- Click Restore.
2. Search in the Temporary or Recovered Items Folder
Sometimes Word saves temporary files in macOS's system folders.
To access Temporary Items:
- Open Terminal (found in Applications > Utilities).
- Enter the following command:
- open $TMPDIR
- Look for a folder named TemporaryItems or similar.
- Search for files starting with "Word Work File" or containing fragments of your lost content.
3. Use a Data Recovery Tool
If the file was deleted or lost due to a drive issue, a Mac-compatible data recovery program can help. For example, you can use Donemax Data Recovery for Mac:
The software can scan your drive for deleted or lost files and may recover unsaved Word documents, including those that were never manually saved.
Here are the steps to recover the files with Donemax Data Recovery for Mac:
- Run the software and select the drive where you lost data. As for the unsaved Word documents, you can choose the internal hard drive on Mac.
![Word AutoRecovery on Mac]()
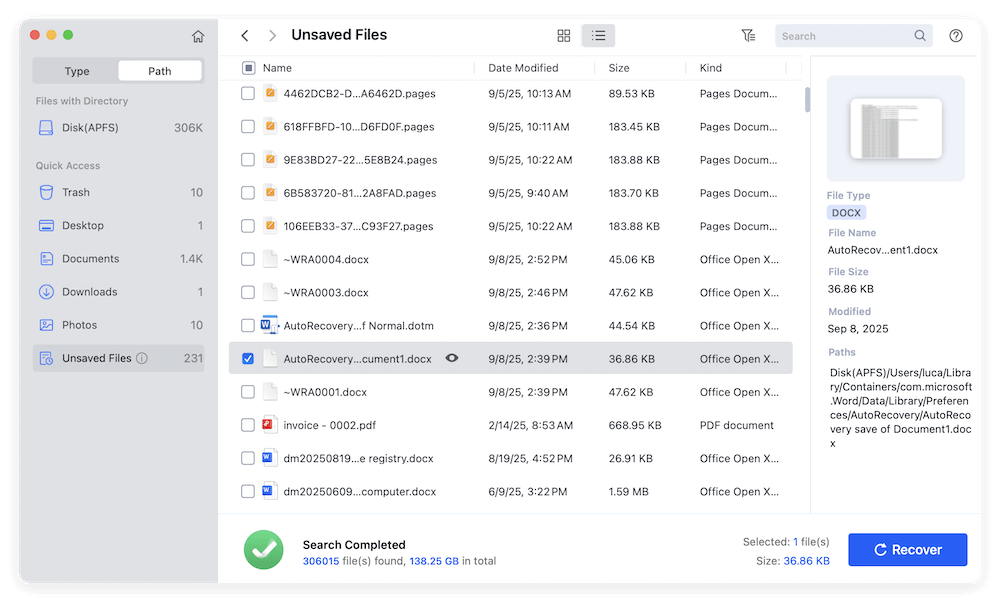
- Click Scan button and then the software will automatically scan the drive deeply to scan for the lost data.
![Word AutoRecovery on Mac]()
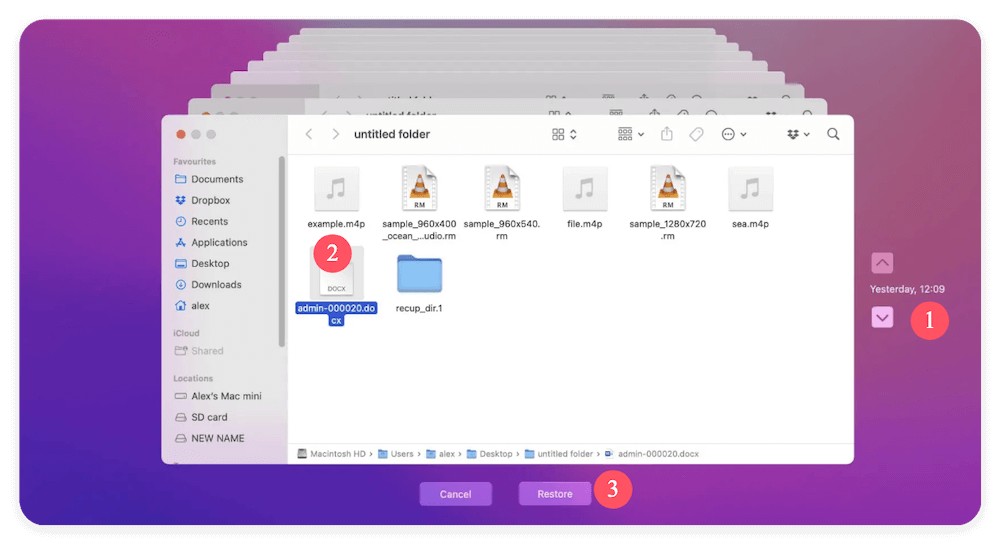
- After the scan is finished, you can then locate the wanted files and preview them. At last, click Recover button to save the files to another drive.
![Word AutoRecovery on Mac]()


4. Check OneDrive or Cloud Sync
If you're using OneDrive or another cloud sync tool, your document may have been auto-synced:
- Sign into OneDrive via browser or app.
- Navigate to the Recent or Recycle Bin section.
- Restore older versions if available.
Preventing Future Data Loss in Word
While AutoRecovery is helpful, the best strategy is to prevent data loss altogether. Here are some tips:
1. Save Frequently
Get into the habit of pressing Command + S often. It's the most reliable way to ensure your changes are saved.
2. Enable AutoSave (if using OneDrive or SharePoint)
If your documents are stored in OneDrive, you can enable AutoSave in the toolbar, which saves changes in real time.
3. Backup with Time Machine
Make regular system backups using Time Machine to protect against disk failure or accidental deletion.
4. Avoid Force Shutdowns
Sudden power losses and forced shutdowns are the main causes of document corruption. Use a surge protector or UPS to prevent power-related damage.
5. Keep Word Updated
Microsoft frequently releases updates to improve stability and fix bugs. Keeping Word updated reduces the chances of crashes.
Conclusion
Microsoft Word's AutoRecovery feature on Mac is a powerful tool that can save you from losing your hard work. Whether it's a system crash, application freeze, or an accidental closure, AutoRecovery provides a safety net by automatically saving backup versions of your document. Knowing where to find these files and how to use them can make the difference between lost productivity and a quick recovery.
While it's a great feature, AutoRecovery is not foolproof. That's why it's essential to combine it with good habits—like saving frequently, enabling cloud backups, and keeping your system in good health. By understanding how Word AutoRecovery works on Mac and following best practices, you can write and edit with more peace of mind, knowing your data is well protected.
Donemax Data Recovery for Mac
Donemax Data Recovery for Mac is one of the best Mac data recovery software. It is easy-to-use and can help in recovering deleted, formatted, inaccessible or lost data from Mac HDD/SSD, external disk, USB drive, SD card, camera or other storage devices.
Related Articles
- Feb 21, 2025Where Deleted Photos Go on Mac?
- Dec 31, 2024No Files on USB Drive on Mac, How to Get the Lost Files Back?
- Apr 22, 2026Top 6 Best Recuva Alternatives for Mac in 2026
- Mar 26, 2025How to Recover Deleted .dmg File on Mac? [7 Methods]
- Jun 20, 2025How to Recover Deleted TXT File on Mac (7 Proven Methods)
- Jan 01, 1970Best Solutions for Word Document Recovery on Mac

Contributing Writer
Steven
Steven has been a senior writer & editor of Donemax software since 2020. He's a super nerd and can't imagine the life without a computer. Over 6 years of experience of writing technical solutions and software tesing, he is passionate about providing solutions and tips for Windows and Mac users.

Editor in chief
Gerhard Chou
In order to effectively solve the problems for our customers, every article and troubleshooting solution published on our website has been strictly tested and practiced. Our editors love researching and using computers and testing software, and are willing to help computer users with their problems