
Written byChristinaUpdated on Dec 25, 2025
How to Restore Mac from Time Machine Backup?
Approved byGerhard Chou
Before we start: Time Machine is a helpful utility to back up data on Mac. It can help recover files or restore the Mac in case of data disaster. If no Time Machine backups available in case of data loss on Mac, you can still restore the missing files with a reliable data recovery tool Donemax Data Recovery for Mac.
PAGE CONTENT:
When you back up your Mac, you make a copy of your files and store them on an external hard drive. The most common data protection method is saving copies of files to an external hard drive or cloud storage. You can back up your files one by one or put them together in a single folder. A full backup of your Mac is preferable to using this method, but it might help protect individual files or make archives.
iCloud is an integrated feature of macOS that serves as Apple's cloud storage solution. It allows users to sync and back up data between their Mac and other iOS and macOS devices. For Mac users, the best way to back up data is to use Time Machine. It can help you restore Mac from Time Machine in some cases. Check how to set Time Machine on macOS >>
If data loss happened, you can recover data using Time Machine backups. It can also help transfer data after reinstalling macOS or changing new Mac. A Time Machine backup can also help to restore entire macOS with all apps and data if there are issues with the Mac startup disk.
How Does A Time Machine Function?
Apple's Macs come included with a backup application called Time Machine. Incremental copies of files are made and saved for later use. It is compatible with any external or internal volume linked to your Mac through USB, FireWire, or Thunderbolt. It allows users to restore the entire Mac system, multiple or single files.
When activated, Time Machine will routinely make copies of your data on the backup disk you specify. Time Machine backs up your Mac every hour, every day, and every week, and as the backup drive fills up, it will automatically delete the oldest backups and make room for the newest ones.
📎 Learn More:
Best Time Machine alternative - disk cloning application. A disk cloning application can help you securely create a bootable clone backup for Mac. Then you can use the clone as a bootable disk or use it to restore your startup disk on different Macs.
What Are Time Machine's Main Recovery Options?
Time Machine is a system utility standard on every Mac. It's a backup program that can restore files that have been lost or corrupted.
Time Machine allows back up the entire Mac by making a copy of all your files and data and moving it to an external device. The backed-up information can then be used to replace lost or corrupted originals.
You have three primary choices when using Time Machine backups:
- You can use file recovery if you accidentally erased a crucial file and need to get it back.
- If you've reinstalled macOS and want everything to be as it was, you may use Time Machine to roll back your Mac to a previous backup.
- When you buy a new Mac and want to transfer your data from your Time Machine backup, you need to perform a restoration.
Restore from A Time Machine Backup
There are some cases you may need to restore from a Time Machine backup as mentioned above. Here we will introduce each way in detail and you can choose one way to recover files or restore Mac if needed.
Option 1. Migrate apps and data
In some case, you may get a new Mac or reinstall the fresh new macOS. Then you can use Time Machine backup to transfer the previous settings, personal data and installed apps to the new machine or system without configuring everything again. Here we will show you how to do that:
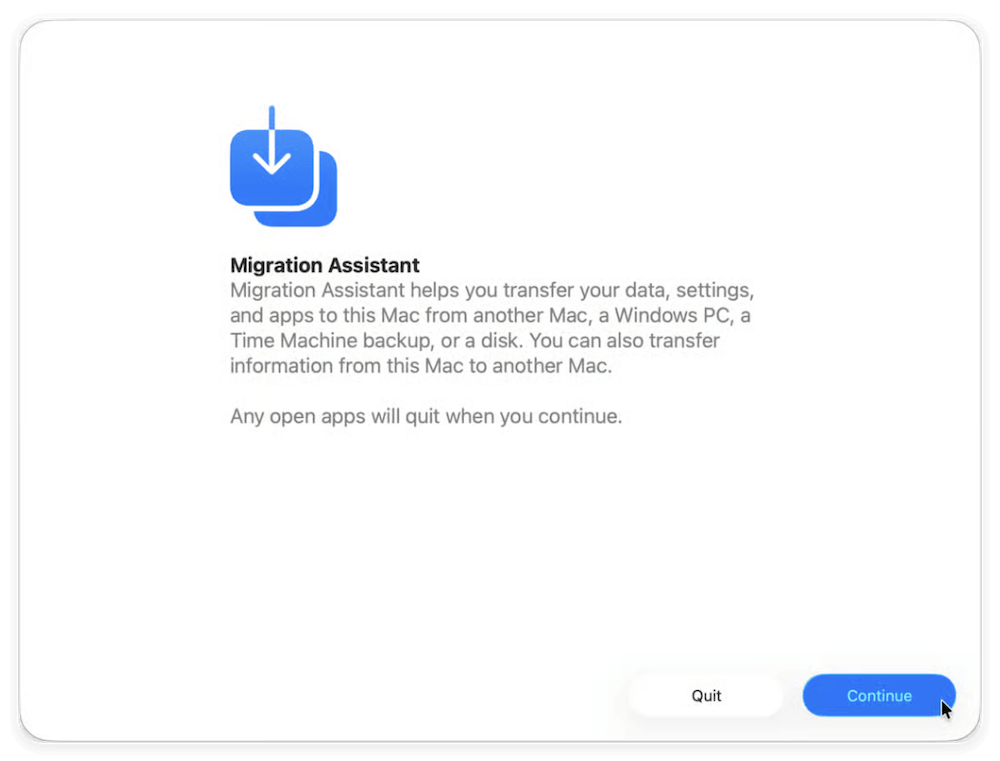
- To begin, fire up Apple's Migration Assistant on your Mac. Within the Applications folder of macOS, you'll find Utilities. It is important to note that if your Mac boots into a setup assistant asking for your country and network, you may skip this step and move on to the next one because the setup assistant already includes the migration assistance.
![restore Mac from Time Machine]()
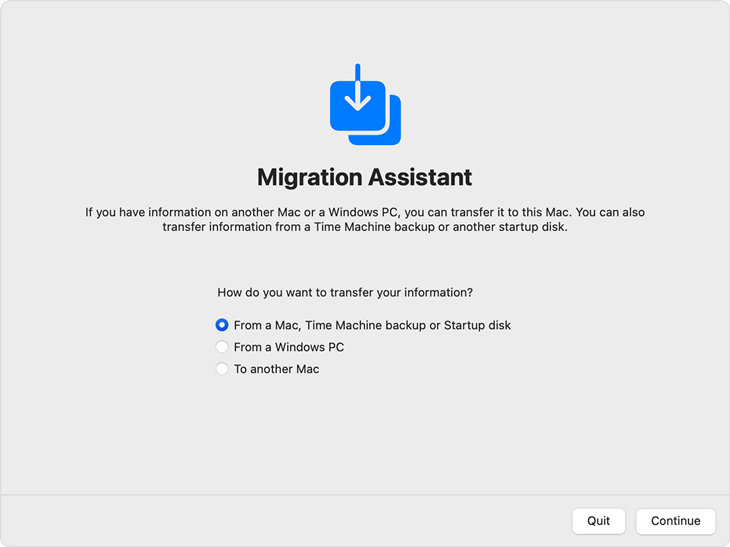
- Choose the option to transfer from a Time Machine backup or start-up disk, and then press the proceed button in the bottom right of the screen when prompted to choose how you would like to install your information.
![restore Mac from Time Machine]()
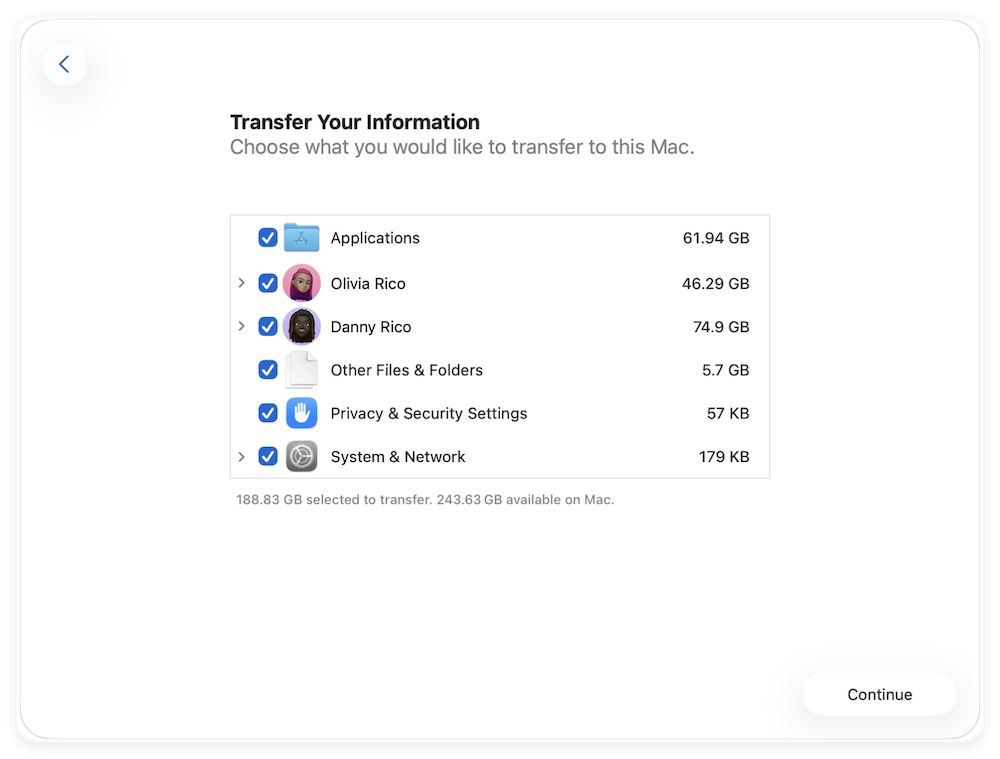
- Next, navigate to the location on your external drive where the Time Machine backup you want to restore to your Apple Mac machine is stored. Then you need to select the items you want to transfer to the new Mac or system. To continue, please press the Continue button once more.
![restore Mac from Time Machine]()
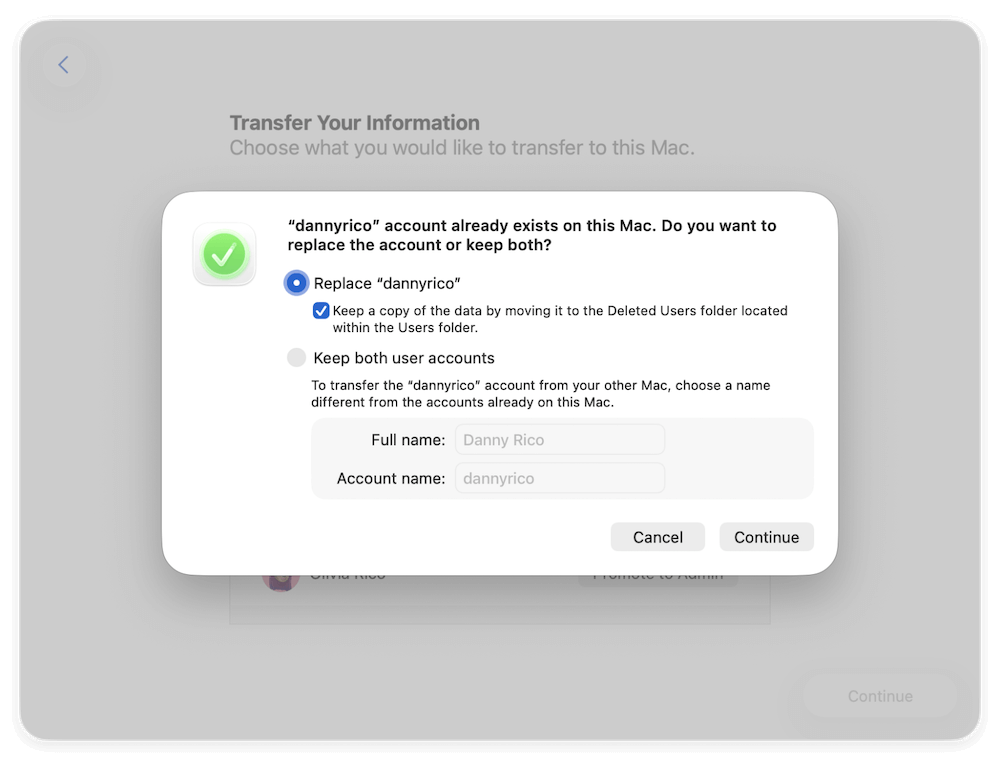
- Now that you know more about the transfer, Apple can help you choose products tailored to your specific needs and preferences. When you've made your choices and are satisfied, click the Continue button. Note that if you have two accounts on your Mac with the same name and reinstall one, you will be prompted to rename or replace the account.
![restore Mac from Time Machine]()
- Once the Time Machine restores on your Mac has begun, it can take several hours to finish and may appear to have halted or failed. Apple suggests waiting overnight for the Time Machine backup to be restored.
All your files, documents, and Apple account settings should be back in place after you connect to macOS after the Migration Assistant has finished restoring your Time Machine backup.
Option 2. Recover individual files or folders
In another case, you may deleted or lost some important files. Fortunately, you have Time Machine backups for the missing files. Then you can use Time Machine to restore the specified files. Here is how:
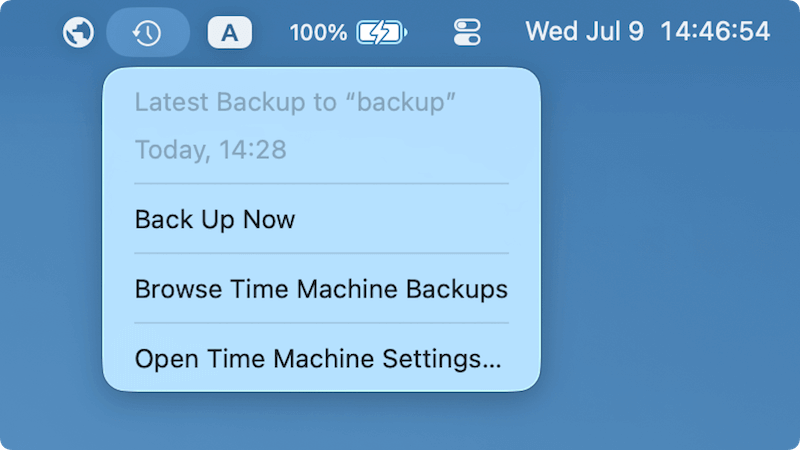
- Connect the external hard drive with Time Machine backups to the Mac.
- Right click the Time Machine icon at the top task bar and choose Browse Time Machine Backups.
![restore Mac from Time Machine]()
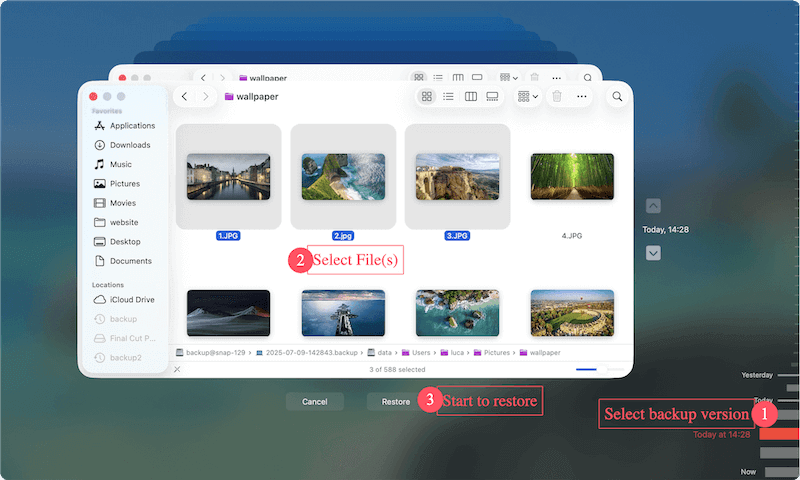
- Navigate to the files you want to recover, select them and click the Restore button to restore them to your Mac.
![restore Mac from Time Machine]()
Option 3. Restore entire macOS with apps and data
If the macOS system is crashed and startup disk cannot boot up normally, you can use Time Machine backup to restore the entire macOS with all data and make the Mac working again. Do as following steps:
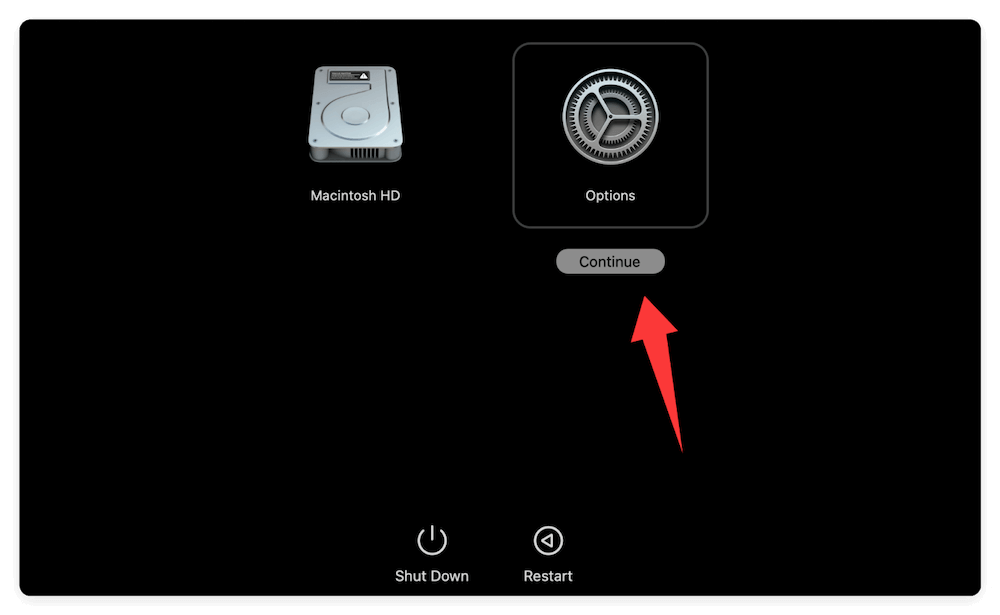
- Restart your Mac and hold Power button during boot until you see "Loading startup options." Select Options and click Continue to enter macOS Recovery Mode.
![restore Mac from Time Machine]()
- Select Restore from Time Machine option and click Continue button. Connect your Time Machine backup drive. Follow the onscreen prompts to select a backup and restore your system.
![restore Mac from Time Machine]()
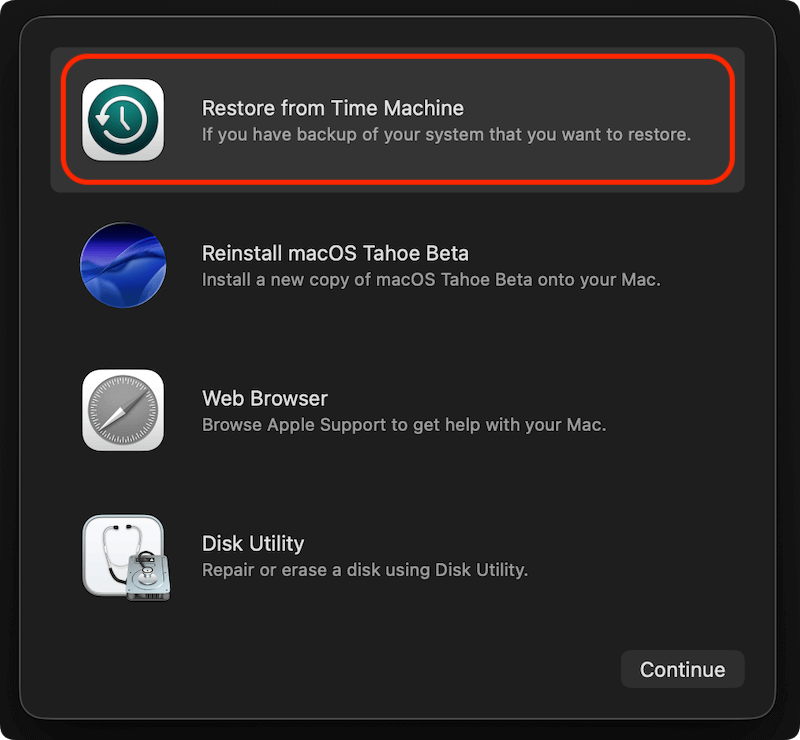
In this way, it restore macOS, apps, files and settings from Time Machine backup, returning your system to the previous working backup's state.
How to Recover Lost Data on Mac without Backup?
When you lose important data on Mac and don’t have a backup, you can try data recovery software to get the lost data back. Most of data recovery applications such as Donemax Data Recovery for Mac can recover deleted or formatted data on Mac.
Donemax Data Recovery for Mac
- Recover permanently deleted files on Mac.
- Recover formatted or erased data on Mac.
- Recover damaged or inaccessible data on Mac.
Follow the guide below to recover lost data on Mac with Donemax Data Recovery for Mac:
Step 1. Download and install Donemax Data Recovery for Mac on your Mac, then open it to start data recovery. Select the drive where you delete or lose your data.

Step 2. Click on Scan button, then Donemax Data Recovery for Mac will deeply scan the selected hard drive and find all recoverable files.

Step 3. Once the scan is completed, you can preview all recoverable files. Select the wanted files and save them to another hard drive.

Conclusion:
It's never fun to lose anything from your Mac, but if you've been using Time Machine, Quickly retrieving some of your files may be possible. Make regular use of the program to ensure that your most crucial information is always safe. You may need to rely solely on your backups for data restoration in the event of a catastrophic loss.
It's crucial always to back up your data. If the data on your Mac is important to you, you should back it up frequently. That's why Apple included Time Machine in every fresh macOS install. Make use of this no-cost resource to safeguard your information. As soon as feasible, invest in an external hard drive and begin backing up your Mac regularly using Time Machine.
In addition, we expect you to have learned How to Restore from Time Machine as a result of reading this!
Donemax Data Recovery for Mac
Donemax Data Recovery for Mac is one of the best Mac data recovery software. It is easy-to-use and can help in recovering deleted, formatted, inaccessible or lost data from Mac HDD/SSD, external disk, USB drive, SD card, camera or other storage devices.
Related Articles
- Mar 21, 2025How to Recover Deleted Notes on Mac? [6 Methods]
- May 27, 2026How to Recover Lost Data from Crashed M5 Max Mac: The Ultimate Guide
- Apr 12, 2024How to Recover Erased Seagate External Hard Drive on Mac?
- Oct 29, 2024How to Recover Deleted PNG/JPG Images on Mac?
- Nov 06, 2025How to Unformat SD Card on Mac?
- Sep 03, 2025Recover Unsaved or Deleted Sketch Files on Mac

Contributing Writer
Christina
Christina is the senior editor of Donemax software who has worked in the company for 4+ years. She mainly writes the guides and solutions about data erasure, data transferring, data recovery and disk cloning to help users get the most out of their Windows and Mac. She likes to travel, enjoy country music and play games in her spare time.

Editor in chief
Gerhard Chou
In order to effectively solve the problems for our customers, every article and troubleshooting solution published on our website has been strictly tested and practiced. Our editors love researching and using computers and testing software, and are willing to help computer users with their problems