
Written byMariaUpdated on Sep 04, 2025
Recover Deleted or Unsaved PowerPoint Files on Mac
Approved byGerhard Chou
Before we start: With the software Donemax Data Recovery for Mac, you can easily recover deleted, unsaved or lost PowerPoint files in different data loss cases. The software can also recover any other type of missing files.
PAGE CONTENT:
Losing a PowerPoint presentation on your Mac can be awful, especially if it contains critical data, research, or hours of hard work. Accidental deletion, system crashes, power failures, or forgetting to save changes are some of the most common causes of lost PowerPoint files. Fortunately, macOS offers several built-in and third-party ways to recover deleted or unsaved PowerPoint files on Mac.

In this guide, we'll explore different ways to recover your lost PowerPoint files on Mac, covering both unsaved and deleted scenarios. Additionally, we'll provide preventive measures to help you avoid data loss in the future.
Recover Unsaved PowerPoint Files on Mac
Sometimes, a PowerPoint file is not deleted but remains unsaved due to a crash, accidental closing, or a system restart. Below are methods to recover unsaved files.
Method 1. Using PowerPoint's AutoRecover Feature
Microsoft PowerPoint has a default AutoRecover feature that periodically saves a copy of your presentation, even if you forget to save it manually. If your PowerPoint crashes or your Mac shuts down unexpectedly, you may be able to recover the last saved version.
Steps to Recover Unsaved PowerPoint Files via AutoRecover:
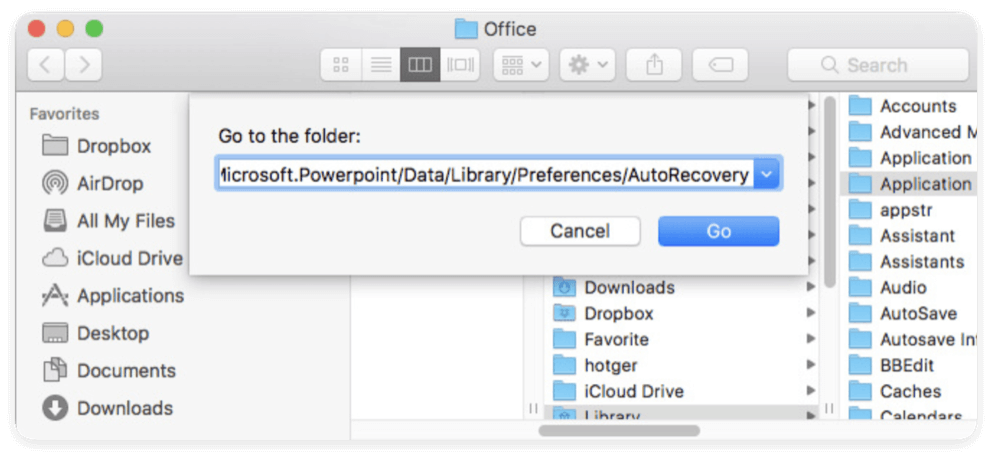
- Launch Finder, then select Go from the top menu under Go to Folder.
- Type the below path and hit Enter:
~/Library/Containers/com.microsoft.Powerpoint/Data/Library/Preferences/AutoRecovery
- Look for a file that starts with AutoRecovery save of followed by your presentation's name.
- To open the file in PowerPoint, double-click it.
- Save the recovered file immediately to prevent future loss.
💡 Note: If the AutoRecover option was disabled, this method will not work. To enable AutoRecover for future protection, ensure AutoSave is turned on.

Method 2. Recovering from Temporary Folders
Mac's temporary folders sometimes store unsaved PowerPoint files. You can try accessing them using Terminal.
Steps to Locate Unsaved PowerPoint Files in Temporary Folders:
- Open Terminal from Utilities via Applications.
- Type the below command and press Enter:
open $TMPDIR
- This opens the Temporary Files directory. Navigate to TemporaryItems
- Look for PowerPoint files with the .pptx extension.
- If found, open and save them immediately to a secure location.

Method 3. Checking the Recent Tab in PowerPoint
Sometimes, unsaved files may still be listed in the Recent section of PowerPoint.
Steps to Check Recent Files:
- Open PowerPoint on your Mac.
- Click on File > Open Recent.
- Look for your unsaved presentation and open it.
- Save the file immediately if found.

Recover Deleted PowerPoint Files on Mac
If your PowerPoint file was saved but later deleted, you still have a chance to restore it. Here are different methods to recover deleted PowerPoint presentations.
Method 1. Restore from Mac's Trash
Deleted files often remain in the Trash before being permanently erased.
Steps to Restore PowerPoint from Trash:
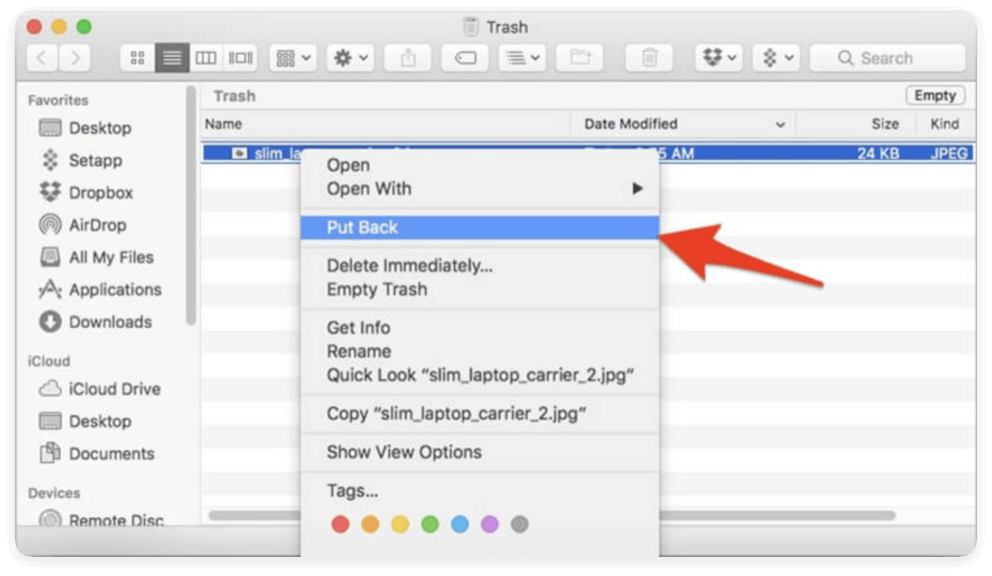
- On the Dock, click the Trash icon.
- Look for your deleted PowerPoint file.
- To return the file to its original location, right-click on it and choose Put Back if it was located.
💡 Note: If you have emptied the Trash, you'll need to use Time Machine or data recovery software.
Method 2. Restore from Time Machine Backup
If you have Time Machine enabled, you can restore a deleted PowerPoint file from a previous backup.
Steps to Recover PowerPoint from Time Machine:
- If your backup drive is external, connect it to your time machine.
- Access the folder containing the PowerPoint file.
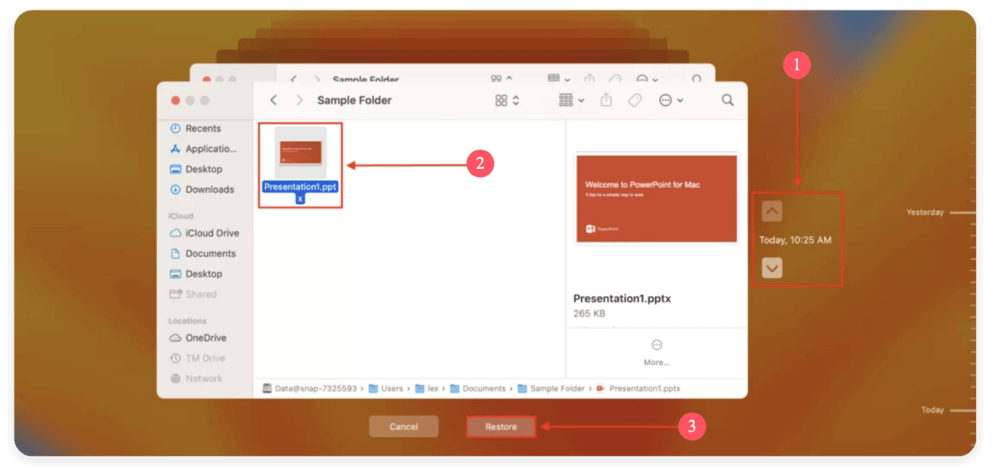
- Choose "Browse Time Machine Backups" after clicking the Time Machine symbol in the navigation bar.
- To view previous backups, use the timeline on the right.
- Select the PowerPoint file and click Restore.
Method 3. Recover Using Cloud Backups (OneDrive/iCloud)
If you save PowerPoint files to OneDrive or iCloud, they may still be recoverable even after deletion.
Recover from OneDrive:
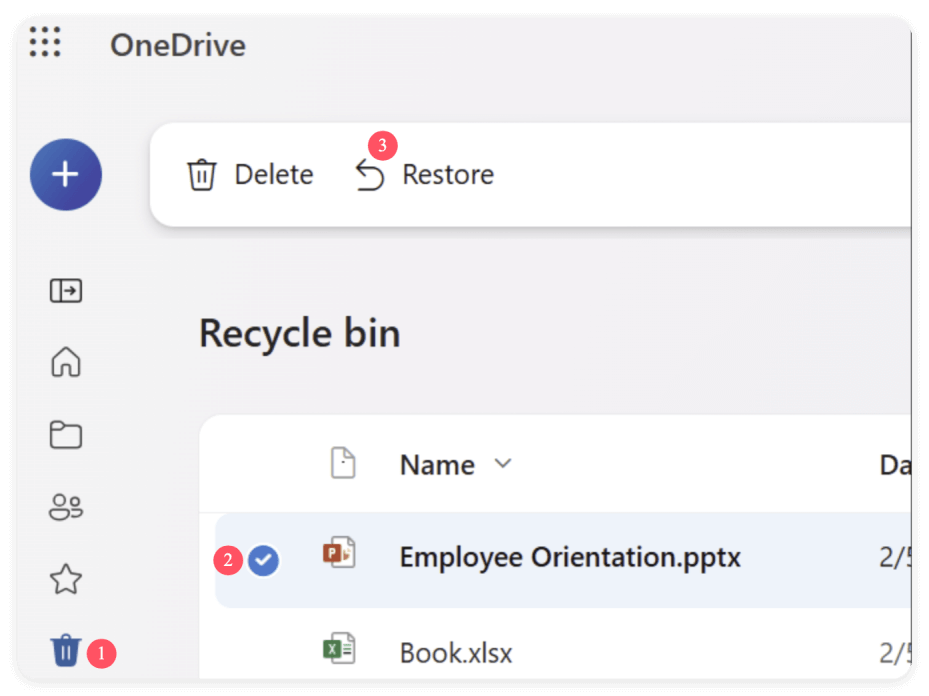
- Open OneDrive on your browser (onedrive.live.com).
- Go to the left sidebar's Recycle Bin.
- Locate the deleted PowerPoint file and select Restore.
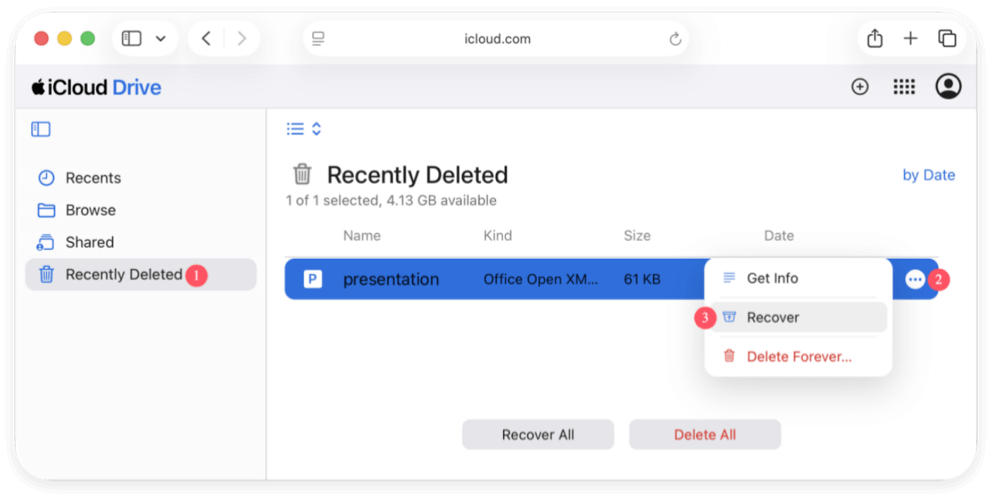
Recover from iCloud Drive:
- Go to iCloud.com and sign in.
- Click iCloud Drive and check for your PowerPoint file.
- If not found, go to Recently Deleted to check for recently deleted items.
- Select the file and click Recover.
Method 4. Using Third-Party Data Recovery Software
If built-in Mac recovery options like AutoRecover, Temporary Folders, Trash, Time Machine, or Cloud Backups do not help, your best option is to use third-party Mac data recovery software. These tools scan your Mac's storage for lost PowerPoint files, even if they were deleted permanently or lost due to formatting or corruption.
How Data Recovery Software Works
On a Mac, deleting a file does not instantly remove it from the disk. Instead, the space it occupied is marked as "available," and the file remains recoverable until new data overwrites it. Data recovery software works by:
- Scanning your disk to identify lost files that haven't been overwritten.
- Reconstructing file fragments to recover usable PowerPoint presentations.
- Allowing you to preview files before restoring them.
If a PowerPoint file has been deleted, it is important to stop using the Mac immediately to prevent overwriting and maximize the chances of recovery.
Best Data Recovery Software for PowerPoint File Recovery
Here are some of the most reliable tools for recovering deleted PowerPoint files on Mac:
1. Donemax Data Recovery for Mac - Donemax Data Recovery is renowned for its strong recovery capabilities and easy-to-use interface. It allows users to recover files from internal and external storage and provides a preview feature before restoration.
2. Do Your Data Recovery - It is a beginner-friendly recovery tool that offers a fast scanning and recovery process. It supports recovery from formatted drives, making it useful in various scenarios. However, full recovery requires a paid version, and the software may not be able to restore severely corrupted files.
3. Wondershare Recoverit - Wondershare Recoverit is known for its deep scanning capabilities and high success rate in recovering lost files. It can retrieve data from crashed Macs and supports multiple file types, including PowerPoint, PDFs, and videos. However, it is more expensive than other tools, and deep scanning can be slow.
Step-by-Step Guide to Recover PowerPoint Files Using Donemax
Step 1: Download and Install Donemax Data Recovery for Mac
- Download the software by going to the official Donemax website.
- Install the application on your Mac and grant necessary permissions for full disk access.
Step 2: Launch Donemax Data Recovery and Select a Drive
- Open Donemax Data Recovery and select the disk where the lost PowerPoint file was stored.
- Click the Scan button to begin scanning.

Step 3: Scan for Lost Files
- The software will quickly scan for the deleted files and then automatically start a deep scan, which takes longer but has a higher success rate.

Step 4: Preview and Select Files
- Once the scan is complete, peruse the list of recovered files.
- Look for PowerPoint files with a .pptx or .ppt extension.
- Use the preview feature to verify the contents before recovery.

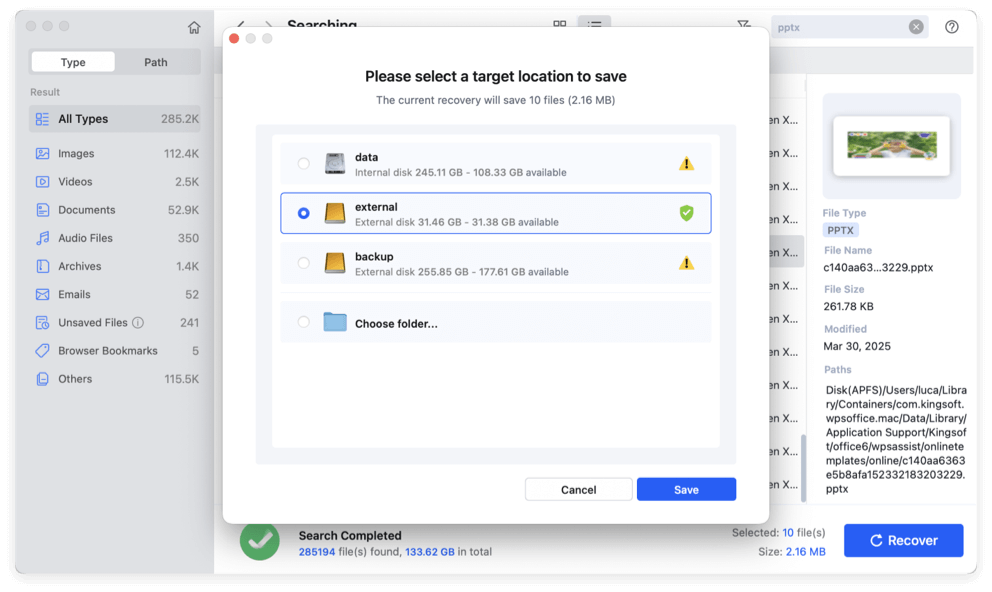
Step 5: Recover and Save Your File
- Select the PowerPoint file and click Recover button.
- Save the recovered file to a different location, such as an external drive, to avoid potential data overwriting.
Key Considerations When Using Data Recovery Software
When using third-party recovery software, consider the following factors:
- Avoid installing the software on the same drive where the lost file was stored, as this could overwrite the data. If possible, install the software on an external drive.
- If one recovery tool does not work, trying another may yield better results. Different software solutions use different recovery algorithms.
- Always check the file integrity after recovery. Some recovered files may be partially corrupted, especially if they were overwritten.
When to Seek Professional Data Recovery Services
If a PowerPoint file is still missing after using recovery software, expert data recovery services may be necessary. File recovery from physically damaged, corrupted, or formatted disks is the area of expertise for these services.
Signs That Professional Help May Be Needed:
- The Mac's drive is making unusual clicking noises, which could indicate hardware failure.
- The drive is not recognized by macOS, preventing access to the file system.
- Recovery software fails to detect the deleted file or produces only corrupted versions.
Preventive Measures to Avoid Data Loss in PowerPoint
While recovering lost PowerPoint files is possible, it's best to prevent data loss in the first place. Here are some best practices:
- Enable AutoSave and AutoRecover
- Open PowerPoint and go to Preferences > Save.
- Enable AutoSave and set AutoRecover to save every 5 minutes.
- Save Files to Cloud Storage (OneDrive/iCloud/Google Drive)
- Enable OneDrive or iCloud Drive backup for automatic saving.
- Consider using Google Drive for additional cloud protection.
- Regularly Back Up Files with Time Machine
- Connect an external drive and set up Time Machine via System Settings.
- Ensure automatic backups are enabled.
- Develop a Habit of Manually Saving Work
- Use Command + S frequently to manually save changes.
- Name files properly and save them in an organized folder structure.
Conclusion
Losing a PowerPoint file on Mac can be stressful, but there are multiple ways to recover both unsaved and deleted files. AutoRecover, Temporary Folders, Time Machine, Cloud Backups, and third-party data recovery software are some of the most effective methods to retrieve lost presentations.
To avoid future data loss, always enable AutoSave, back up files to cloud storage, and use Time Machine for regular backups. By following these steps, you can minimize the risk of losing important PowerPoint files and ensure your work remains secure.
Donemax Data Recovery for Mac
Donemax Data Recovery for Mac is one of the best Mac data recovery software. It is easy-to-use and can help in recovering deleted, formatted, inaccessible or lost data from Mac HDD/SSD, external disk, USB drive, SD card, camera or other storage devices.
Related Articles
- May 13, 2025Recover Files Which Are Lost Due to Mac Shut Down
- Mar 21, 2025Recover Deleted/Erased or Lost AutoCAD's DWG Files on Mac
- Dec 16, 2025Solved: Hard Drive or External Device Not Showing Up on Mac
- May 12, 2025[4 Methods] How to Recover Deleted GoPro Files on Mac?
- May 29, 2026How to Recover Permanently Deleted 4K Videos on M5 Mac: An Easy Guide
- Apr 22, 2026Top 6 Best Recuva Alternatives for Mac in 2026

Contributing Writer
Maria
Maria is one of the senior writers & editors of Donemax who lives and works in Sydney, Australia. She loves PC, Mac and Internet Technology. She has 6 years of writing articles about data recovery on PC/Mac, disk cloning solution, data eraser and computer OS optimization, etc. She is also interested in testing various software and digital products.

Editor in chief
Gerhard Chou
In order to effectively solve the problems for our customers, every article and troubleshooting solution published on our website has been strictly tested and practiced. Our editors love researching and using computers and testing software, and are willing to help computer users with their problems