
Written byCharlesUpdated on Oct 09, 2025
How to Recover Erased Data on macOS Tahoe 26?
Approved byGerhard Chou
Before we start: If the hard drive is erased by Disk Utility on macOS Tahoe 26, you can still recover the erased data with the software Donemax Data Recovery for Mac. The software is fully compatible with macOS Tahoe and it can effectively recover the data with ease.
PAGE CONTENT:
Losing important files on your Mac can be stressful, especially if you accidentally erased or formatted a hard drive while running macOS Tahoe 26, Apple's latest update. Whether it's precious photos, work documents, or entire partitions, data loss is common and can happen for a variety of reasons. Fortunately, in most cases, recovery is possible if you act quickly.
In this guide, we'll explore how to recover erased data on macOS Tahoe 26 and unformat a hard drive safely. You'll learn about built-in recovery options, third-party tools, step-by-step methods, and best practices to prevent future data loss.
Can You Recover Erased Data or Unformat a Drive on macOS Tahoe 26?
When you erase or format a drive in macOS, the operating system typically removes the file directory, not the actual data. The space previously occupied by the files is marked as available for new data. This means that until new files overwrite those sectors, recovery is often possible.
Key points to understand:
- Deleting a file → moves it to Trash; recovery is simple if not emptied.
- Erasing a drive in Disk Utility → removes file system metadata; recovery requires specialized tools.
- Formatting or partitioning → makes recovery harder but not impossible.
macOS Tahoe 26 supports multiple file systems, including APFS, HFS+, exFAT, and FAT32. Recovery tools must be compatible with these formats, especially APFS, which is now the default for modern Macs.
Common Causes of Data Loss on macOS Tahoe 26
Data loss can occur due to:
- Accidental Erase in Disk Utility
Many users mistakenly erase the wrong drive when preparing an external disk.
- Formatting a Hard Drive or SSD
Reformatting to APFS, HFS+, or exFAT without backup leads to instant data loss.
- Partition Deletion or Corruption
APFS containers and partitions can become corrupted, making data inaccessible.
- File System Corruption
Power failures, crashes, or improper ejections may corrupt the file system.
- Cross-Platform Usage
Drives formatted for Windows may be erased when made compatible with macOS.
Understanding the cause helps you choose the right recovery method.
Built-in macOS Tahoe 26 Options for Data Recovery
Before turning to third-party tools, check if macOS's native features can help.
1. Restore from Trash
- If you deleted files (not erased the disk), check the Trash.
- Right-click the file → Put Back.
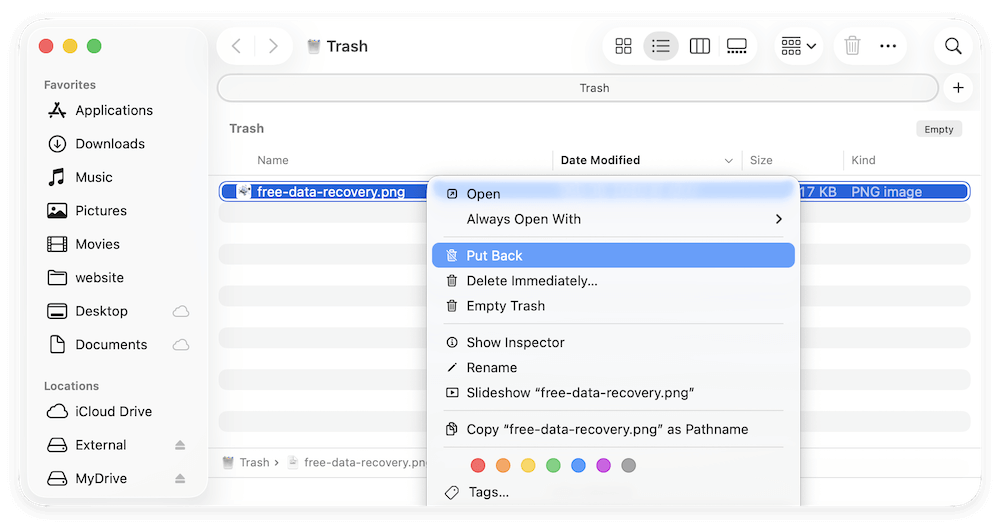
Works only if Trash hasn't been emptied.
2. Time Machine Backup
- Open Time Machine from Applications.
- Navigate to the date before the deletion.
- Select files and click Restore.
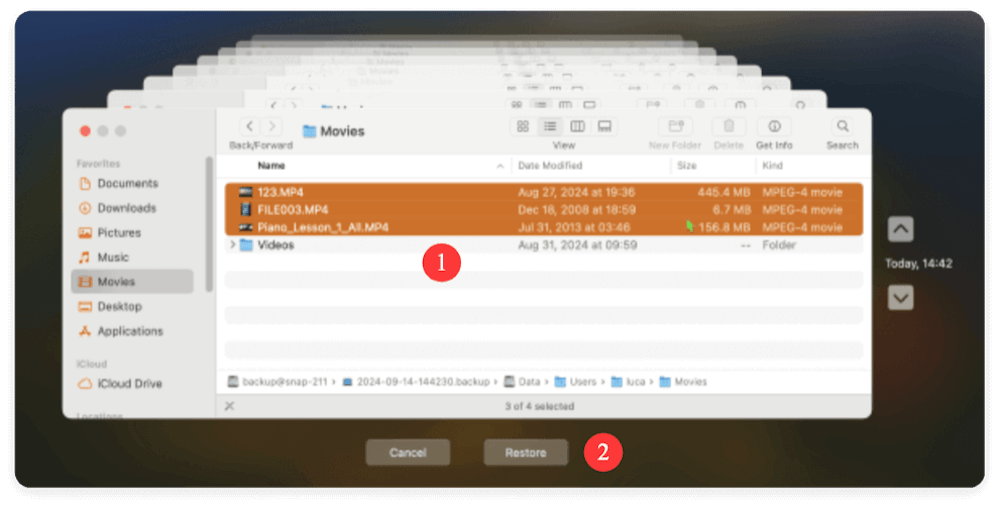
Works if Time Machine backups were previously enabled.
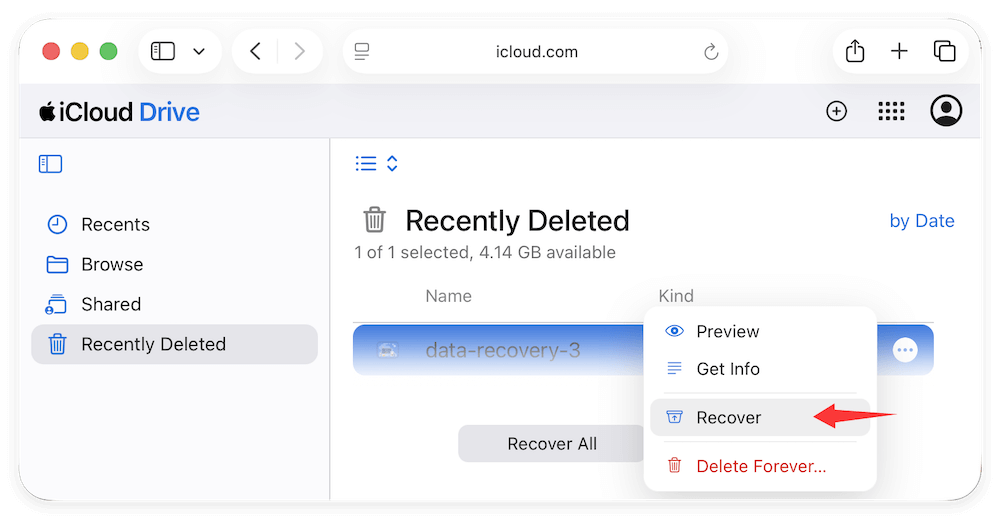
3. iCloud Drive Restore
- Visit iCloud.com → iCloud Drive.
- Open Recently Deleted folder.
- Restore files if available.
Limitations of Built-in Options
- They don't work if the drive was erased or reformatted.
- Require prior backups (Time Machine/iCloud).
- Cannot unformat a hard drive.
If built-in solutions don't work, you'll need data recovery software.
How to Unformat a Hard Drive on macOS Tahoe 26
Unlike Windows, macOS doesn't include a direct "unformat" feature. Once a disk is erased in Disk Utility, the system doesn't provide a rollback option. However, you can recover the data with a reliable data recovery software.
Why third-party software is necessary:
- Disk Utility only allows erasing, partitioning, or repairing disks—not unformatting.
- Unformatting requires scanning raw disk sectors for recoverable data.
- Only specialized software can rebuild lost file directories.
Best Third-Party Data Recovery Software for macOS Tahoe 26
If you need to unformat a drive or recover erased files, third-party recovery tools are the most effective solution. Below are popular options that support APFS and macOS Tahoe 26.
If you've erased or formatted a drive on macOS Tahoe 26, built-in options like Time Machine or iCloud may not help. In such cases, third-party data recovery tools are the most reliable way to recover lost files or even unformat an entire hard drive. The right software will scan your disk sector by sector, rebuild the lost file system, and let you preview and recover files safely.
Here's a detailed look at the most effective options:
1. Donemax Data Recovery for Mac
Best for: Beginners and professionals needing reliable recovery for APFS, HFS+, and external drives.
Features:
- Supports recovery from APFS, HFS+, exFAT, and FAT32 drives.
- Works with internal SSDs, HDDs, USB drives, SD cards, and external storage.
- Deep scan for erased or formatted drives.
- File preview before recovery ensures you only restore the files you need.
Pros
- Easy-to-use interface.
- Supports Apple Silicon and Intel Macs.
- Can recover data from lost partitions.
Cons
- Free trial version only recovers up to 200MB.
2. Stellar Data Recovery for Mac
Best for: Professional users recovering partitions and large volumes of data.
Features:
- Works with APFS, HFS+, exFAT, and NTFS file systems.
- Can recover entire partitions lost due to formatting or corruption.
- Advanced search lets you filter by file type (documents, photos, videos).
- Supports encrypted APFS drives.
- Recovers from Time Machine backups that may have been corrupted.
Pros
- Professional-grade results.
- Deep scanning for heavily formatted drives.
- Recovers data from RAID setups.
Cons
- More expensive compared to other tools.
3. Do Your Data Recovery for Mac
Best for: Lightweight, fast recovery with strong APFS support.
Features:
- Designed for APFS and macOS-exclusive issues like container corruption.
- Recovers lost partitions and erased drives with high success rates.
- Simple three-step recovery: Scan → Preview → Restore.
- Works well with Apple Silicon Macs.
Pros
- User-friendly and lightweight.
- Focused on APFS and other file systems data recovery.
- Affordable pricing.
Cons
- Fewer advanced features compared to Stellar.
4. Magoshare Data Recovery for Mac
Best for: Casual users looking for a straightforward solution.
Features:
- Supports multiple file systems and storage devices.
- Can recover from accidental deletions, erasures, and partitions.
- Allows file preview before restoring.
- Built-in recovery session manager lets you pause/resume scans.
Pros
- Beginner-friendly design.
- Free trial available.
- Good balance between features and price.
Cons
- Recovery speed is slower compared to Donemax.
- Deep scan results may be less thorough.
5. R-Studio for Mac
Best for: Advanced users and IT professionals.
Features:
- Supports APFS, HFS+, FAT, exFAT, and NTFS file systems.
- Hexadecimal editor for advanced recovery.
- RAID recovery support.
- Cross-platform version available (Mac, Windows, Linux).
Pros
- Professional-level features.
- Handles complex recovery scenarios.
- Excellent for IT technicians.
Cons
- Steeper learning curve.
- Interface is not as beginner-friendly.
Comparison Table: Best macOS Tahoe 26 Data Recovery Tools
Software |
Best For |
File Systems Supported |
APFS Support |
Free Version |
Difficulty Level |
|---|---|---|---|---|---|
Donemax |
General users |
APFS, HFS+, exFAT, FAT32 NTFS EXT2/3 |
Yes |
200MB limit |
Very Easy |
Stellar |
Professional recovery |
APFS, HFS+, exFAT, NTFS |
Yes |
Preview only |
Medium |
DoYourData |
APFS-focused recovery |
APFS, HFS+, exFAT |
Yes |
Limited scan |
Easy |
Magoshare |
Beginners and casual use |
APFS, HFS+, exFAT, FAT32 |
Yes |
Limited scan |
Very Easy |
R-Studio |
Advanced/IT professionals |
APFS, HFS+, exFAT, NTFS |
Yes |
None |
Advanced |
Step-by-Step Guide: Recover Erased Data Using Data Recovery Software
Let's use Donemax Data Recovery for Mac as an example:
Step 1: Download and Install
Download Donemax Data Recovery for Mac from its official website. Install it on a different drive (not the erased one) to avoid overwriting.
Step 2: Select the Erased or Formatted Drive
Launch the app and it will list all the connected drives on Mac. Choose the erased drive you want to recover.

Step 3: Scan the Drive
Click the Scan button. The software will deeply scan the drive to search for the lost data. Wait for the scan to finish.

Step 4: Preview Recoverable Files
Once the scan process is finished, you can search and locate the wanted files. Preview documents, photos, or videos. Confirm that your files are intact.
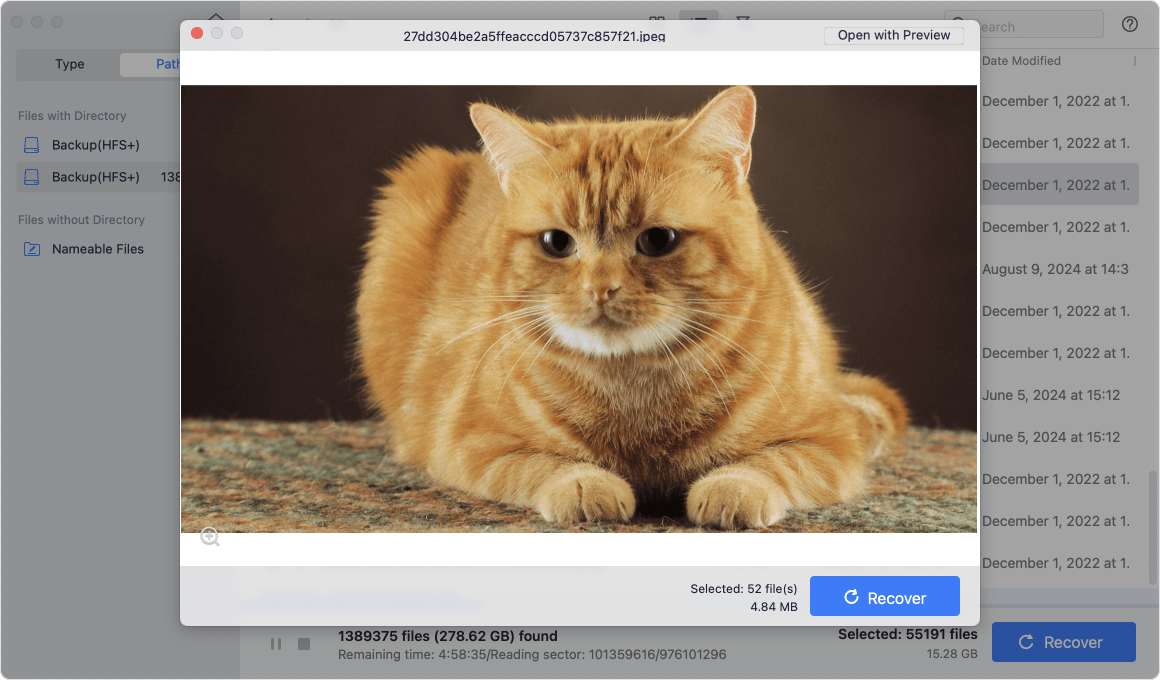
/images/screenshots/mac-data-recovery/preview.png
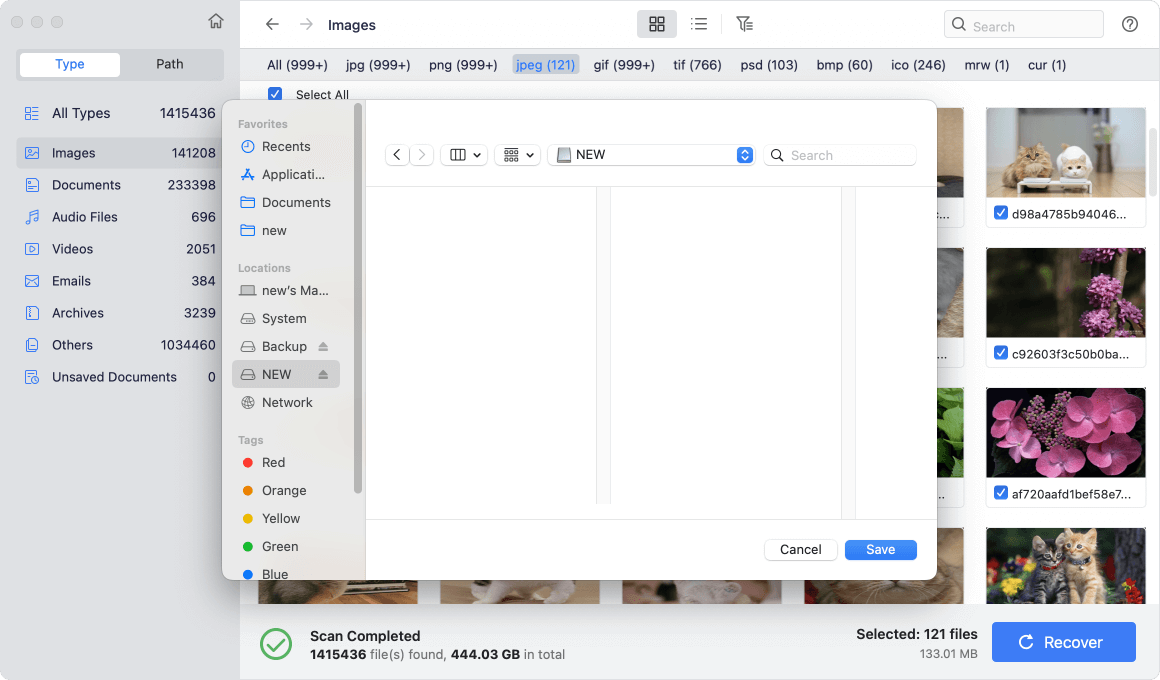
Step 5: Recover Files
Select desired files. Click Recover button and save them to a safe location (external drive recommended).
💡 Important: Never save recovered files back to the same drive you are recovering from.
Tips to Improve Success Rate of Recovery
- Stop using the drive immediately. The more you write new data, the lower your chances.
- Use read-only scanning tools to avoid additional damage.
- Recover files to a separate storage device to prevent overwriting.
- Don't reinstall macOS on the same drive until recovery is complete.
Prevent Future Data Loss on macOS Tahoe 26
While data recovery is possible, prevention is always better. Here are key practices:
- Enable Time Machine Backups
- Connect an external drive.
- Set up automatic hourly, daily, and weekly backups.
- Use iCloud for Essential Files
- Store documents and photos in iCloud.
- Automatic sync ensures data recovery from the cloud.
- Maintain Redundant Backups
- Use external drives or NAS storage for a second backup layer.
- Disk Utility Caution
- Double-check before clicking Erase or Partition.
- Label external drives clearly to avoid confusion.
- Monitor Disk Health
- Use tools like DriveDx to check SSD/HDD health.
- Replace failing drives before data loss occurs.
Conclusion
Accidentally erasing a drive or losing important files on macOS Tahoe 26 can feel like a disaster, but recovery is often possible. Built-in tools like Time Machine and iCloud work in simple cases, but for unformatting a hard drive or restoring large amounts of erased data, third-party recovery software is your best option.
By acting quickly, choosing the right recovery method, and following best practices to prevent future data loss, you can safeguard your data and reduce the stress of unexpected mishaps.
In short:
- Check Trash, Time Machine, and iCloud first.
- Use third-party Mac recovery tools for unformatting.
- Always back up regularly.
With these strategies, you'll be prepared to recover erased data and unformat hard drives on macOS Tahoe 26 with confidence.
Donemax Data Recovery for Mac
Donemax Data Recovery for Mac is one of the best Mac data recovery software. It is easy-to-use and can help in recovering deleted, formatted, inaccessible or lost data from Mac HDD/SSD, external disk, USB drive, SD card, camera or other storage devices.
Related Articles
- May 22, 2026MacBook Neo Data Recovery Software Free Download: Recover Lost Files Instantly
- May 13, 2025Recover Files Which Are Lost Due to Mac Shut Down
- Sep 08, 2025Word AutoRecovery on Mac – A Complete Guide
- Mar 26, 2025How to Recover Deleted Audio Files on Mac? Here Are 7 Proven Methods
- Mar 19, 2025How to Recover Lost Data on MacBook Pro: 5 Proven Methods (2025 Guide)
- Dec 23, 2025Best Mac Unformat Software for External Hard Drive

Contributing Writer
Charles
Charles, who lives in Sydney, Australia, is an editor & writer of Donemax Team. He is good at writing articles related with Apple Mac computers, Windows operating systems, data recovery, data erasure, disk clone and data backup, etc. He loves reading and playing tennis in his spare time and is interested in testing new digital devices such as mobile phones, Macs, HDDs, SSDs, digital cameras, etc.

Editor in chief
Gerhard Chou
In order to effectively solve the problems for our customers, every article and troubleshooting solution published on our website has been strictly tested and practiced. Our editors love researching and using computers and testing software, and are willing to help computer users with their problems