
Written byMariaUpdated on May 19, 2025
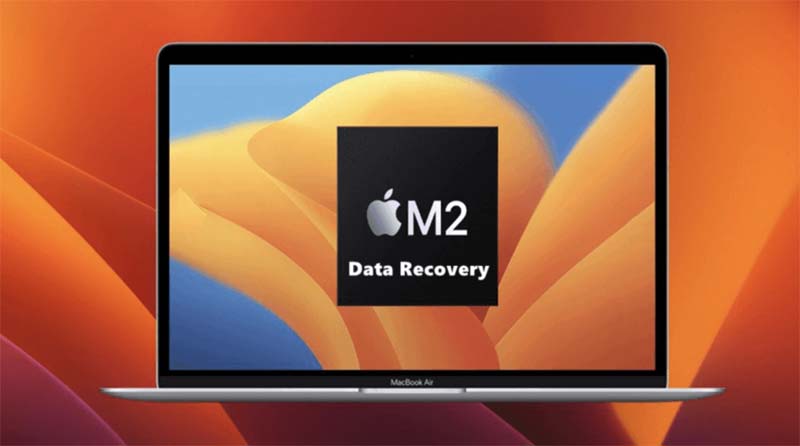
How to Recover Lost Data on M2 Mac? [4 Methods]
Approved byGerhard Chou
Before we start: Donemax Data Recovery is able to recover lost data on a M2-chip Mac. It offers advanced data recovery technology and can recover permanently deleted files, recover erased/inaccessible files from M2 Mac's internal SSD or external USB drive, SD card, external disk, etc.
PAGE CONTENT:
With Apple's transition to custom silicon chips like the M1 and M2, Mac users have experienced significant performance improvements. The M2 chip, in particular, offers advanced efficiency and speed, making it a popular choice among professionals and casual users alike. However, despite this hardware evolution, one thing remains unchanged - data loss can still happen.
Whether you've accidentally deleted files, formatted a drive, or encountered system corruption, losing data can be stressful. This comprehensive guide will help you understand how to recover lost data on an M2 Mac safely and effectively.
Common Causes of Data Loss on M2 Mac
Before diving into recovery techniques, it's essential to understand the most frequent causes of data loss on M2-based Macs:
1. Accidental Deletion
You might delete important files unintentionally and even clear the Trash before realizing it.
2. Formatted Drives
Formatting a drive or partition, whether internal or external, wipes all existing data unless recovered.
3. macOS Update Failures
An interrupted or failed system update may corrupt files or cause the Mac to become unbootable.
4. File System Corruption
Issues with the APFS or HFS+ file system can make volumes unreadable or inaccessible.
5. Malware or Virus Attacks
Though rare, certain malware can delete, encrypt, or corrupt files.
6. Faulty External Devices
Malfunctioning SSDs, USB drives, or SD cards can result in partial or complete data loss.
Knowing the cause helps determine the best recovery approach.
Immediate Actions After Data Loss on a M2 Mac
When you realize data is missing, time becomes critical. The more you use your Mac, the higher the chance that the lost data will be overwritten, especially on the internal SSD.
Key Steps:
- Stop using the affected drive immediately.
- Avoid installing software or saving new files.
- Disconnect external storage devices if they're the source of data loss.
- Do not reformat or repartition until after attempting recovery.
👍Best 4 Methods to Recover Lost Data from a M2-chip Mac
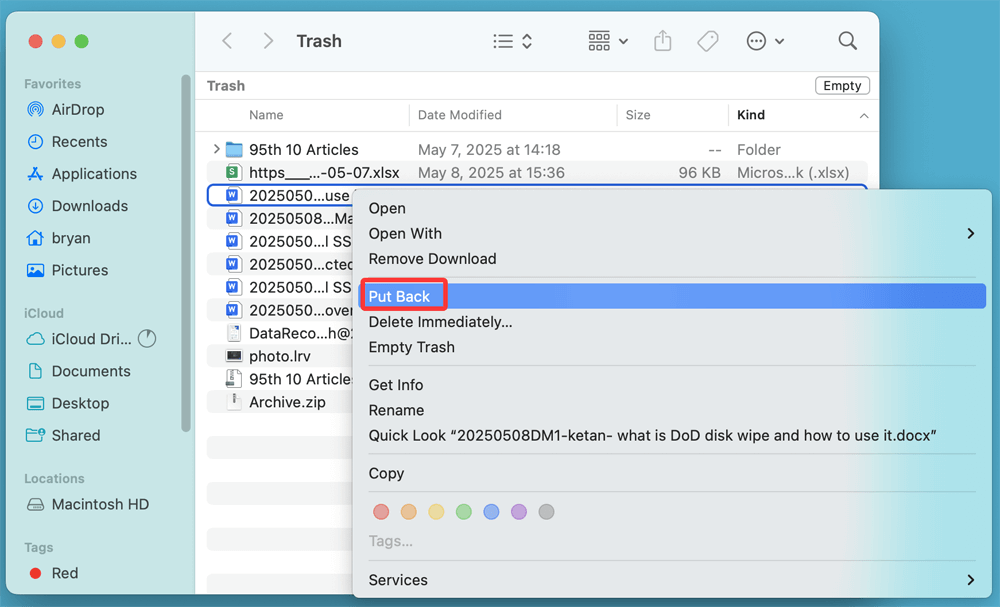
Method 1. Recover Deleted Files from M2 Mac's Trash Bin
The simplest recovery method is checking the Trash:
- Open the Trash icon in the Dock.
- Locate your deleted file.
- Right-click and choose Put Back.
![Recover Deleted Files from M2 Mac's Trash Bin]()
If the file isn't in the Trash, proceed to more advanced methods.
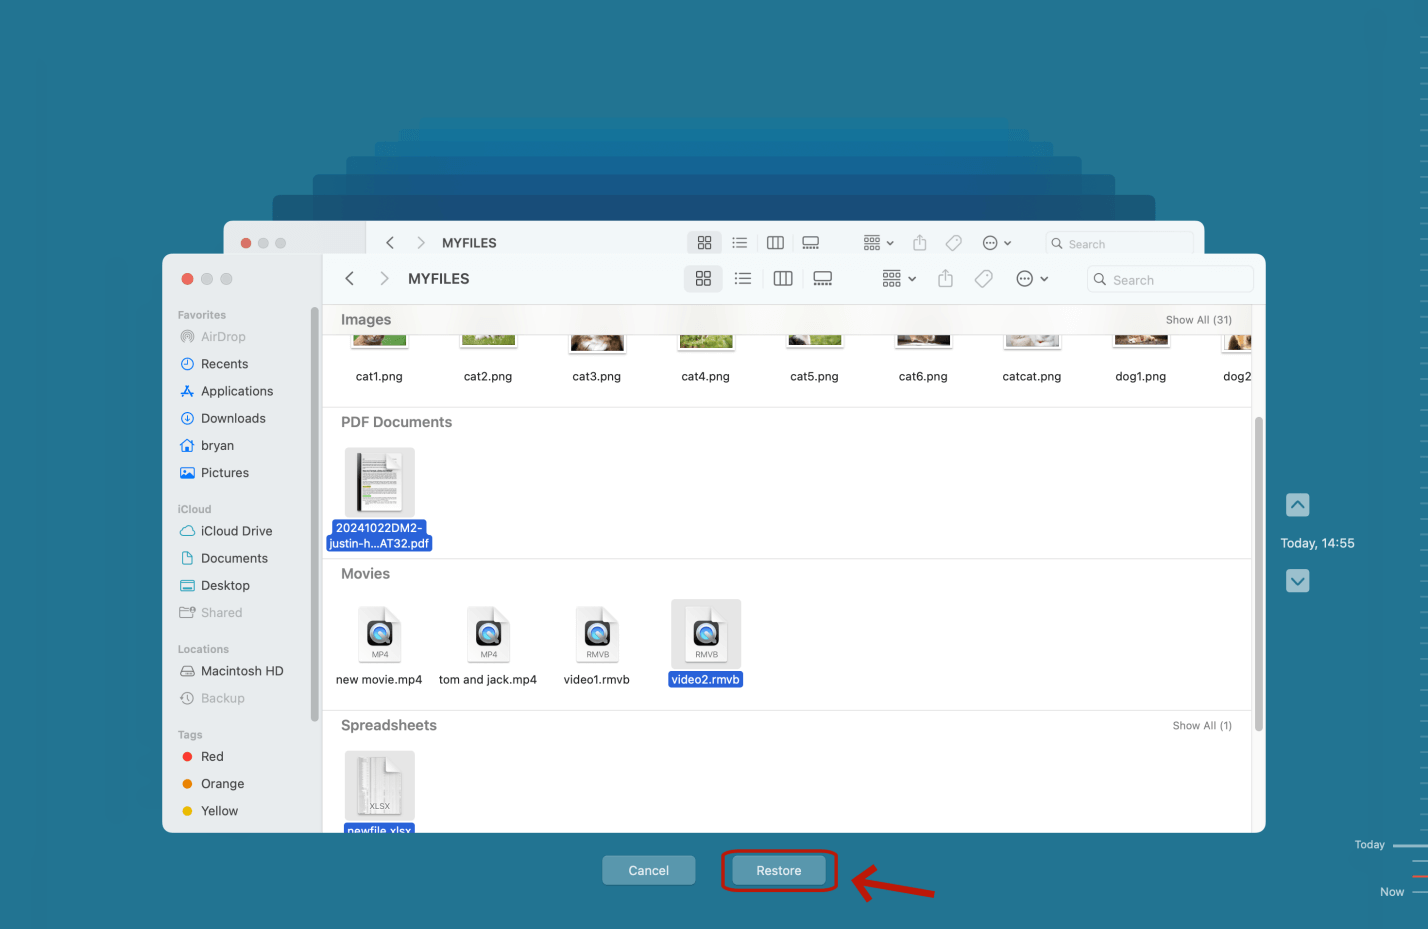
Method 2. Restore Lost Files on M2 Mac via Time Machine Backup
Apple's Time Machine is an excellent built-in tool for file recovery:
- Connect your Time Machine backup drive.
- Open the folder where the deleted file existed.
- Launch Time Machine from the Applications folder or menu bar.
- Browse through backups and restore the needed file.
![Restore Lost Files on M2 Mac via Time Machine Backup]()
Note: Time Machine must be set up beforehand for this to work.
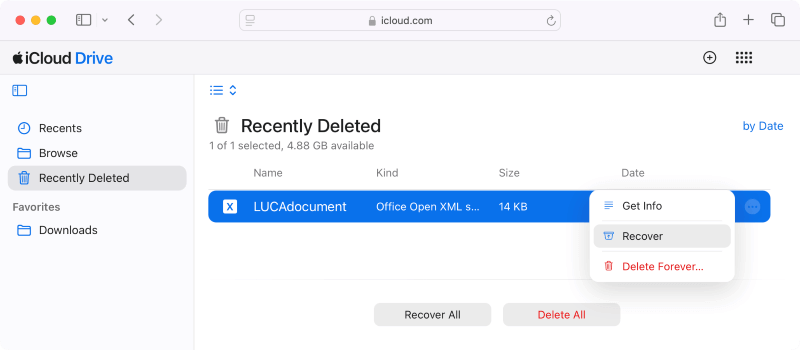
Method 3. Recover M2 Mac's Files from iCloud Drive
If your Mac is connected to iCloud and iCloud Drive is enabled:
- Visit iCloud.com.
- Log in with your Apple ID.
- Click Drive > Recently Deleted.
- Select the files to restore.
![Recover M2 Mac's Files from iCloud Drive]()
Files remain in iCloud's "Recently Deleted" for up to 30 days.
Method 4. Recover Files Using M2 Mac Data Recovery Software
When built-in macOS recovery tools fail to retrieve lost files, specialized data recovery software becomes your next best option. However, using recovery tools on an M2 Mac presents unique challenges and requirements due to its advanced architecture, Apple's strict security features, and the APFS file system.
◾Why Apple Silicon (M2) Affects Recovery
Apple's shift from Intel to its own Apple Silicon (M1, M2 or later chips) changed how macOS interacts with hardware. M2-based Macs use the System-on-a-Chip (SoC) design, integrating CPU, GPU, RAM, and SSD controller into one chip.
Key Implications:
- T2 Security Chip Features are Integrated: The M2 chip inherits data encryption and secure boot features from Intel Macs with the T2 chip.
- APFS File System is Default: Recovery tools must support scanning APFS volumes.
- System Integrity Protection (SIP): Apple restricts kernel-level access to protect system integrity, which many recovery tools require for deep scans.
- Rootless Mode: macOS prevents even administrators from accessing certain system files, limiting low-level disk access unless SIP is disabled.
All this means you need modern, Apple Silicon-compatible software that respects these limitations yet still enables effective recovery.
◾Best M2 Mac Recovery Software
Donemax Data Recovery for Mac is one of the best data recovery software for M2 Mac (M2/M2 Max/M2 Pro/M2 Ultra). It can securely and completely recover lost data on a M2 Mac:
- Recover permanently deleted files, formatted data or inaccessible files on M2 Mac.
- Advanced recovery mode to deeply scan any drive and find any recoverable file.
- Recover lost data from M2 Mac or external HDD/SSD, USB Drive, SD card, digital camera, etc.
- Recover all types of lost files.
◾Step-by-Step Guide: Using Donemax Data Recovery on M2 Mac
Donemax Data Recovery for Mac is a great choice for both beginners and advanced users. Here's a step-by-step breakdown:
Step 1: Prepare the Environment
- Avoid installing on the same drive you're recovering from - this prevents data from being overwritten.
- Use an external volume if possible.
Step 2: Install Donemax Data Recovery for Mac
Click Download button below to download Donemax Data Recovery for Mac, then install it on your M2 Mac.
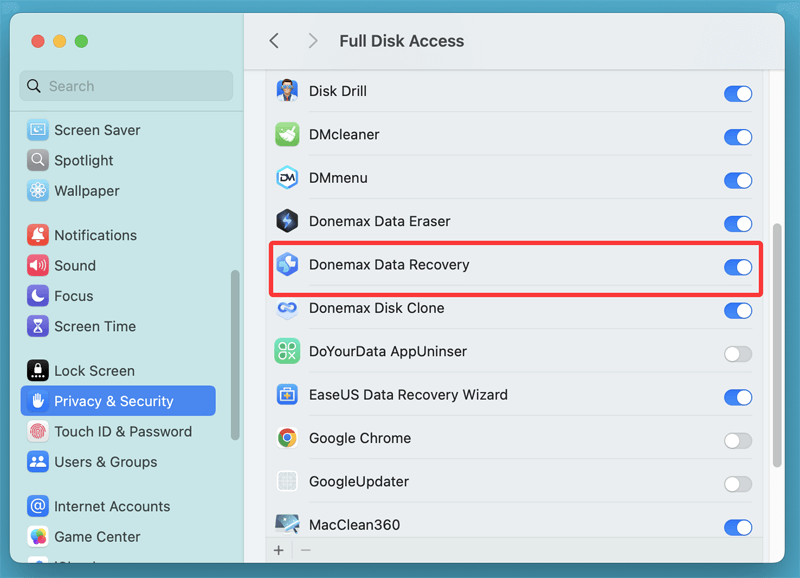
Step 3: Grant Necessary Permissions
- Open System Settings > Privacy & Security > Full Disk Access.
![Grant Necessary Permissions]()
- Add Donemax Data Recovery for Mac by clicking the + icon and selecting it from Applications if it is not in the list.
Step 4: Launch Donemax Data Recovery for Mac and Scan
- Open Donemax Data Recovery for Mac.
- Select your disk or partition (internal SSD or external device).
![Select your disk or partition]()
- Click "Scan".
![Scan disk or partitio]()


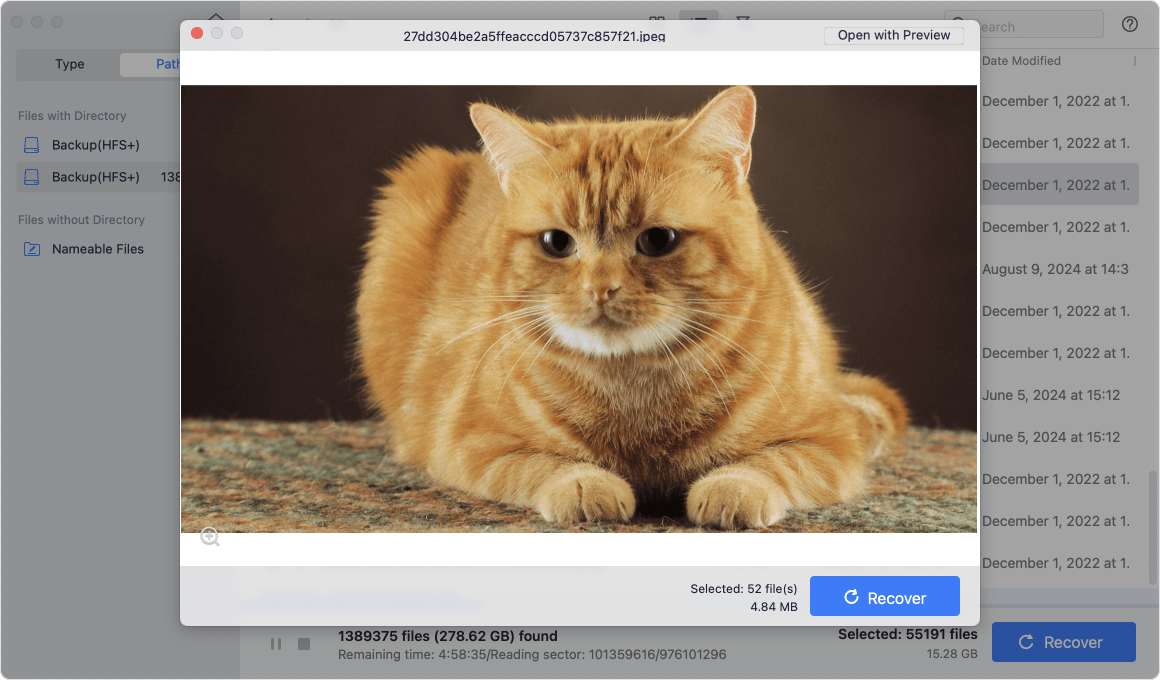
Step 5: Filter and Preview Results
- Let the scan complete. This may take several minutes or even hours depending on disk size.
- Use file type filters (Images, Videos, Documents) for quick browsing.
- Click the "eye" icon to preview each file.
![Filter and Preview Results]()
Step 6: Recover Files
- Select the files you want to recover.
- Click Recover.
![Recover Files]()
- Choose a different drive (never restore to the original source).

Tips for Better Data Recovery Results:
- Scan as soon as possible after file loss.
- Avoid formatting or running Disk Utility repairs before trying software recovery.
- Run deep scans if quick scan yields no results.
- Save scan sessions (supported by some tools) so you can resume later without restarting.
Recovering Data from External Devices on M2 Mac:
External SSDs, USBs, and SD Cards
If your data loss occurred on an external drive:
- Make sure the drive is not encrypted or write-protected.
- Check in Disk Utility whether the drive is recognized.
- Use the same recovery software (e.g., Donemax Data Recovery for Mac).
- If the external device is physically damaged, skip to the professional help section.
Tip: For removable devices, always eject properly to avoid file system corruption.
When to Seek Professional Help:
Some data loss scenarios require more than software:
Signs You Need Professional Recovery Services:
- The SSD is not detected at all in Disk Utility.
- You hear clicking or buzzing sounds from an external hard drive.
- Data recovery software fails to find important files.
- Drive has suffered water, fire, or physical damage.
Choosing a Data Recovery Lab:
- Look for Apple-authorized service providers.
- Confirm they handle APFS and encrypted drives.
- Ask about non-disclosure agreements (NDAs) for data privacy.
Examples of Professional Labs:
- DriveSavers
- Ontrack
- Secure Data Recovery
Be aware: Professional recovery can be costly ($300–$1000+), depending on severity.
Prevent Future Data Loss on M2 Mac
The best recovery is not needing one. Here's how to reduce your risk:
1. Enable Time Machine
- Use an external HDD or SSD and set up automatic hourly backups.
2. Use iCloud or Another Cloud Storage
- Automatically sync your documents and desktop.
- Services like Dropbox, Google Drive, and OneDrive also offer file versioning.
3. Avoid Unnecessary Formatting
- Double-check before initializing or partitioning a drive.
4. Monitor Disk Health
- Use Disk Utility > First Aid regularly.
- Install third-party health monitoring apps like DriveDx or SMART Utility.
5. Use Data Loss Prevention Tools
- Enable FileVault for encryption (but keep your recovery key safe).
- Avoid suspicious websites and downloads.
Conclusion
Losing valuable data on your M2 Mac doesn't have to be permanent. Start with built-in solutions like Trash, Time Machine, and iCloud. If those don't work, turn to reputable third-party recovery tools that support Apple Silicon. And if your device is damaged, don't hesitate to contact a professional recovery service.
Act quickly, avoid overwriting data, and always back up regularly. Prevention is the ultimate safeguard, but when data loss strikes, the right approach can make all the difference.
FAQs About M2 Mac Data Recovery
1. How to recover lost data on a M2 Mac?
Here are 4 methods for data recovery on a M2-chip Mac:
- Recover deleted items from trash bin.
- Recover lost files or entire system via Time Machine backup.
- Recover deleted files from iCloud drive
- Recover lost data using data recovery software.
2. How to recover permanently deleted files on M2 Mac without backup?
You can use M2 Mac data recovery software - such as Donemax Data Recovery or Mac to recover permanently deleted files on your M2 Mac:
- Download and install Donemax Data Recovery on your M2 Mac.
- Select the drive where you lose your files.
- Click on Scan button.
- Preview and recover files after scanning.
3. What is the best M2 Mac data recovery software?
When selecting recovery software for your M2 Mac, evaluate the following:
1. Compatibility
- Must support macOS Monterey, Ventura, Sonoma, Sequoia etc, depending on your version.
- Should run natively on Apple Silicon, or at least work smoothly via Rosetta 2.
2. File System Support
- APFS is used on all modern Macs, while older external drives may use HFS+, exFAT, or FAT32. Your recovery tool should handle them all.
3. Scanning Depth
- Look for tools offering deep scan capabilities to retrieve data lost due to formatting or corruption.
4. Preview Option
- The ability to preview recoverable files before restoring helps avoid recovering broken or irrelevant files.
5. Ease of Use
- An intuitive UI is crucial, especially if you're not tech-savvy.
Best Recommended Recovery Tool for M2 Mac
- Donemax Data Recovery for Mac for Mac
- Supports Apple Silicon and APFS.
- Deep scan and partition recovery.
- Free version offers preview.
- Stellar Data Recovery for Mac
- Easy to use, offers recovery from formatted drives.
- Native M1/M2 support.
- EaseUS Data Recovery Wizard for Mac
- Recovers data from Time Machine, internal SSDs, USBs, etc.
- Compatible with the latest macOS and Apple Silicon.
- Tenorshare 4DDiG
- Offers recovery for lost documents, videos, and photos.
- Clean UI with deep scan capabilities.
4. How to recover lost data from an external hard drive on a M2 Mac?
You can run Donemax Data Recovery for Mac to deeply scan the external hard drive. It can recover all deleted, formatted or inaccessible files.
Donemax Data Recovery for Mac
Donemax Data Recovery for Mac is one of the best Mac data recovery software. It is easy-to-use and can help in recovering deleted, formatted, inaccessible or lost data from Mac HDD/SSD, external disk, USB drive, SD card, camera or other storage devices.
Related Articles
- May 13, 2025Recover Files Which Are Lost Due to Mac Shut Down
- Aug 10, 2025Recover Lost Data from SanDisk G-DRIVE on Mac – Complete Guide
- Sep 25, 2025Top 5 Data Recovery Software for macOS Tahoe – Complete Guide
- Jun 20, 2025[5 Methods] Recover Deleted RTFD File on Mac: Complete Guide
- Apr 10, 2025[7 Solutions] Fix Mac Trash Put Back Not Working | Can't Put Back Files on Mac
- Apr 10, 2025Can't Find Deleted Photos in Recently Deleted Folder on Mac, How to Recover Them?

Contributing Writer
Maria
Maria is one of the senior writers & editors of Donemax who lives and works in Sydney, Australia. She loves PC, Mac and Internet Technology. She has 6 years of writing articles about data recovery on PC/Mac, disk cloning solution, data eraser and computer OS optimization, etc. She is also interested in testing various software and digital products.

Editor in chief
Gerhard Chou
In order to effectively solve the problems for our customers, every article and troubleshooting solution published on our website has been strictly tested and practiced. Our editors love researching and using computers and testing software, and are willing to help computer users with their problems