
Written byChristinaUpdated on Aug 10, 2025
How to Enable or Disable macOS Auto-Update?
Approved byGerhard Chou
PAGE CONTENT:
- What is macOS Auto-Update?
- How to Enable Auto-Updates on macOS?
- How to Disable Auto-Updates on macOS?
- Use Terminal to Control Auto-Updates (for Old macOS Versions)
- Why You Might Want to Disable Auto-Updates?
- How to Manually Check and Install Updates?
- Troubleshooting Auto-Update Issues
- Best Practices for Managing macOS Updates
- Conclusion
Apple's macOS is known for its robust performance, user-friendly interface, and strong security measures. One of its helpful features is automatic updates, which ensure that your system and applications stay current with the latest features and security patches. However, there are scenarios where you might want to disable macOS auto-updates - for example, to prevent unexpected restarts or conserve data usage on limited networks.
This comprehensive guide will walk you through how to enable or disable auto-updates on macOS, including differences between macOS Tahoe, Sequoia, Sonoma, Ventura and earlier versions. Whether you want more control over updates or ensure you never miss a critical patch, you'll find all the options laid out clearly below.
What is macOS Auto-Update?
macOS auto-update is a background service that automatically downloads and installs updates for the operating system, security patches, and apps installed through the App Store. This feature is designed to help users stay protected from vulnerabilities and enjoy new features as soon as they're released.
Types of Auto-Updates on macOS
- System Updates – macOS version upgrades and feature updates.
- Security Updates – Critical patches and security improvements.
- App Store Updates – Updates to apps downloaded via the Mac App Store.
Pros and Cons of Auto-Updates
Pros
- Ensures system security by applying patches promptly.
- Keeps features up-to-date.
- Requires minimal user intervention.
Cons
- May cause unexpected restarts or interruptions.
- New updates can introduce bugs or compatibility issues.
- Data usage might spike on limited connections.
If these trade-offs concern you, you may want to customize or disable automatic updates.
How to Enable Auto-Updates on macOS?
Depending on your macOS version, the process differs slightly. Here's how to do it on Ventura and earlier versions.
1. Enable Auto-Updates on macOS Ventura and Later
Apple redesigned the System Settings interface in macOS Ventura.
Steps:
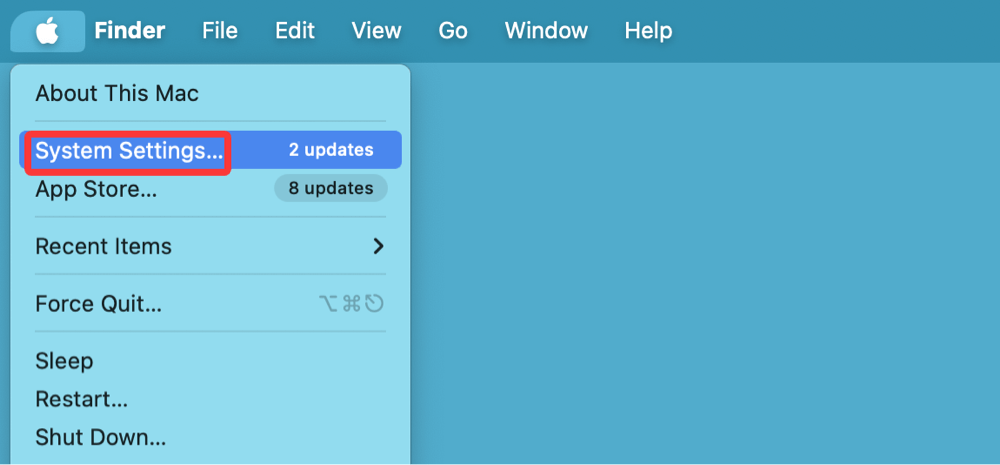
- Click the Apple menu and choose System Settings.
![disable macOS auto-updates]()
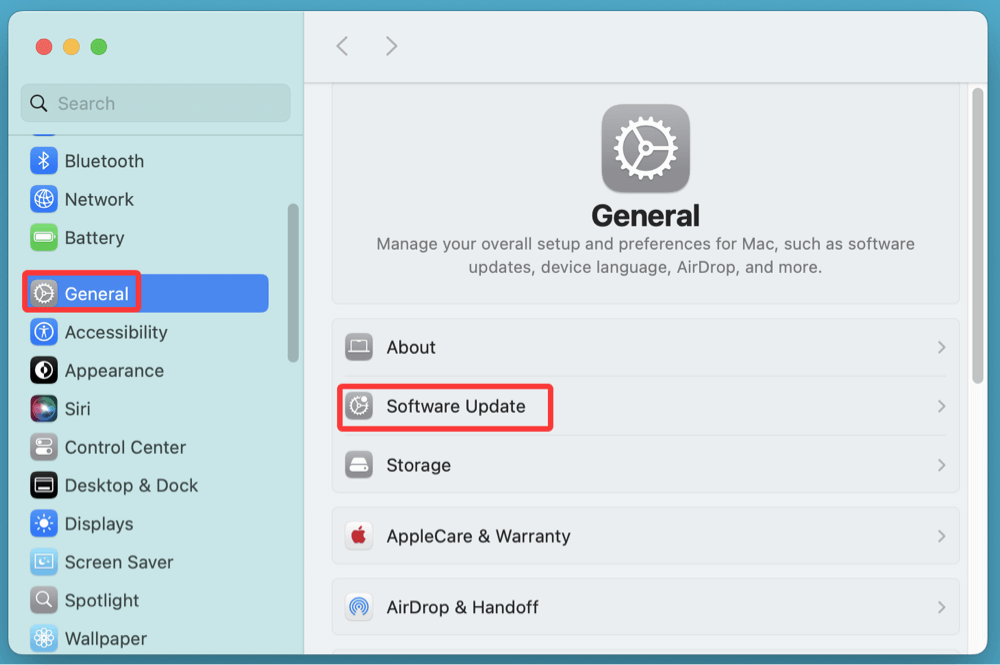
- Scroll down and click General.
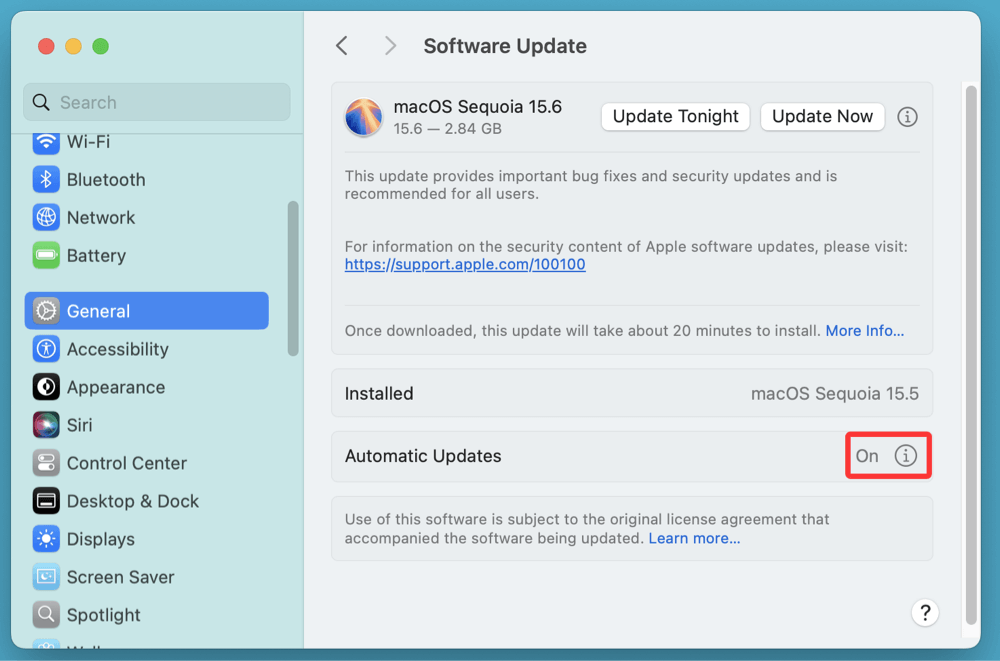
- Select Software Update.
![disable macOS auto-updates]()
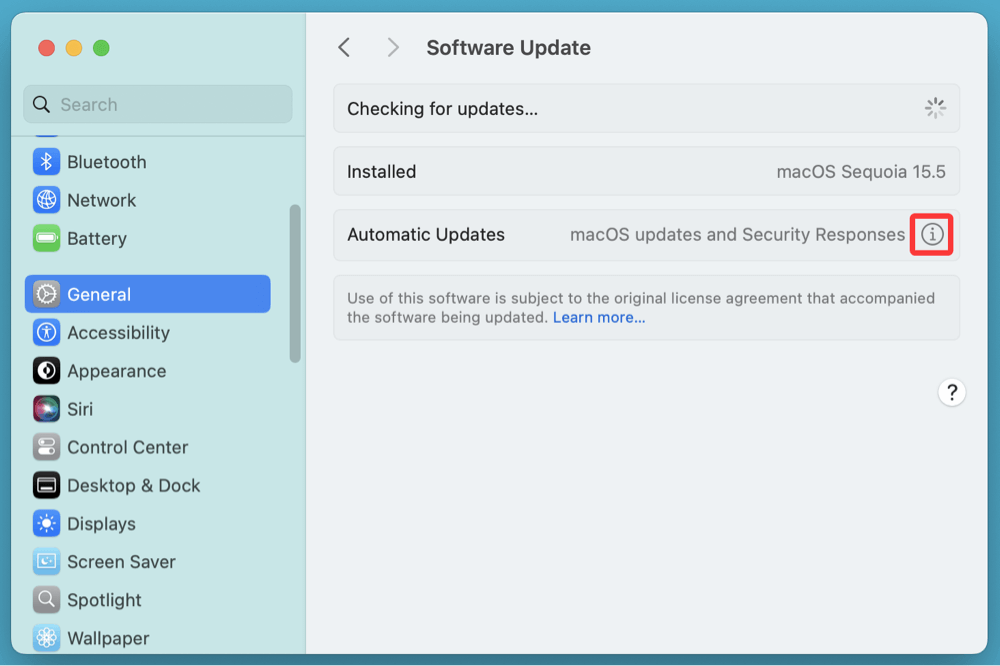
- Click the small "i" or Details… button next to Automatic Updates.
![disable macOS auto-updates]()
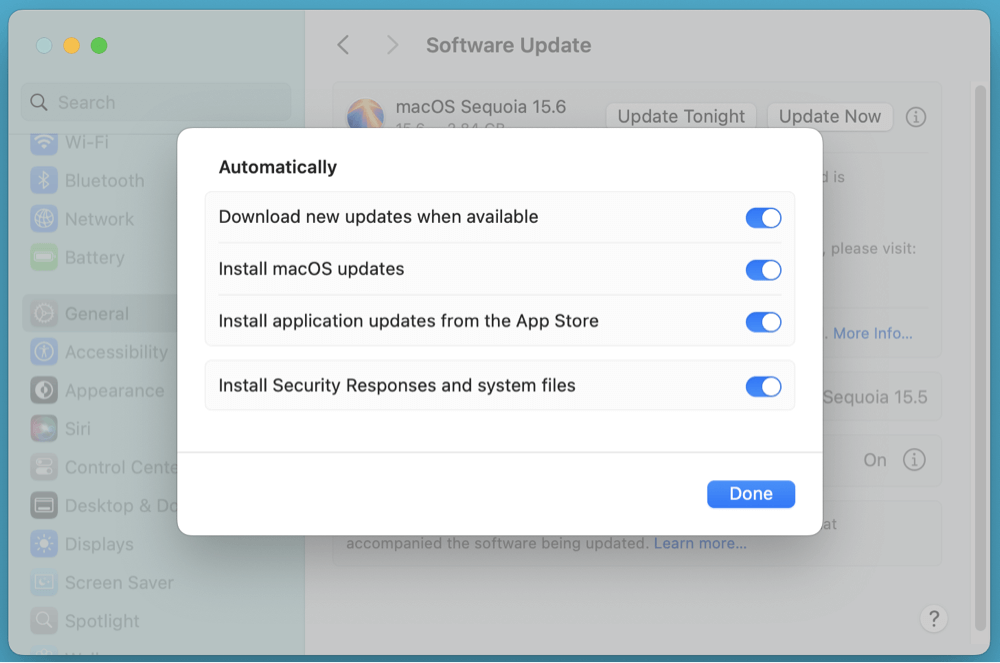
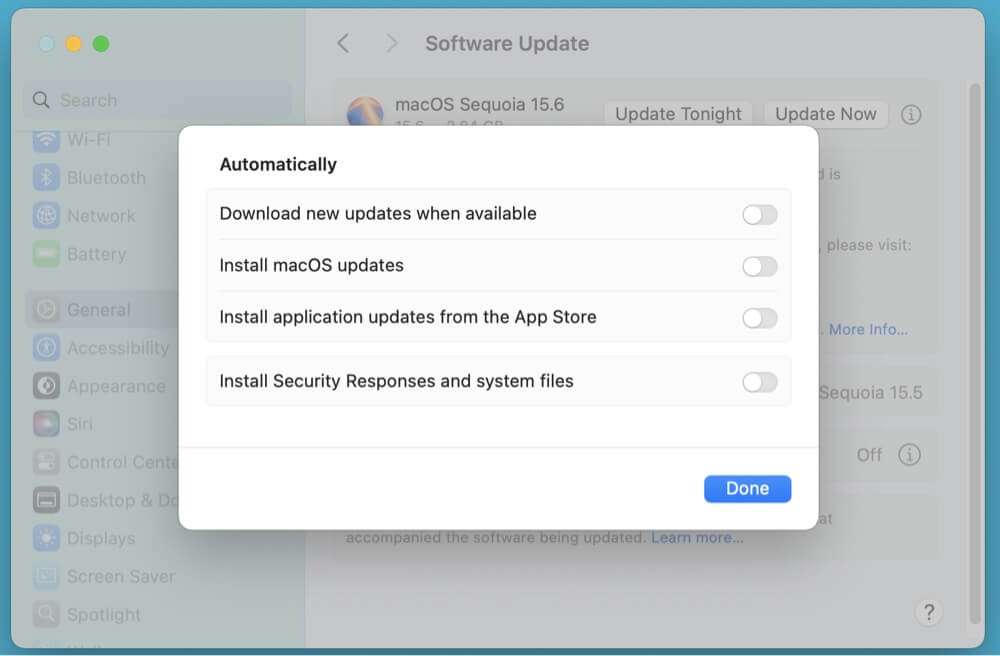
- Toggle on the following options:
- Download updates when available
- Install macOS updates
- Install application updates from the App Store
- Install Security Responses and system files
![disable macOS auto-updates]()
- Close the window to save changes.
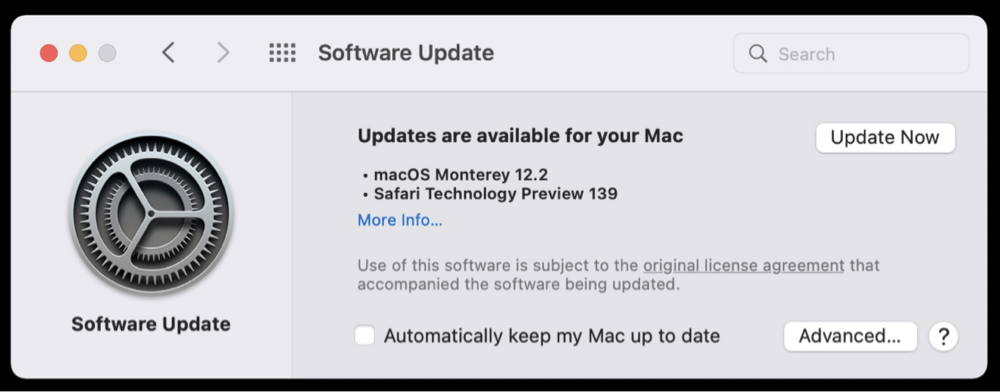
2. Enable Auto-Updates on macOS Monterey and Earlier
Steps:
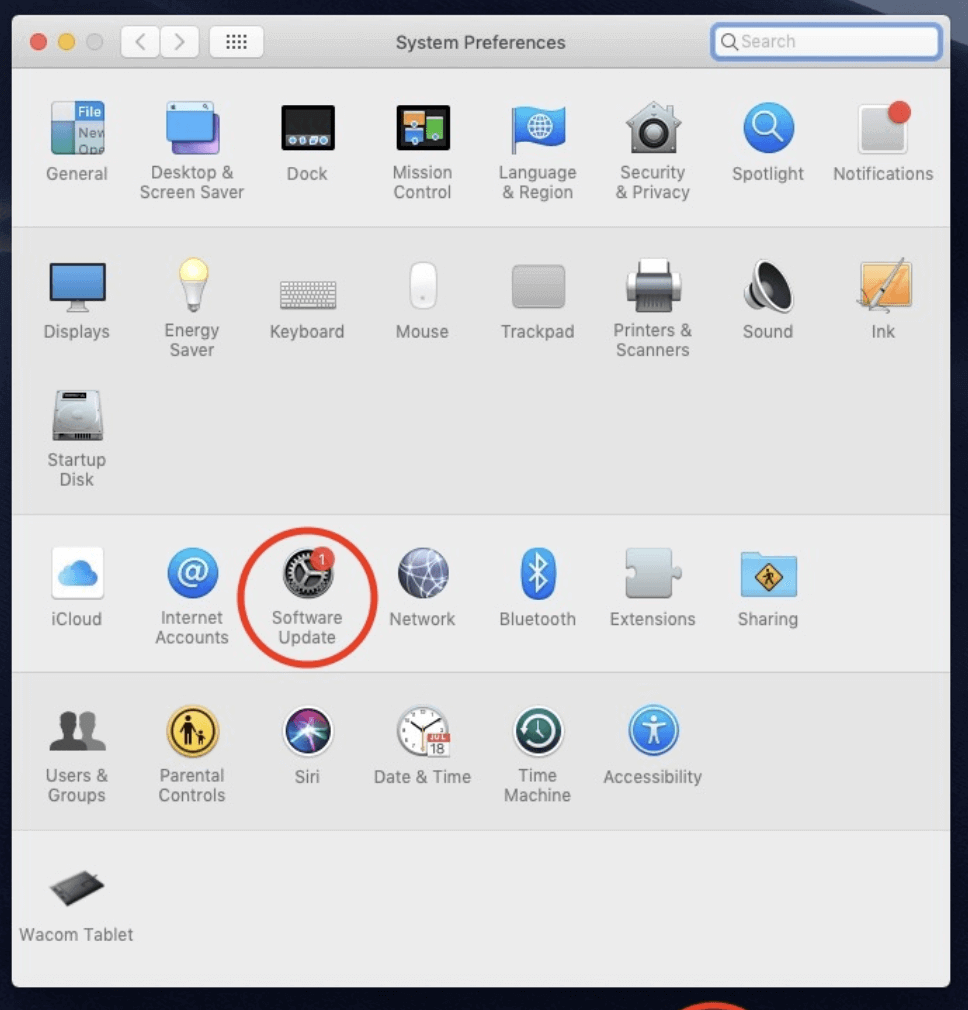
- Open System Preferences from the Apple menu.
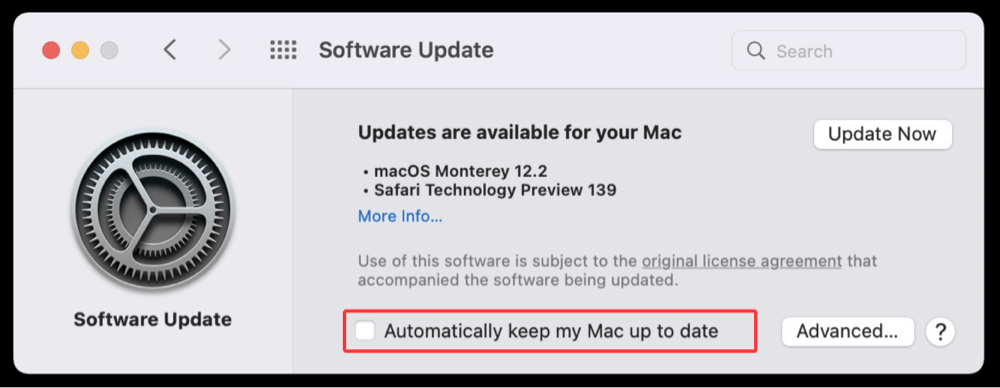
- Click Software Update.
![disable macOS auto-updates]()
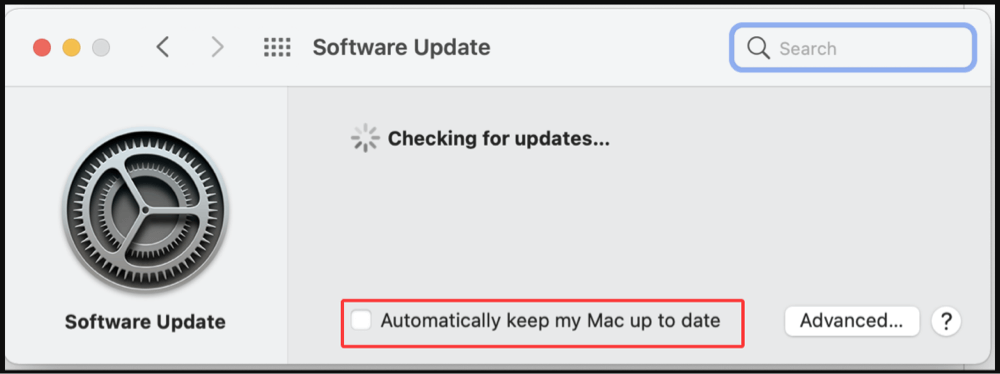
- Check the box labeled Automatically keep my Mac up to date.
![disable macOS auto-updates]()
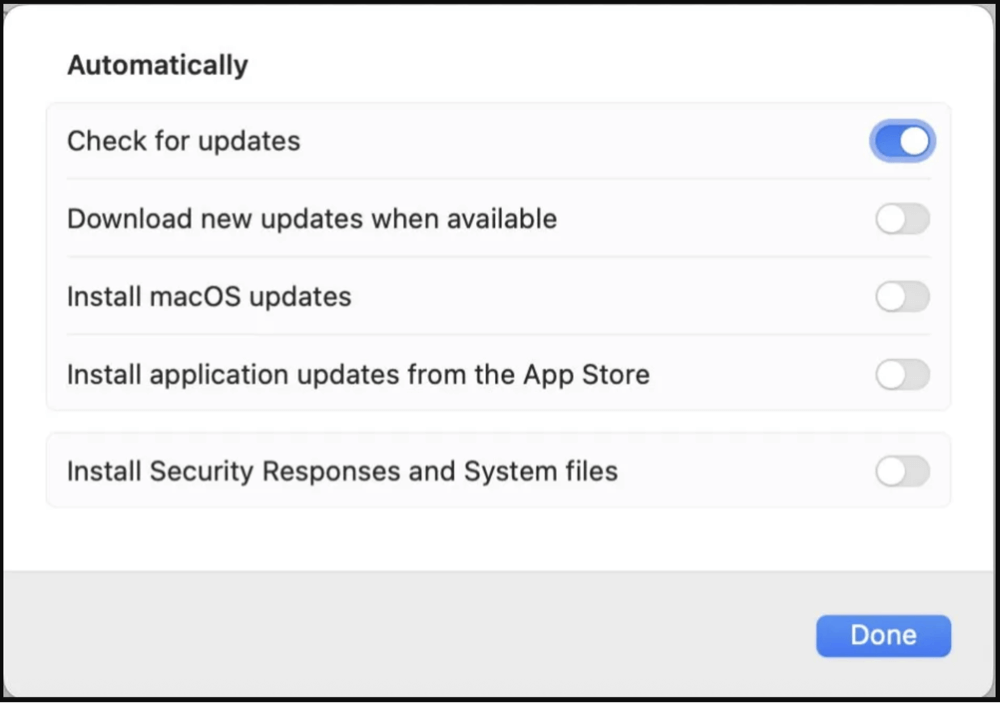
- Click Advanced for more granular controls:
- Enable options such as:
- Check for updates
- Download new updates when available
- Install macOS updates
- Install app updates from the App Store
- Install system data files and security updates
- Enable options such as:
Click Done to confirm your selections.
How to Disable Auto-Updates on macOS?
If you prefer to install updates manually or delay system upgrades, disabling automatic updates is easy.
1. Disable Auto-Updates on macOS Ventura and Later
Steps:
- Go to System Settings > General > Software Update.
![disable macOS auto-updates]()
- Click Details next to Automatic Updates.
![disable macOS auto-updates]()
- Toggle off all of the following:
- Download new updates when available
- Install macOS updates
- Install applications updates from the App Store
- Install Security Responses and system files
![disable macOS auto-updates]()

You will now need to manually check for and install updates.
2. Disable Auto-Updates on macOS Monterey and Earlier
Steps:
- Open System Preferences > Software Update.
- Uncheck Automatically keep my Mac up to date.
![disable macOS auto-updates]()
- Optionally, click Advanced and disable all individual checkboxes if you prefer more granular control.
Use Terminal to Control Auto-Updates (for Old macOS Versions)
While macOS offers a graphical interface to manage software updates, advanced users or system administrators may prefer using Terminal commands for better control, scripting, or remote configuration. Terminal lets you enable or disable different aspects of automatic updates using system preferences and softwareupdate commands.
Important: Terminal commands should be used cautiously. They can affect critical system behavior. Always back up your data before making changes.
1. Check if Auto-Updates Are Enabled
Before making any changes, you can check the current status of auto-updates:
defaults read /Library/Preferences/com.apple.SoftwareUpdate AutomaticCheckEnabled
This will return either 1 (enabled) or 0 (disabled).
2. Disable All Auto-Updates
To completely turn off automatic checking and installation of updates:
sudo softwareupdate --schedule off
This command disables the background update scheduler, meaning your Mac will no longer automatically check for or install updates.
Use Case: Ideal for users managing macOS in development environments where stability is prioritized over new features.
3. Enable All Auto-Updates
To restore automatic update scheduling:
sudo softwareupdate --schedule on
This turns on regular update checks and restores default macOS update behavior.
4. Customize Specific Auto-Update Settings
You can individually control different types of updates:
🔹 Enable/Disable Checking for Updates
defaults write com.apple.SoftwareUpdate AutomaticCheckEnabled -bool TRUE
or
defaults write com.apple.SoftwareUpdate AutomaticCheckEnabled -bool FALSE
🔹 Enable/Disable Downloading Updates Automatically
defaults write com.apple.SoftwareUpdate AutomaticDownload -bool TRUE
or
defaults write com.apple.SoftwareUpdate AutomaticDownload -bool FALSE
🔹 Enable/Disable macOS Auto-Installation
defaults write com.apple.SoftwareUpdate AutomaticallyInstallMacOSUpdates -bool TRUE
or
defaults write com.apple.SoftwareUpdate AutomaticallyInstallMacOSUpdates -bool FALSE
🔹 Enable/Disable App Store Auto-Updates
defaults write com.apple.commerce AutoUpdate -bool TRUE
or
defaults write com.apple.commerce AutoUpdate -bool FALSE
🔹 Enable/Disable Security and System Files Updates
defaults write /Library/Preferences/com.apple.SoftwareUpdate CriticalUpdateInstall -bool TRUE
or
defaults write /Library/Preferences/com.apple.SoftwareUpdate CriticalUpdateInstall -bool FALSE
💡 Tip: Combine these commands in a script for use in enterprise deployments or managed environments.
5. View Available Software Updates from Terminal
Even if auto-updates are off, you can manually check for available updates using:
softwareupdate -l
This lists available updates.
6. Install Updates via Terminal
To install all available updates:
sudo softwareupdate -i -a
To install a specific update:
sudo softwareupdate -i "macOS Ventura 13.5.1"
To download without installing:
sudo softwareupdate -d -a
7. Reset Update Settings to Default
If things go wrong and you'd like to return to default update settings:
sudo softwareupdate --schedule on
defaults delete com.apple.SoftwareUpdate
defaults delete com.apple.commerce
This removes custom configuration and lets macOS manage updates in its default state.
Why You Might Want to Disable Auto-Updates?
While automatic updates improve convenience and security, they may not suit everyone.
Common Reasons to Disable:
- Prevent interruption during work: Updates can cause unexpected reboots.
- Avoid compatibility issues: New updates may break compatibility with critical apps or plugins.
- Control data usage: Ideal for metered or mobile data connections.
- Delay major upgrades: Some users prefer to wait for reviews before upgrading to a new macOS version.
How to Manually Check and Install Updates?
Whether or not you have auto-updates enabled, you can manually initiate updates whenever you choose.
macOS System Updates:
- Go to System Settings > General > Software Update (Ventura+).
- Click Check for Updates or follow the prompt.
- Click Install Now if updates are available.
App Store Updates:
- Open the App Store.
- Click Updates in the sidebar.
- Click Update All or update individual apps as needed.
Manually managing updates allows you to choose the most convenient time for installation.
Troubleshooting Auto-Update Issues
Issue 1: Auto-Updates Aren't Working
- Fix: Ensure all update toggles are enabled in System Settings or Preferences.
- Fix: Reboot your Mac and try checking for updates again.
Issue 2: Auto-Updates Are Enabled But System Isn't Updating
- Fix: Check your internet connection.
- Fix: Sign in to your Apple ID and make sure App Store permissions are enabled.
Issue 3: Terminal Command Not Working
- Fix: Ensure you run commands with sudo and enter the admin password.
- Fix: Check for typos or incorrect Boolean values (TRUE, FALSE).
Best Practices for Managing macOS Updates
- Backup before major updates: Use Time Machine or a third-party backup tool.
- Schedule updates during off-hours: Avoid work disruption.
- Read release notes: Understand what's being installed before proceeding.
- Wait a few days on new releases: Let Apple iron out potential bugs before jumping in.
Conclusion
Whether you choose to enable or disable auto-updates on macOS, the most important factor is control. Automatic updates are a helpful feature for most users, ensuring that systems remain protected and up to date. However, advanced users or professionals who rely on stability and compatibility may prefer to manage updates manually.
macOS offers flexible settings through the GUI and Terminal, so you can tailor your update strategy based on your needs. Just remember: staying current on security patches is crucial - so if you disable auto-updates, make it a habit to check for new updates regularly.
By following the steps outlined in this guide, you can take full control of how and when your Mac gets updated, minimizing interruptions while maintaining system security and performance.
DMcleaner for Mac
Donemax DMcleaner for Mac is an award-winning Mac cleanup & maintenance application. It offers 10+ tools to help Mac users clean up junk data on Mac, uninstall unwanted apps & delete leftovers, shred files, delete duplicate files, free up disk space, speed up slow Mac, etc. It is also a smart switch manager for Mac, a powerful disk manager for Mac.
Related Articles
- Dec 23, 2024Fix LaCie External Hard Drive Read-Only on Mac: Comprehensive Guide
- Apr 20, 2026How to Create a macOS Sierra Bootable USB Installer (2026 Guide)
- Nov 11, 2024How to Use Finder on Mac – A Complete Guide
- Oct 14, 2024Fix Error Code 100006 on Mac: A Complete Guide to Solving the Issue
- Jan 12, 2025How to Bypass Trash When Deleting Files on Mac?
- Jul 15, 2025How to Enter and Exit Full Screen on a Mac?

Contributing Writer
Christina
Christina is the senior editor of Donemax software who has worked in the company for 4+ years. She mainly writes the guides and solutions about data erasure, data transferring, data recovery and disk cloning to help users get the most out of their Windows and Mac. She likes to travel, enjoy country music and play games in her spare time.

Editor in chief
Gerhard Chou
In order to effectively solve the problems for our customers, every article and troubleshooting solution published on our website has been strictly tested and practiced. Our editors love researching and using computers and testing software, and are willing to help computer users with their problems