Written byChristinaUpdated on May 15, 2026
How to Merge Partitions on Mac: Storage Guide
Approved byGerhard Chou
PAGE CONTENT:
Have you ever looked at your Mac's storage and wondered why it's split into three or four different "disks" when you only wanted one? Maybe you created a partition years ago for a project that's now finished, or perhaps you bought a used Mac that came with a messy drive layout.

Whatever the reason, if you want to merge partitions on Mac setups to reclaim your space, you're in the right place. In this guide, we'll show you how to simplify your digital life by combining those separate volumes into one seamless drive. We will also cover how to resize partitions on Mac if you aren't quite ready to delete them entirely.
Why You Might Need to Combine or Resize Partitions
As we move into 2026, storage needs are changing. With cloud integration and larger system updates, having a tiny system partition and a huge "Data" partition often leads to "Disk Full" errors—even when you have plenty of total space.
Merging partitions allows you to:
- Eliminate Wasted Space: Stop "storage fragmentation" where one partition is empty and the other is overflowing.
- Simplify Backups: Manage one single volume for Time Machine instead of juggling several.
- Optimize Performance: macOS works best when it has a large, contiguous block of free space for swap files and temporary cache.
Essential Checklist Before Merge Partitions
Before we touch any settings, let's handle the "safety first" rules. Merging partitions is a major structural change to your drive.
Back Up Everything: We cannot stress this enough. When you merge partitions, you are essentially deleting one and expanding another. If something goes wrong (like a power flicker), you could lose data. Use an external drive or iCloud.

How to Backup Mac Data?
To back up Mac data, you can use Time Machine or third-party backup or clone software.
Check Your Format: Modern Macs use APFS (Apple File System). Older ones use HFS+. You can usually only merge partitions that share the same format.
Identify the "Parent" Partition: On a Mac, you typically merge a "child" partition into the one that sits "above" it in the disk map.
2 Methods to Merge Partitions on Mac
Method 1: Using Disk Utility (The Easiest Way)
For 99% of home users, the built-in Disk Utility is the best tool to merge partition on Mac volumes. It's visual, safe, and built right into macOS.
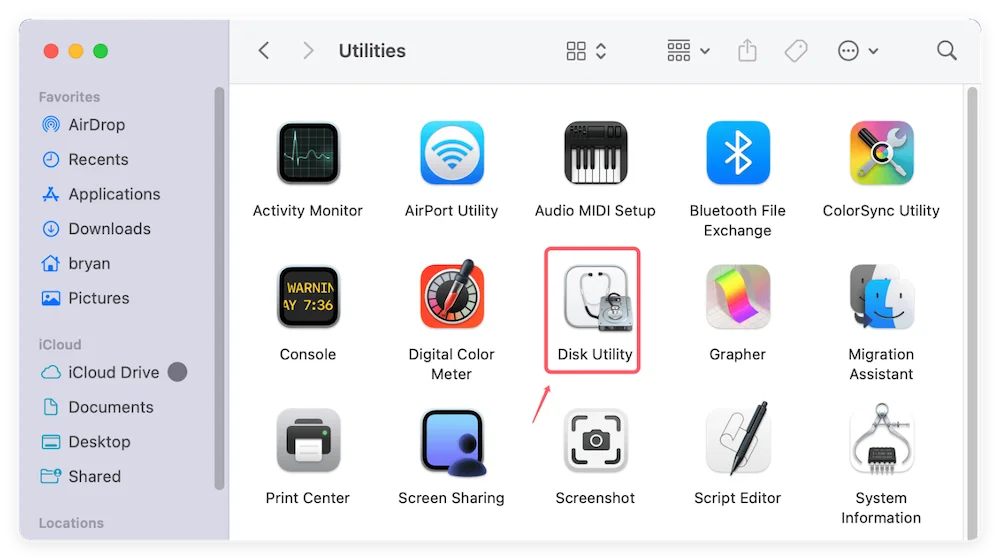
Step 1: Launch Disk Utility
Press Command + Space and type "Disk Utility," or find it in Applications > Utilities.
Step 2: View All Devices
In the top-left corner, click the View icon and select Show All Devices. This ensures you see the physical drive, not just the logical volumes.
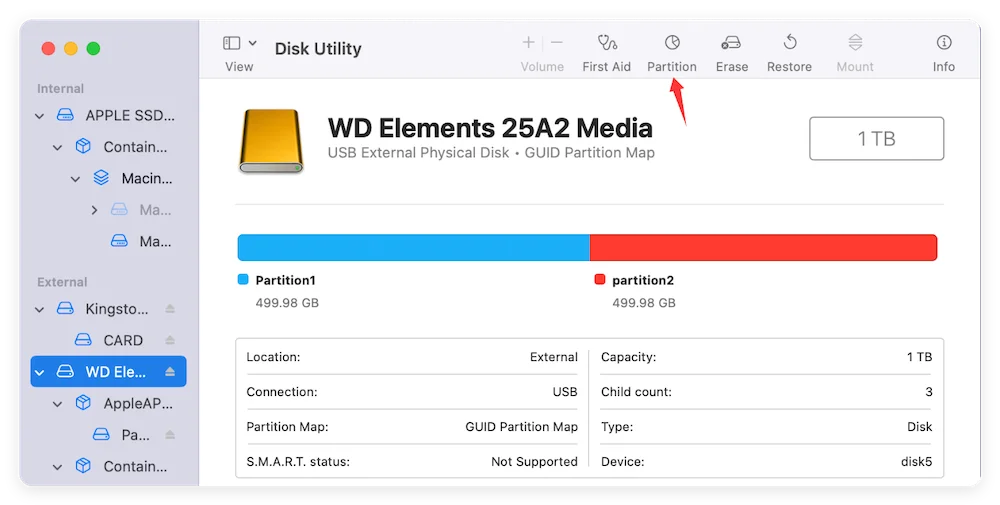
Step 3: The Partition Map
Select your main internal drive and click the Partition button in the top toolbar. A pie chart will appear showing how your space is divided.
Step 4: Delete the Unwanted Partition
Select the partition you want to get rid of (the one you are merging away from). Click the Minus (-) button. Note: This will instantly erase the data on that specific partition.
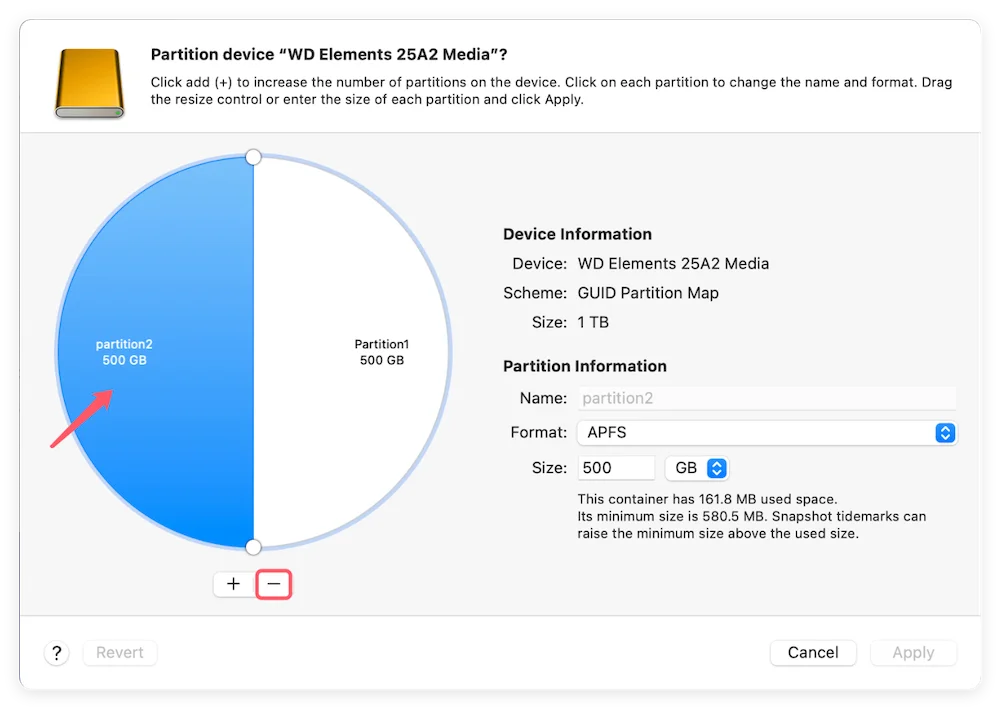
Step 5: Resize to Fill the Gap
Once the partition is deleted, you'll have a gray "Free Space" area. To resize partitions on Mac so they take up that space:
- Select the partition you want to keep.
- Drag the resize handle on the pie chart to fill the empty space, or type the maximum size in the "Size" box.
- Click Apply.
Method 2: Using Terminal (The Pro Way)
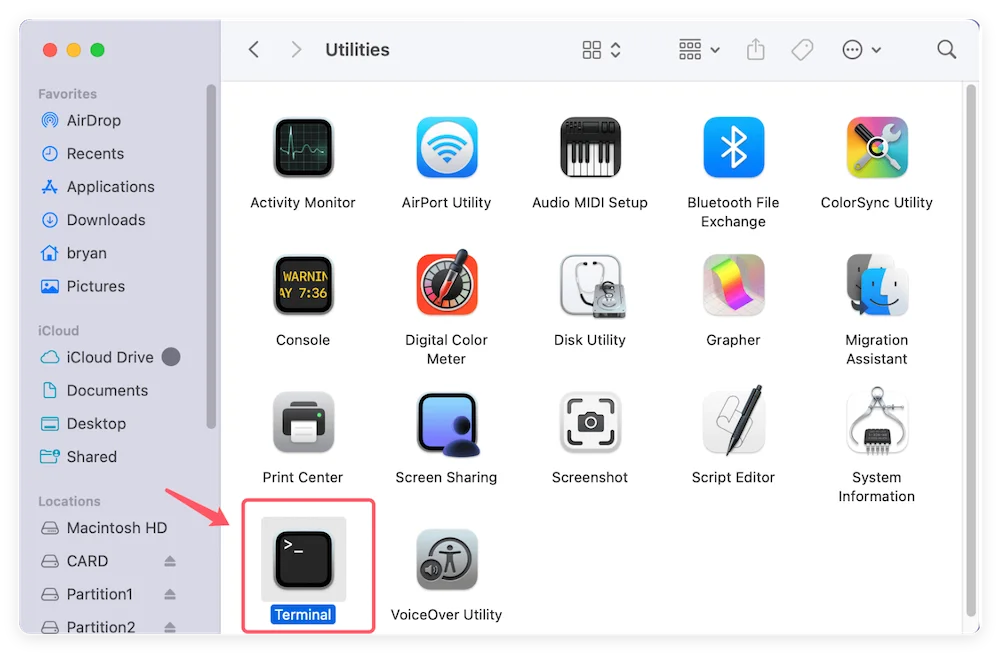
If Disk Utility gives you an error or the "Minus" button is grayed out, you may need to use the Terminal. This is more technical but often more powerful for stubborn drives.
- Open Terminal: Find it in Applications > Utilities.
![merge partition on Mac]()
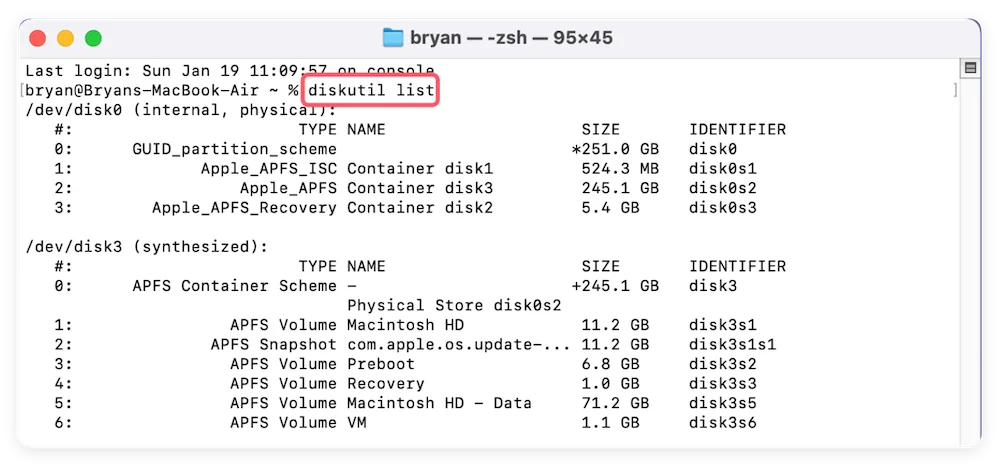
- List Your Drives: Type diskutil list and hit Enter. This shows a map of your drive. Identify the identifiers (e.g., disk2s2 and disk2s3) for the partitions you want to merge.
![merge partition on Mac]()
- The Merge Command: Use the following syntax (be very careful here): diskutil mergePartitions HFS+ NewName disk2s2 disk2s3
💡 Note: This command merges the space from the second partition into the first one listed.
Tips to Successfully Resize Partitions on Mac
Sometimes you don't want to delete a partition; you just want to move the "border" between them. This is called resizing.
- APFS Containers: If your Mac uses APFS, it actually shares space dynamically. You might not even need to resize! All volumes in an "APFS Container" can see the same pool of free space.
- Order Matters: You can usually only expand a partition into free space that is physically "below" or "after" it on the disk. You cannot easily expand a partition "upwards" into space that used to be before it.
FAQs about Merging Mac Partitions
Yes and No. The partition you are keeping (expanding) will stay intact. However, the partition you are merging into it must be deleted first, which erases its data. Always move your files to the primary partition before you hit the delete button.
This usually happens if you are trying to delete a startup partition, a protected recovery partition, or if the drive has a physical error. Try running First Aid on the drive first.
Not directly. macOS cannot natively expand into an NTFS-formatted space. You would need to erase the NTFS partition first to turn it into "Free Space," then expand your Mac partition into that gap.
One big partition is generally better. macOS manages its own system files in a hidden, read-only volume, so the old reason for "partitioning to protect the OS" is no longer necessary for most users.
Absolutely. The process is identical. Just make sure to select the external drive in the Disk Utility sidebar instead of the internal "Macintosh HD."
Final Thoughts
Managing your storage shouldn't feel like a chore. While the terms "partitioning" and "merging" sound technical, Apple has made the process much more user-friendly over the years. By choosing to merge partition on Mac layouts, you're giving your computer more breathing room and making your file organization much simpler.
Just remember: Backup first, click second. Once those partitions are combined, you'll enjoy a much smoother, more efficient Mac experience.
Donemax Disk Clone for Mac
An award-winning disk cloning program to help Mac users clone HDD/SSD/external device. It also can create full bootable clone backup for Macs.
Related Articles
- May 26, 2026Fix macOS Tahoe Battery Drain: Complete Troubleshooting Guide
- May 12, 2025Purple/Blue/Pink/Black/Green Lines on Mac Screen: Why & Fixes
- Apr 10, 2025[9 Fixes] Fix Macintosh HD Not Mounting on Mac or Not Showing Up in Disk Utility
- Jul 01, 2026How to Empty Trash on Mac Quickly (Shortcut & Auto-Clean)?
- Oct 16, 2024Can't Open Trash on Mac? Here's How to Fix It
- Nov 29, 2024How to Convert or Reformat an USB Drive to NTFS on Mac?

Contributing Writer
Christina
Christina is the senior editor of Donemax software who has worked in the company for 4+ years. She mainly writes the guides and solutions about data erasure, data transferring, data recovery and disk cloning to help users get the most out of their Windows and Mac. She likes to travel, enjoy country music and play games in her spare time.

Editor in chief
Gerhard Chou
In order to effectively solve the problems for our customers, every article and troubleshooting solution published on our website has been strictly tested and practiced. Our editors love researching and using computers and testing software, and are willing to help computer users with their problems