Written byStevenUpdated on Jul 01, 2026
Mouse Pointer Disappeared on Mac? Here's How to Find It Fast
Approved byGerhard Chou
PAGE CONTENT:
Imagine you're in the middle of an important project, a high-stakes meeting, or just browsing your favorite site, and suddenly—poof! Your mouse pointer has vanished. You move your hand, you hear the clicks, but the screen is a blank slate of icons with no cursor in sight.
A mouse pointer disappeared on Mac issue is more common than you think, and while it feels like a major system failure, it's usually just a temporary software glitch or a settings hiccup.

In this guide, we'll walk through why your Mac mouse cursor is missing or invisible and provide step-by-step solutions to get you back to work.
Why Does the Mouse Cursor Disappear?
Before we jump into the "how-to," let's look at the "why." Usually, it’s one of these culprits:
- System Lag: High CPU usage can cause the UI (User Interface) to stutter, making the cursor invisible.
- External Displays: Sometimes the Mac "thinks" your cursor is on a second screen that isn’t actually on.
- App Glitches: Certain full-screen apps (like video players or games) are designed to hide the cursor and sometimes forget to bring it back.
- Corrupted Plist Files: The tiny files that store your mouse preferences might be broken.
12 Proven Ways to Bring Your Disappeared Mouse Back on Mac
Below are 12 proven and effective ways to bring your disappeared mouse pointer back and regain full control of your Mac.
1. Check the Mouse or Trackpad Connection
Before diving into system-level fixes, start with the basics:
For Wired Mice:
- Ensure the mouse is securely connected to your Mac via the USB or USB-C port.
- Test the mouse on a different port or another computer to rule out hardware failure.
For Wireless/Bluetooth Mice:
- Make sure the mouse is powered on.
- Confirm that the battery isn't dead or too low - replace or recharge as needed.
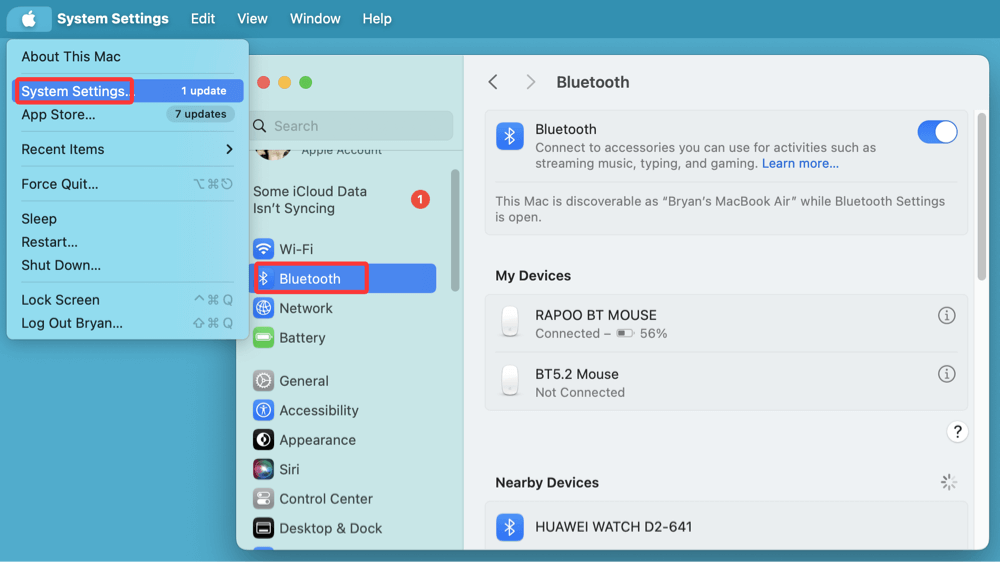
- Disconnect and reconnect via System Settings > Bluetooth.
![Losing your mouse cursor on a Mac]()
- Remove the mouse and re-pair it if connection issues persist.
Also, test another mouse if available to confirm if the issue is with the device or your Mac.
2. Use Keyboard Shortcuts to Regain Control
If you've lost control of your cursor, keyboard shortcuts can act as a temporary lifeline:
- Command + Tab: Switch between open applications. This can sometimes refresh the graphical environment.
- Command + Option + Escape: Opens the Force Quit menu in case an app is freezing your UI.
- Control + F3: Navigates to the Dock via keyboard.
- Control + Up Arrow (or F3): Opens Mission Control, which can help reposition or locate the cursor.
These shortcuts let you navigate and potentially restore UI functionality even without a visible pointer.
3. Shake Your Mouse or Move Your Finger Rapidly
macOS has a built-in accessibility feature where shaking the mouse or moving your finger quickly on the trackpad enlarges the pointer temporarily to help locate it.
Try this first - shake the mouse or drag your finger in circles rapidly. If the feature is enabled, your pointer should briefly enlarge and become visible again.
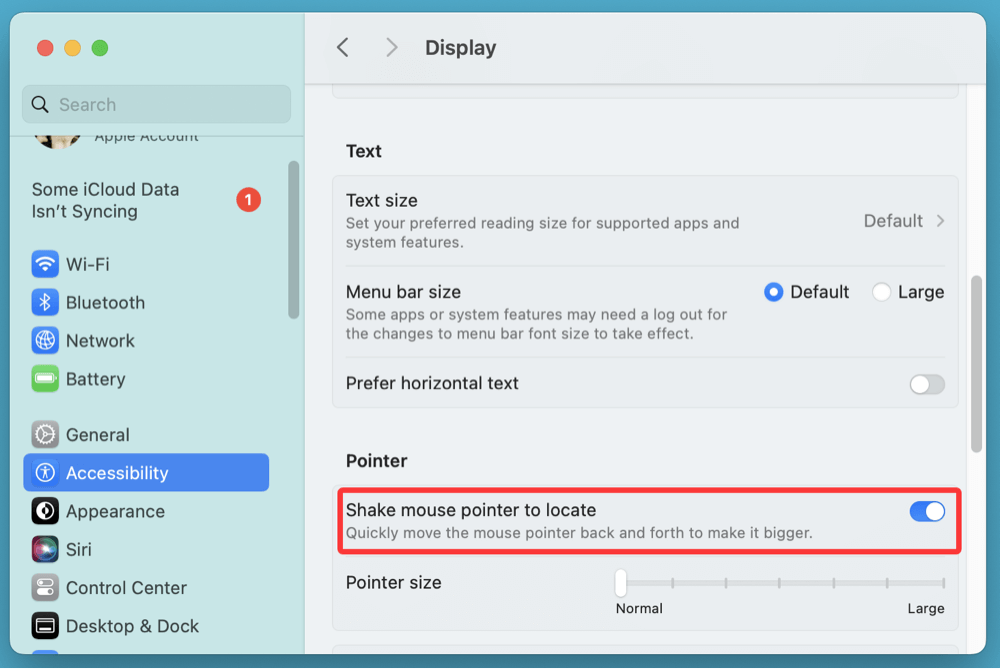
To make sure this is turned on:
- Go to System Settings > Accessibility > Display > Pointer.
- Make sure "Shake mouse pointer to locate" is toggled on.
![Losing your mouse cursor on a Mac]()
4. Use Mission Control and App Switcher
macOS visual elements can sometimes cause the pointer to go "off-screen" or become invisible, especially when using full-screen apps.
Try these steps:
- Press F3 or Control + Up Arrow to activate Mission Control. This gives an overview of all open apps and may help reposition the pointer.
- If the pointer is lost on a full-screen app, switch to another app using Command + Tab, then go back.
Toggling between windowed and full-screen modes often brings the pointer back.
5. Disconnect External Monitors Temporarily
Using multiple displays is a known trigger for mouse disappearance on Macs. If you've recently connected an external monitor:
- Disconnect the external display.
- Wait for your Mac's screen to adjust.
- See if the pointer returns on the main display.
Once it reappears, reconnect your external monitor. Go to System Settings > Displays and use the "Arrange" tool to reconfigure the display layout. Also, make sure the mouse isn't "trapped" on the inactive or non-primary screen.
6. Adjust Display Resolution or Zoom Settings
Sometimes macOS display settings can glitch and cause the cursor to disappear or render outside the screen bounds.
To fix this:
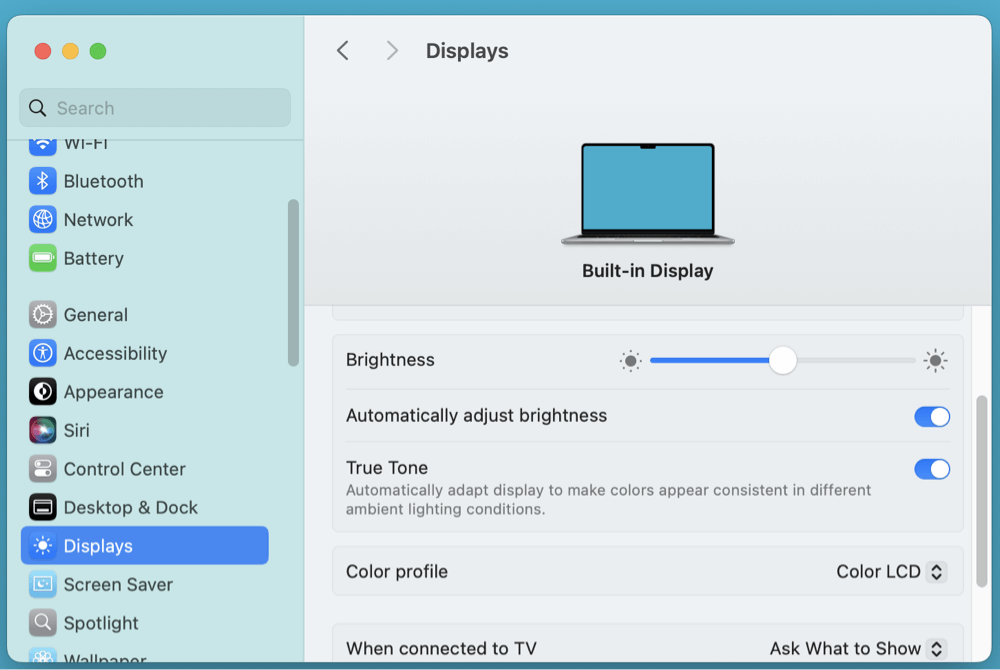
- Go to System Settings > Displays.
- Temporarily change the resolution and revert it back.
- If you’re using display zoom or scaling, switch to a default or standard option.
This will refresh your screen configuration and often re-center the pointer.
7. Restart Your Mac
It may seem obvious, but a reboot can solve many temporary glitches, including cursor-related ones. If you can't click the Apple logo:
- Use Control + Eject/Power and then press Enter to restart.
- Or use Command + Control + Power to force a reboot.
Upon reboot, any frozen processes, driver hiccups, or UI issues should clear up.
8. Reset NVRAM/PRAM (Intel Macs Only)
If restarting doesn't work and you're using an Intel-based Mac, try resetting the NVRAM or PRAM:
- Turn Off your Mac.
- Switch it back on and press and hold right away: Command + Option + P + R
- Keep the keys in place for roughly 20 seconds.
- Let go when you see the Apple logo twice or hear the startup sound once more.
This resets display, resolution, and other system settings that might affect cursor visibility.
9. Reset the SMC (System Management Controller)
The SMC handles power and hardware-level behavior. Resetting it can help if your Magic Mouse or trackpad is acting up.
For Intel Macs:
- Turn Off your Mac.
- On the left side of the keyboard, press Shift + Control + Option. Next, press the Power button.
- Hold for ten seconds, then let go of all the keys and turn on.
💡 Note: Apple Silicon Macs (M-chip Macs) do not require SMC resets. Just restart.
10. Restart macOS UI Services via Terminal
If you're comfortable with Terminal, you can try restarting core macOS UI services that affect the pointer:
Open Terminal via Spotlight:
- Press Command + Space, type "Terminal," and press Enter.
![Losing your mouse cursor on a Mac]()

Then enter the following commands one at a time:
killall Dock
killall SystemUIServer
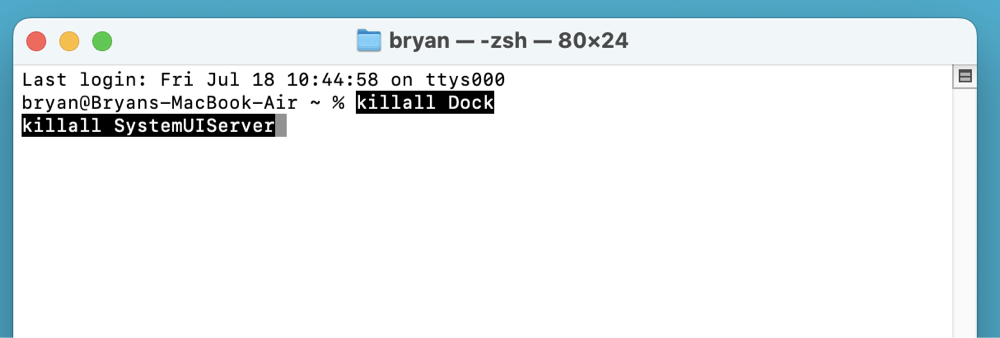
These commands refresh the Dock and system UI components and may revive a stuck or invisible pointer.
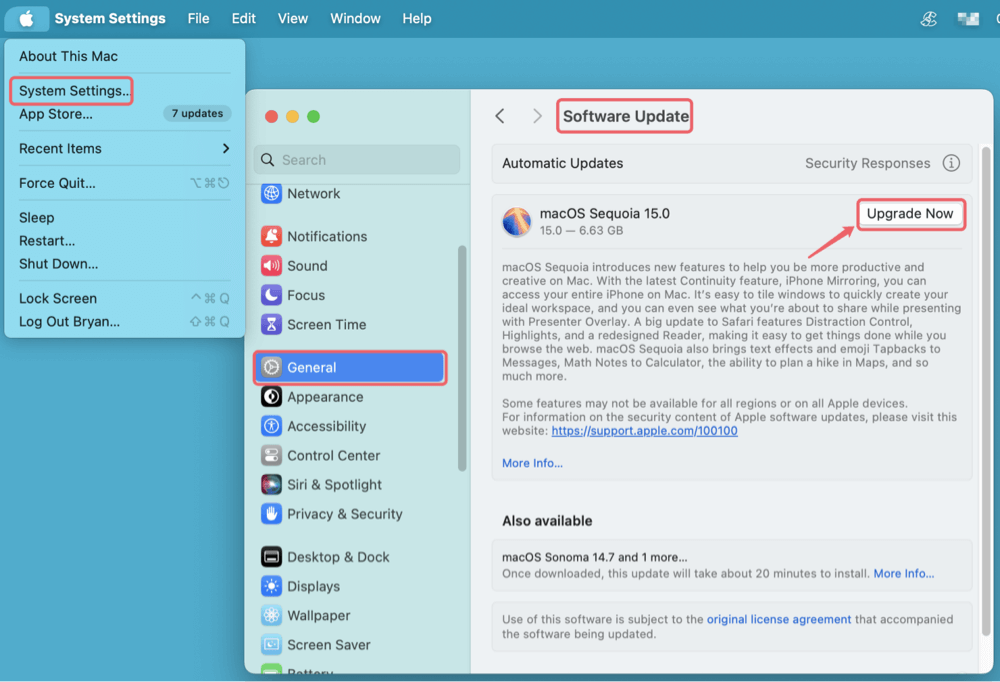
11. Update macOS and Device Drivers
Outdated software is another potential culprit, especially after a macOS upgrade.
To check for updates:
- Go to System Settings > General > Software Update.
![Losing your mouse cursor on a Mac]()
- If any updates are available, install them and restart your Mac.
If you use a third-party mouse or trackpad, visit the manufacturer's website to ensure you have the latest drivers compatible with your macOS version.
12. Remove Conflicting Apps or Extensions
Some third-party software - especially those that customize the UI or pointer - can interfere with macOS's display layers.
Examples include:
- Screen recorders
- Virtual desktops
- Custom pointer themes
- Remote desktop tools
Temporarily uninstall or disable such apps and restart your Mac to test if the problem resolves. If the mouse pointer reappears, the issue lies in one of those apps.
When to Contact Apple Support
If none of the above solutions work, and:
- The issue persists after multiple restarts
- The problem worsened after a macOS update
- The built-in trackpad is unresponsive
- External devices work on other machines but not your Mac
…then it's time to contact Apple Support or visit an Apple Store for diagnostics. Hardware issues like trackpad damage or motherboard problems may be involved.
Bonus Tip: Enable VoiceOver as a Backup Navigation Method
If your mouse pointer keeps disappearing and makes it hard to navigate macOS visually, you can temporarily rely on VoiceOver, Apple's built-in screen reader. This accessibility tool provides spoken feedback, allowing you to move around the interface without needing to see or use your mouse.
Here's how to use it as a quick backup:
- Press Command + F5 to toggle VoiceOver on or off instantly. When enabled, VoiceOver will start reading out the items currently highlighted on your screen.
- Use keyboard arrows and the Tab key to move between menus, buttons, and apps. VoiceOver will announce each selection, so you’ll know exactly where you are without needing the pointer.
While VoiceOver isn't a permanent fix for the disappearing cursor issue, it's a helpful temporary navigation method that ensures you can keep working until your pointer returns. If you've never used it before, don't worry - VoiceOver includes a quick tutorial to get you familiar with the basic commands in just a few minutes.
How to Prevent Mouse Disappearance on Mac in the Future?
Once you've fixed the issue, here are some ways to reduce the chances of recurrence:
- Avoid overloading your Mac with too many login items or UI utilities.
- Regularly update macOS and apps to stay compatible.
- Use certified accessories or Apple-recommended mice/trackpads.
- Keep your Mac clean of screen dust and check for system lag.
- Disable unnecessary display extensions or third-party widgets.
FAQs about Mouse Pointer Disappeared on Mac
This means the hardware is working, but the "graphic" for the cursor isn't being rendered. This is almost always a software glitch. Try the killall Dock command in Terminal or a simple restart.
Chrome is notorious for high memory usage. If you have too many tabs open, hardware acceleration can sometimes cause the cursor to flicker or vanish. Try disabling "Hardware Acceleration" in Chrome settings.
Usually, a low battery causes the cursor to lag or disconnect entirely, rather than just becoming invisible. However, it's always worth plugging it in for a few minutes to rule out power issues.
While there isn't a direct "find" shortcut, pressing Command + Tab to switch between apps often forces the OS to re-identify the cursor's position.
If the cursor disappears along with other visual artifacts (like lines on the screen or flickering), it could be a hardware issue. If it's only the cursor, it's likely a software bug.
Conclusion
A disappearing mouse on Mac is annoying - but in most cases, it's fixable with simple steps like restarting the UI, shaking the pointer, or checking display configurations. Whether you're using a MacBook Air, iMac, or Mac Studio with multiple monitors, this guide offers a practical solution for every setup.
By staying updated and avoiding conflicting software, you can keep your Mac running smoothly and avoid future mouse visibility issues.
DMcleaner for Mac
Donemax DMcleaner for Mac is an award-winning Mac cleanup & maintenance application. It offers 10+ tools to help Mac users clean up junk data on Mac, uninstall unwanted apps & delete leftovers, shred files, delete duplicate files, free up disk space, speed up slow Mac, etc. It is also a smart switch manager for Mac, a powerful disk manager for Mac.
Related Articles
- Dec 17, 2025Fixed: Safari Can't Connect to iCloud Private Relay on Mac
- May 21, 2026How to Safely Eject or Force Eject an External Drive, USB, or SD Card on Mac?
- Dec 17, 2024How to Clean Install macOS High Sierra?
- Sep 23, 2025Fix Xcode Not Working on macOS Tahoe, Sequoia, Sonoma, etc.
- Jul 02, 2025Why Can't Select Time Machine Backup Disk?
- Apr 01, 2026How to Factory Reset macOS Catalina (2026 Guide) - Erase & Reinstall

Contributing Writer
Steven
Steven has been a senior writer & editor of Donemax software since 2020. He's a super nerd and can't imagine the life without a computer. Over 6 years of experience of writing technical solutions and software tesing, he is passionate about providing solutions and tips for Windows and Mac users.

Editor in chief
Gerhard Chou
In order to effectively solve the problems for our customers, every article and troubleshooting solution published on our website has been strictly tested and practiced. Our editors love researching and using computers and testing software, and are willing to help computer users with their problems