
Written byStevenUpdated on Sep 19, 2025
How to Remove macOS Tahoe Beta?
Approved byGerhard Chou
Before we start: Before you remove macOS Tahoe beta, it's necessary to back up the data first. You can use Time Machine to back up Mac, manually copy important files to another drive, or using Donemax Disk Clone for Mac to create a full clone backup.
PAGE CONTENT:
Apple's macOS beta releases, such as macOS Tahoe beta, give users the chance to experience upcoming features before they are officially rolled out to the public. Beta testing is valuable for developers and tech enthusiasts who want early access and the ability to provide feedback. However, these early versions are not always stable. They often come with performance issues, bugs, app compatibility problems, and occasional system crashes.

If you've installed the macOS Tahoe beta but find that it's affecting your workflow, you may want to remove it and return to a stable macOS release, such as macOS Sequoia or Sonoma. Fortunately, there are several methods to do this, ranging from simple unenrollment from the beta program to a complete erase and reinstall.
This guide walks you through step-by-step instructions on how to remove macOS Tahoe beta and safely revert your Mac to a stable version.
Things to Know Before Removing macOS Tahoe Beta
Before jumping into the removal process, it's important to prepare properly. Removing a beta version isn't like uninstalling an app—it requires reverting the operating system, which can affect your data if not done carefully.
1. Back Up Your Mac
- Use Time Machine to create a full backup of your system.
- Alternatively, copy important files to an external hard drive or upload them to iCloud Drive.
- You can also make a full and bootable clone for Mac with Donemax Disk Clone for Mac.
![remove macOS Tahoe beta]()
- Without a backup, you risk losing documents, photos, or system settings.

2. Public Beta vs. Developer Beta
- If you installed the public beta, unenrolling from Apple's Beta Software Program is enough to stop receiving future beta updates.
- If you installed the developer beta, the process may require reinstalling macOS manually.
3. Decide How You Want to Revert
There are different ways to remove macOS Tahoe beta:
- Unenroll from macOS Tahoe beta program (stops new betas but keeps current version).
- Reinstall macOS from Recovery Mode (returns you to the latest stable release).
- Erase and clean install macOS (completely wipes beta system).
- Restore from a Time Machine backup (fastest way if you backed up before upgrading).
4. Stable Internet Connection
Downloading and reinstalling macOS requires several gigabytes of data. Make sure your internet connection is strong and reliable.
Methods to Remove macOS Tahoe Beta
Method 1: Unenroll from the macOS Beta Program
The simplest way to stop receiving future beta updates is to unenroll your Mac from Apple's beta program. However, keep in mind that this won't automatically downgrade your system—it just ensures you no longer get beta updates.
Steps to Unenroll:
- Go to System Settings on your Mac.
- Navigate to General > Software Update.
- Select Beta Updates.
- Change the setting from macOS Tahoe Beta to Off.
- Restart your Mac.
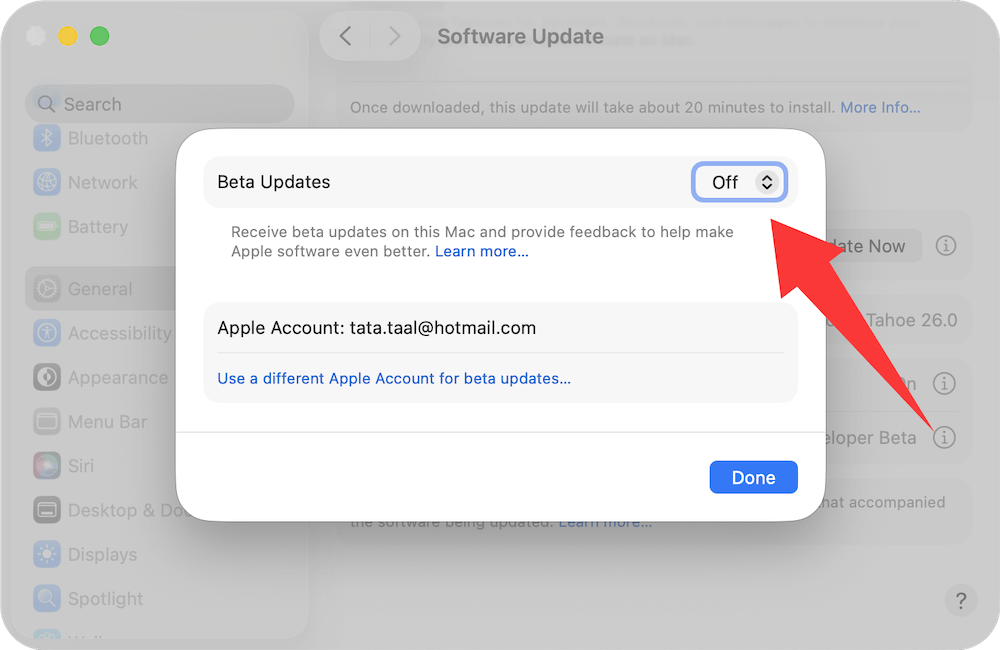
After unenrolling, you'll continue using the Tahoe beta until the next stable update is released. At that point, your Mac will update to the public release.
This method is best if you don't mind keeping the beta temporarily and just want to exit the program moving forward.
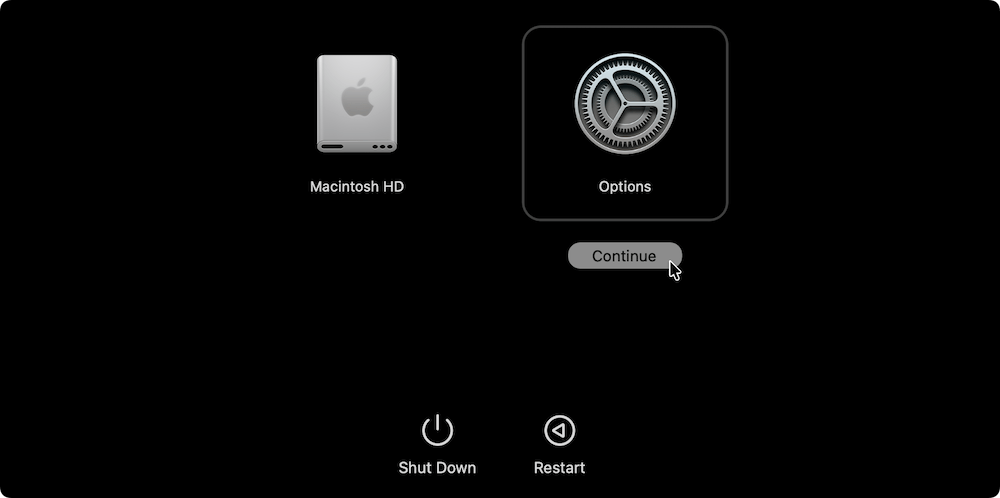
Method 2: Reinstall macOS from Recovery Mode
If you want to remove macOS Tahoe beta immediately, reinstalling macOS from Recovery Mode is the most direct approach. This replaces the beta with the latest official release without erasing your files (though a backup is still strongly recommended).
Steps to Reinstall macOS:
- Restart your Mac.
- As it boots, hold down Power button for Apple Silicon Macs until "Options" appears. Select Options > Continue. (for Intel Macs, just hold Cmd + R keys)
![remove macOS Tahoe beta]()
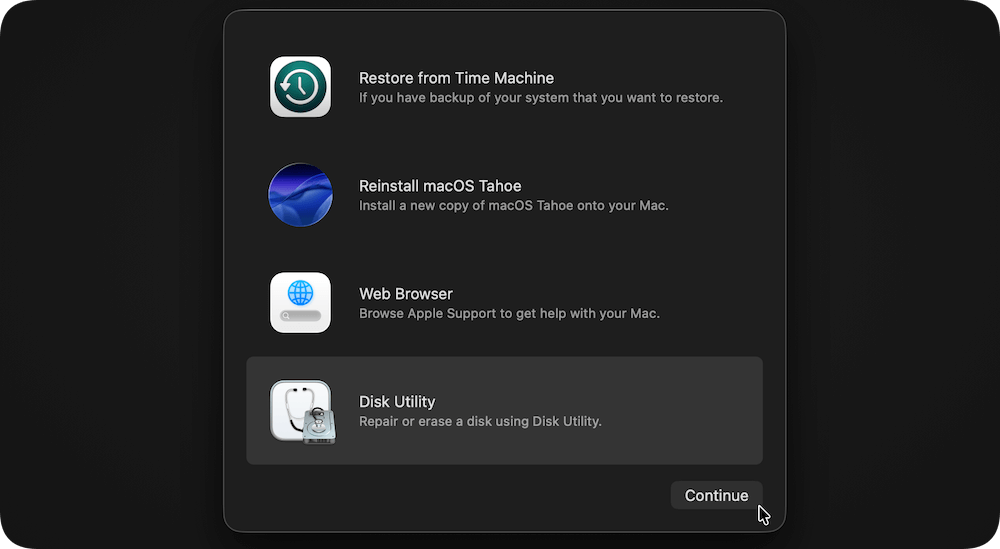
- Choose Reinstall macOS from the Recovery menu.
![remove macOS Tahoe beta]()
- Follow the on-screen instructions to install the latest stable version.

Your Mac will download and install the most recent official macOS release, replacing the beta. Depending on internet speed, this process may take an hour or more.
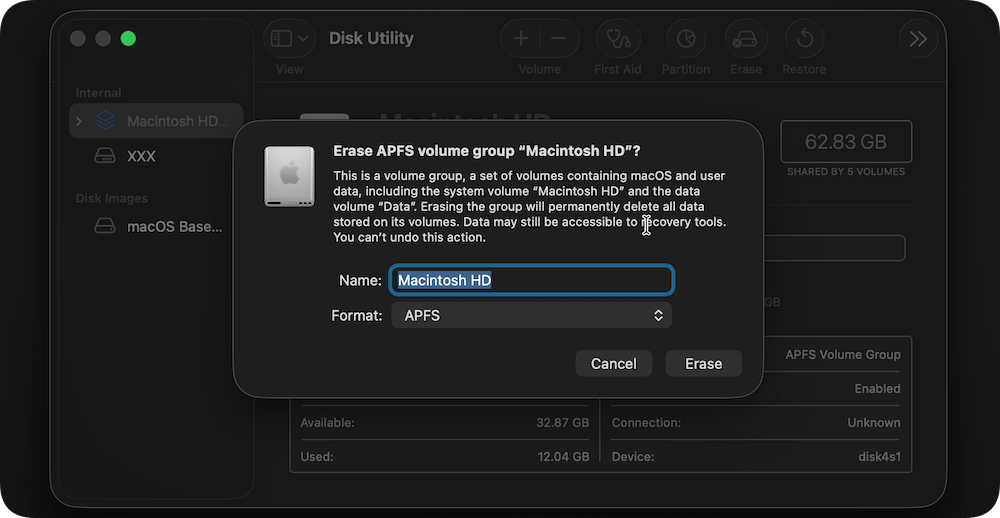
Method 3: Erase and Reinstall macOS (Clean Install)
If the Tahoe beta caused severe issues such as system crashes, file corruption, or app instability, a clean installation is the best way to completely remove it. This method wipes your Mac's drive and installs a fresh copy of the stable macOS.
💡 Important: A clean install erases everything on your Mac. Make sure you have backed up your files before proceeding.
Steps for a Clean Install:
- Restart your Mac into Recovery Mode (same steps as above).
- From the Recovery menu, select Disk Utility.
![remove macOS Tahoe beta]()
- Choose your startup disk (usually named Macintosh HD).
- Click Erase, choose APFS format, and confirm.
![remove macOS Tahoe beta]()
- Exit Disk Utility and select Reinstall macOS.
- Follow the installation prompts to download and install the latest stable macOS.
After installation, your Mac will feel like a brand-new machine. You can then restore your files from a backup or set it up from scratch.
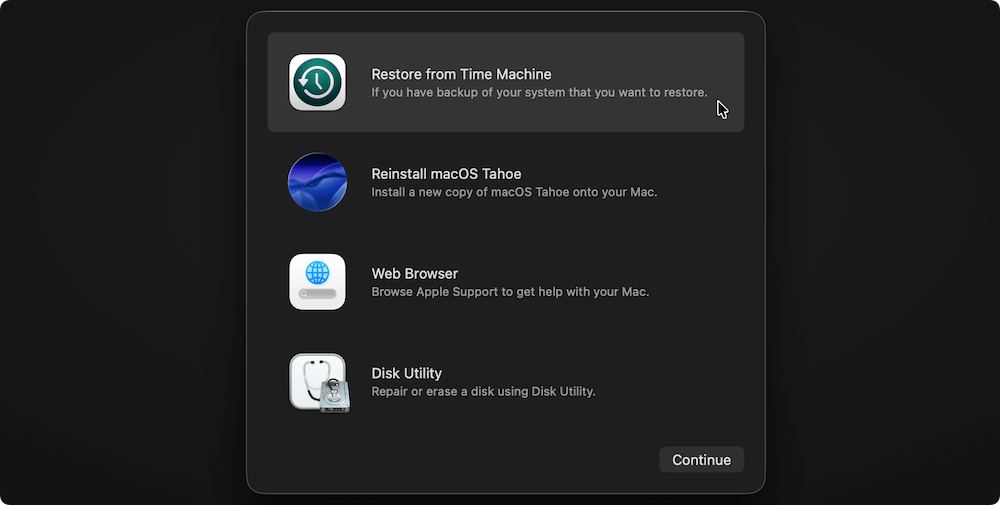
Method 4: Restore from a Time Machine Backup
If you created a Time Machine backup before installing macOS Tahoe beta, you can quickly roll back to that version. This method is the most efficient way to get rid of the beta without needing a full reinstall.
Steps to Restore:
- Connect your Time Machine drive to your Mac.
- Restart your Mac and enter Recovery Mode.
- Select Restore from Time Machine Backup from the menu.
- Choose the most recent backup taken before installing the Tahoe beta.
- Confirm and start the restore process.
Your Mac will revert to the exact state it was in before the beta installation, including apps, settings, and files.
Troubleshooting & Common Issues
Sometimes, removing a macOS beta doesn't go smoothly. Here are some common problems and solutions:
1. Recovery Mode Not Working
- If you can't boot into Recovery Mode, create a bootable macOS installer USB using another Mac.
- Insert the USB, restart your Mac, and hold Power button or Option (⌥) to boot from it.
2. Installation Stuck or Fails
- Ensure your Mac is connected to a stable Wi-Fi network.
- Reset NVRAM/PRAM (Intel Macs) or restart into Safe Mode and try again.
3. Boot Loop After Reinstall
- Perform a clean install instead of a simple reinstall.
- Erasing the startup disk usually resolves persistent boot loops.
4. Missing Data After Reinstall
- Restore your files manually from Time Machine or iCloud.
- If backups weren't made, use professional Mac data recovery software.
After Removing macOS Tahoe Beta
Once you've successfully removed the beta and returned to a stable macOS version, here are a few steps to ensure your Mac is back to optimal performance:
1. Verify macOS Version
- Go to Apple Menu > About This Mac.
- Confirm you're running the latest public macOS release.
2. Restore Your Files
- If you performed a clean install, restore files from Time Machine, iCloud, or your external drive.
3. Reinstall Applications
- Some third-party apps may need to be reinstalled after a clean install.
- Download the latest versions from the App Store or developer websites.
4. Check System Performance
- Run your Mac for a few days to ensure there are no crashes, glitches, or slowdowns.
- Keep macOS updated through System Settings > Software Update.
Tips for Future Beta Testing
If you enjoy testing Apple's beta versions but don't want to risk your main system again, consider these safer options:
- Install beta on a secondary Mac: Keeps your primary device stable.
- Use an external drive: Install macOS beta on an external SSD to test without affecting your main system.
- Dual-boot setup: Partition your Mac's internal drive to run both stable and beta versions side by side.
Conclusion
The macOS Tahoe beta offers exciting new features for early adopters, but like any beta release, it comes with risks. If the instability becomes too disruptive, you have several ways to remove it:
- Unenroll from the beta program to stop future beta updates.
- Reinstall macOS from Recovery Mode for a quick rollback.
- Erase and reinstall macOS for a fresh, clean system.
- Restore from a Time Machine backup for the fastest and most complete rollback.
By following the steps in this guide and ensuring you back up your data beforehand, you can smoothly return to a stable macOS version and keep your Mac running reliably. For future beta testing, consider safer alternatives such as using an external drive or a secondary device.
Returning to a stable release ensures you get the best performance, security, and compatibility—keeping your Mac ready for daily productivity without the unpredictability of a beta system.
Donemax Disk Clone for Mac
An award-winning disk cloning program to help Mac users clone HDD/SSD/external device. It also can create full bootable clone backup for Macs.
Related Articles
- Jun 16, 20252025 Best 8 Snipping Tools for Mac
- Aug 10, 2025How to Set Default Browser on Mac?
- Apr 15, 20263 Easy Ways to Open & Extract RAR Files on macOS (2026 Guide)
- Feb 09, 2025[7 Solutions] Fix Storage System Verify or Repair Failed 69716 Error on Mac
- Aug 07, 2024Fix Time Machine Won't Start Backup
- Oct 11, 2024What is First Aid? How to Run First Aid to Repair Disk on Mac?

Contributing Writer
Steven
Steven has been a senior writer & editor of Donemax software since 2020. He's a super nerd and can't imagine the life without a computer. Over 6 years of experience of writing technical solutions and software tesing, he is passionate about providing solutions and tips for Windows and Mac users.

Editor in chief
Gerhard Chou
In order to effectively solve the problems for our customers, every article and troubleshooting solution published on our website has been strictly tested and practiced. Our editors love researching and using computers and testing software, and are willing to help computer users with their problems