Written byChristinaUpdated on Oct 30, 2025
KIOXIA SSD Not Showing Up? Fix Detection Issues Fast
Approved byGerhard Chou
Before we start: Connection issues, outdated driver/firmware, file system corruption or other issue may cause KIOXIA SSD not showing up issue. If there are important files on the drive, it's essential to recover the data first with Donemax Data Recovery. Then you can try the advanced methods to fix or reformat the KIOXIA SSD.
PAGE CONTENT:
SSDs have revolutionized data storage with their fast performance and reliability. KIOXIA, formerly Toshiba Memory, is one of the leading SSD manufacturers, offering a range of SATA and NVMe drives. However, like all tech products, users may occasionally face issues — one of the most common being a KIOXIA SSD not showing up on their system.
Whether you're installing a new drive or troubleshooting an existing one, this comprehensive guide will walk you through every step to identify and fix the problem.
Common Scenarios Where KIOXIA SSD Doesn't Show Up
Understanding when and where the SSD goes undetected is the first step in fixing the issue. Below are typical scenarios:
- Newly installed KIOXIA SSD not showing in BIOS/UEFI or Windows.
- SSD missing from Disk Management or File Explorer.
- KIOXIA external SSD not recognized via USB.
- Drive not showing after OS reinstall or BIOS update.
These problems can stem from physical connection issues, system misconfigurations, outdated drivers, or even firmware bugs.
Preliminary Checks When KIOXIA SSD Not Showing Up
Prior moving into complex solutions, it is beneficial to perform some basic checks.
A. Inspect Physical Connections
- Check SATA/Power cables (for SATA SSDs):
Make sure the SSD is connected to both the SATA data and power cables firmly.
- Check M.2 installation (for NVMe SSDs):
Reseat the M.2 SSD and ensure it's properly screwed into the slot.
- Try different ports/cables:
Use another SATA port or USB cable. If using a USB adapter/enclosure, test a different one.
- External SSDs:
If you're using a portable KIOXIA SSD, ensure the USB port supplies enough power, especially with hubs.
B. Verify Hardware Compatibility
- M.2 compatibility: Not all motherboards support both SATA and NVMe M.2 drives. Check your motherboard's specs.
- Older motherboards: Some older BIOS versions don't support NVMe without updates.
C. Check BIOS/UEFI Settings
If the SSD isn't showing up in Windows, check if it's recognized in BIOS/UEFI:
- Enter BIOS/UEFI:
Restart the computer and press DEL, F2, or ESC (depending on your system) to enter BIOS.
- Check Storage Configuration:
Look under "SATA Configuration" or "NVMe Configuration." The SSD should be listed.
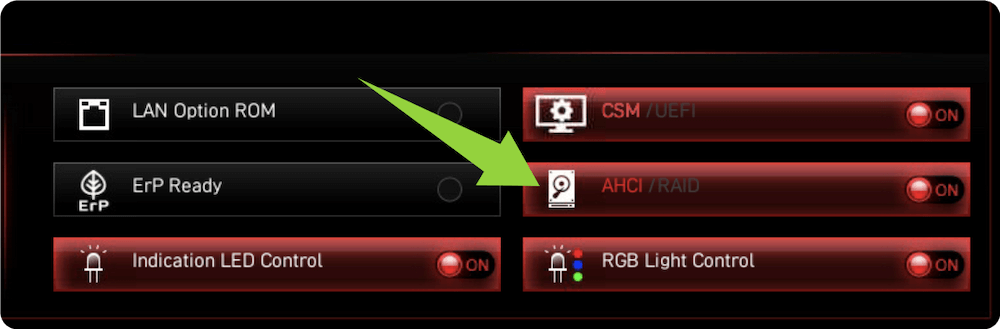
- Enable AHCI mode:
For SATA SSDs, ensure the controller is set to AHCI instead of IDE or RAID.
![KIOXIA SSD not showing up]()
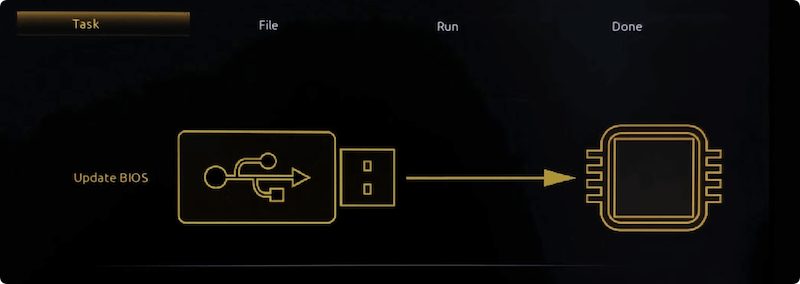
- Update BIOS Firmware:
Visit your motherboard manufacturer's website and install the latest BIOS version.
![KIOXIA SSD not showing up]()
If the SSD doesn't appear in BIOS, it's likely a physical or compatibility issue.
Data Recovery for Not Showing Up KIOXIA SSD
If you checked and found there are no problems with the connections and settings, there might be issues with the drive itself. Before trying the advanced fixes, it's better to recover the important files first if necessary. Some fixes may change the drive information and cause damage to the data on the drive.
If the KIOXIA SSD is inaccessible or not showing up, you can use the software Donemax Data Recovery to retrieve the files from the drive. The software is able to deeply scan the drive and analyze the corrupted file system to get back the files properly.
Donemax Data Recovery
- Professional data recovery software with high success rate.
- Recover data quickly and the software is easy-to-use.
- Support data recovery for different devices and file systems.
Here are the steps to recover the files from not showing up KIOXIA SDD with the software:
- Connect the KIOXIA SSD to the computer. Run the software Donemax Data Recovery and select the drive.
![recover data from not showing up KIOXIA SSD]()
- Scan the drive to search for the files on the drive. It will take a while depending on the size of the drive.
![recover data from not showing up KIOXIA SSD]()
- After scanning the drive completely, the software will list all the found files. Check and preview the files first. At last, select the wanted files and save to another drive.
![recover data from not showing up KIOXIA SSD]()


Advanced Fixes for KIOXIA SSD Not Showing Up Issue
Fix 1. Use Disk Management to Initialize and Format the SSD
Disk Management is the first place to check when a new SSD is installed but not accessible in File Explorer.
- Open Disk Management: Click on Disk Management after pressing Windows + X. As an alternative, type diskmgmt.msc, hit Enter, and press Windows + R.
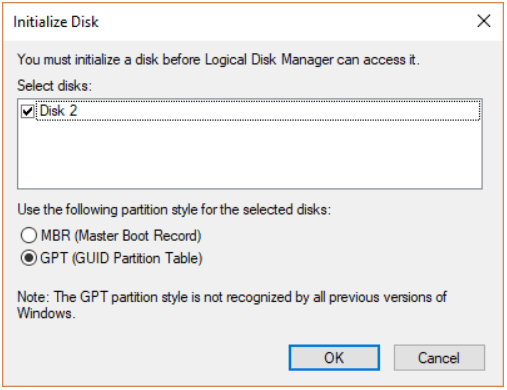
- Look for Uninitialized Drives: If a pop-up appears saying "You must initialize a disk before Logical Disk Manager can access it", select the SSD and choose GPT for modern systems or MBR for older systems.
![KIOXIA SSD not showing up]()
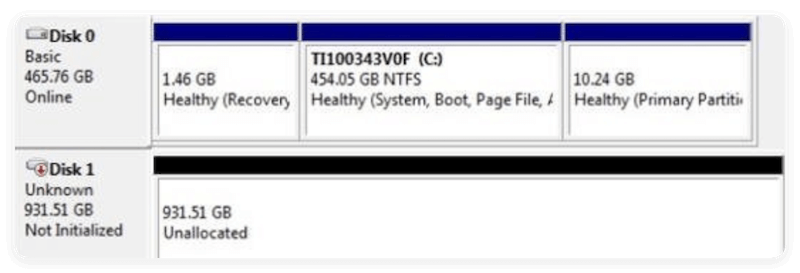
- If no pop-up appears, scroll through the bottom panel of the Disk Management window and look for:
- Disk 1 (Unknown, Not Initialized)
- Disk 2 (Unallocated)
![KIOXIA SSD not showing up]()
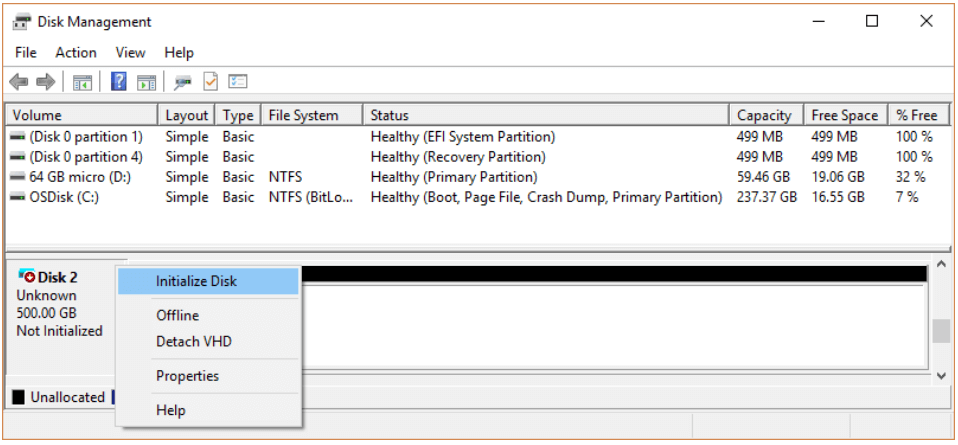
- Initialize or Format the SSD: If necessary, right-click the disk and choose Initialize Disk.
![KIOXIA SSD not showing up]()
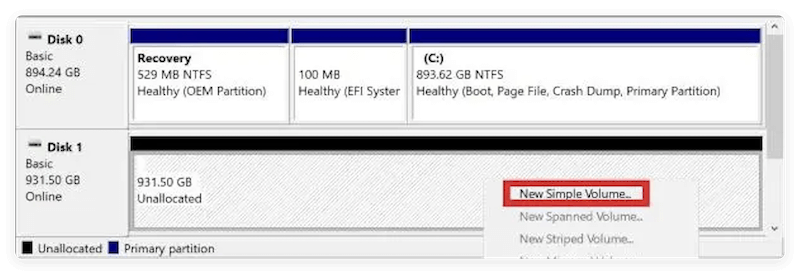
Next, select New Simple Volume from the menu when you right-click the Unallocated space, and then proceed with the process to:
- Assign a drive letter.
- Format the partition (NTFS recommended for Windows).
- Create the volume.
💡 Troubleshooting Tips:
- If you receive an error such as "The request could not be performed because of an I/O device error", this might indicate a cable issue or failing drive.
- Drives that show up but cannot be initialized may need to be cleaned using diskpart (see Fix 6).
Fix 2. Device Manager: Scan for Hardware & Update Drivers
If your SSD isn't visible in Disk Management, it might not be detected properly by Windows. Here's how to troubleshoot using Device Manager.
- Open Device Manager: Press Windows + X > select Device Manager.
- Check under "Disk Drives": Look for your KIOXIA SSD. It should be listed by name (e.g., KIOXIA Exceria 1TB SSD). If it's not listed, click Action > Scan for hardware changes.
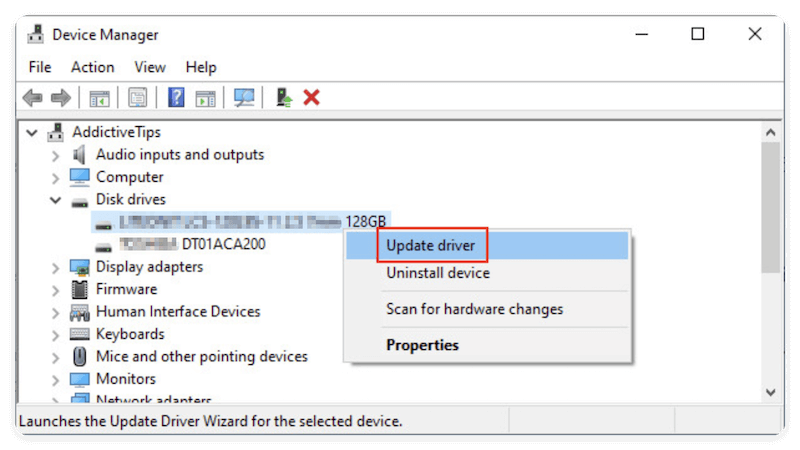
- Check for Unknown Devices: Expand "Other Devices" or "Storage Controllers". If there's a yellow warning icon (⚠ ️) , right-click and select: Update Driver, and then Browse my computer for drivers or Search automatically
![KIOXIA SSD not showing up]()
- Uninstall & Reinstall Device: If the SSD is listed but not functioning, right-click > Uninstall device. Then restart the PC. Windows should automatically reinstall the correct driver.
💡 Advanced Tip:
- Check View > Devices by connection to trace how Windows is enumerating storage devices.
- This helps determine if the SSD is connected via SATA controller, USB hub, or NVMe driver path.
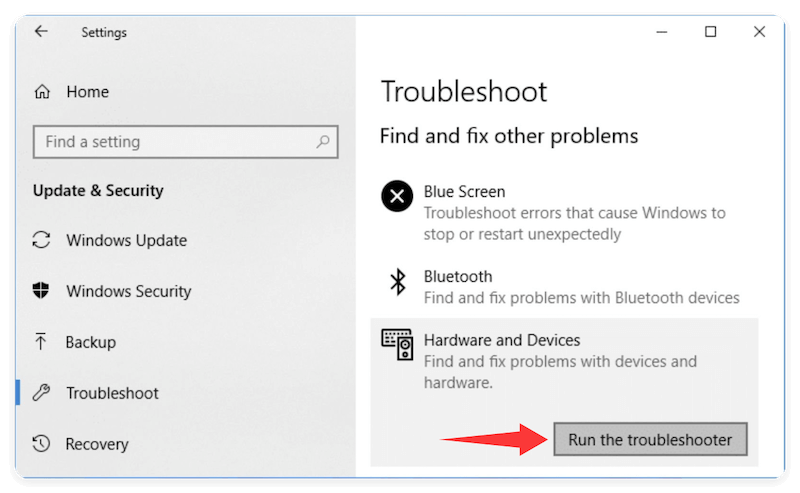
Fix 3. Use Windows Storage Troubleshooter
Windows includes a built-in troubleshooter that can detect and resolve hardware-related problems automatically.
- Go to Settings: Start > Settings > System > Troubleshoot > Other Troubleshooters.
- Run the Troubleshooter: Find Hardware and Devices, then click Run. The tool will check for:
- Improper device configuration
- Missing drivers
- Conflicts between storage devices
- Follow Recommendations: If Windows detects an issue, apply the suggested fixes and reboot your system.
Fix 4. Assign or Change Drive Letter
Sometimes the SSD is fully functional but lacks a drive letter, making it invisible in File Explorer.
- Open Disk Management.
- Right-click on the SSD's visible volume.
- Select the "Change Drive Letter and Paths" option.
- To assign a new letter, click Add or Change.
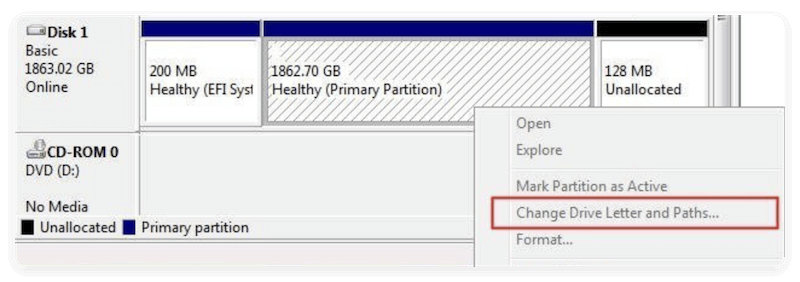
💡 Note: Windows Explorer will only show drives with assigned letters. Unlettered partitions remain hidden.
Fix 5. Update or Install Drivers and Firmware Manually
Sometimes detection problems are caused by outdated or missing drivers.
- Visit KIOXIA's official website. Go to the Support or Downloads section for your SSD model.
- Download latest driver packages or SSD management tools (e.g., KIOXIA SSD Utility)
- Install firmware updates using their utility software (if available).

💡 Tip: Firmware updates can resolve bugs that affect SSD visibility and performance.
Fix 6. Format and Partition the SSD Properly via Commands
If your KIOXIA SSD is new or has a corrupted partition, Windows may not recognize it properly. You can format it using DiskPart (Advanced):
- Launch Command Prompt in Administrator mode.
- Type the below commands:
diskpart
list disk
select disk X (replace X with the disk number of your SSD)
clean
create partition primary
format fs=ntfs quick
assign
exit
💡 Warning: This will erase all data on the SSD. Use only if you're sure the drive is new or needs to be reset.
Fix 7. Fixes for External KIOXIA SSDs
If you're using a portable or external KIOXIA SSD, here are specific fixes:
A. Try Other Ports
- Use a USB 3.0 or 3.1 port if available. Avoid USB hubs initially.
- Try connecting the SSD directly to a rear port on a desktop.
B. Replace Cable or Adapter
- A faulty USB cable or adapter can prevent detection.
- If you're using a USB-to-SATA adapter, test with another known working one.
C. Power Supply Issues
- Portable SSDs might require more power than some ports provide.
- Try using a Y-splitter cable or powered USB hub.
D. Test on Another System
- Connect the SSD to another PC or Mac to rule out host device issues.
When to Replace or RMA the SSD
If none of the above solutions work, your KIOXIA SSD may be faulty.
Signs of a Faulty SSD:
- SSD not detected in BIOS and other systems.
- Frequent disconnections.
- Corrupted partitions repeatedly after formatting.
Check Warranty and Support:
- Visit KIOXIA's warranty portal.
- Use the SSD's serial number to check coverage.
- Request an RMA (Return Merchandise Authorization) if the drive is defective.
KIOXIA usually offers 3 to 5 years of warranty depending on the model.
Conclusion
If your KIOXIA SSD is not showing up, the issue could stem from something as simple as a loose connection to a more complex driver or firmware issue. To summarize:
- Physically check connections and ports.
- Verify BIOS detection.
- Initialize or partition the SSD in Windows Disk Management.
- Install the latest KIOXIA firmware and driver tools.
- Format and clean the drive using DiskPart if necessary.
- For external SSDs, test with different cables and systems.
If you've tried all options and the SSD still fails to appear, it's likely a hardware fault, and you should proceed with a replacement or RMA.
By methodically going through these steps, most users can resolve detection problems without professional help.
Donemax Data Recovery
Powerful, safe & easy-to-use data recovery software. Easily and completely recover deleted, formatted, or other lost data. The tool supports PC, Mac, HDD, SSD, USB drive, camera, SD card, RAID and other storage devices.
Related Articles
- Nov 07, 2024How to Recover Lost Data from an SSD on Mac?
- Nov 05, 2024How to Upgrade HDD to SSD on Toshiba Laptop?
- Jul 01, 2026Fix Bad Sectors on SSD Without Losing Data
- Jul 11, 2025Fix SanDisk G-Drive Not Working on Mac Without Losing Data
- May 25, 2026Fix & Format: How to Reformat or Repair SSD Using Command Prompt
- Nov 13, 2024Can I Recover Data If TRIM Is Enabled on My SSD Drive?

Contributing Writer
Christina
Christina is the senior editor of Donemax software who has worked in the company for 4+ years. She mainly writes the guides and solutions about data erasure, data transferring, data recovery and disk cloning to help users get the most out of their Windows and Mac. She likes to travel, enjoy country music and play games in her spare time.

Editor in chief
Gerhard Chou
In order to effectively solve the problems for our customers, every article and troubleshooting solution published on our website has been strictly tested and practiced. Our editors love researching and using computers and testing software, and are willing to help computer users with their problems