
Written byCharlesUpdated on Apr 29, 2025
Bad Sectors Repair Solutions
Approved byGerhard Chou
Before we start: Before fixing bad sectors on a hard drive, you can use data recovery software - such as Donemax Data Recovery to help recover all inaccessible, deleted or lost data. This data recovery software also helps fix bad sectors, repair damaged drives, etc.
PAGE CONTENT:
- What Are Bad Sectors?
- Recover Inaccessible/Deleted/Formatted Data Before Fixing Bad Sectors
- How to Check for Bad Sectors?
- Repair Solutions for Logical Bad Sectors
- Repair Solutions for Physical Bad Sectors
- SSD-Specific Considerations When Fixing Bad Sectors
- Preventive Measures to Avoid Bad Sectors or Data Loss
- Conclusion
A hard drive or solid-state drive (SSD) is the heart of your data storage system. However, over time, storage drives can develop bad sectors - small clusters of storage space that become unreadable or corrupted. Whether you're using a traditional hard disk drive (HDD) or a modern SSD, dealing with bad sectors is crucial to prevent data loss and maintain system stability.
This comprehensive guide covers the types, causes, detection methods, and repair solutions for bad sectors, as well as best practices to prevent them from occurring in the future.
What Are Bad Sectors?
A bad sector is a section of a disk storage unit that has become permanently damaged and cannot reliably store data. When a system tries to read or write to a bad sector, it may result in performance degradation, data corruption, or system crashes.
There are two main types:
- Logical bad sectors: Caused by software errors or improper shutdowns. The physical disk is intact, but the data is corrupted.
- Physical bad sectors: Caused by physical damage to the disk, such as scratches on an HDD platter or wear on an SSD cell. These are irreversible.
Common Symptoms of Bad Sectors
- Slow performance or system freezes
- Frequent file corruption
- Error messages during file access or system startup
- Clicking or grinding noises from an HDD
- Blue Screen of Death (BSOD) in Windows
- Inability to format the drive or run applications stored on it
Recognizing these symptoms early can help you repair logical bad sectors and back up your data before the drive fails completely.
Causes of Bad Sectors
Understanding what causes bad sectors can help you avoid them in the future:
1. Physical Damage
Shock from dropping a laptop or desktop tower can scratch the platters inside an HDD or damage SSD chips.
2. Power Failures
Sudden shutdowns or surges during read/write operations can corrupt sectors.
3. Manufacturing Defects
Some drives leave the factory with defective areas. Though most are marked as unusable (spared) at the factory level, some may slip through.
4. Aging and Wear
All storage devices degrade over time. SSDs have limited write cycles, and HDDs wear out after years of spinning at high speeds.
5. Malware or Software Errors
Viruses or corrupted software can overwrite data improperly, leading to logical sector corruption.
Recover Inaccessible/Deleted/Formatted Data Before Fixing Bad Sectors
Before fixing bad sectors and repairing your hard drive, you can use data recovery software - such as Donemax Data Recovery to deeply scan the drive and recover all inaccessible, deleted, formatted or lost files.
Step 1. Download and install the Donemax Data Recovery software on your computer and ensure the hard drive which has bad sectors is connected to the computer.
Step 2. Open Donemax Data Recovery, then select the failed hard drive or corrupted hard drive to start data recovery.

Step 3. This data recovery software will deeply scan the hard drive and find all recoverable files including existing files, hidden files, inaccessible files, deleted/formatted/lost files, etc.

Step 4. Wait until the scanning process is completed, then preview the recoverable files. Select the wanted ones, click on Recover button to save them.

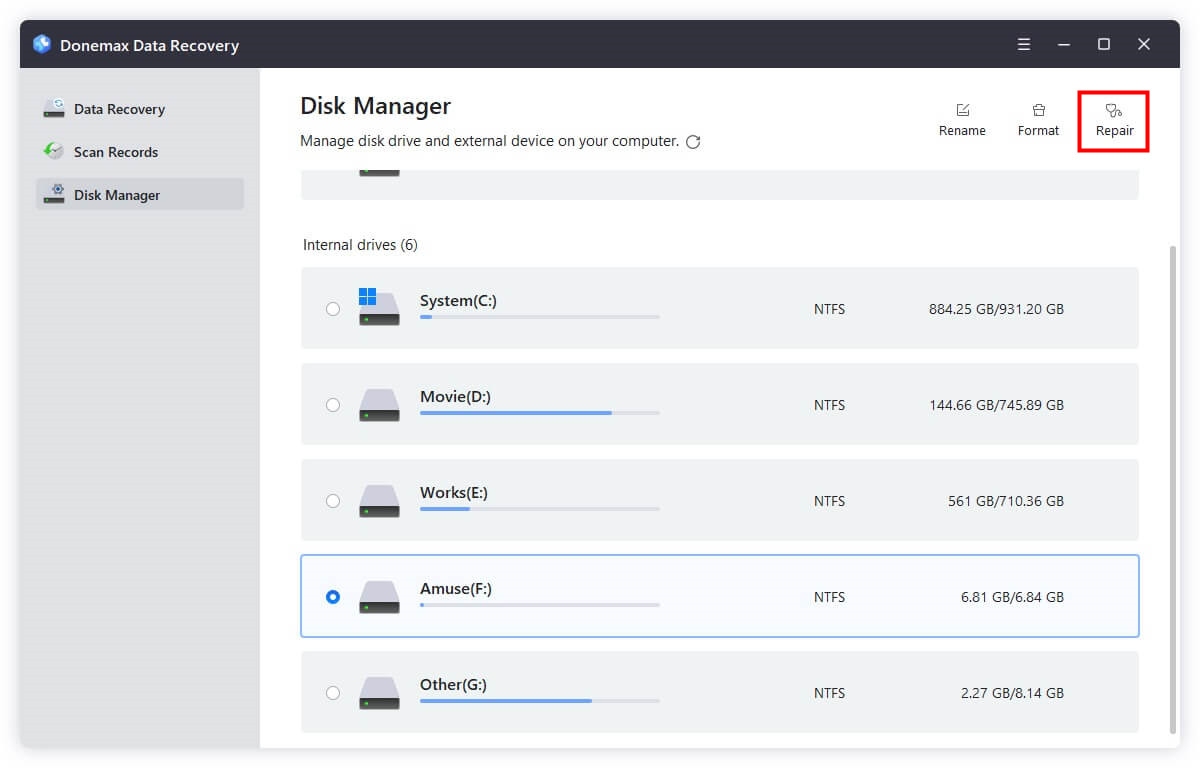
Donemax Data Recovery also can help you fix bad sectors, just choose Disk Manager tool, then select the corrupted hard drive, click on Repair button.
How to Check for Bad Sectors?
Diagnosing bad sectors early is key to minimizing data loss and maintaining system reliability. Fortunately, several methods - both built-in and third-party - can help identify problematic areas on your drive. Here's how to perform a thorough check:
1. Using CHKDSK (Check Disk) in Windows
CHKDSK is a built-in Windows utility designed to scan the integrity of file systems and fix logical errors. It can also check for bad sectors and attempt to recover readable information.
Steps to Use CHKDSK:
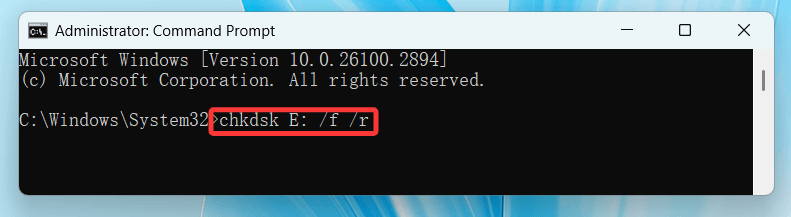
- Launch the Command Prompt in Administrator mode.
- Type the following command:
chkdsk X: /f /r
![repair solutions for bad sectors]()
Replace X: with the appropriate drive letter.
- /f tells CHKDSK to fix any detected file system errors.
- /r locates bad sectors and attempts data recovery from them.
- If the disk is currently in use (e.g., the system drive), you'll be asked to schedule the scan on the next reboot. Type Y and press Enter.
- Start your computer again. The scan will run before Windows starts.
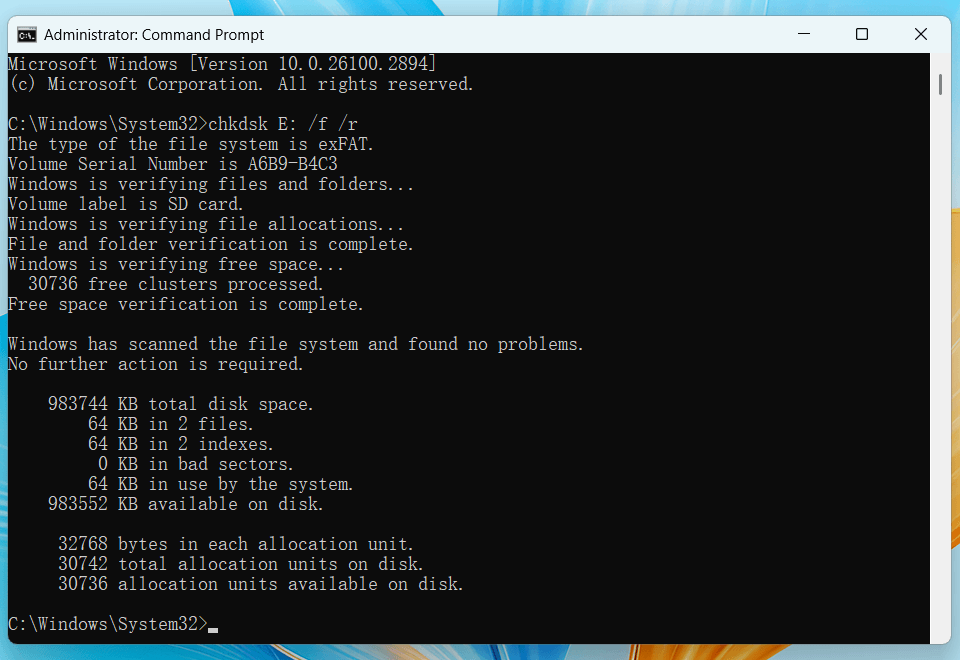
What CHKDSK Reports:
- Total disk space
- Allocation unit size
- Number of bad sectors found
- Volume bitmap errors
- Index entry inconsistencies
💡 Note: The time taken depends on the drive size and number of files. Large drives may take hours to scan completely.
2. Using Windows Error Checking (GUI Version)
For users uncomfortable with command-line tools, Windows also offers a graphical version:
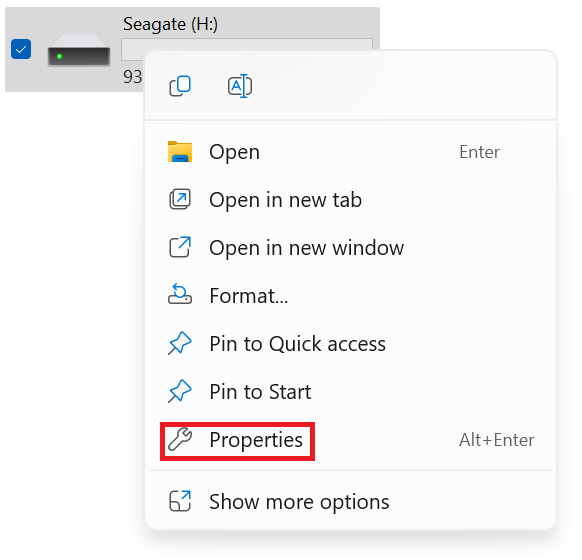
- Open File Explorer.
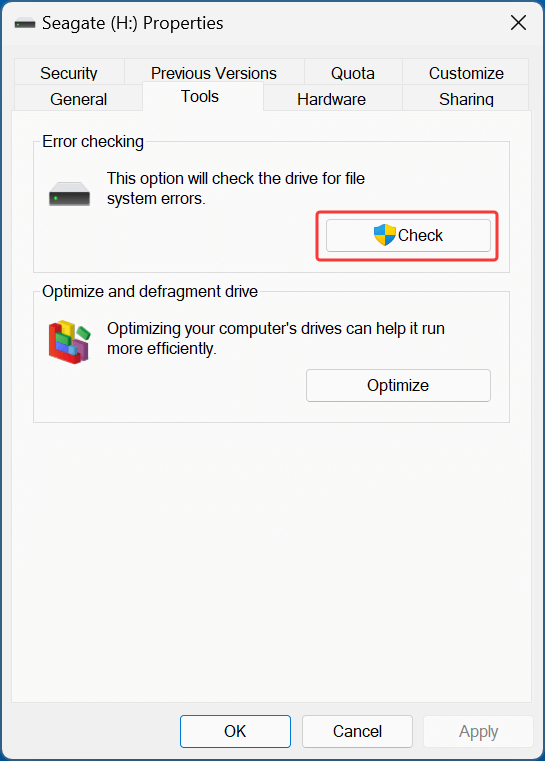
- To check a drive, right-click on it.
![repair solutions for bad sectors]()
- Choose Properties > Tools > Error checking.
![repair solutions for bad sectors]()
- Click Check, then Scan drive.
![repair solutions for bad sectors]()
- If errors are found, you'll be prompted to repair them.
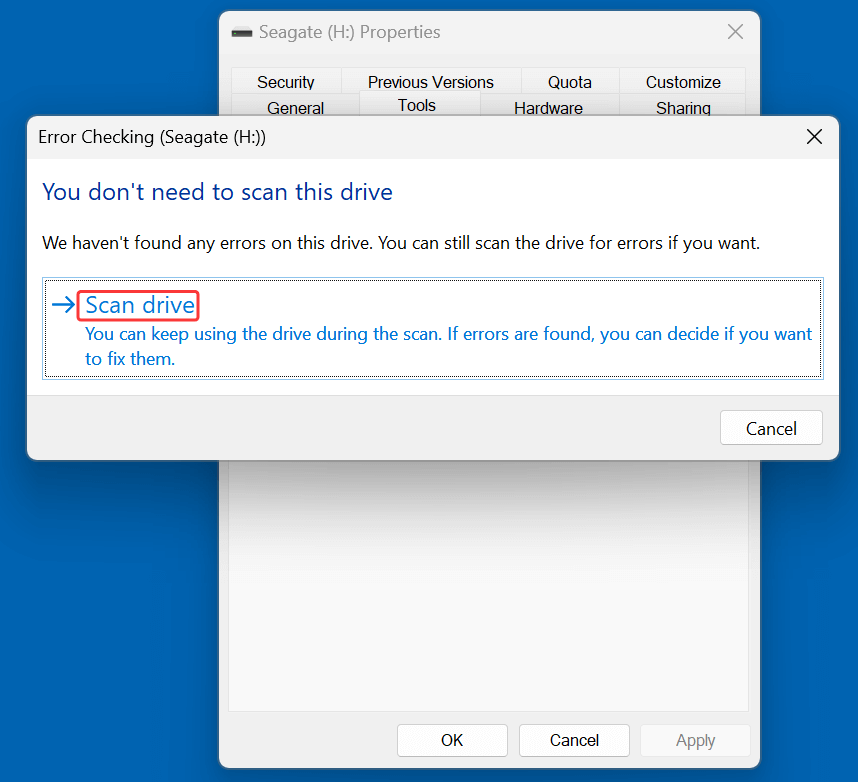
This tool uses CHKDSK in the background but provides an easier interface for casual users.
3. Monitoring SMART Data
SMART is a diagnostic tool built into most modern HDDs and SSDs. It can detect early signs of drive failure.
How to View SMART Status:
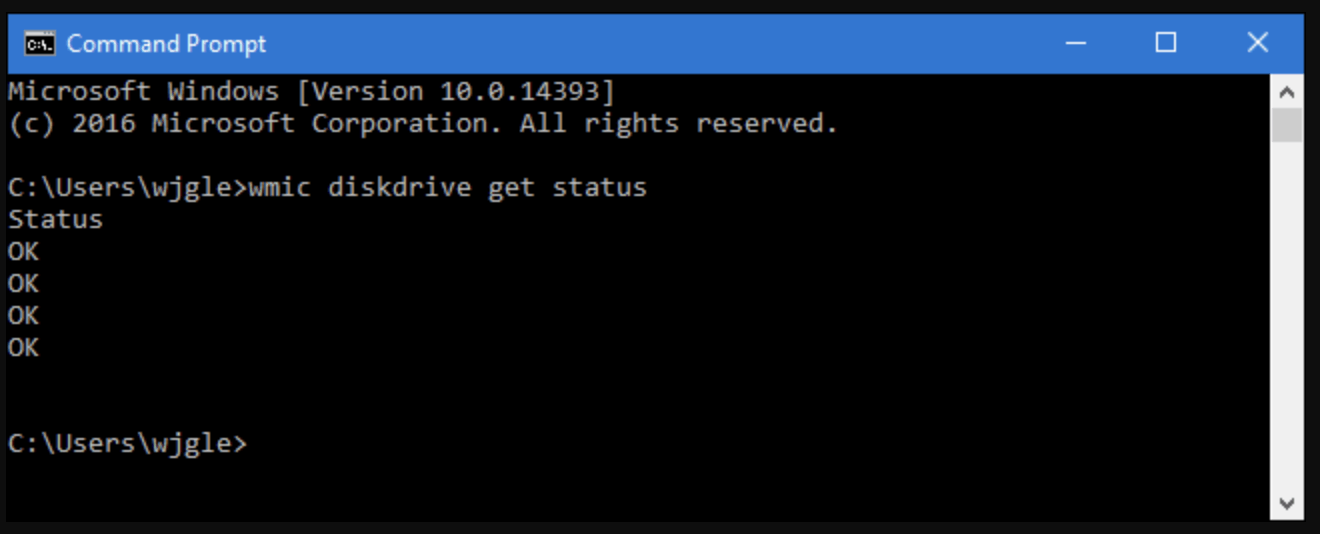
- Use Command Prompt:
wmic diskdrive get status
![repair solutions for bad sectors]()
You'll see OK or Pred Fail. However, this is very basic.
- Use CrystalDiskInfo (free):
- Provides a visual summary of your drive's health.
- Displays temperature, power-on hours, reallocated sectors, and more.
- Alerts you if thresholds are exceeded.
- For SSDs, manufacturer tools like Samsung Magician, Intel SSD Toolbox, or Crucial Storage Executive offer tailored SMART insights.
4. Using Third-Party Disk Scanning Tools
Third-party applications provide advanced features, deeper insights, and sometimes faster scans.
Recommended Tools:
- Donemax Data Recovery
- Recover inaccessible/lost files before fixing bad sectors.
- Scan the drive and find all errors.
- Fix bad sectors and errors.
- HD Tune
- Free and Pro versions available.
- Performs surface scans and displays bad blocks.
- Offers performance benchmarking and health info.
- HDDScan
- Portable tool with deep sector scanning capabilities.
- Tests read/write speeds and monitors temperature.
- Victoria HDD/SSD Utility (advanced users)
- Offers real-time diagnostics and sector-by-sector scans.
- Allows you to remap or attempt regeneration of sectors.
- Macrorit Disk Scanner
- Highlights bad sectors on a visual map.
- Lightweight and beginner-friendly.
- Doesn’t fix errors but useful for identifying problem areas.
5. BIOS and UEFI Diagnostics
Many systems from manufacturers like Dell, HP, and Lenovo include built-in diagnostics accessible during boot (usually via F2, F10, or F12).
These tools often include hard drive health tests based on SMART and surface scanning, independent of the OS.
Interpreting Results
- If only a few logical bad sectors are found and repaired, the drive may still be safe for use.
- A growing number of bad sectors, SMART warnings, or frequent scan failures usually indicate an imminent hardware failure. Backup data immediately and consider drive replacement.
Pro Tip: Run Surface Scans Regularly
Running a full sector scan once every few months, especially on older drives, helps detect issues before they become critical. Combine this with regular backups for a strong data protection plan.
Repair Solutions for Logical Bad Sectors
Logical bad sectors can usually be fixed using software utilities:
1. Run CHKDSK with Repair Options
As previously shown:
chkdsk X: /f /r
This scans the disk, marks bad sectors, and attempts to move data to a healthy area.
2. Third-Party Repair Utilities
- Donemax Data Recovery - repair damaged drives and fix bad sectors on Windows and macOS.
- EaseUS Partition Master – Includes surface test and repair options.
- Macrorit Disk Scanner – Scans and marks bad areas.
- MiniTool Partition Wizard – Offers surface test and repair alongside partition management.
These tools typically provide a visual representation of bad sectors and user-friendly interfaces.
3. Disk Defragmentation (HDD Only)
Defragmenting organizes data to reduce wear. While it doesn't fix bad sectors, it minimizes the impact by optimizing data layout.
💡 Note: Never defragment an SSD - it causes unnecessary wear.
4. Backup and Clone the Drive
If bad sectors are increasing, back up your data immediately. Use tools like Donemax Disk Clone or Acronis True Image to clone the drive to a new one.
🔗 Related link: clone hard drive which has bad sectors to a new drive.
Repair Solutions for Physical Bad Sectors
Unfortunately, physical damage is often permanent, but some workarounds exist:
1. Isolate the Damaged Area
Partition the drive so the OS avoids the bad area:
Use Disk Management or third-party software to resize or create partitions that exclude the damaged space.
2. HDD Regenerator (Limited Use)
Tools like HDD Regenerator claim to "repair" bad sectors using magnetic reversal techniques. However, their success rate is low, and they don't work on SSDs.
3. Data Recovery First
Before attempting repairs, prioritize data recovery:
- Donemax Data Recovery (high recovery rate)
- Recuva
- R-Studio
Once data is recovered, consider whether the drive is worth saving.
4. Replace the Drive
If your HDD/SSD continues to develop bad sectors or SMART data indicates failure (e.g., high Reallocated Sector Count), replacement is the only safe option.
SSD-Specific Considerations When Fixing Bad Sectors
SSDs don't have spinning platters, but they still develop bad blocks over time.
1. SSD Tools
- Samsung Magician
- Crucial Storage Executive
- Intel SSD Toolbox
These utilities offer diagnostics, health monitoring, firmware updates, and secure erase options.
2. Firmware Updates
Manufacturers regularly release firmware updates to improve SSD lifespan and reliability. Always keep your SSD firmware up to date.
3. Enable TRIM
TRIM helps the OS inform the SSD which blocks are no longer in use, improving longevity.
Check TRIM status in Windows:
fsutil behavior query DisableDeleteNotify
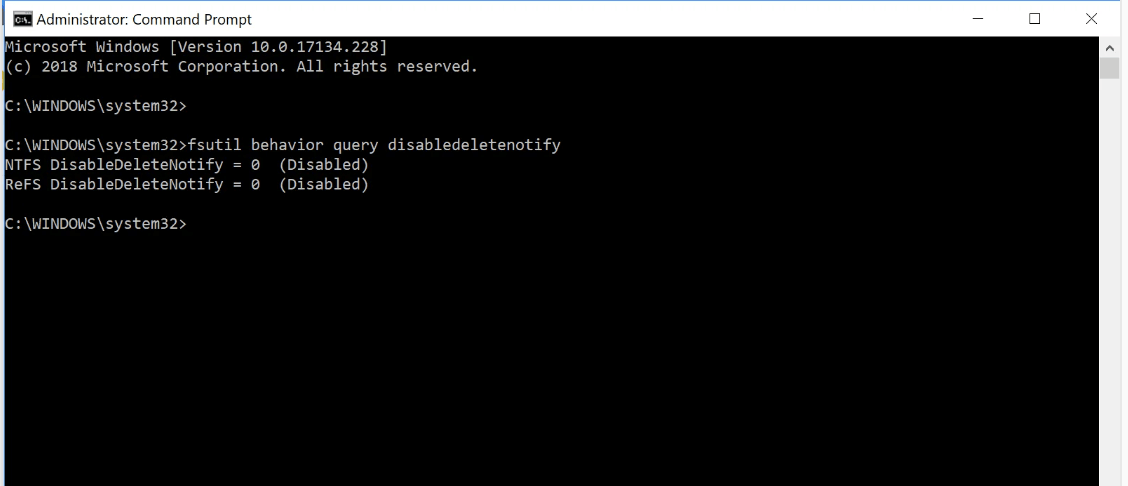
If the output is 0, TRIM is enabled.
4. Garbage Collection
Most SSDs perform automatic background maintenance. Avoid interrupting it by leaving the PC idle occasionally when plugged in.
Preventive Measures to Avoid Bad Sectors or Data Loss
1. Regular Backups
Use local or cloud-based backup tools:
- Windows File History
- Time Machine (macOS)
- Donemax Disk Clone, Acronis, Backblaze, or OneDrive
2. Avoid Shocks and Heat
Handle drives carefully. Avoid overheating by ensuring good ventilation and using cooling pads for laptops.
3. Use a UPS
Uninterruptible Power Supplies prevent data corruption during outages or surges.
4. Shut Down Properly
Avoid hard shutdowns. Let the OS complete all background operations before powering off.
5. Monitor Drive Health
Set reminders to check SMART status monthly. Free tools like CrystalDiskInfo can run in the background and alert you to impending failure.
Conclusion
Bad sectors are a warning sign that your drive may be heading toward failure - but not all bad sectors are created equal. Logical bad sectors can be repaired with utilities like CHKDSK or third-party software. Physical damage, however, often means it's time to back up and replace the drive.
Key Takeaways:
- Identify the type of bad sector (logical vs. physical).
- Use CHKDSK or reliable third-party tools for diagnostics and repair.
- Always prioritize data recovery and backups.
- SSDs require different handling - check for TRIM support and update firmware regularly.
- Prevent future issues through regular maintenance and safe computing practices.
Staying proactive about disk health not only preserves your files but also ensures your system runs smoothly - because when a drive fails, it rarely gives a second chance.
Donemax Data Recovery
One of the best data recovery programs to recover deleted, formatted or lost data from PC, Mac, HDD, SSD, USB drive, SD card, camera, RAID, Sever or other storage devices.
Related Articles
- May 19, 2025External Hard Drive Not Mounting on macOS Big Sur, Fix It Now
- Dec 13, 20246 Methods to Fix Mac Won't Boot Into macOS Recovery Mode
- Feb 19, 2025Fix WD My Passport Access Denied Error or Fix Unreadable WD My Passport Drive
- Nov 27, 2025Fixes for PowerShell Has Stopped Working Error on Windows
- Feb 09, 20256 Solutions to Fix Mac Says the SD Card Is Full, but Nothing Is on It
- Mar 17, 202510 Solutions to Fix Seagate External Hard Drive Not Mounting on Mac

Contributing Writer
Charles
Charles, who lives in Sydney, Australia, is an editor & writer of Donemax Team. He is good at writing articles related with Apple Mac computers, Windows operating systems, data recovery, data erasure, disk clone and data backup, etc. He loves reading and playing tennis in his spare time and is interested in testing new digital devices such as mobile phones, Macs, HDDs, SSDs, digital cameras, etc.

Editor in chief
Gerhard Chou
In order to effectively solve the problems for our customers, every article and troubleshooting solution published on our website has been strictly tested and practiced. Our editors love researching and using computers and testing software, and are willing to help computer users with their problems
Hot Donemax Products

Clone hard drive with advanced clone technology or create bootable clone for Windows/Mac OS.

Completely and easily recover deleted, formatted, hidden or lost files from hard drive and external storage device.

Certified data erasure software - permanently erase data before selling or donating your disk or any digital device.