
Written byCharlesUpdated on Jul 15, 2026
What is SSD TRIM and How It Works?
Approved byGerhard Chou
PAGE CONTENT:
Solid State Drives (SSDs) have revolutionized data storage with their superior speed, lower power consumption, and improved durability compared to typical HDDs. However, to maintain the performance and longevity of SSDs, certain maintenance commands like TRIM are crucial.
In this article, we'll explain what SSD TRIM is, why it's important, and how you can check, enable, or disable TRIM on your Windows computer. We'll also discuss when it might be necessary to disable TRIM and the pros and cons of doing so. Whether you're an everyday user or a tech enthusiast, understanding TRIM can help you keep your SSD in top shape.
If you want to know how to enable/disable TRIM on SSD on Mac, just go to SSD TRIM on Mac >>
What is SSD TRIM?
With the help of a specialized instruction called TRIM, an operating system can tell an SSD which data blocks are no longer deemed to be in use and can be internally erased. Understanding how TRIM works gives you valuable insight into why it's so critical for maintaining your SSD's performance and longevity.
Why is TRIM Necessary for SSDs?
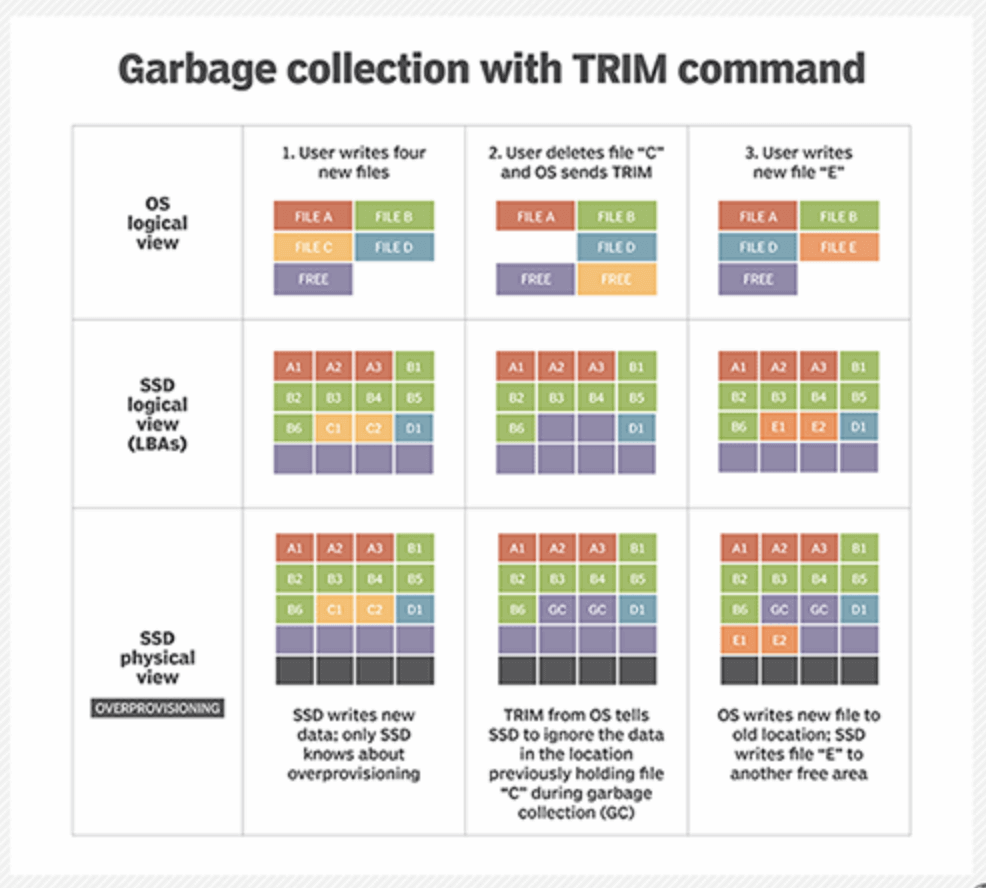
To understand why TRIM is essential, it's helpful to first understand how SSDs manage data differently compared to typical HDDs. In HDDs, data is written magnetically to spinning platters. When you delete a file, the system simply marks the space as "available," but the data isn't physically erased until it is overwritten later. In contrast, SSDs store data in memory cells, which must be erased before new data can be written. If a file is deleted and the system doesn't inform the SSD, the SSD must first erase the old data before writing the new data during the next operation, slowing down performance significantly.
This extra erase-before-write step creates a phenomenon known as write amplification, where more data is rewritten than necessary, causing performance drops and quicker wear on the memory cells. TRIM solves this problem. When you delete a file, TRIM tells the SSD which memory cells are no longer in use so the SSD can immediately clear them in the background. As a result, when new data needs to be written, the drive can simply write to the clean memory cells without the added step of erasing.
How TRIM Works in Practice?
When you delete a file in Windows, it doesn't immediately vanish from your SSD. Instead, the file system marks the file's space as available, and TRIM notifies the SSD about the unused sectors. The SSD then proactively wipes these sectors when idle, preparing them for future use without impacting active operations.
This background maintenance is crucial because it keeps the SSD operating at optimal speed without interfering with your day-to-day computing. Without TRIM, an SSD would slowly degrade in performance as it fills up, leading to frustrating slowdowns, especially when writing new files or installing updates.
Key Benefits of TRIM
- Maintains Write Speeds: Without the need to perform time-consuming erase operations before every write, SSDs with TRIM can maintain high-speed data operations even after prolonged use.
- Reduces Wear and Tear: Each memory cell in an SSD can only endure a limited number of write-erase cycles. By reducing unnecessary rewriting, TRIM helps prolong the lifespan of the drive.
- Improves System Responsiveness: Systems with TRIM-enabled SSDs boot faster, open applications quicker, and handle multitasking more efficiently.
- Enhances Data Security: Since TRIM clears deleted files at the hardware level, it becomes much harder to recover sensitive information once it’s deleted — a big advantage for users concerned about privacy.
A Brief History of TRIM
The TRIM command was introduced around 2009 alongside the growing popularity of consumer SSDs. Initially, many older operating systems and SSDs didn't support TRIM, leading to severe performance degradation over time. Today, modern operating systems like Windows 7, 8, 10, and 11 natively support TRIM. Most new SSDs are also designed to handle TRIM commands automatically, ensuring that users enjoy fast, reliable performance without needing to manually intervene.
However, because TRIM's effectiveness relies on cooperation between the SSD firmware, the storage controller, and the operating system, it's still worth verifying that it's properly enabled on your system - particularly after system upgrades, SSD swaps, or fresh installs.
How to Check if TRIM is Enabled on Windows?
Before tweaking settings, it's a good idea to check whether TRIM is already active on your system. Windows 7 and later versions typically enable TRIM automatically for SSDs, but verifying it yourself takes just a few seconds.
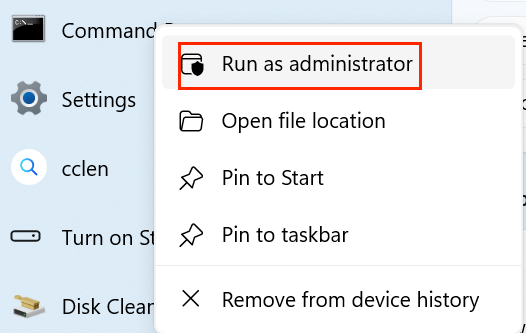
1. Launch the Command Prompt in Administrator Mode: Type cmd into the Command Prompt by pressing Windows Key + S. Then, right-click and choose Run as administrator.
2. Enter the following command: fsutil behavior query DisableDeleteNotify
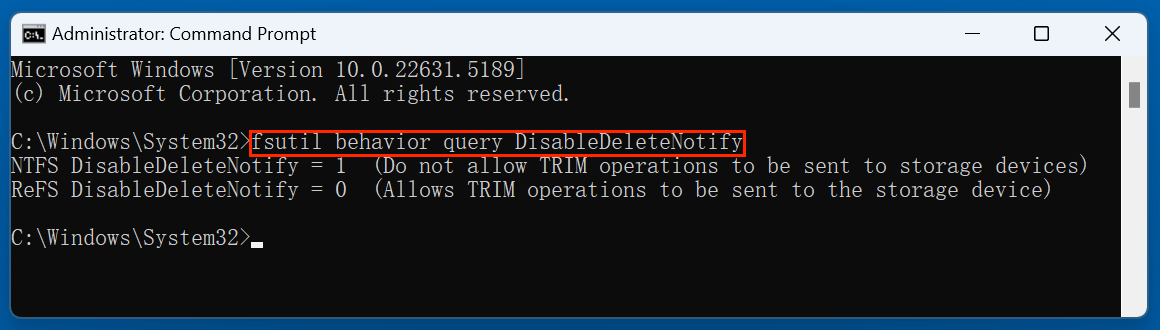
3. Interpret the output:
- DisableDeleteNotify = 0 means TRIM is enabled.
- DisableDeleteNotify = 1 means TRIM is disabled.
If TRIM is enabled, you're good to go. If not, you may want to enable it to maintain your SSD's performance.
How to Enable TRIM on SSD on Windows?
If TRIM is disabled, enabling it is quick and straightforward. Here's how you can do it:
Method 1 Enable TRIM Using Command Prompt
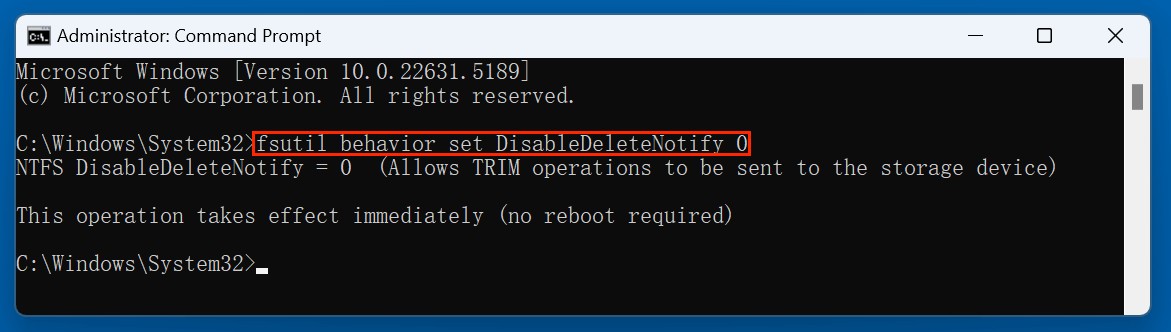
- Launch the Command Prompt in Administrator Mode (same steps as above).
- Type the below command and press Enter:
fsutil behavior set DisableDeleteNotify 0
![What is SSD TRIM]()
- Confirmation:
- If successful, Windows will confirm the change.
- You can re-run the query command to double-check that TRIM is now active.
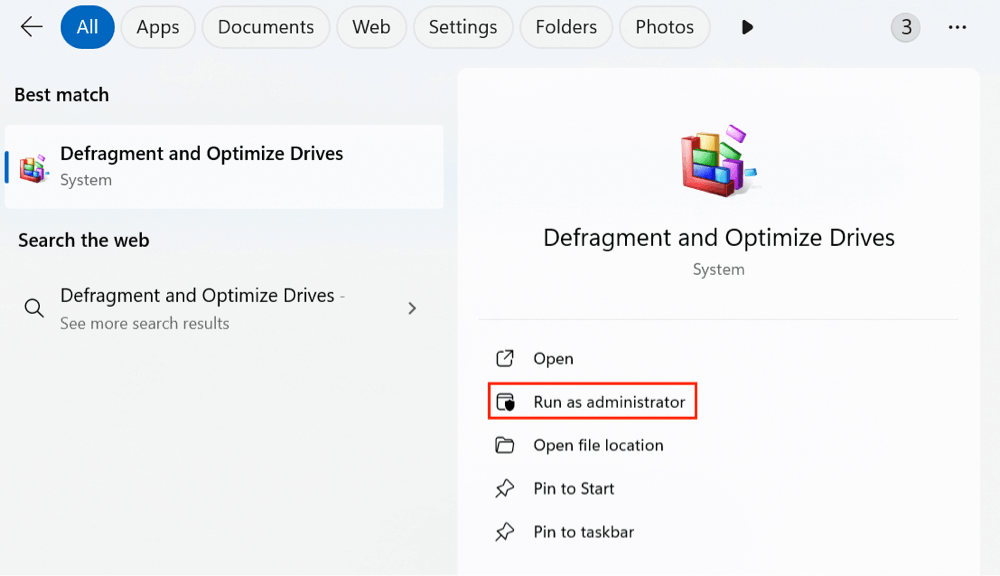
Method 2: Enable TRIM Through Windows Settings
Windows also provides an indirect way to ensure TRIM is working through its "Optimize Drives" feature.
- Press Windows Key + S and search for Defragment and Optimize Drives.
![What is SSD TRIM]()
- Open the app, and you'll see your drives listed.
- Look for your SSD in the list: Under the Media Type column, it should say "Solid State Drive."
- Select your SSD and click Optimize. If TRIM is working, optimization will complete quickly.
- Click Change settings to ensure that scheduled optimization (which includes sending TRIM commands) is turned on.
![What is SSD TRIM]()
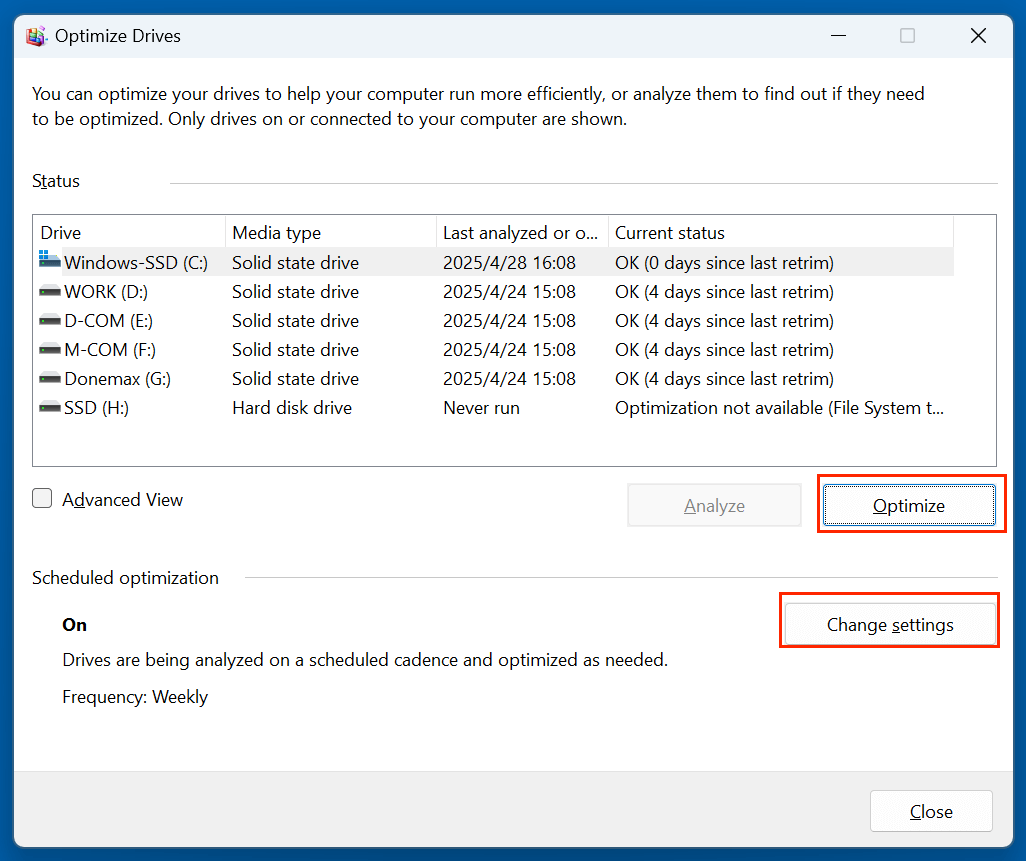
By using scheduled optimization, Windows will periodically send TRIM instructions to your SSD automatically.
How to Disable TRIM on SSD on Windows?
Although enabling TRIM is recommended for most users, there are rare scenarios where disabling it might be necessary - such as certain data recovery efforts where you don’t want deleted files to be immediately wiped.
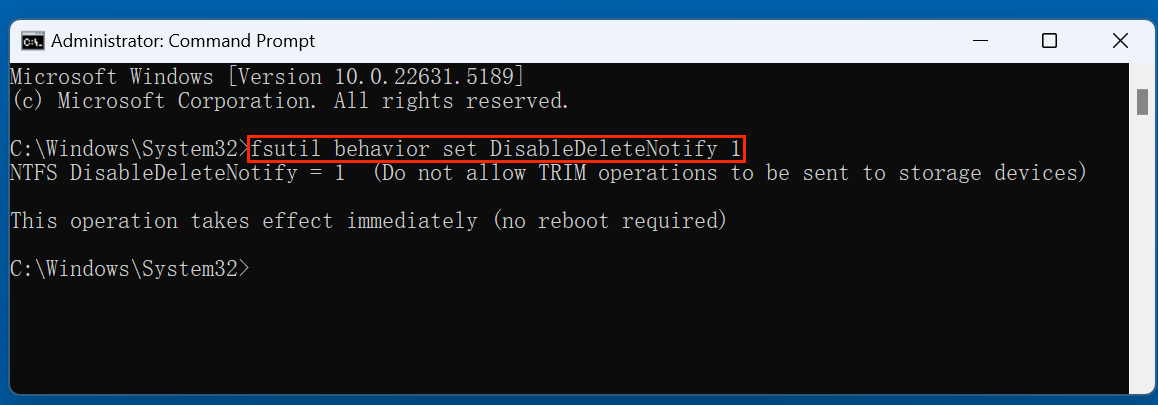
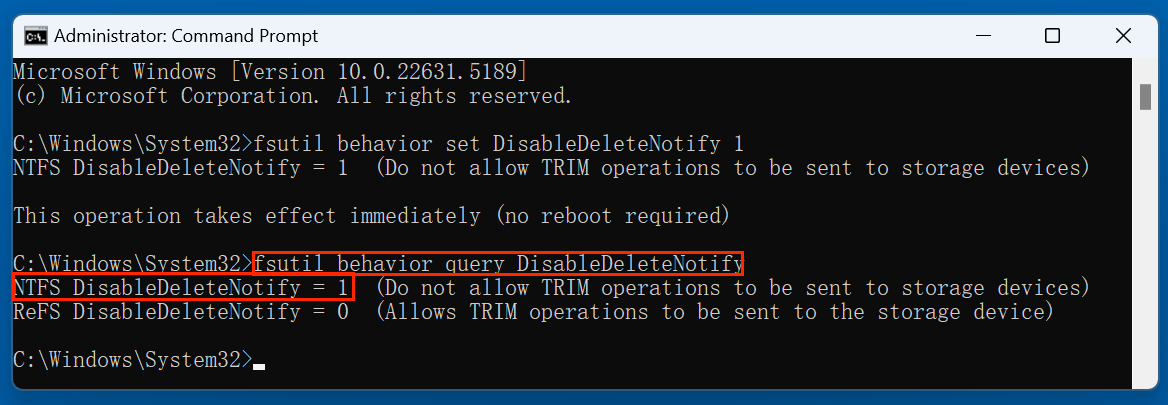
Method 1: Disable TRIM Using Command Prompt
- Launch the Command Prompt in Administrator Mode.
- Enter the below command:
fsutil behavior set DisableDeleteNotify 1
![What is SSD TRIM]()
- Check Status: Run the query command again to ensure that DisableDeleteNotify = 1.
![What is SSD TRIM]()
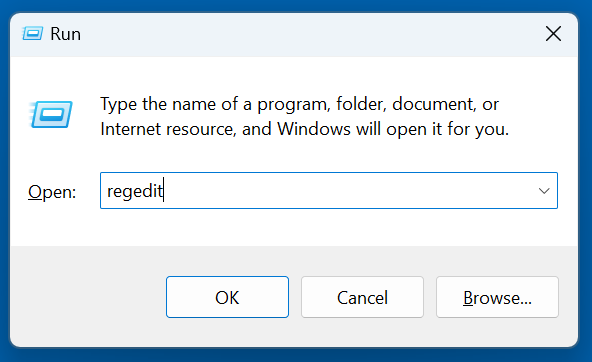
Method 2: Disable TRIM via Registry Editor (Advanced Users)
⚠️ Warning: Editing the Windows Registry can cause system instability if done incorrectly. Proceed with caution.
- Type regedit using Windows Key + R, then hit Enter.
![What is SSD TRIM]()
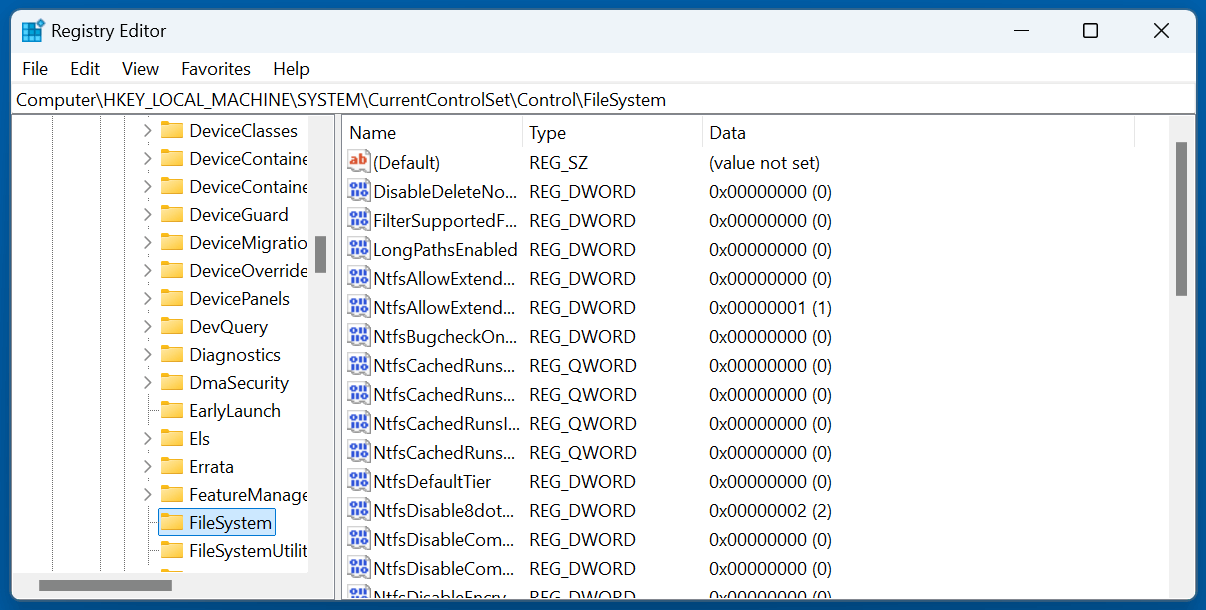
- Move to the following path:
HKEY_LOCAL_MACHINE\SYSTEM\CurrentControlSet\Control\FileSystem
![What is SSD TRIM]()
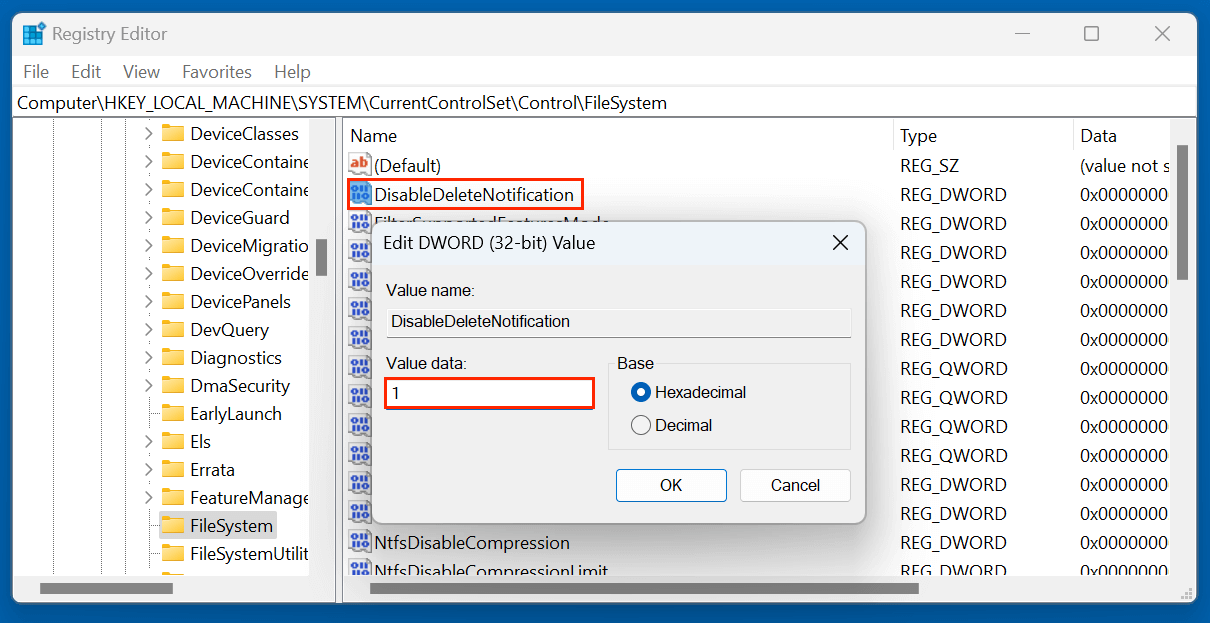
- Locate the DisableDeleteNotification entry.
- Double-click it and set its Value data to 1.
![What is SSD TRIM]()
- To ensure the modifications take effect, exit Registry Editor and restart your computer.
This method should only be used by advanced users who understand the risks involved.
Pros and Cons of Enabling or Disabling TRIM
Pros
- Improved Performance: Keeping the SSD's memory clean allows for faster writing and reading operations.
- Extended Drive Life: Less unnecessary wear and tear means your SSD lasts longer.
- Security Enhancement: Deleted data is more thoroughly removed, making recovery by unauthorized parties more difficult.
- Automatic Maintenance: Windows handles TRIM operations automatically, so there's no manual upkeep needed.
Cons
- Performance Degradation: Without TRIM, your SSD might slow down significantly over time.
- Increased Wear: SSD cells will experience unnecessary write/erase cycles.
- More Complicated Management: You may need to manually clean up or manage your SSD to keep it performing well.
When Disabling TRIM Might Be Useful:
- Data Recovery Situations: If you accidentally delete important files and want to maximize the chances of recovery, disabling TRIM temporarily might help, because once TRIM is active, deleted files become unrecoverable.
- Testing and Benchmarking: Some specialized testing scenarios might call for TRIM to be disabled temporarily.
However, in normal day-to-day use, TRIM should always be enabled.
🔗 Related link: recover lost data from SSD even TRIM is enabled.
Common Issues Related to TRIM and Their Fixes
Even if TRIM is enabled, some users still encounter SSD performance issues or errors. Here are a few common problems and their solutions:
Issue 1: TRIM is Enabled but SSD is Still Slow
- Possible Causes:
- Outdated SSD firmware.
- Drive is nearly full, which hampers performance.
- Background apps consuming high resources.
- Fixes:
- Update your SSD's firmware using the manufacturer's software.
- Leave about 20–25% free space on your SSD.
- Use built-in tools like Task Manager to close unnecessary background programs.
Issue 2: TRIM Not Working Despite Being Enabled
- Possible Causes:
- Older SSDs may not support TRIM properly.
- File system errors or corruption.
- Fixes:
- Run chkdsk to fix file system errors.
- Check if your SSD model fully supports TRIM (check with manufacturer).
- Use third-party SSD management tools to verify TRIM functionality.
Issue 3: TRIM-Related Errors During Optimization
- Possible Causes:
- System errors or drive malfunctions.
- Fixes:
- Try running the sfc /scannow command in Command Prompt to fix system file issues.
- Reboot into Safe Mode and attempt optimization again.
Conclusion
TRIM is an essential command that helps SSDs maintain their speed, efficiency, and lifespan by proactively cleaning up unused data blocks. On Windows systems, TRIM is usually enabled by default, but knowing how to verify, enable, or disable it can empower you to better manage your storage.
If you've upgraded to an SSD or are thinking about doing so, make sure TRIM is active. A few simple checks and commands can significantly impact the health and performance of your drive over the long haul. By understanding and managing TRIM effectively, you're taking a big step toward maximizing your system's storage potential!
Related Articles
- Jun 28, 2025Windows.old: What Is It & How to Delete It - Is It Safe?
- Jun 25, 2025What Is Internet Recovery Mode on Mac? What Can It Do?
- Dec 06, 2024Learn Everything About Recycle Bin on Windows Computer
- Apr 29, 2026What is the File Explorer on Mac and How to Use?
- Oct 11, 2024What Is Time Machine?
- Sep 12, 2025Windows Safe Mode: The Complete Troubleshooting Guide

Contributing Writer
Charles
Charles, who lives in Sydney, Australia, is an editor & writer of Donemax Team. He is good at writing articles related with Apple Mac computers, Windows operating systems, data recovery, data erasure, disk clone and data backup, etc. He loves reading and playing tennis in his spare time and is interested in testing new digital devices such as mobile phones, Macs, HDDs, SSDs, digital cameras, etc.

Editor in chief
Gerhard Chou
In order to effectively solve the problems for our customers, every article and troubleshooting solution published on our website has been strictly tested and practiced. Our editors love researching and using computers and testing software, and are willing to help computer users with their problems
Hot Donemax Products

Clone hard drive with advanced clone technology or create bootable clone for Windows/Mac OS.

Completely and easily recover deleted, formatted, hidden or lost files from hard drive and external storage device.

Certified data erasure software - permanently erase data before selling or donating your disk or any digital device.