
Written byCoco LinUpdated on Aug 20, 2025
Fix Couldn't Mount Disk Error (-69842) on Mac: Step-by-Step Guide
Approved byGerhard Chou
Before we start: If there are important files on a hard drive with couldn't mount disk error, it's better to recover the files first with Donemax Data Recovery for Mac. The software is easy-to-use and effective to recover lost files in any case.
PAGE CONTENT:
If you're seeing the "Couldn't Mount Disk Error (-69842)" on your Mac, you're not alone. This issue often occurs when trying to access, repair, or mount a disk via Disk Utility or Terminal. While it can be alarming—especially if it involves an external hard drive, SSD, USB flash drive, or internal APFS volume—the error typically stems from software-level issues, not necessarily hardware failure.
This comprehensive guide will help you understand why the error appears and walk you through detailed methods to fix it using both native macOS tools and third-party utilities.
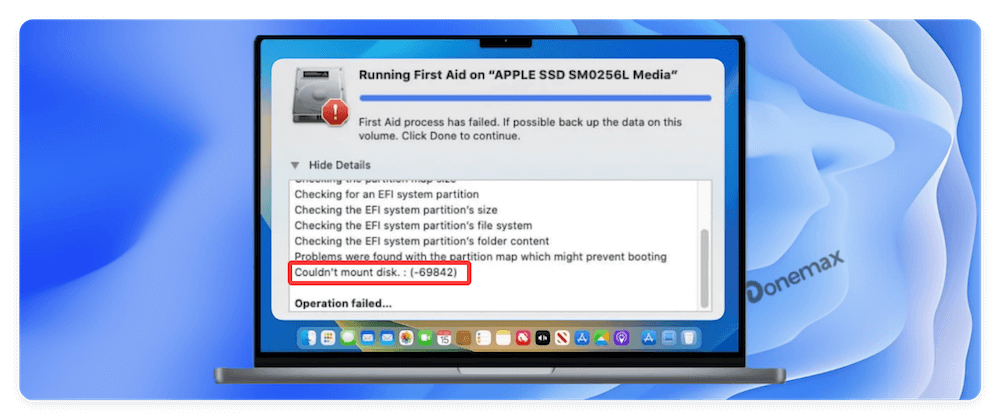
Understand "Couldn't Mount Disk Error (-69842)" on Mac?
The error code -69842 is a generic macOS disk management failure, typically returned by Disk Utility or Terminal when macOS fails to mount a disk volume. This can happen for internal or external drives and often indicates issues with file system corruption, volume structure, or security settings like encryption.
The error might be shown as:
- "Disk Utility can't repair this disk."
- "Mount failed -69842."
- "Couldn't mount disk. Try running First Aid."
Common Causes of Error (-69842)
Understanding the root cause helps you apply the right fix:
- File System Corruption: Often caused by improper ejection or sudden power loss.
- Incompatible Format: Windows-formatted drives like NTFS may not mount without third-party drivers.
- APFS or HFS+ Volume Errors: Especially if the system was interrupted during formatting.
- Encryption Conflict: A password-protected or FileVault-enabled disk can confuse macOS if authentication fails.
- Disk Not Properly Initialized: Partition table corruption can prevent mounting.
- Hardware Issue: Though rare, a failing USB cable or port could also be the culprit.
Preliminary Checks Before Troubleshooting
Before diving into technical methods, try these simple checks:
- Reconnect the Disk: Unplug and reconnect the external disk.
- Try Another USB Port/Cable: Rule out hardware connection issues.
- Test on Another Mac: See if the disk mounts elsewhere.
- Open System Information > USB or SATA: Check if the disk is detected at all.
- Open Disk Utility: Can the disk be seen but grayed out?
If the disk is visible in Disk Utility but not mounting, continue to the fixes below.
6 Methods to Fix Couldn't Mount Disk Error (-69842) on Mac
Method 1: Use Disk Utility First Aid
Disk Utility's First Aid is the built-in repair tool for minor file system issues.
Steps:
- Go to Disk Utility from Utilities via Applications.
- Select the grayed-out disk or volume.
- Click First Aid > Run.
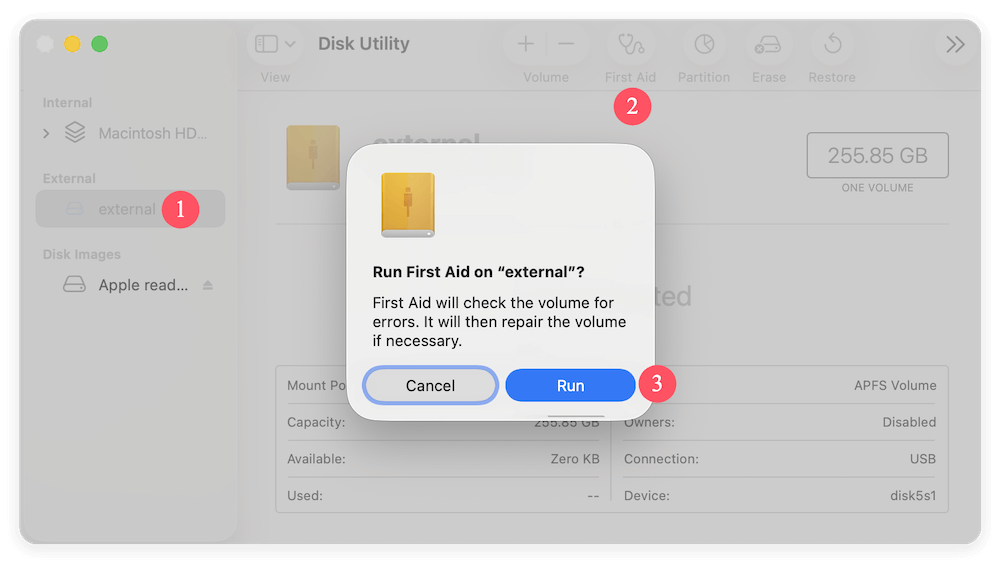
Disk Utility will verify and repair the volume structure. If successful, the disk should mount automatically.
💡 Note: If First Aid fails repeatedly, continue to Terminal-based solutions.
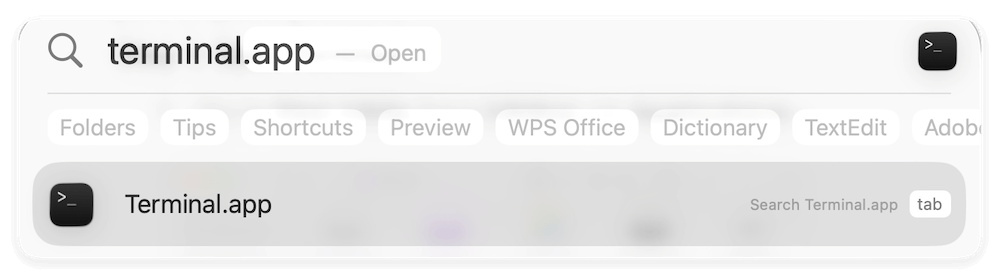
Method 2: Mount Disk Manually via Terminal
If Disk Utility fails to mount the disk and shows error (-69842), you can try to mount the drive manually using macOS Terminal. This approach provides more control over the mounting process and can reveal more specific errors if something goes wrong.
Step 1: Open Terminal
1. Go to Disk Utility from Utilities via Applications.

2. Alternatively, press Command + Space, type Terminal, and press Enter.
Step 2: List All Disks
Use the following command to list all storage devices connected to your Mac:
diskutil list
This will display a tree-like structure showing all disks, volumes, partitions, and identifiers.
Step 3: Attempt to Mount the Disk
Now that you've identified the disk, try mounting it manually:
sudo diskutil mount /dev/disk2s1
Replace disk2s1 with your own disk's identifier.
You may be prompted to enter your administrator password.
If successful, you'll see:
Volume UNTITLED on /dev/disk2s1 mounted
And the drive should now appear on your desktop or in Finder.
Step 4: Troubleshooting Common Errors
A. "Volume on disk2s1 failed to mount"
If you receive this message, the file system is likely corrupted or the volume is unrecognized. Try repairing it using:
diskutil repairVolume /dev/disk2s1
If that still doesn't work, you can escalate to file system-specific repair commands (explained in Section VI).
B. "Resource Busy" Error
Sometimes macOS reports that a volume is busy:
diskutil mount /dev/disk2s1
Volume failed to mount: Resource busy
This means something is actively accessing or blocking the disk. You can:
- Check what's using it with: lsof | grep disk2s1
- Then kill the blocking process using: sudo kill -9 [PID]
Or, try unmounting it first, then remounting:
sudo diskutil unmountDisk /dev/disk2
sudo diskutil mountDisk /dev/disk2
C. Mounting with Specific File System
In some cases, macOS fails to detect the file system. You can specify it manually like this:
sudo mount -t hfs /dev/disk2s1 /Volumes/MyDrive
Or for APFS:
sudo mount -t apfs /dev/disk2s1 /Volumes/MyDrive
Make sure /Volumes/MyDrive exists. You can create it with:
sudo mkdir /Volumes/MyDrive
Extra Tip: Disk Identifier vs Volume Identifier
- disk2 refers to the whole physical disk.
- disk2s1, disk2s2 refer to specific partitions or volumes.
Always mount the volume, not the entire disk. Mounting the full disk may cause errors unless it has a single, mountable volume.
Method 3: Repair Disk via Terminal (fsck/diskutil)
Terminal offers a more aggressive way to repair the disk structure.
For APFS Disks:
sudo fsck_apfs -y /dev/disk2s1
For HFS+ Disks:
sudo fsck_hfs -fy /dev/disk2s1
If errors are found and corrected, attempt to mount the disk again:
diskutil mount /dev/disk2s1
For Verifying and Repairing:
diskutil verifyVolume /dev/disk2s1
diskutil repairVolume /dev/disk2s1
💡 Caution: This method won't work if the disk is physically damaged or heavily corrupted.
Method 4: Boot into Safe Mode or Recovery Mode
Steps to enter Safe Mode on Mac
Restart your Mac and immediately hold the Power button until you see "Loading startup options" message. Select the startup disk and hold Shift key, click Continue in Safe Mode. (Hold "Shift" key while booting up on Intel Macs)
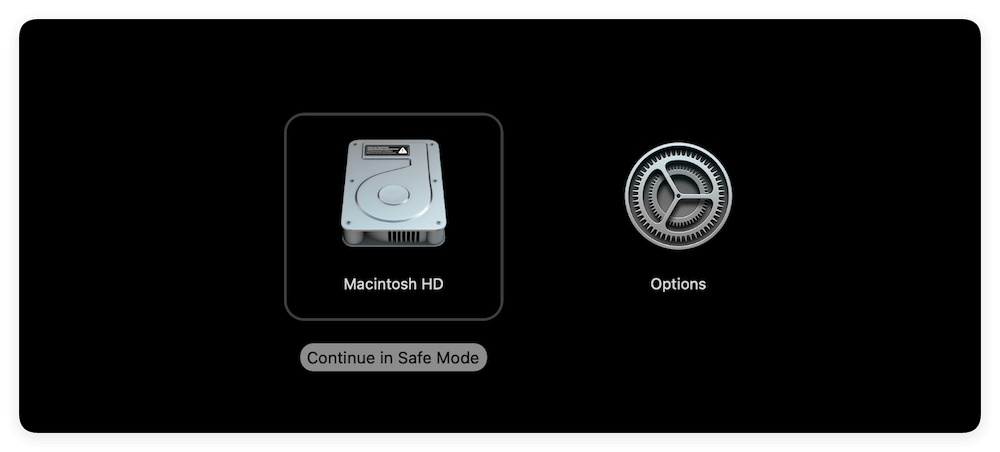
Safe Mode disables unnecessary extensions and allows mounting in a clean environment.
Steps to enter macOS Recovery Mode
Restart your Mac and hold Power button until "Loading startup options" appears. Select Options and click Continue. (Intel Macs: Command + R)

Recovery Mode loads a minimal system where mounting might succeed if blocked by system-level conflicts.
Run First Aid or mount the disk in Disk Utility
Once booted into Safe or Recovery mode, open Disk Utility. Repair disk with First Aid or mount the disk from here.

Method 5: Use Third-Party Disk Repair Tools
If native macOS tools fail, third-party apps might succeed.
Recommended Tools:
- Donemax Data Recovery for Mac
- DiskWarrior
- TechTool Pro
These tools can:
- Rebuild corrupted volume directories
- Repair APFS/HFS+ errors
- Force mount volumes
- Recover data before formatting

💡 Note: Always download these tools from the official website to avoid malware.
Method 6: Reformat the Drive (Last Resort)
If data recovery isn't needed and the disk is too corrupted to mount, reformatting is the final fix.
💡 Warning: This will erase all data on the drive.
Steps to format drive with Disk Utility:
- Open Disk Utility.
- Select the affected disk from the left sidebar.
- Click Erase.
- Choose:
- Format: APFS (for SSDs), Mac OS Extended (Journaled), or exFAT (for cross-platform use)
- Scheme: GUID Partition Map
- Click Erase and wait for the process to complete.

The disk should automatically mount after formatting.
Need to Recover Data? Try Donemax Data Recovery for Mac
If the data is important and you can't mount or repair the disk, use data recovery software before formatting. To effectively recover lost data, you can use the reliable tool Donemax Data Recovery for Mac.
The software can deeply scan drive to find any possible missing files. The software is also easy to handle even for newbies. Within a few clicks, you can quickly get back the missing files with the software.
Recovery steps with Donemax Data Recovery for Mac:
- Launch the recovery software.
- Scan the unmounted or corrupted disk.
- Preview recoverable files.
- Save recovered files to a separate location (not the same disk).

If the scan fails or no files are found, consider sending the disk to a professional data recovery lab.
Preventing Disk Mount Error in the Future
Once you've resolved error -69842, take these steps to reduce the chance of recurrence:
- Always Eject Properly: Use "Eject" before unplugging external disks.
- Avoid Sudden Shutdowns: They can corrupt file systems.
- Use Disk Utility Regularly: Run First Aid monthly to catch early errors.
- Back Up Frequently: Use Time Machine or cloud services.
- Monitor Drive Health: Use Terminal: diskutil info diskX or try SMART monitoring apps like DriveDx
When to Contact Apple Support or a Data Recovery Lab
Seek professional help if:
- The drive doesn't show in Disk Utility or diskutil list
- Terminal commands throw I/O errors
- The drive makes clicking or grinding sounds
- The disk is physically damaged or was dropped
- Data recovery software fails to find any files
Apple Genius Bar can help if it's an Apple-branded SSD or internal drive, while certified labs like Ontrack, Seagate Recovery, or DriveSavers can handle more complex recovery cases.
Conclusion
The "Couldn't Mount Disk Error (-69842)" on Mac may seem intimidating, but it's usually fixable with the right approach. From Disk Utility's First Aid to Terminal commands, Safe Mode, and even data recovery tools, this guide has outlined a step-by-step process to regain access to your unmounted disk.
If all else fails, reformatting is a last resort—just be sure to recover your data first. With proper maintenance and safe usage practices, you can minimize the chances of seeing this error again.
Donemax Data Recovery for Mac
Donemax Data Recovery for Mac is one of the best Mac data recovery software. It is easy-to-use and can help in recovering deleted, formatted, inaccessible or lost data from Mac HDD/SSD, external disk, USB drive, SD card, camera or other storage devices.
Related Articles
- Apr 15, 20259 Methods to Fix Apple Support 2002F on Mac
- May 06, 2026Why Can't I Edit My External Hard Drive on Mac? [4 Fixes]
- Dec 26, 2024How to Remove SD Card's Write Protection on Mac? [5 Methods]
- Feb 09, 20256 Solutions to Fix Mac Says the SD Card Is Full, but Nothing Is on It
- Jun 27, 2024Fix LaCie External Hard Drive Not Recognized on Windows PC
- Apr 07, 2025[6 Fixes] Fix Hard Drive Partition Shows 0 Bytes Error on Windows 11/10/8/7

Contributing Writer
Coco Lin
Coco has been a writer and a chief programmer at Donemax software since 2018. Over 10 years of experience of writing troubleshooting articles in the software industry, she is passionate about programming and loves to providing solutions to Windows and Mac users. Also she enjoys music and palying tennis in her free time.

Editor in chief
Gerhard Chou
In order to effectively solve the problems for our customers, every article and troubleshooting solution published on our website has been strictly tested and practiced. Our editors love researching and using computers and testing software, and are willing to help computer users with their problems
Hot Donemax Products

Clone hard drive with advanced clone technology or create bootable clone for Windows/Mac OS.

Completely and easily recover deleted, formatted, hidden or lost files from hard drive and external storage device.

Certified data erasure software - permanently erase data before selling or donating your disk or any digital device.